04/06/2024 21:10:01
热敏电阻 - 管道 - 下 - RH(带加热泵款)(拆卸和更换)
 校正代码
18104202 3.30 注意:除非本程序中另有明确规定,否则上述校正代码和 FRT 反映的是执行本程序(包括关联程序)所需的所有工作。除非明确要求,否则请勿堆叠校正代码。注意:请参阅平均维修工时,深入了解 FRT 及其创建方式。要提供有关 FRT 值的反馈,请发送电子邮件至LaborTimeFeedback@tesla.com。注意:请参阅人员保护,确保在执行以下程序时穿戴适当的个人防护装备 (PPE)。
注意:除非本程序中另有明确规定,否则上述校正代码和 FRT 反映的是执行本程序(包括关联程序)所需的所有工作。除非明确要求,否则请勿堆叠校正代码。
注意:请参阅平均维修工时,深入了解 FRT 及其创建方式。要提供有关 FRT 值的反馈,请发送电子邮件至LaborTimeFeedback@tesla.com。
注意:请参阅人员保护,确保在执行以下程序时穿戴适当的个人防护装备 (PPE)。
校正代码
18104202 3.30 注意:除非本程序中另有明确规定,否则上述校正代码和 FRT 反映的是执行本程序(包括关联程序)所需的所有工作。除非明确要求,否则请勿堆叠校正代码。注意:请参阅平均维修工时,深入了解 FRT 及其创建方式。要提供有关 FRT 值的反馈,请发送电子邮件至LaborTimeFeedback@tesla.com。注意:请参阅人员保护,确保在执行以下程序时穿戴适当的个人防护装备 (PPE)。
注意:除非本程序中另有明确规定,否则上述校正代码和 FRT 反映的是执行本程序(包括关联程序)所需的所有工作。除非明确要求,否则请勿堆叠校正代码。
注意:请参阅平均维修工时,深入了解 FRT 及其创建方式。要提供有关 FRT 值的反馈,请发送电子邮件至LaborTimeFeedback@tesla.com。
注意:请参阅人员保护,确保在执行以下程序时穿戴适当的个人防护装备 (PPE)。
- 2023-08-29: Updated EPB Service Mode reference.
拆卸
警告
尽管此程序已经过验证,但仍是一个草案。可能没有警告和注意事项。请遵守安全要求,处理或靠近高压系统和部件时,请谨慎操作。请将校正修理内容及反馈发送至ServiceDevelopment@teslamotors.com。
- Raise and support vehicle
-
Open hood
注Press "Open" button on the touchscreen to release the latch, Lift the lid manually
-
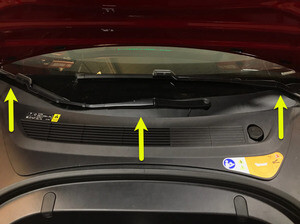
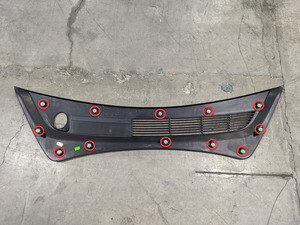
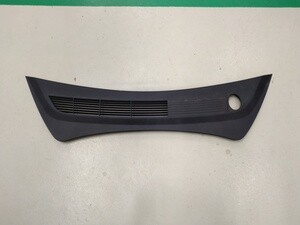
Remove rear apron
注12x clips, Only store rear apron visible face upwards
-
Remove cabin intake upper duct assembly
注4x clips, Heat pump vehicles have 3x clips
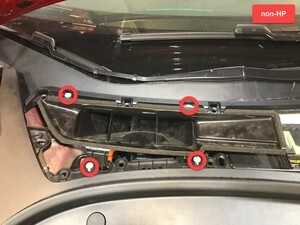
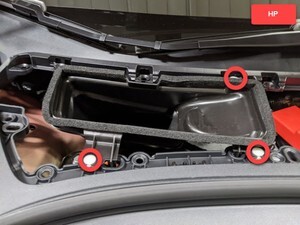
-
Remove closeout panel from frunk assembly
注4x clips, 1x connector, Frunk safety switch, 3x guide tabs, Grab closeout panel from bottom then pull it upward to release clips, Disconnect the switch
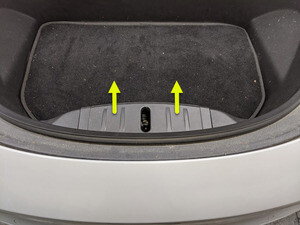
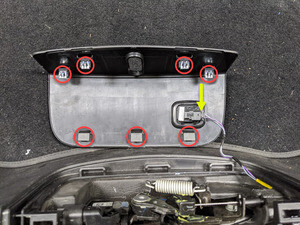
-
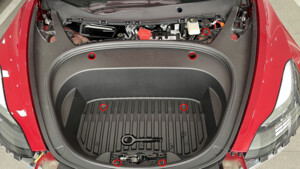
Remove bolts securing frunk assembly
注7x bolts, 10mm, 5 Nm, Lift up RBN covers to access upper fasteners, Newer vehicles may not be equipped with covers
-
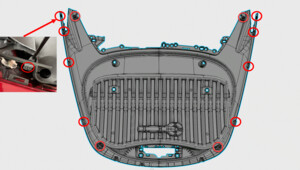
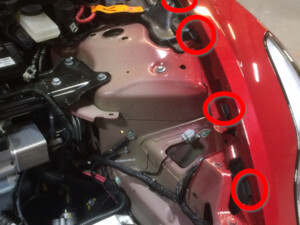
Remove frunk assembly from vehicle
注12x clips, Replace any clips if broken or missing, Number of clips may vary on older vehicles

-
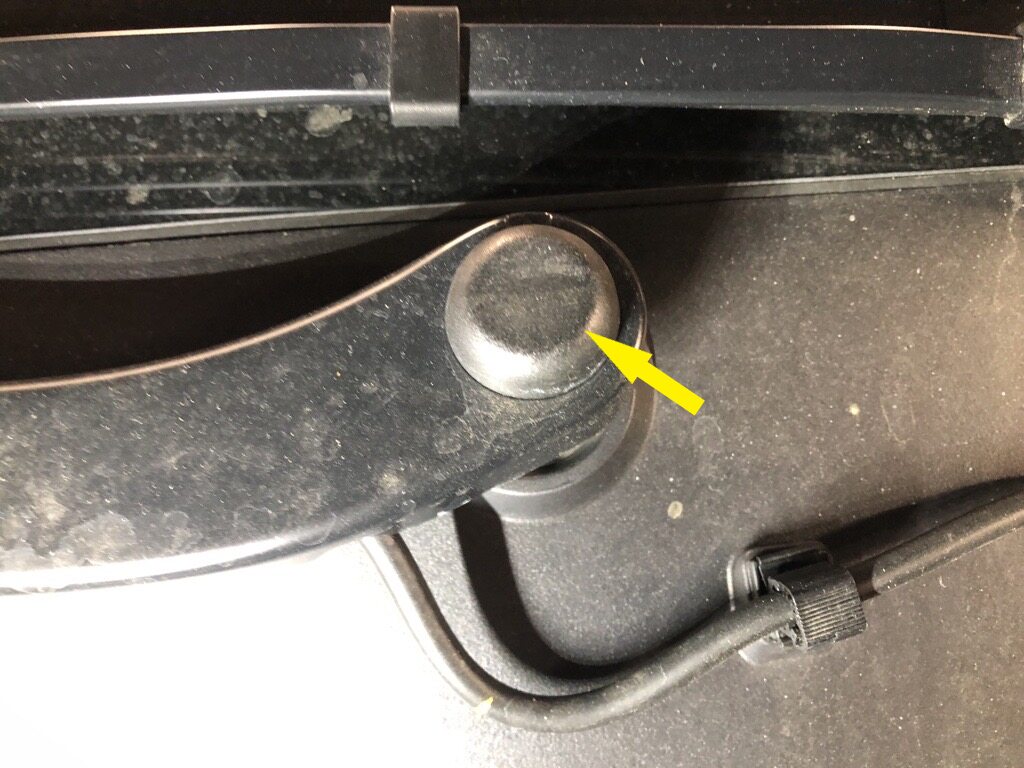
Remove RH wiper arm nut cover
注1x cover
-
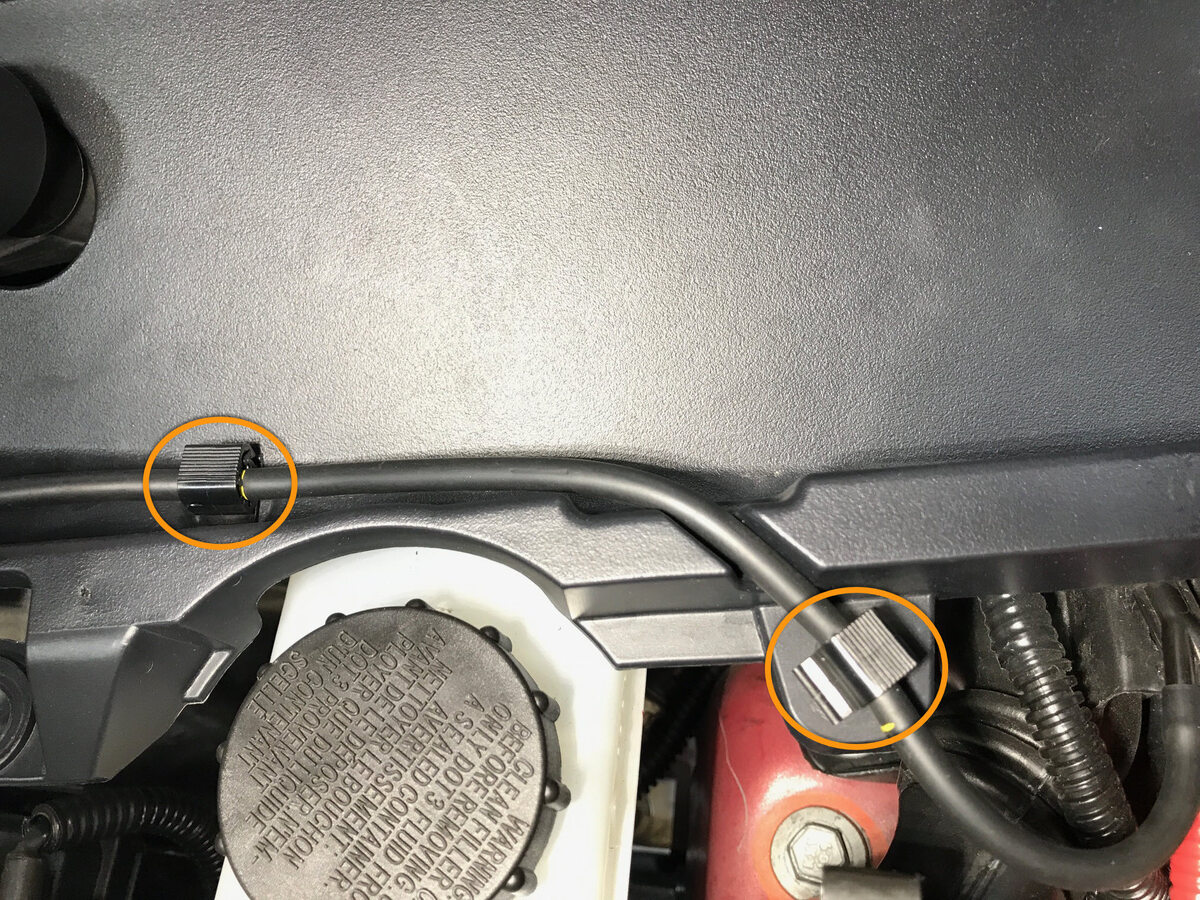
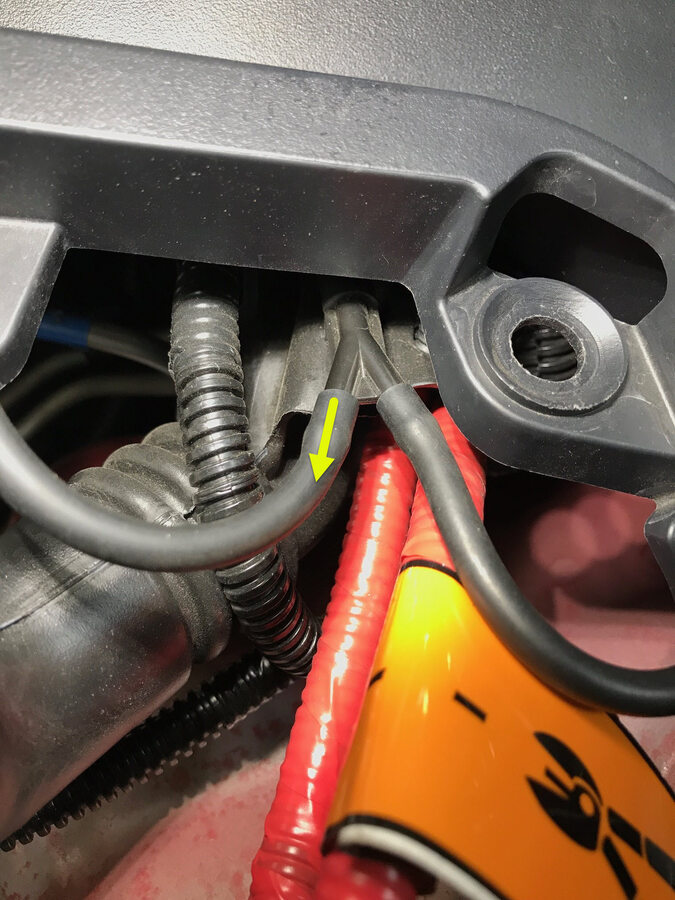
Disconnect washer hose from RH wiper arm to Y-tube fitting and release washer hose clips
注2x clips, 1x hose
-
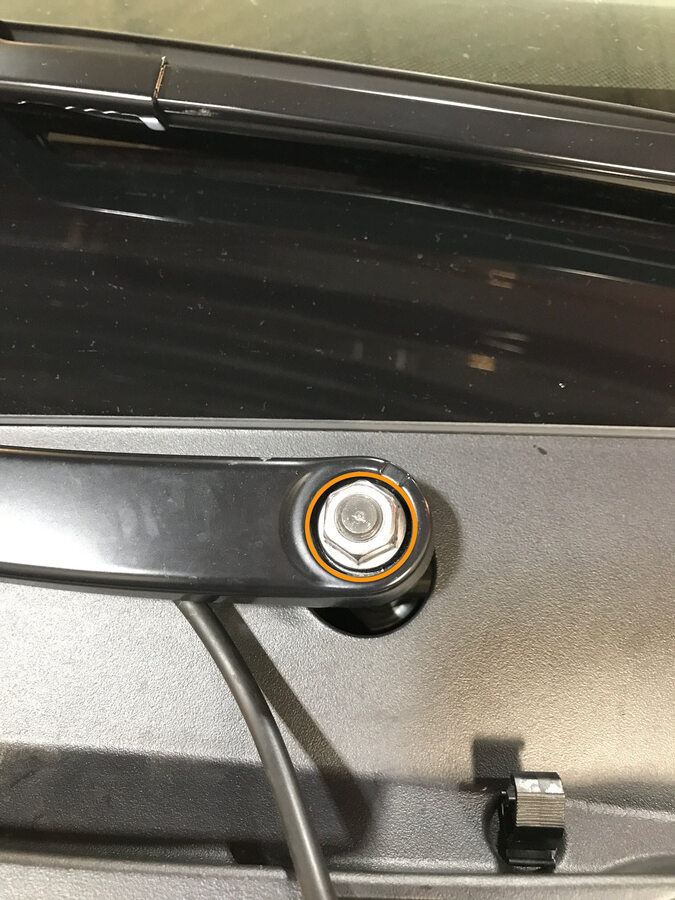
Remove the nut securing the RH wiper arm to wiper module
注1x nut, 15mm, 25 Nm
-
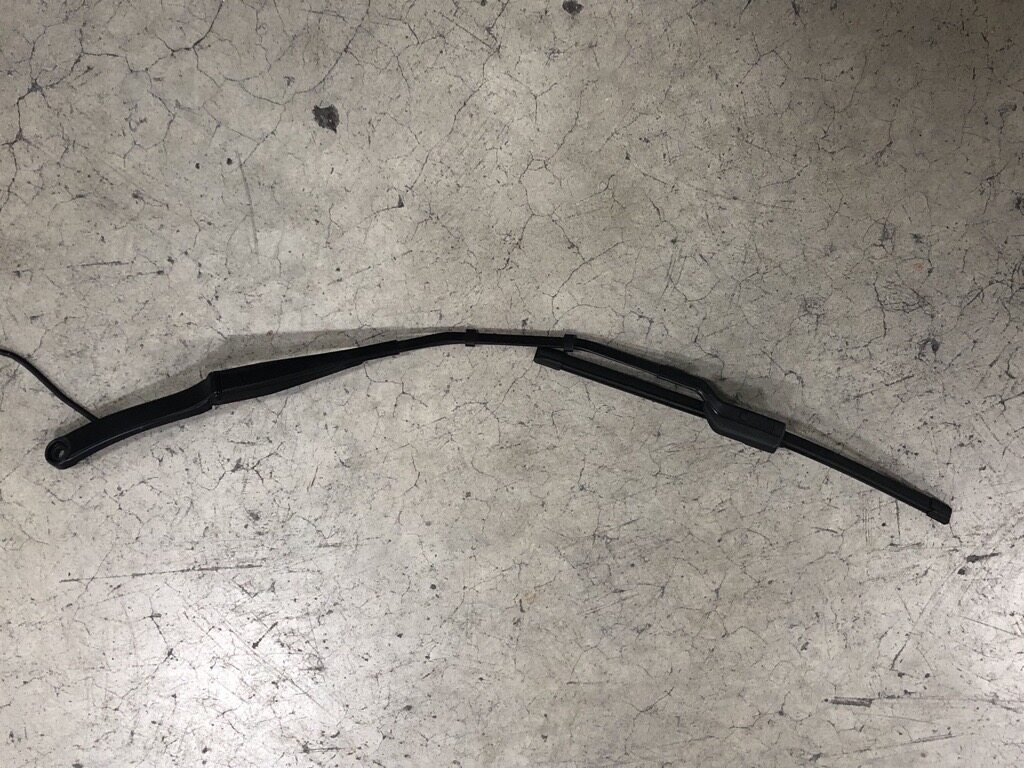
Remove RH wiper arm and hose assembly from vehicle
-
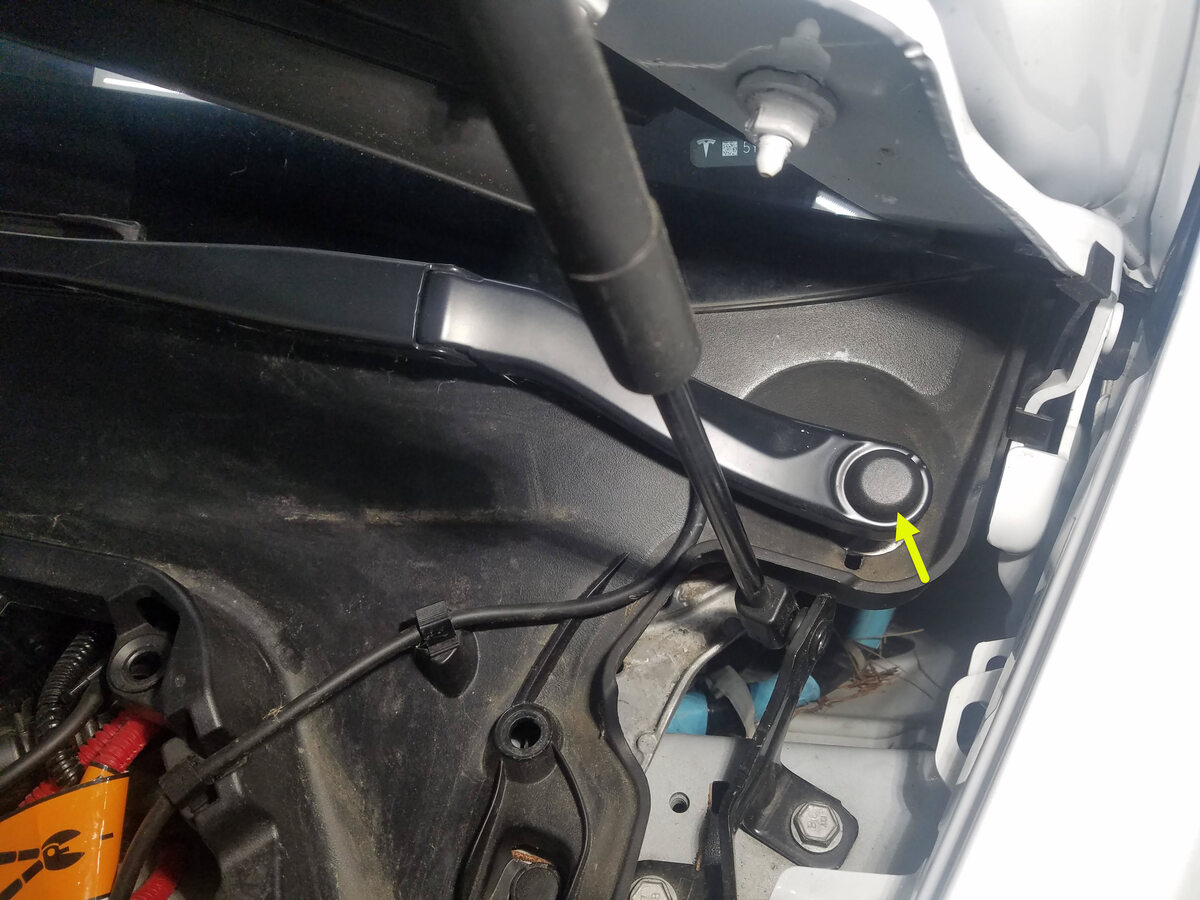
Remove LH wiper arm nut cover
注1x cover
-
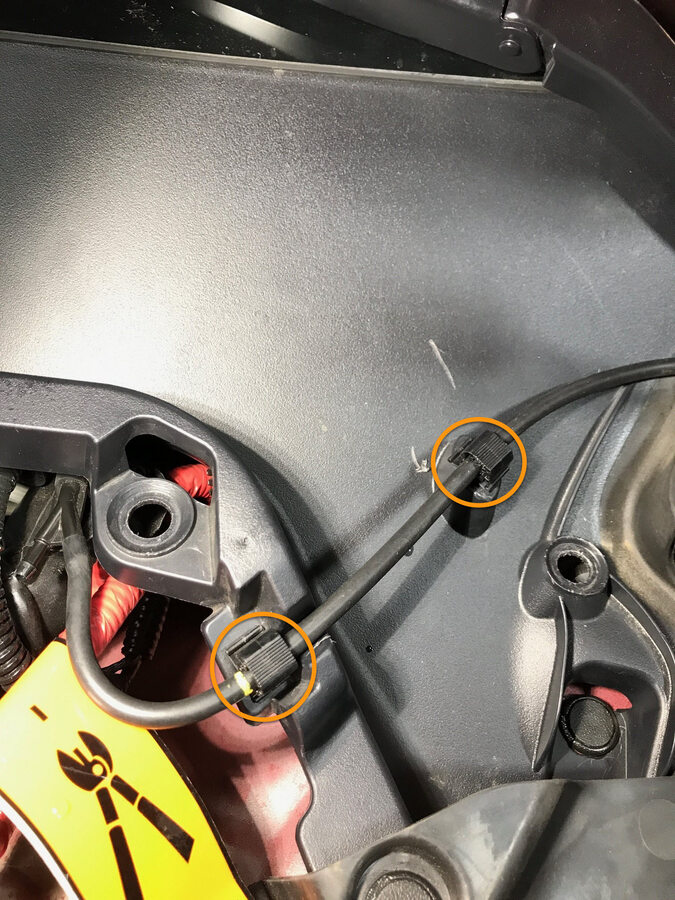
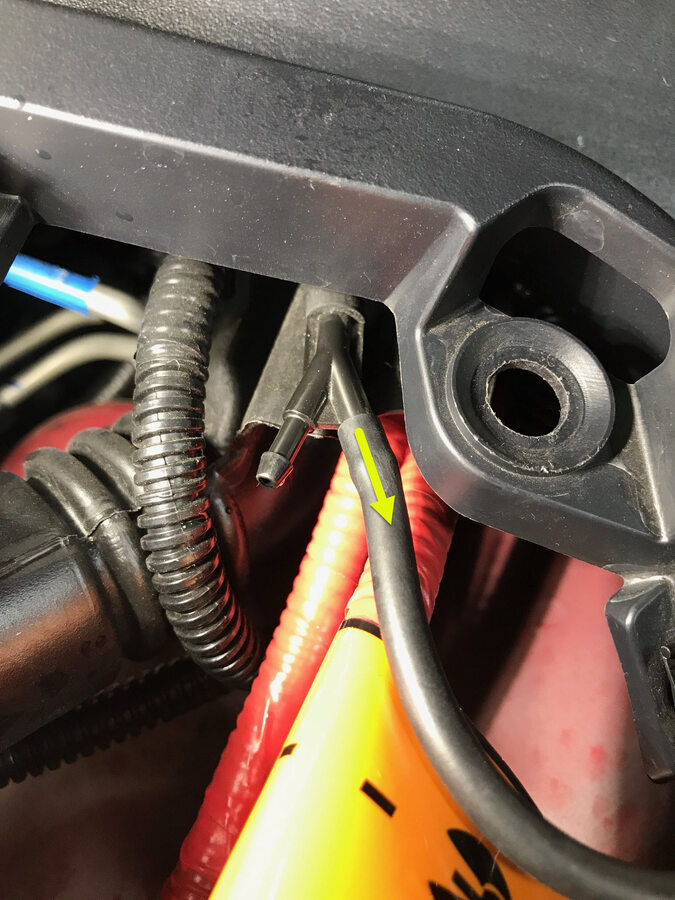
Disconnect washer hose from LH wiper arm to Y-tube fitting and release washer hose clips
注2x clips, 1x hose
-
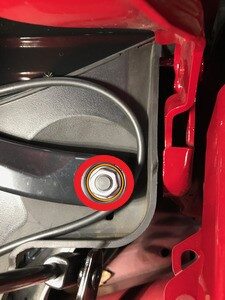
Remove the nut securing the LH wiper arm to wiper module
注1x nut, 15mm, 25 Nm
-
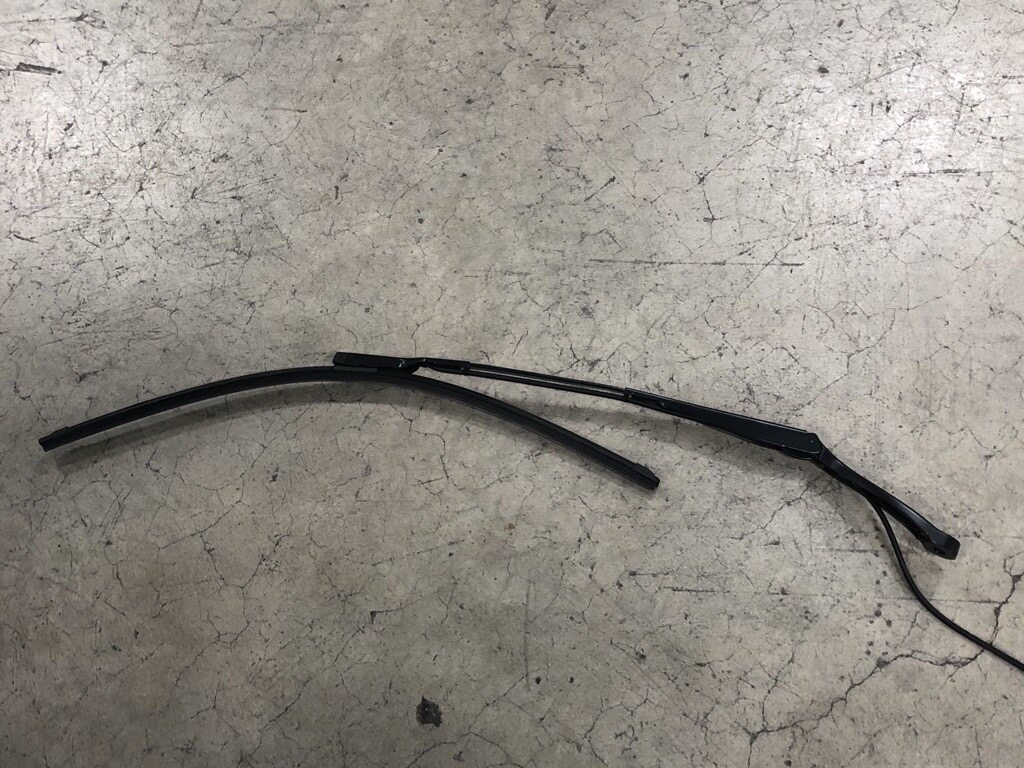
Remove LH wiper arm and hose assembly from vehicle
-
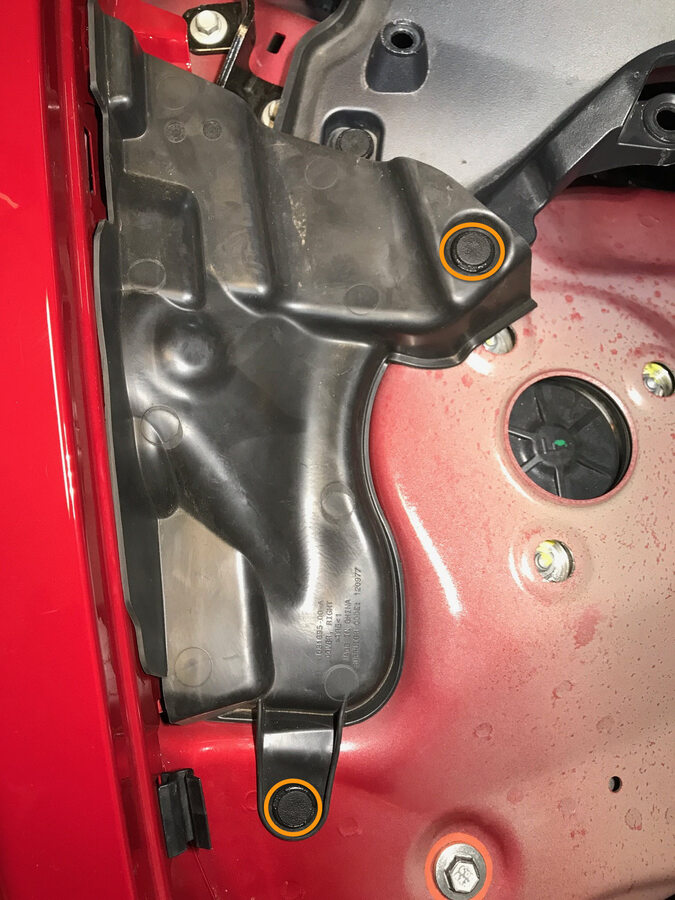
Remove the LH shock tower cover
注2x push clips

-
Remove the RH shock tower cover
注2x push clips
-
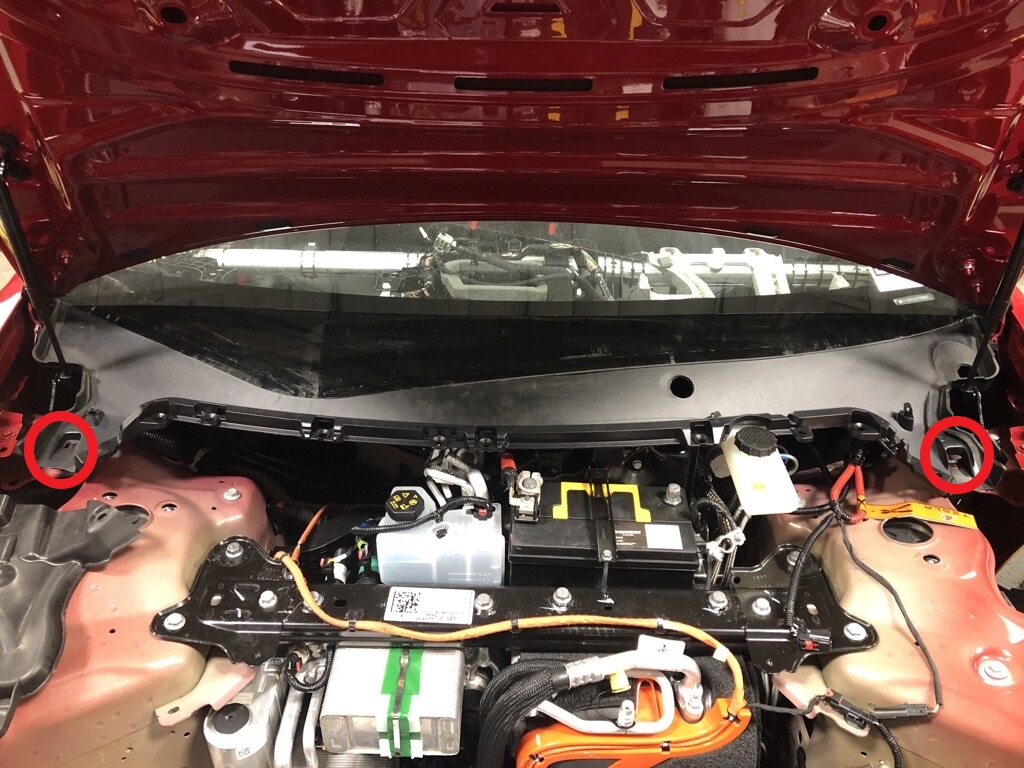
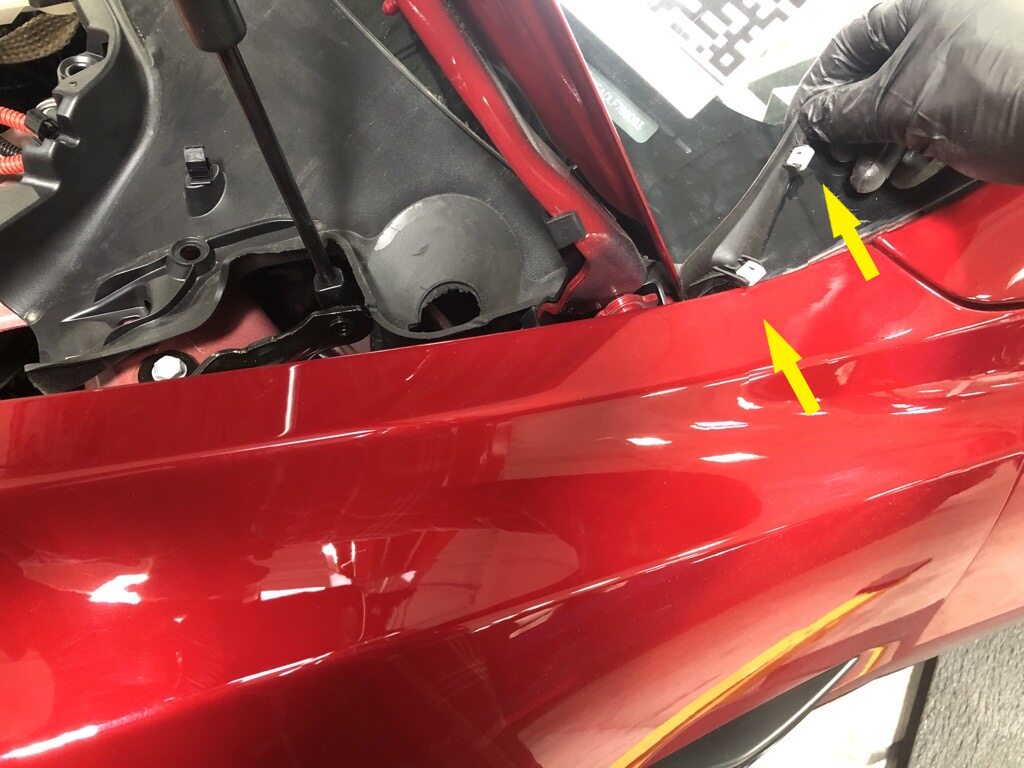
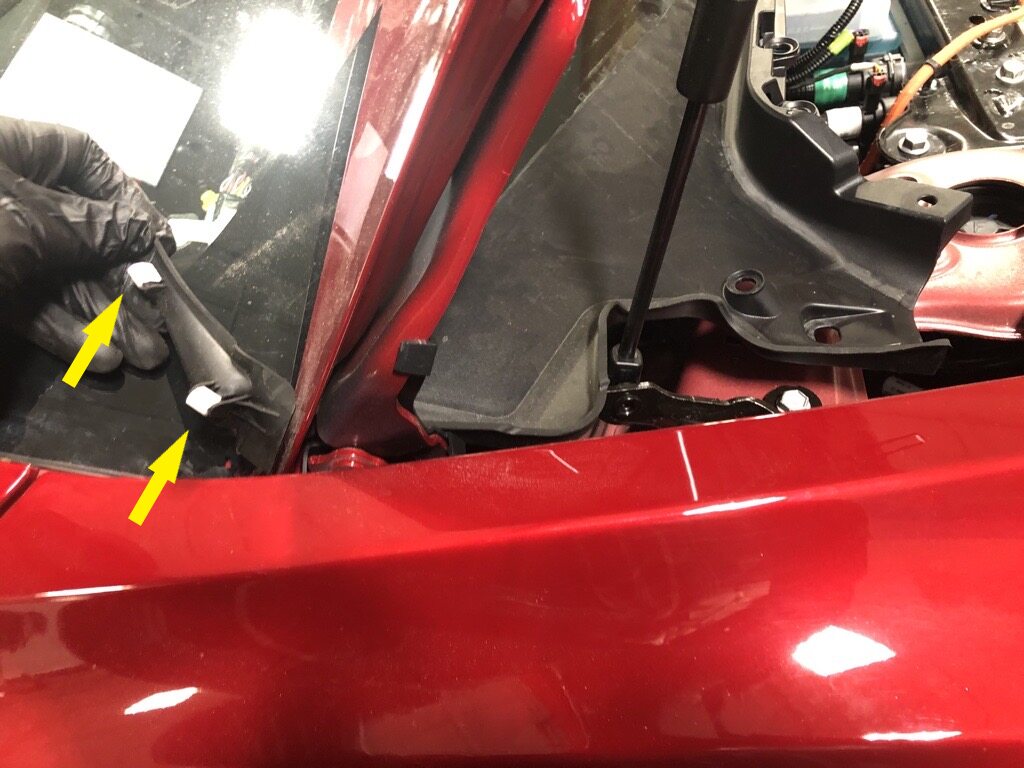
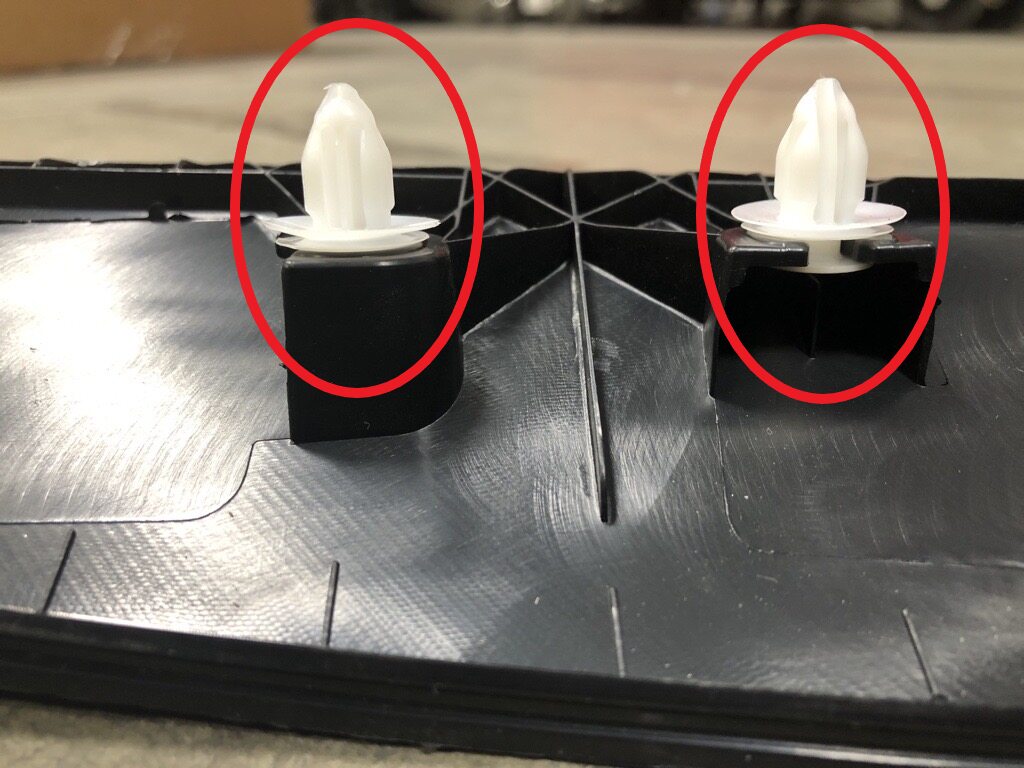
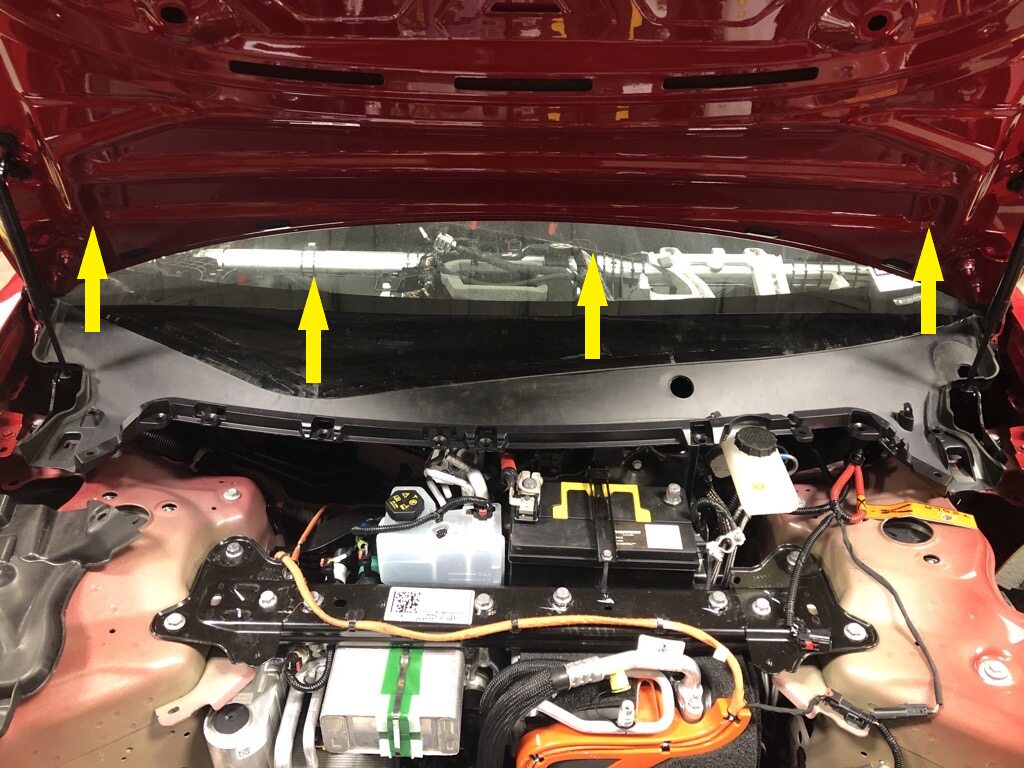
Release cowl screen from windshield and remove from vehicle
注2x push clips, 6x clips
-
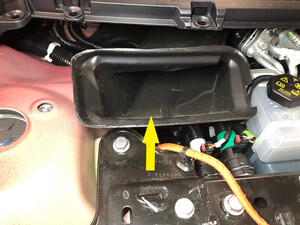
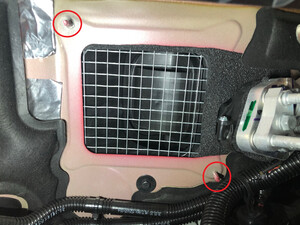
Remove fresh air intake assembly
注2x studs, Maneuver between cowl and frunk
-
Remove the bolts securing wiper module
注3x bolts, 10mm, 7 Nm

-
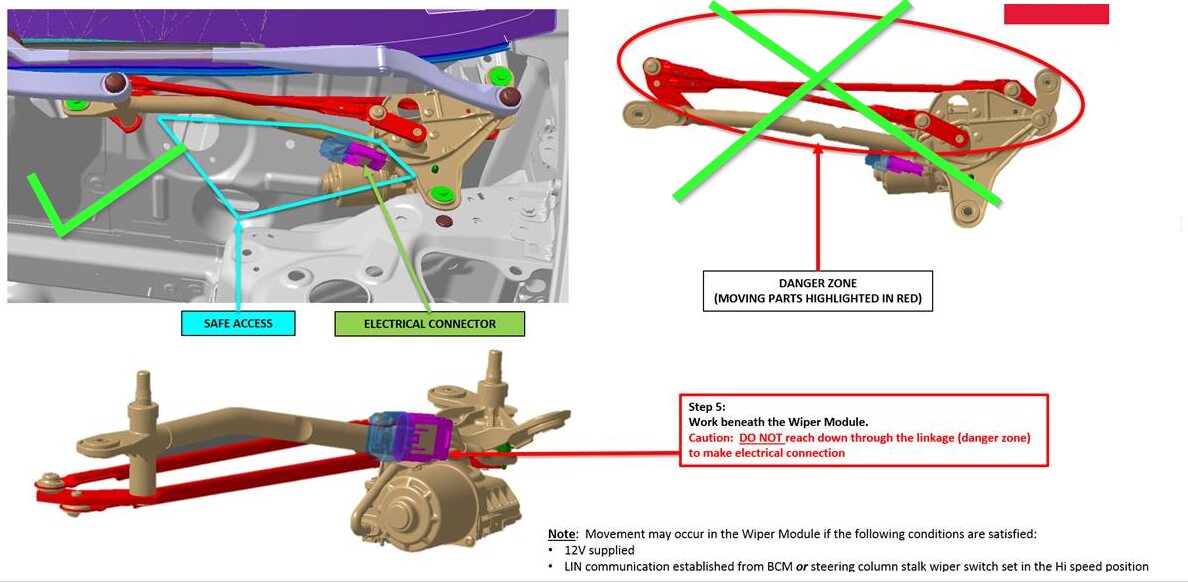
Disconnect wiper module harness
注1x connector, Do NOT place limbs within the linkage movement area as wiper arms will automatically transition to parking mode

-
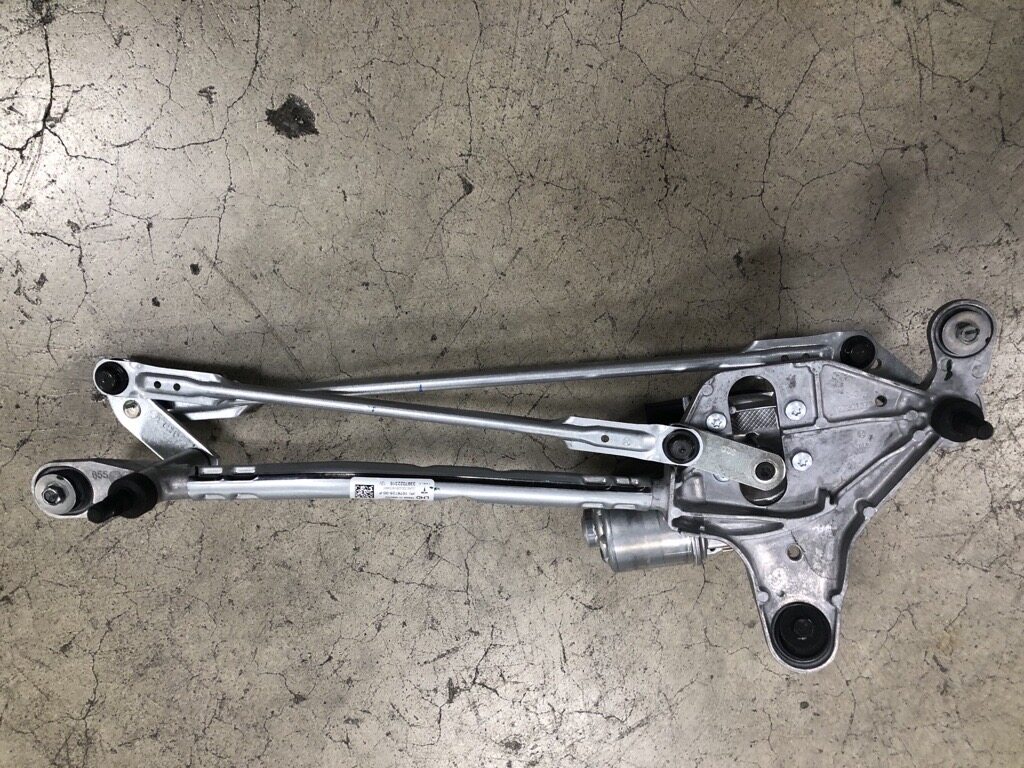
Remove wiper module from vehicle
-
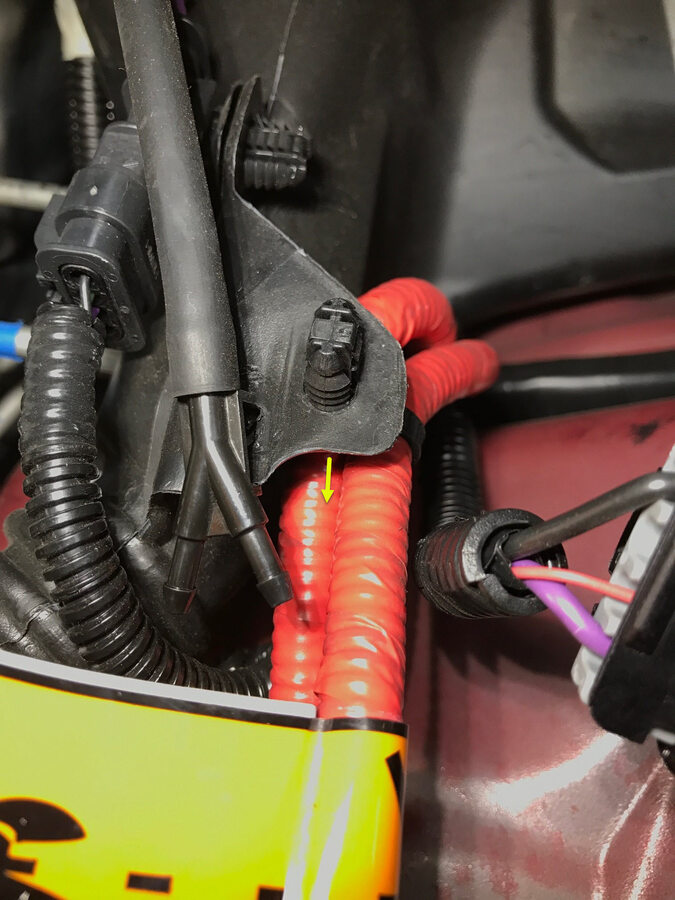
Release harness clip from LH side of washer tank inlet
注1x clip
-
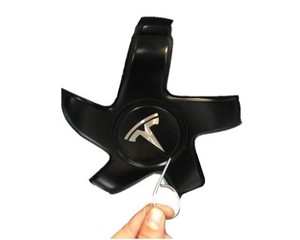
Remove LH front wheel center cap
注1x cap
-
Loosen LH front wheel
注5x nuts, 21mm, 175 Nm
-
Raise vehicle partially and lower lift onto locks
注Set vehicle to a comfortable working height, Make sure there's an audible click of the locks on both sides before lowering, otherwise vehicle may tilt to the side
-
Remove LH front wheel
注5x nuts, 21mm, 175 Nm
-
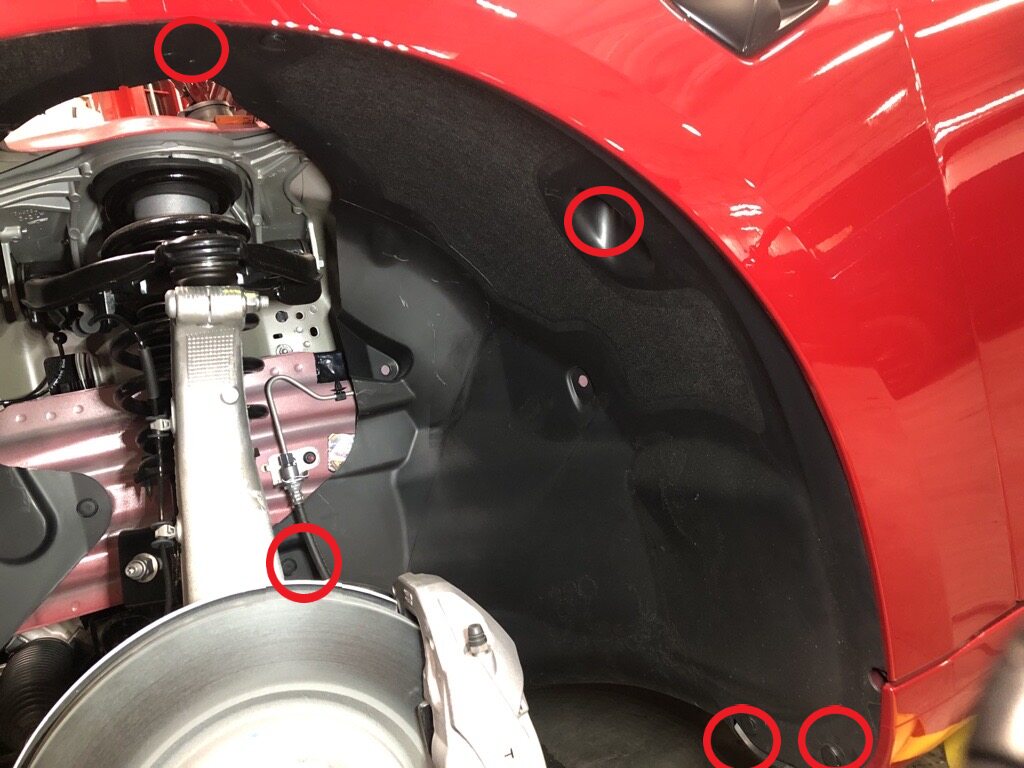
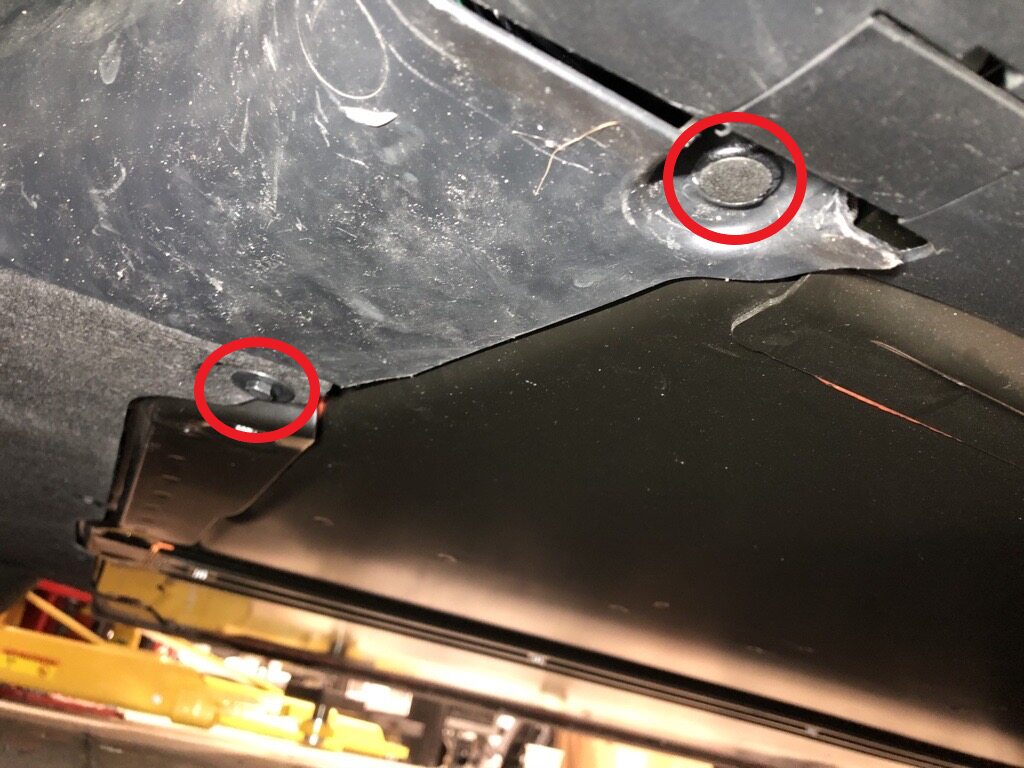
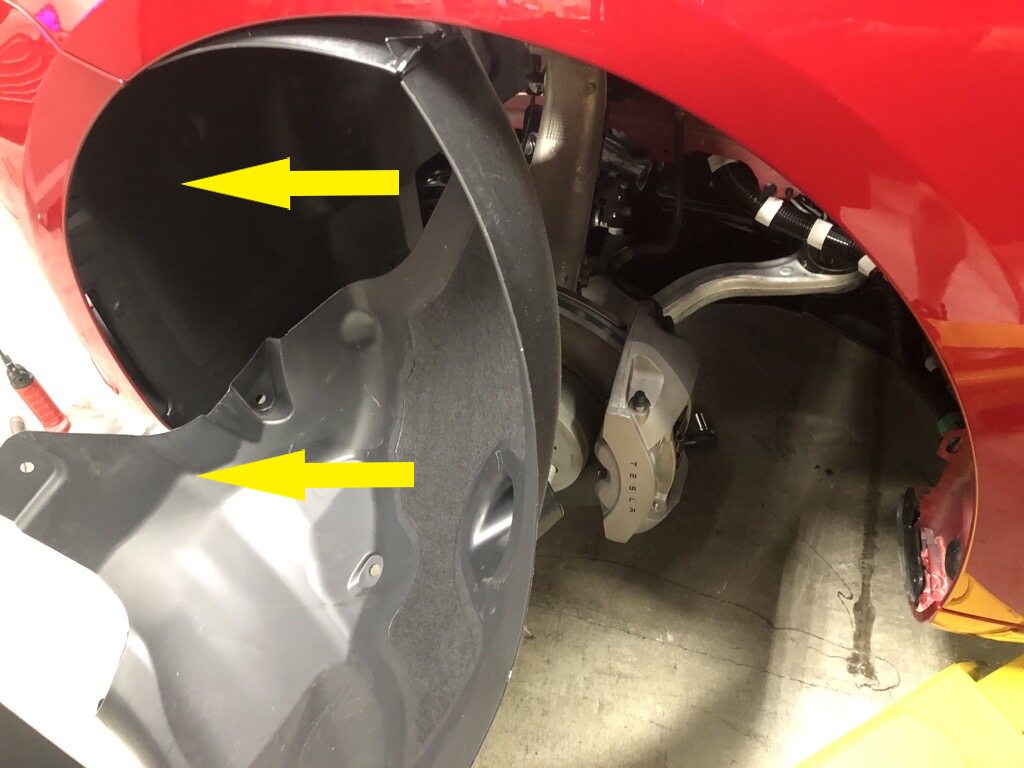
Partially remove LH front wheel liner
注6x clips, 1x bolt, 10mm, 5 Nm, Newer vehicles may be equipped with 2x push clips securing lower portion of liner to body
-
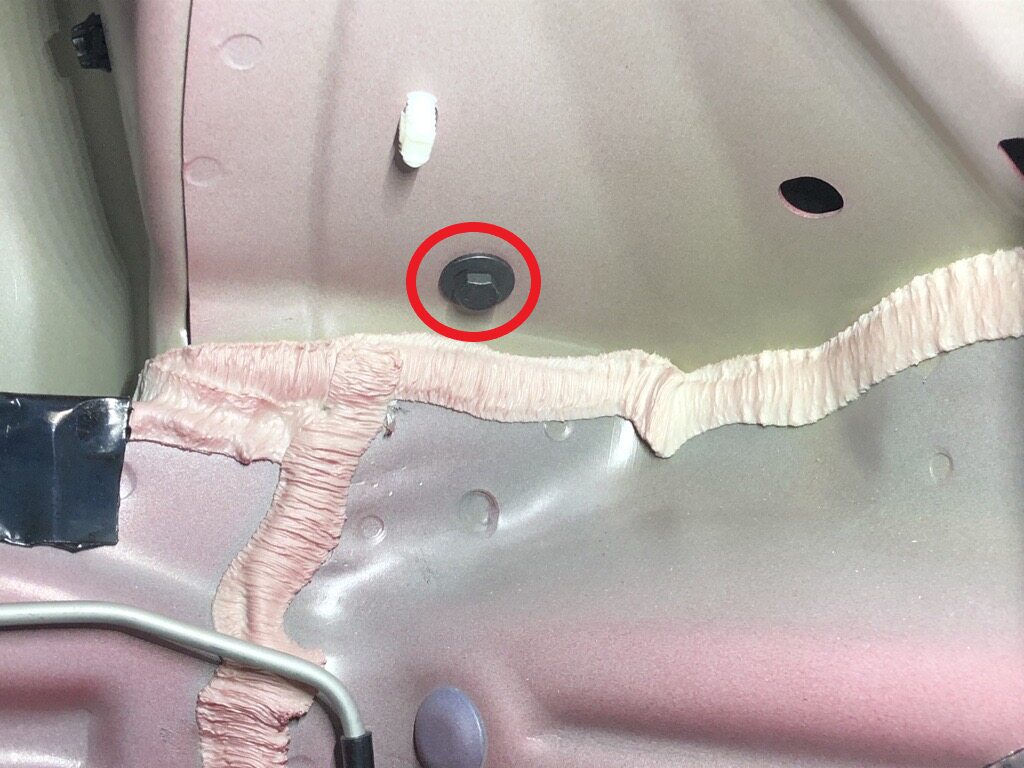
Remove lower bolt securing washer tank to vehicle
注1x bolt, 10mm, 3 Nm
-
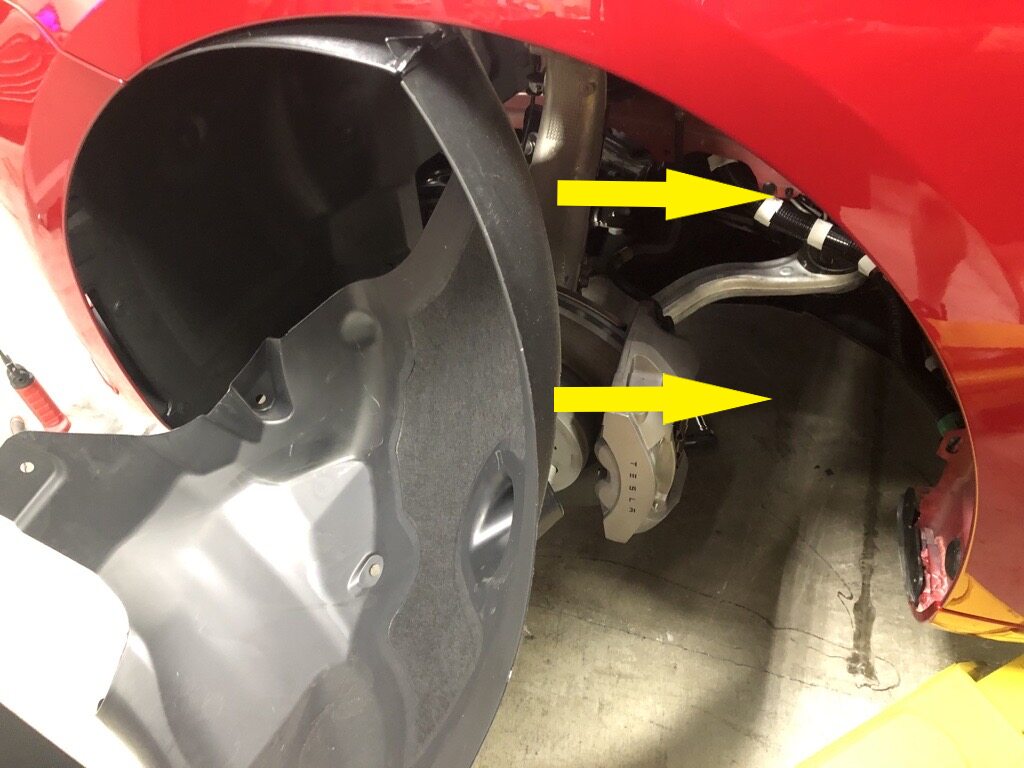
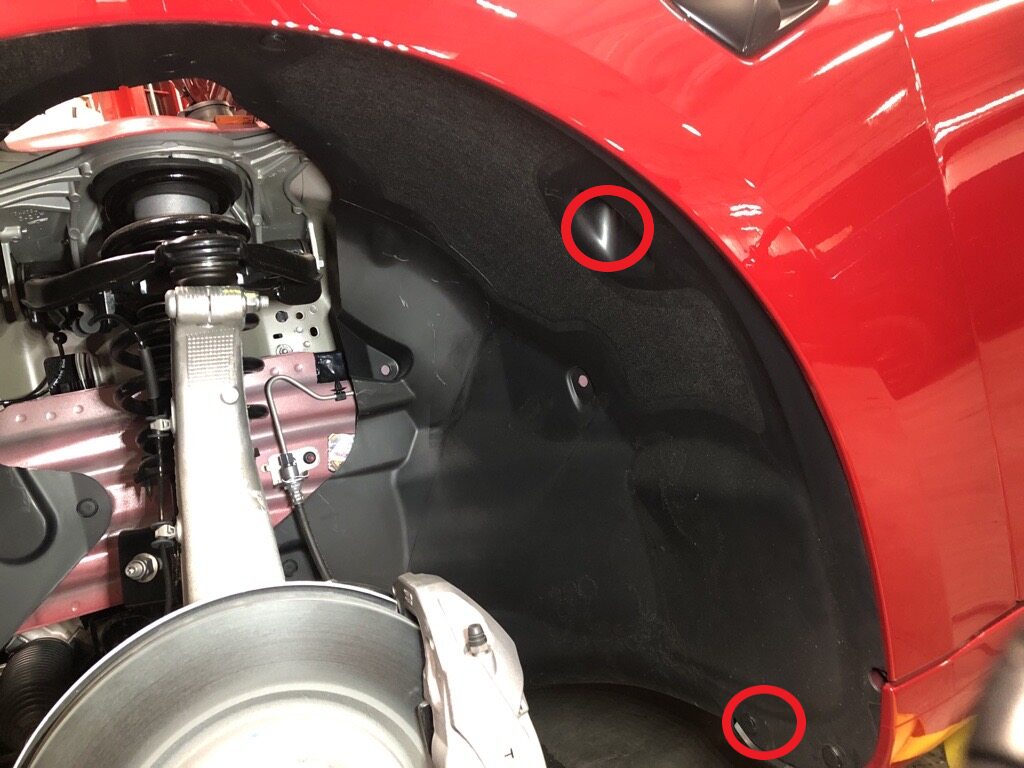
Partially install LH front wheel liner
注2x clips, Partially install LH front wheel liner, Wheel liner will be removed again later, Install 2 clips to secure LH front wheel liner
-
Install LH front wheel
注5x nuts, 21mm, 175 Nm, Start lug nuts by hand before using power tool, Torque at later step
-
Lower vehicle until tires are touching the ground
注Raise lift off locks, then hold lock release lever to keep locks free while vehicle is lowered
-
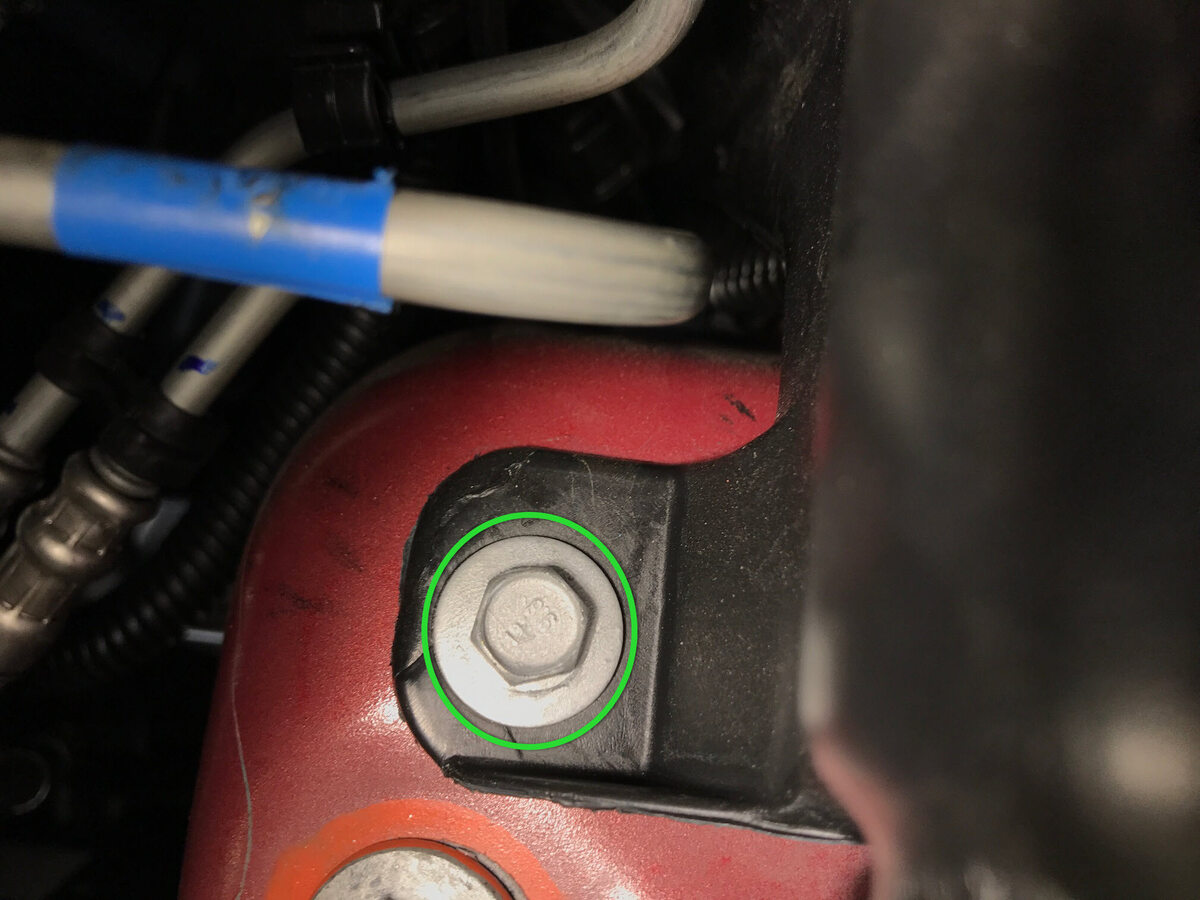
Remove upper bolt securing washer tank to vehicle
注1x bolt, 10mm, 3 Nm
-
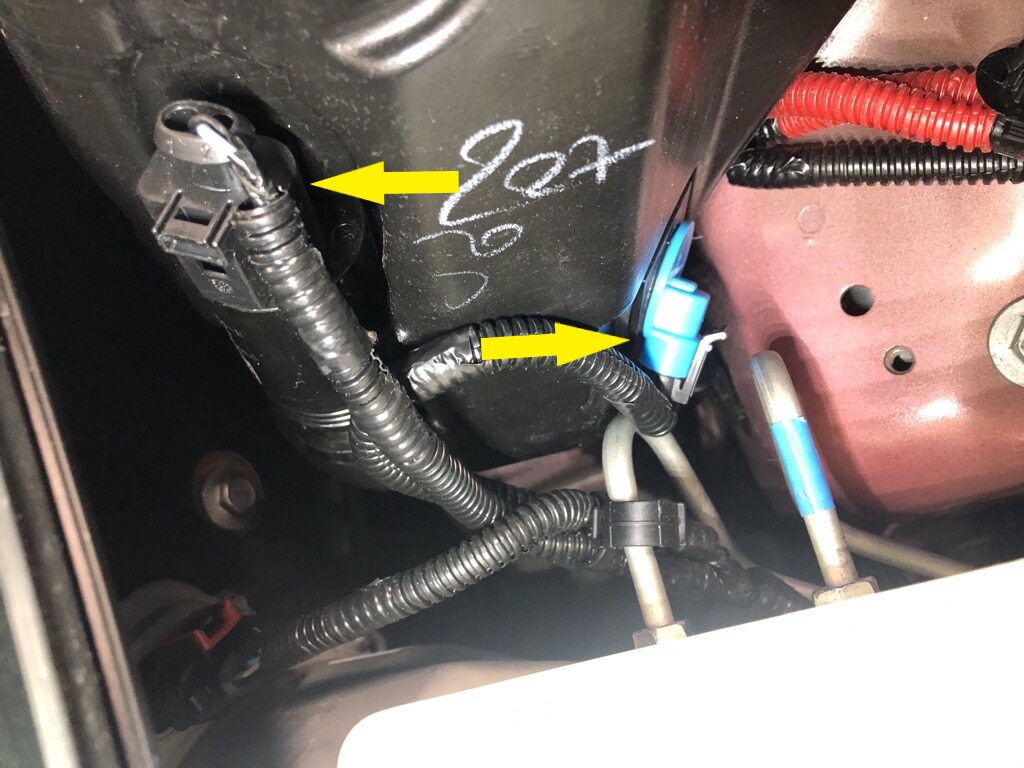
Disconnect washer pump and level sensor connectors
注2x connectors
-
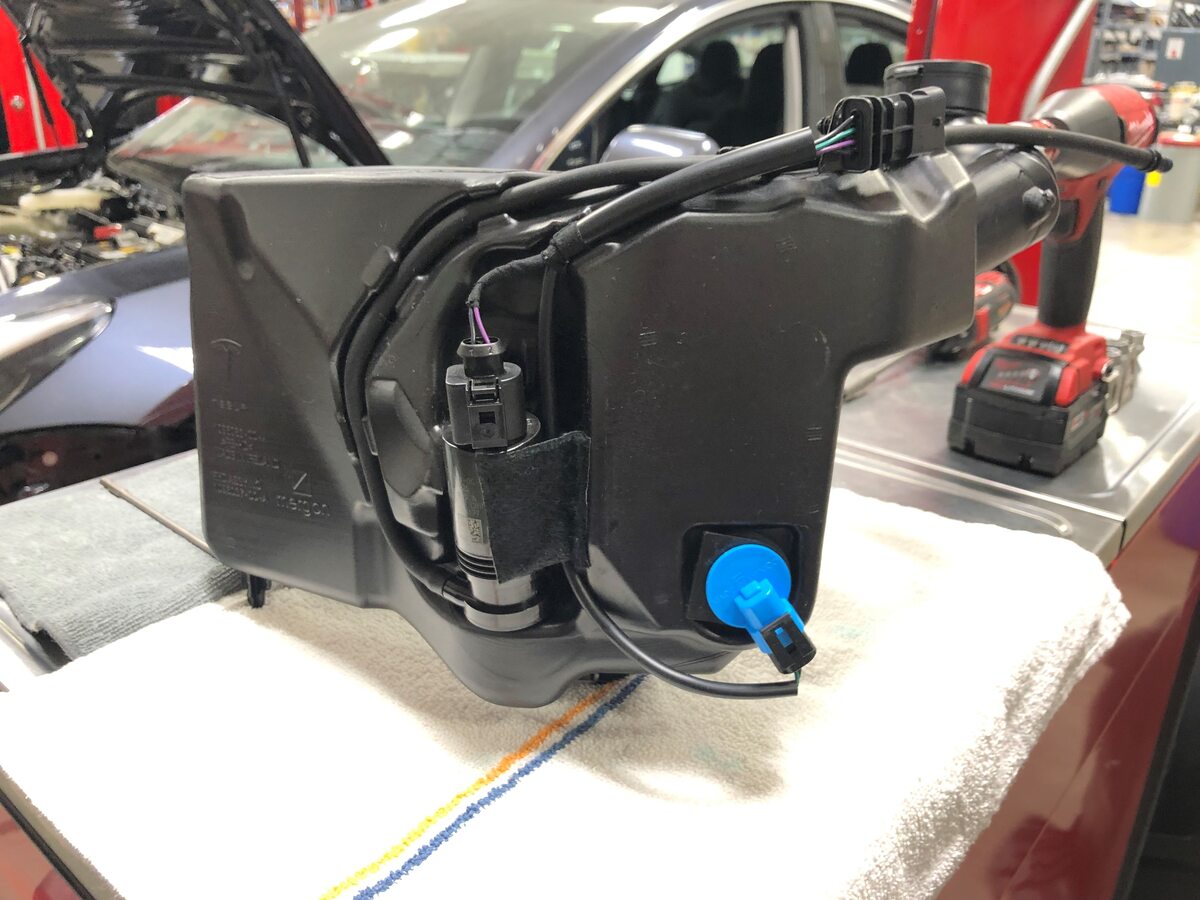
Remove washer tank from vehicle
注2x connectors,Keep washer tank upright to keep contents from spilling
-
Remove vehicle from lift
注Recommend assistance to push the vehicle backward, Note this vehicle can only be safely pushed for a very short distance and at very slow speed
- Enable the EPB Service Mode. See 驻车制动 - 钳 - 后 - LH(释放)
-
Push vehicle away from lift
注Recommend assistance, Place wheel chocks to keep vehicle from moving, Note this vehicle can only be safely pushed for a very short distance and at very slow speed
-
Open all four doors
注If vehicle is being powered down, Latch rear doors to prevent accidental closure
- Lower all four windows
- Move LH front seat forward
-
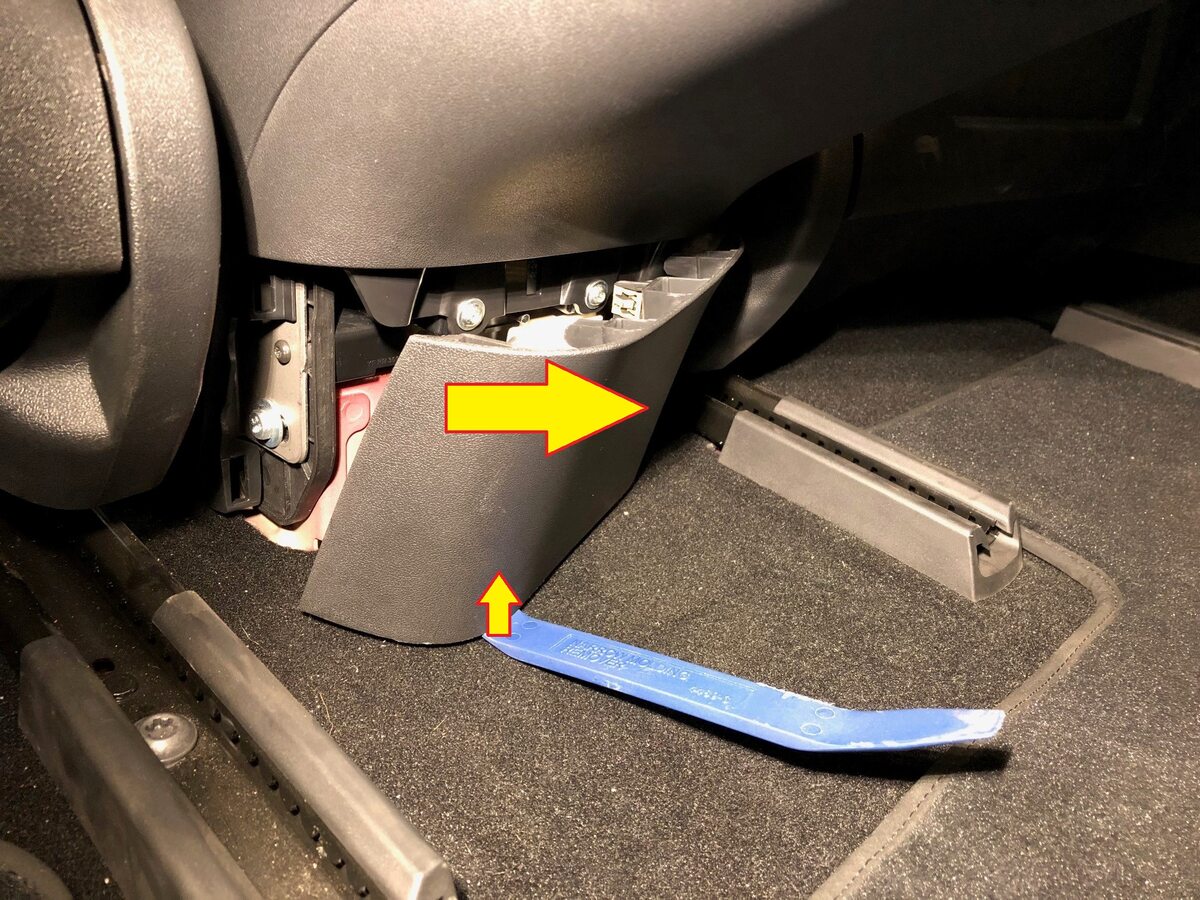
Remove console lower rear panel
注5x clips, Insert the plastic trim tool with a 90 degree bend at the bottom of the cover and pull straight out to release
-
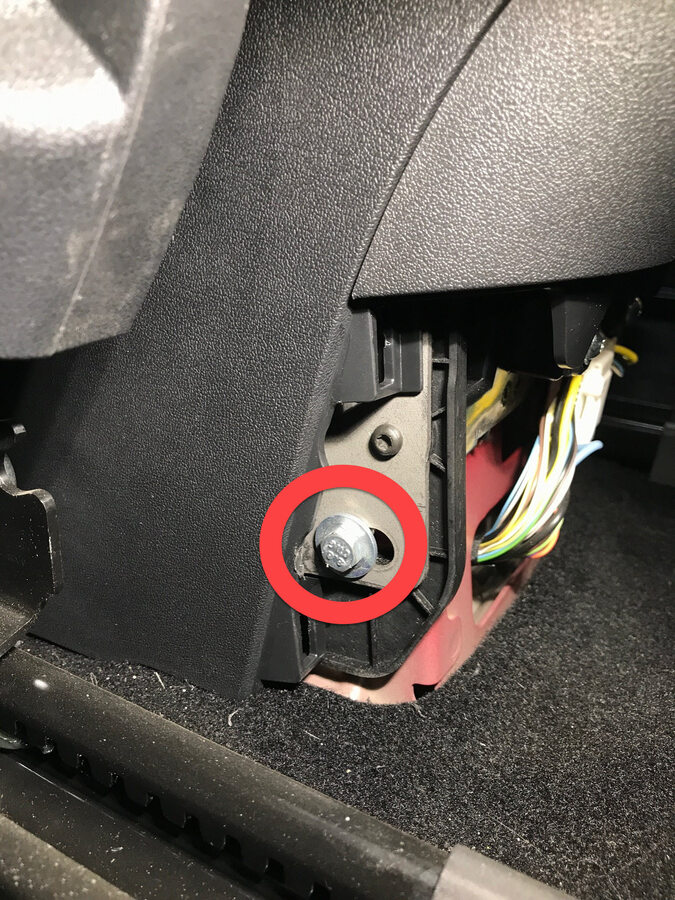
Remove LH rear exterior bolt from center console
注1x bolt, 10mm, 7 Nm
- Move LH front seat backward
-
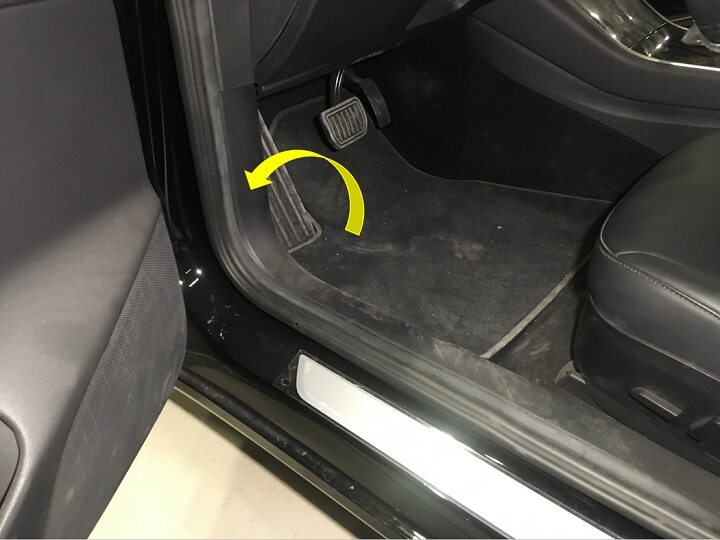
Remove LH front floor mat
-
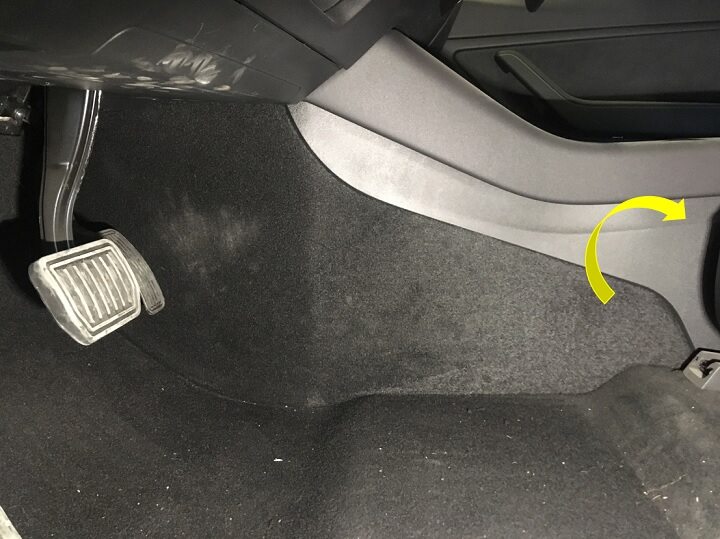
Remove LH console side panel carpet
注12x clips, Use trim tool starting at rear edge to release upper clips, then pull bottom to release remaining clips
-
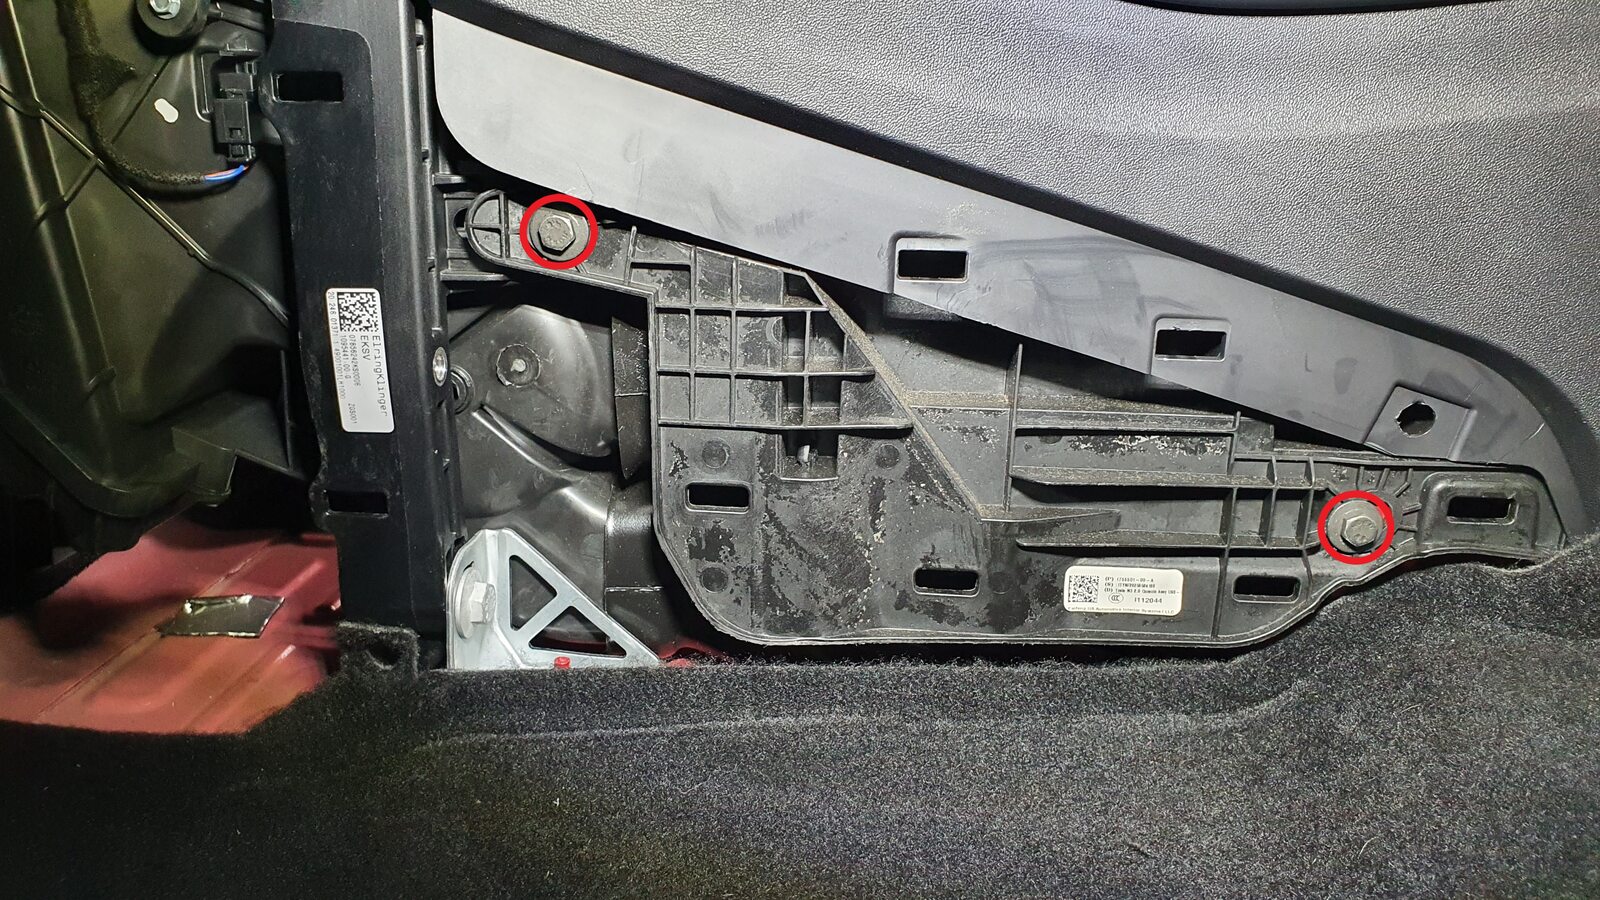
Remove LH front exterior hardware from center console
注2x bolts, 10mm, 7 Nm
-
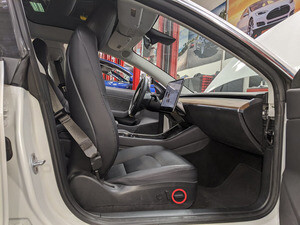
Move RH front seat forward
-
Remove RH rear exterior bolt from center console
注1x bolt, 10mm, 7 Nm
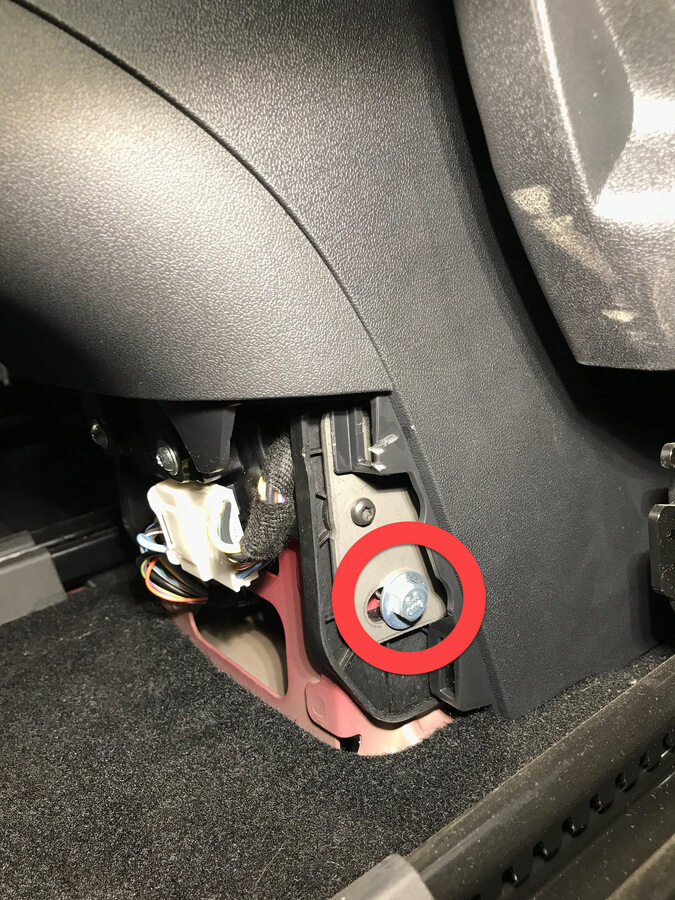
- Move RH front seat backward and seat back downward
-
Remove RH front floor mat
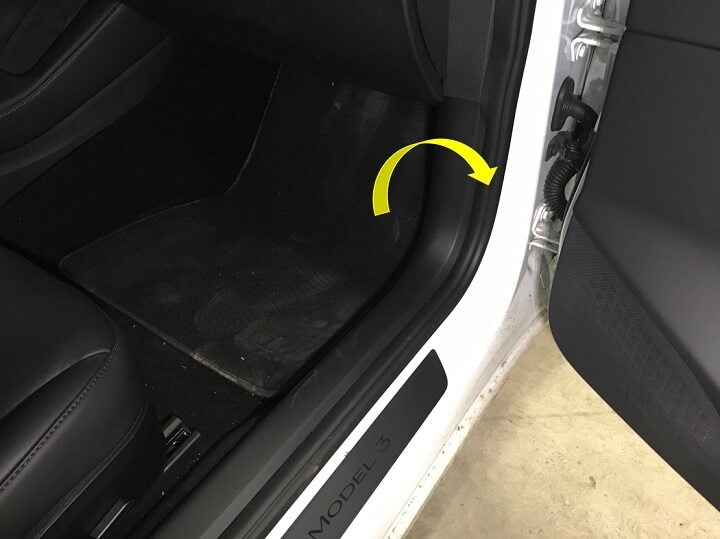
-
Remove RH console side panel carpet
注12x clips, Use trim tool starting at rear edge to release upper clips, Pull bottom to release remaining clips
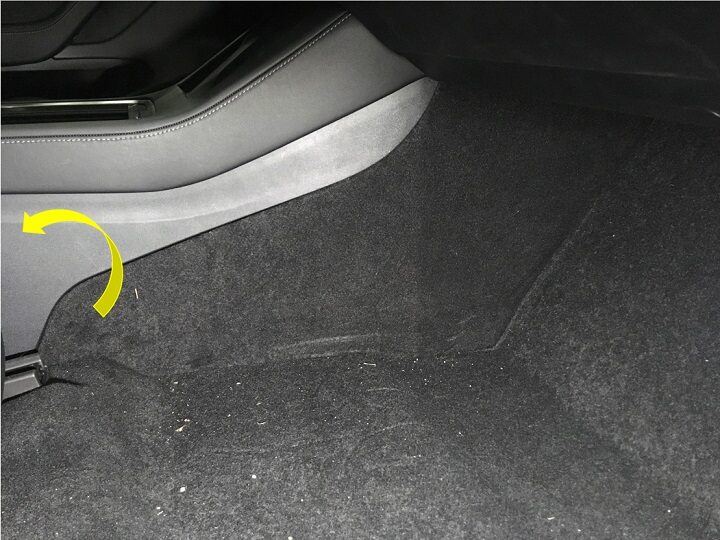
-
Remove RH front exterior hardware from center console
注2x bolts, 10mm, 7 Nm
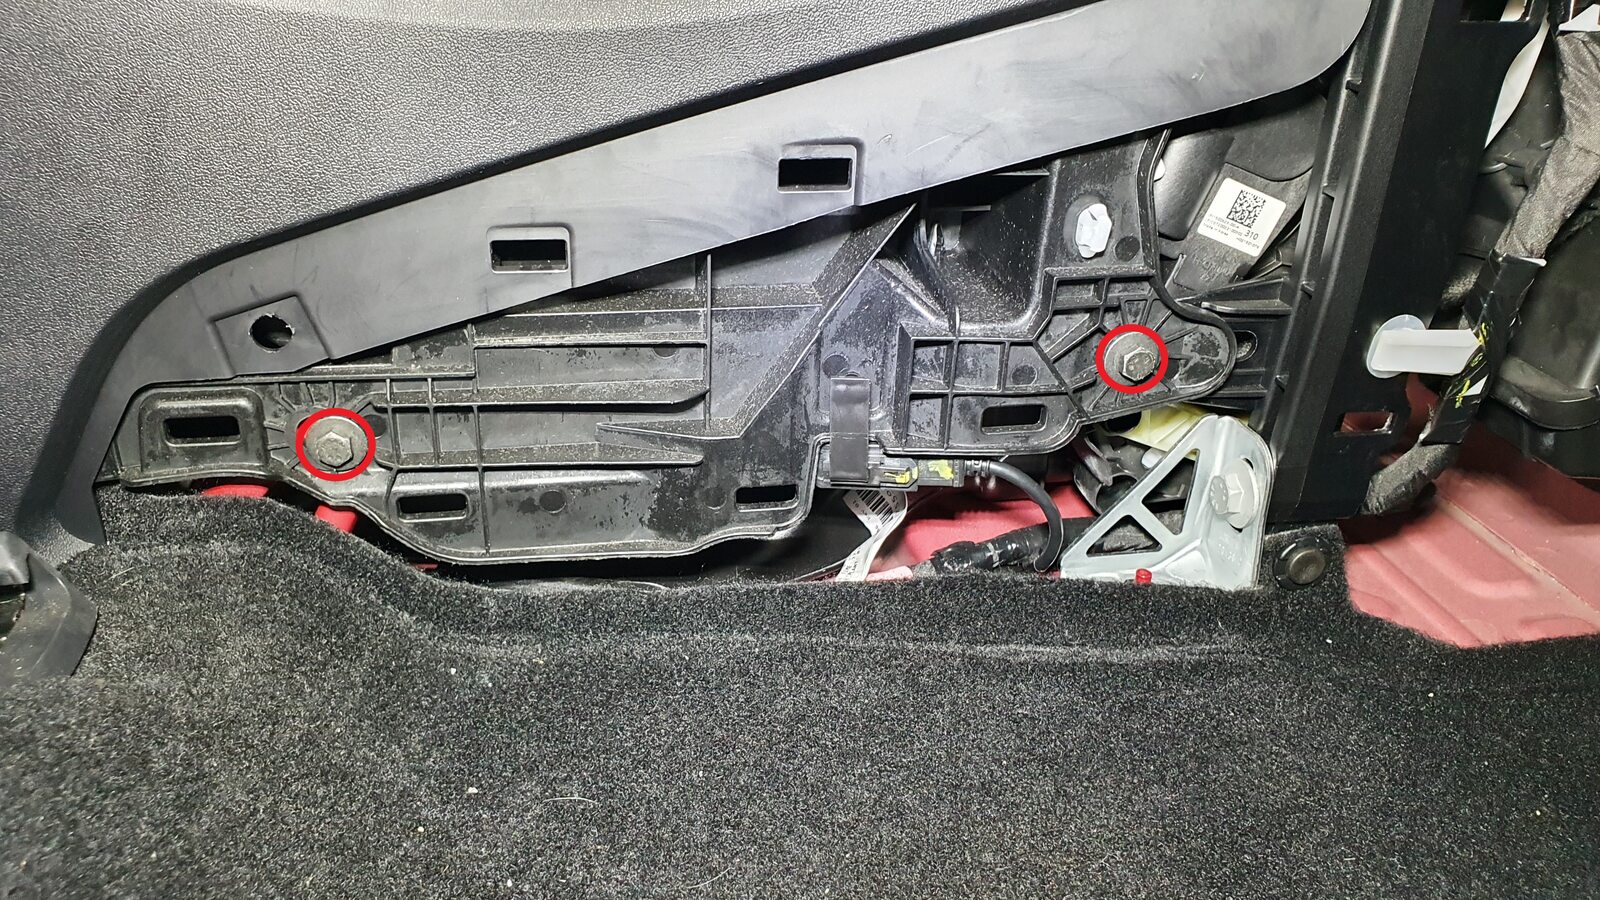
-
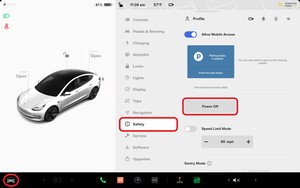
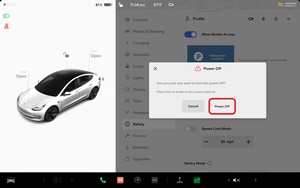
Power off vehicle from center display
注Via Controls > Safety & Security > Vehicle Power > Power Off, Confirm power off at warning dialogue box
-
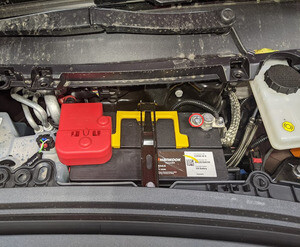
Disconnect 12V negative terminal
注1x nut, 10mm, 6 Nm, Ensure the vehicle is in park, climate control system is off, and vehicle is not charging before disconnecting 12V
-
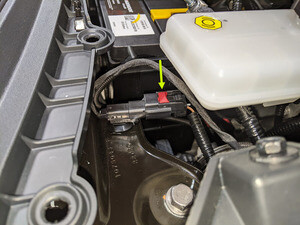
Disconnect first responder loop
注1x connector, Release locking tab
-
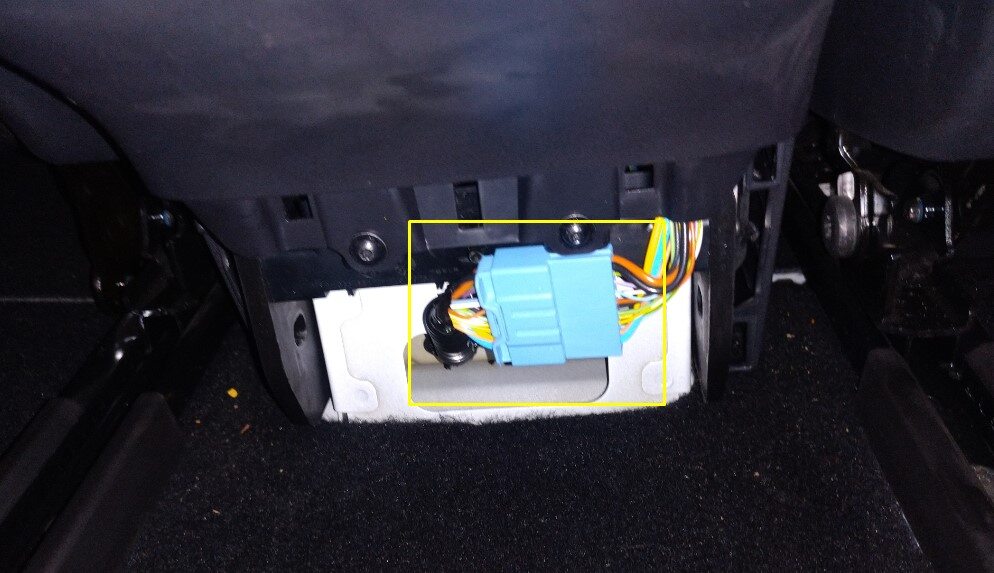
Disconnect harness from rear of center console
注1x connector
-
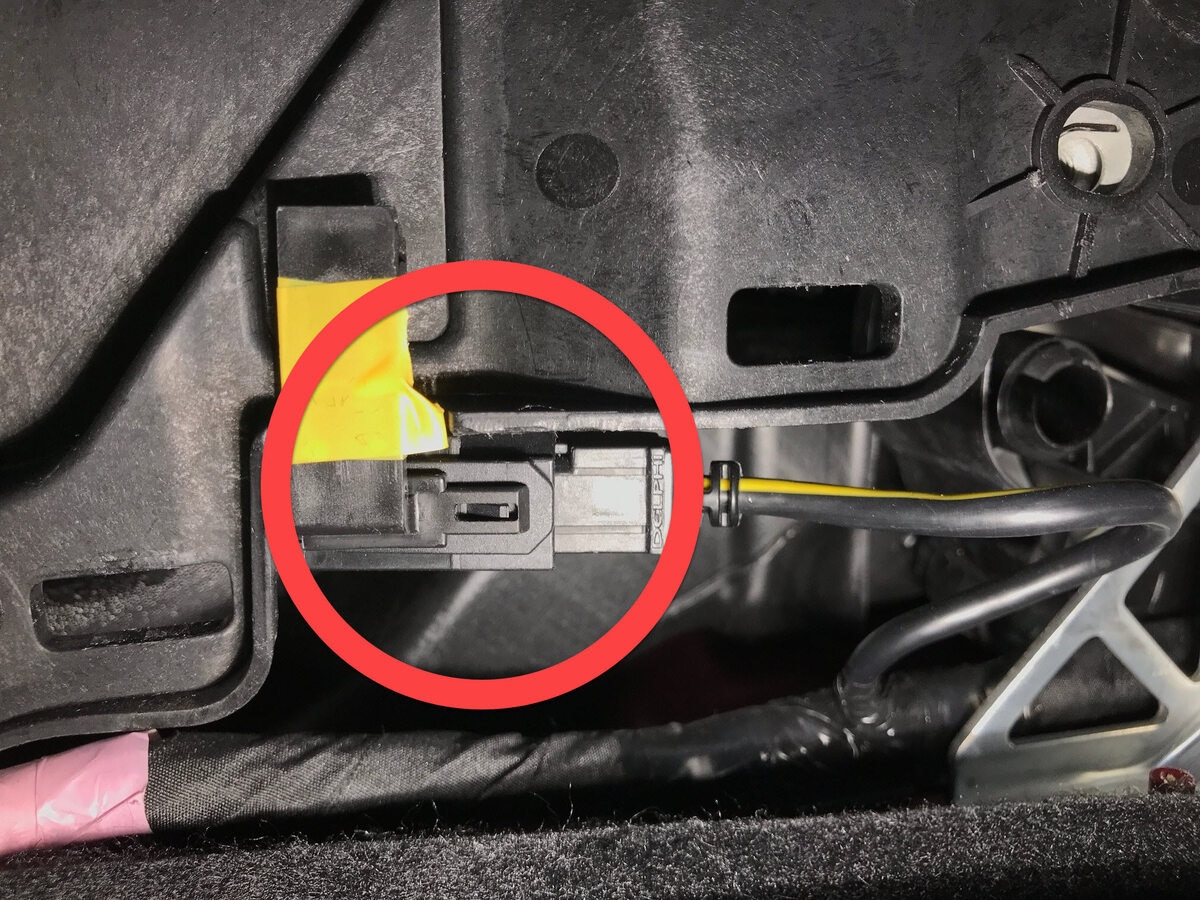
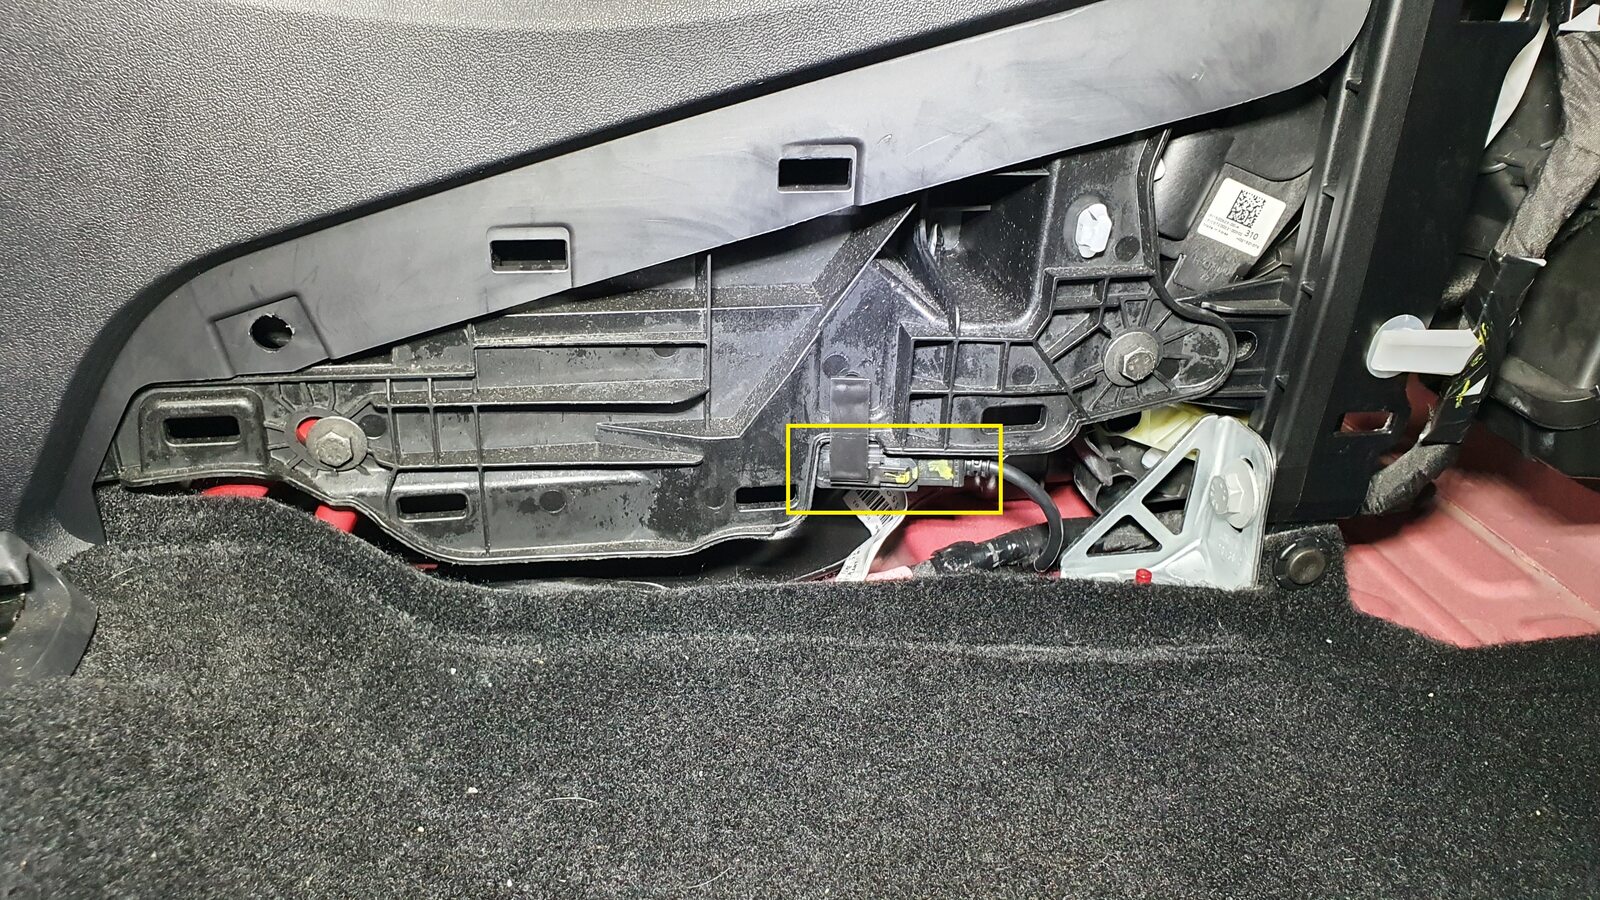
Disconnect USB harness at right front of center console
注1x USB connector
-
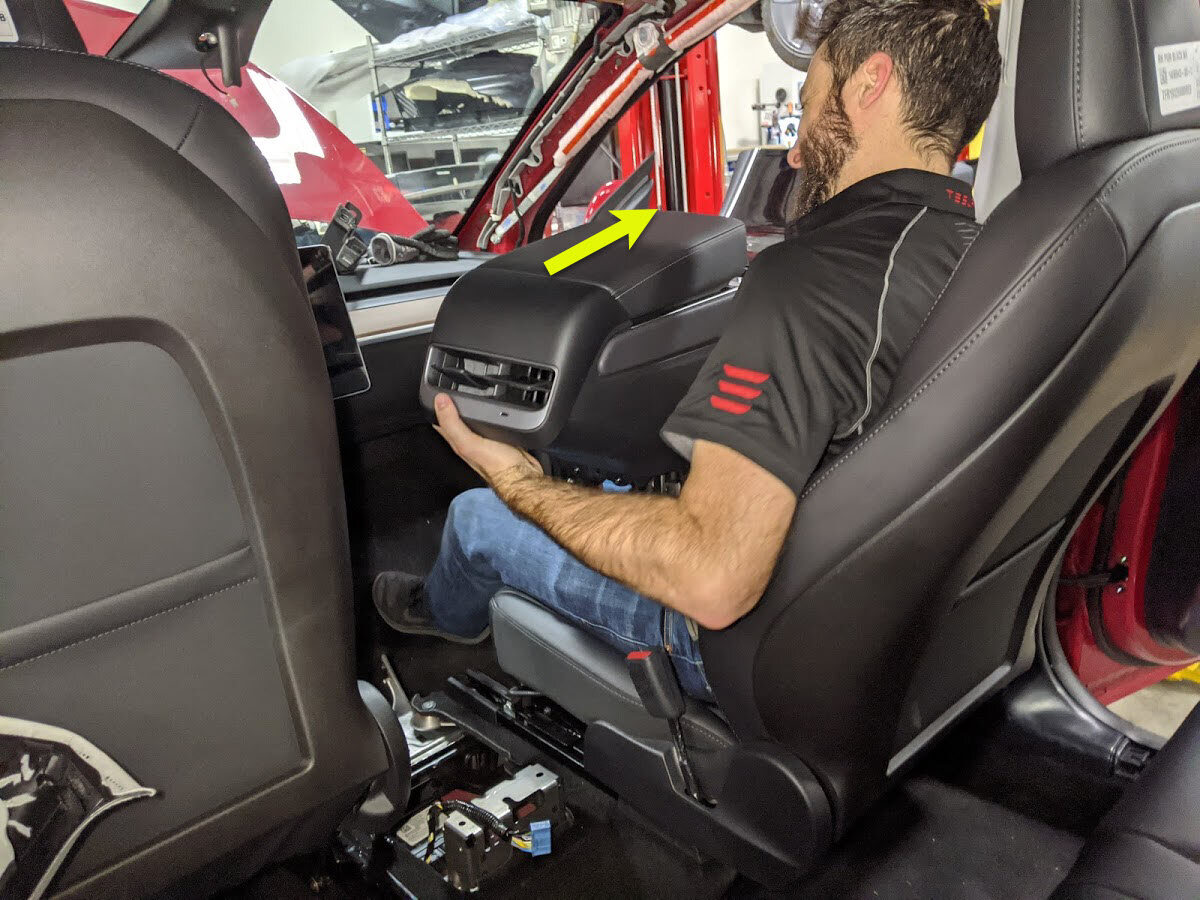
Remove center console from vehicle
注Recommend assistance, Tilt rear of console upward, pull assembly towards rear of vehicle, then tilt front of console upward and remove through passenger side
-
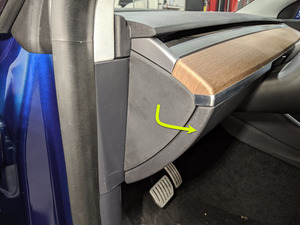
Remove LH IP end cap
注3x clips
-
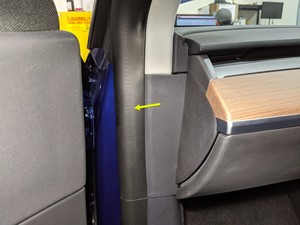
Remove LH mid A-pillar assembly
注1x clip, 1x tab, Release the upper clip then pull mid A-pillar upward to remove
-
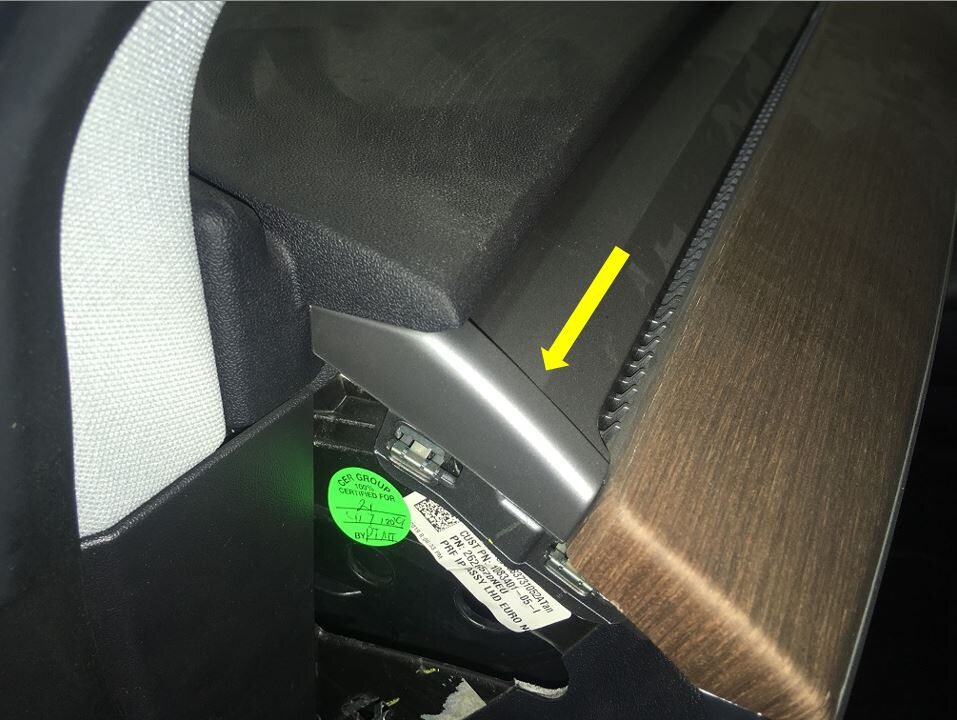
Remove LH air wave bezel cap from main decor assembly
注2x clips
-
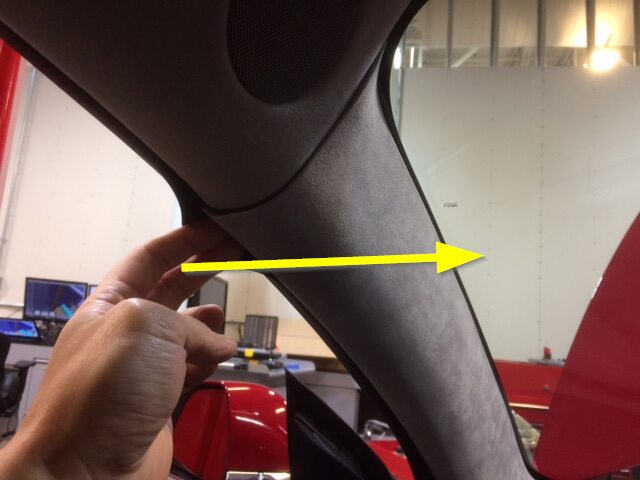
Remove LH upper A-pillar trim
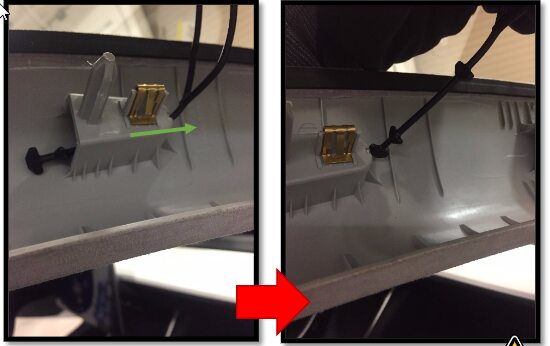
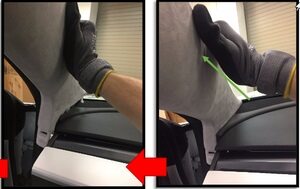
注3x clips, Pull inside of the upper portion of upper A-pillar, Remove 3x tether hooks by twisting and pulling away from housing, Then pull upper A-pillar upward to remove
-
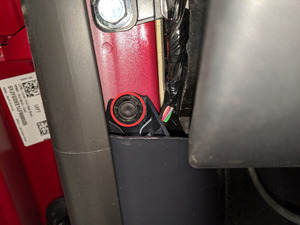
Remove clip for LH lower A-pillar trim
注1x push clip
-
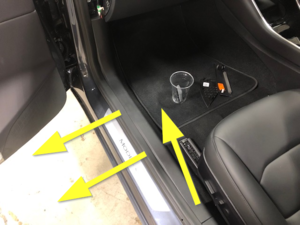
Remove LH lower A-pillar trim
注2x clips, 3 guide tabs, Pull rear of lower A-pillar upward to release clip then pull rearward to release front tabs from carpet
-
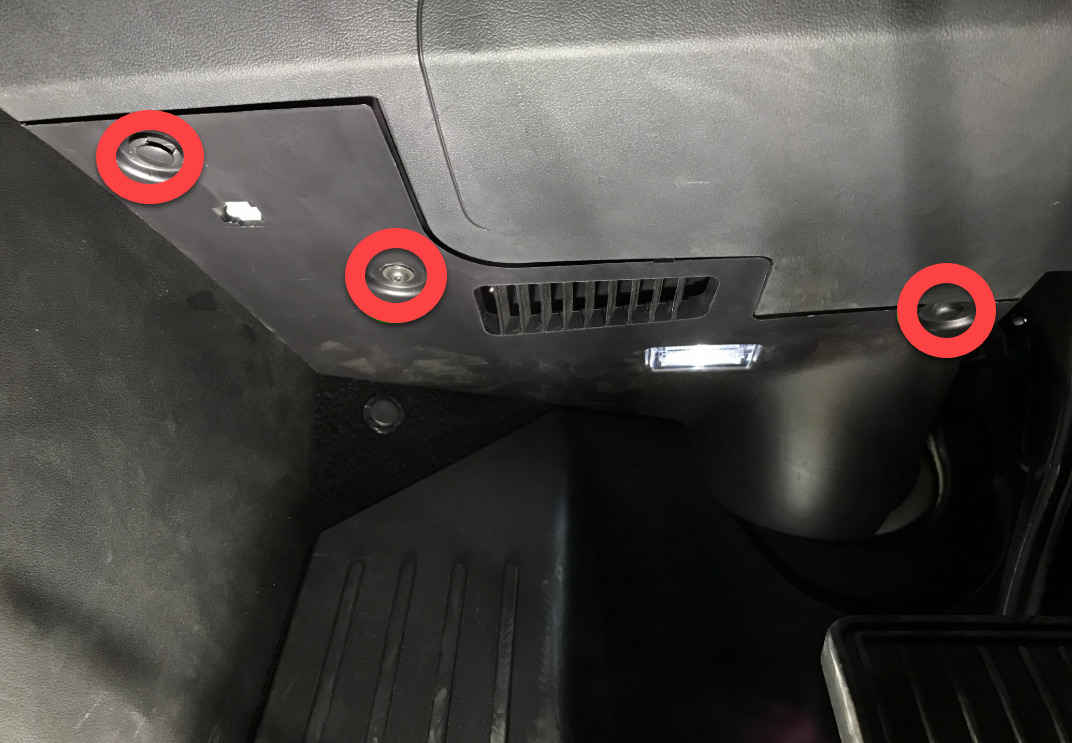
Remove screw and clips securing LH footwell cover
注2x push clips, 1x screw, T20, 2.5 Nm
-
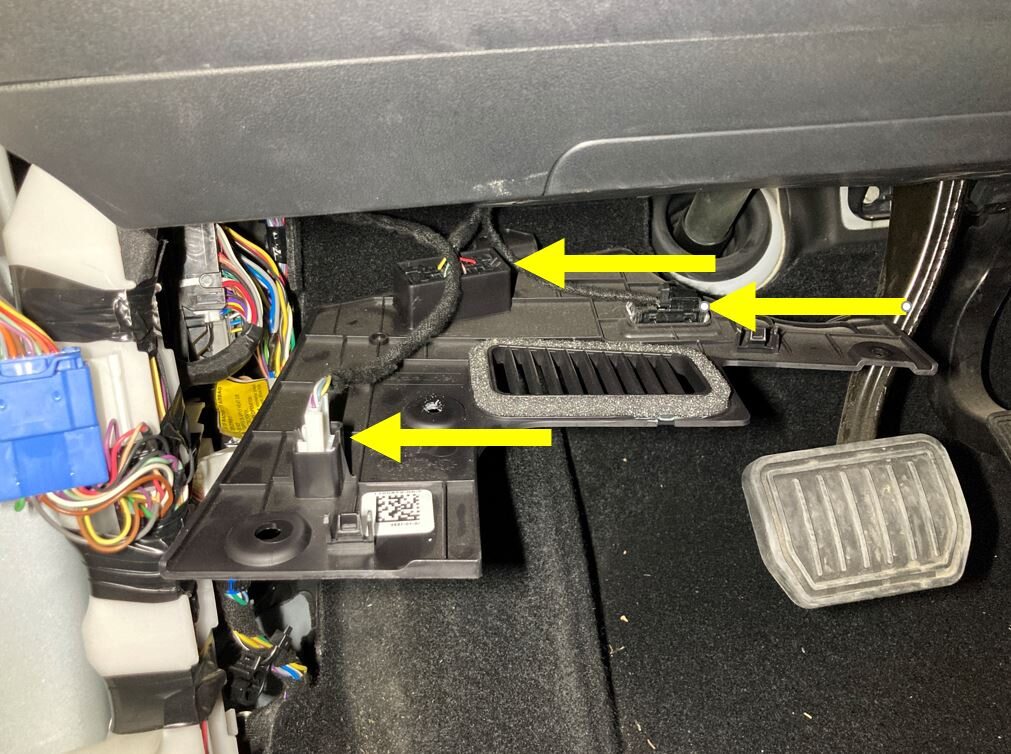
Remove connectors from LH footwell cover and remove from vehicle
注3x tabs, 1x Ethernet connector, 1x puddle light connector, APAC specific vehicles have an additional OBDII connector that will have to be disconnected
-
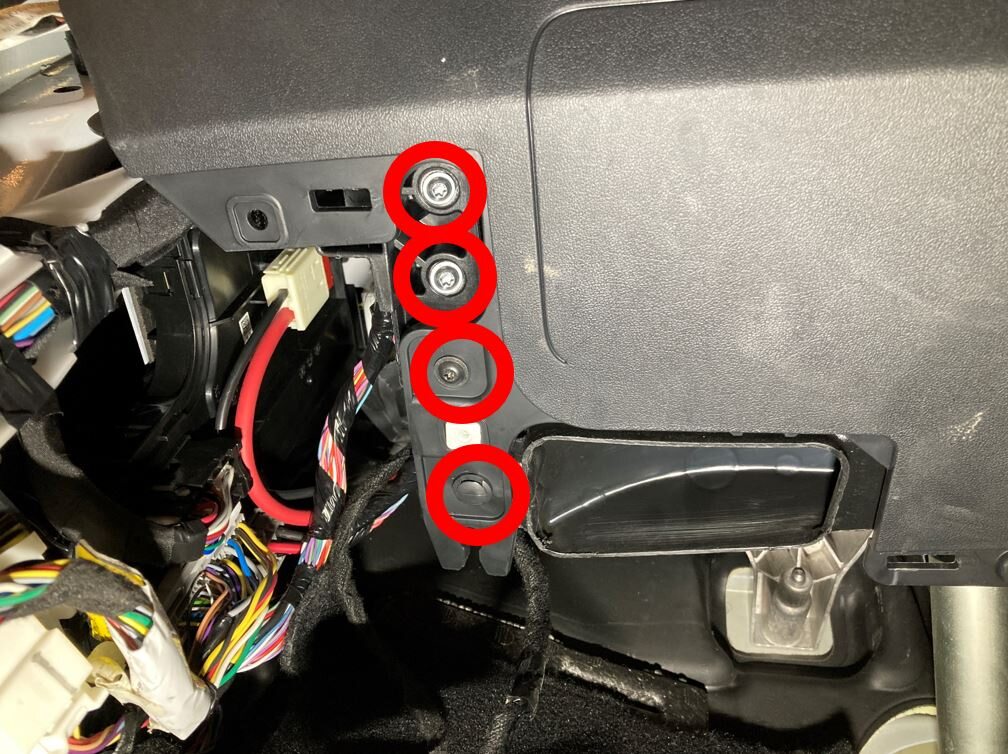
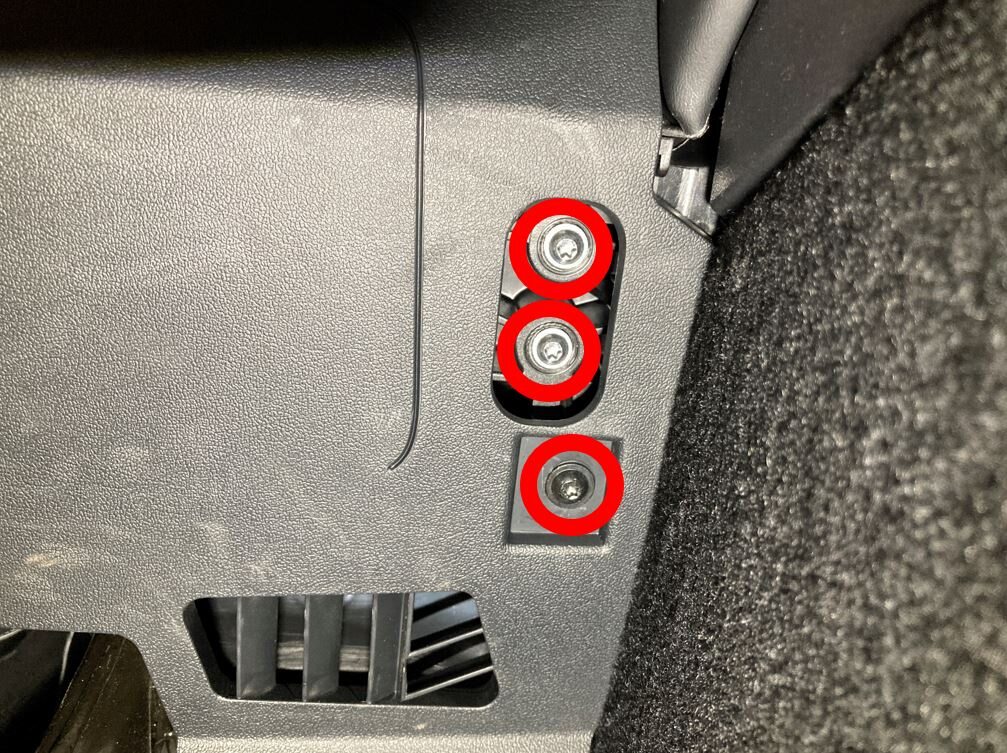
Remove fasteners securing driver knee air bag to vehicle
注1x push clip, 2x screws, T20, 2 Nm, 4x patch bolts, T30, 8 Nm, Newer vehicles have 4x patch bolts, E10, Discard after removal, Support the knee air bag while lowering, The connector / harness length is very short
-
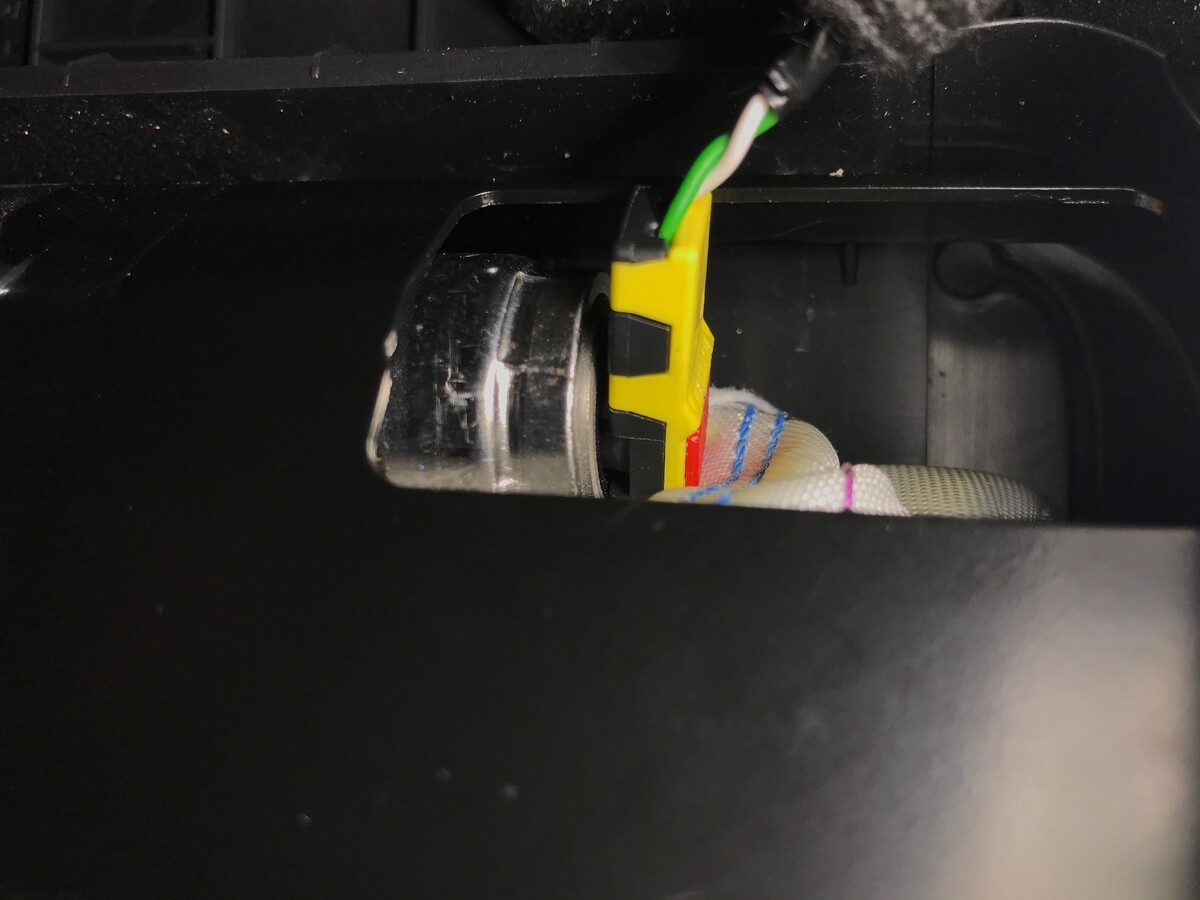
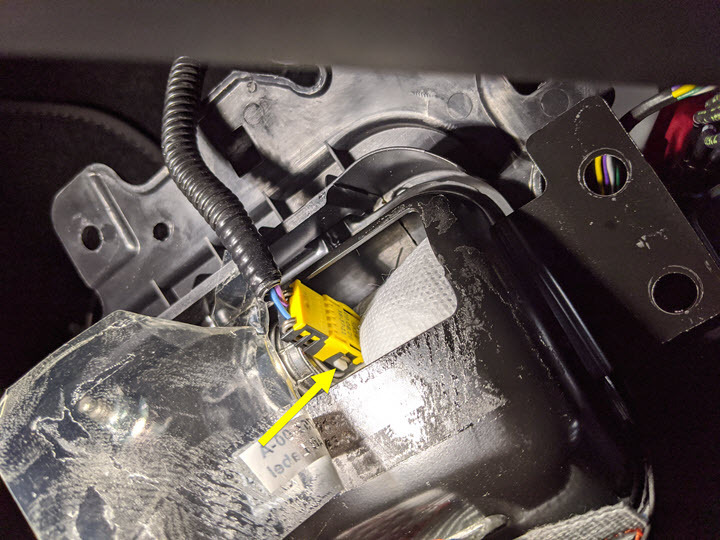
Disconnect the driver knee air bag and remove from vehicle
注1x connector, Release locking tabs, Then release squib from air bag, Support air bag while disconnecting, Connector release may vary
-
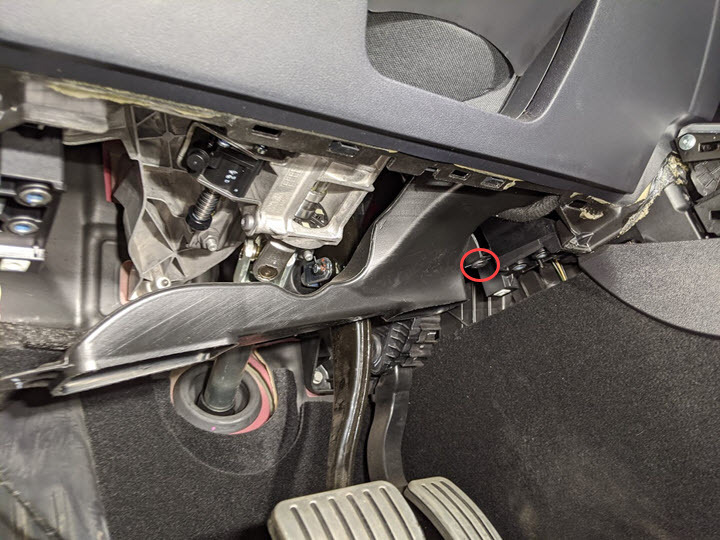
Remove the LH footwell duct from HVAC module
注1x push clip
-
Remove RH IP end cap
注3x clips
-
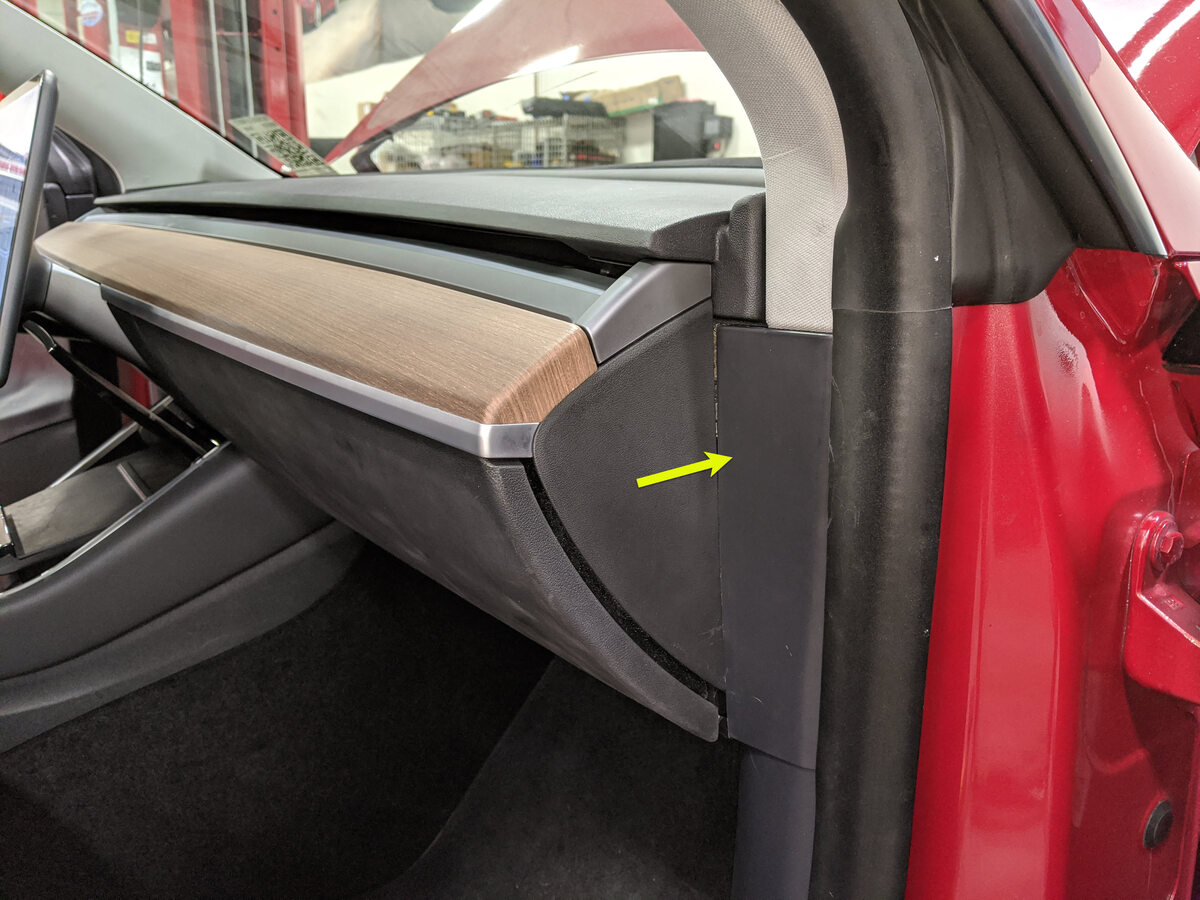
Remove RH mid A-pillar assembly
注1x clip, 1x tab, Release upper clip then pull mid A-pillar upward to remove from vehicle

-
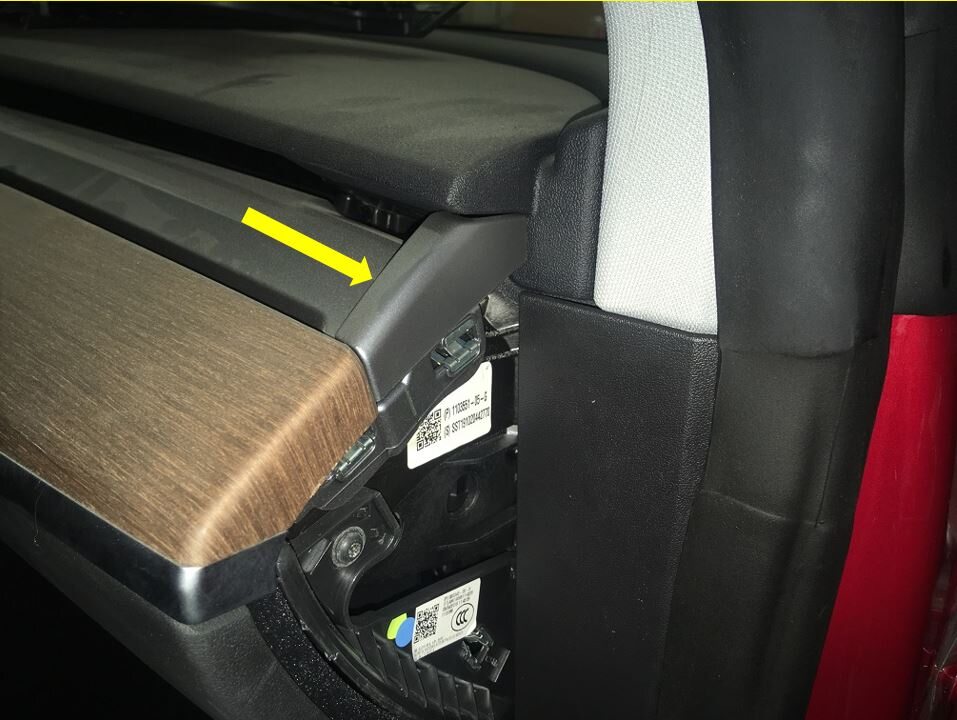
Remove RH air wave bezel cap from main decor assembly
注2x clips
-
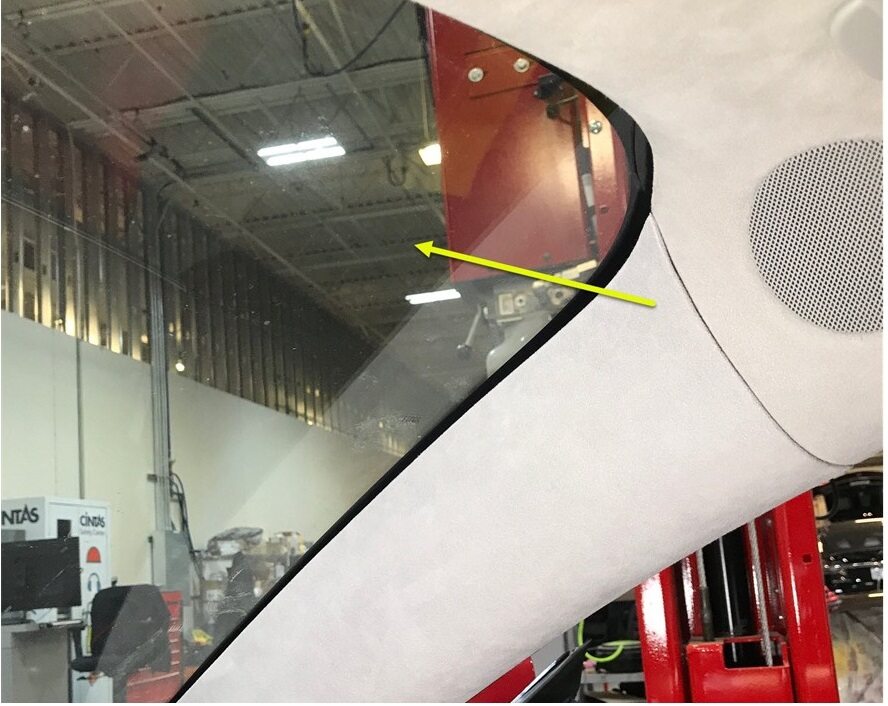
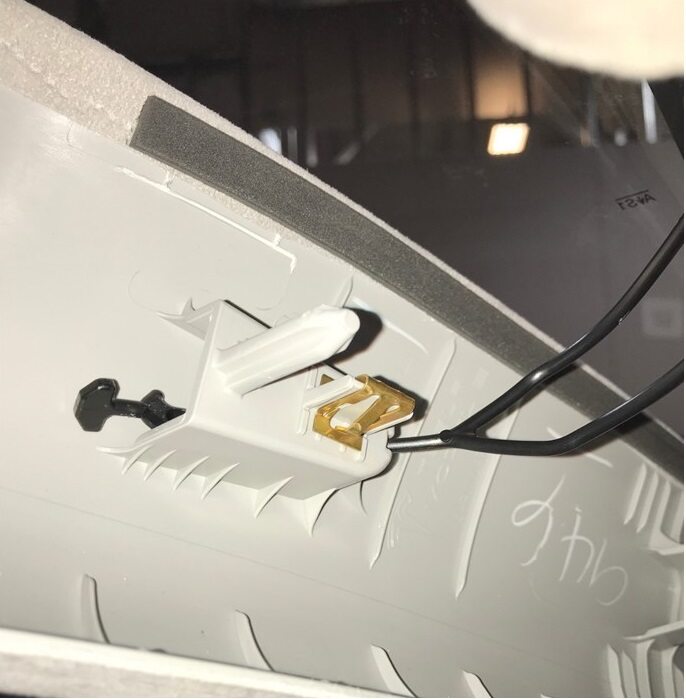
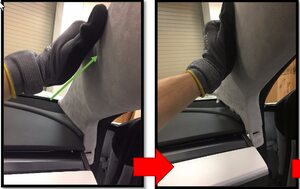
Remove RH upper A-pillar trim
注3x clips, Pull inside of the upper portion of upper A-pillar, Remove 3x tether hooks by twisting and pulling away from housing, Then pull upper A-pillar upward to remove
-
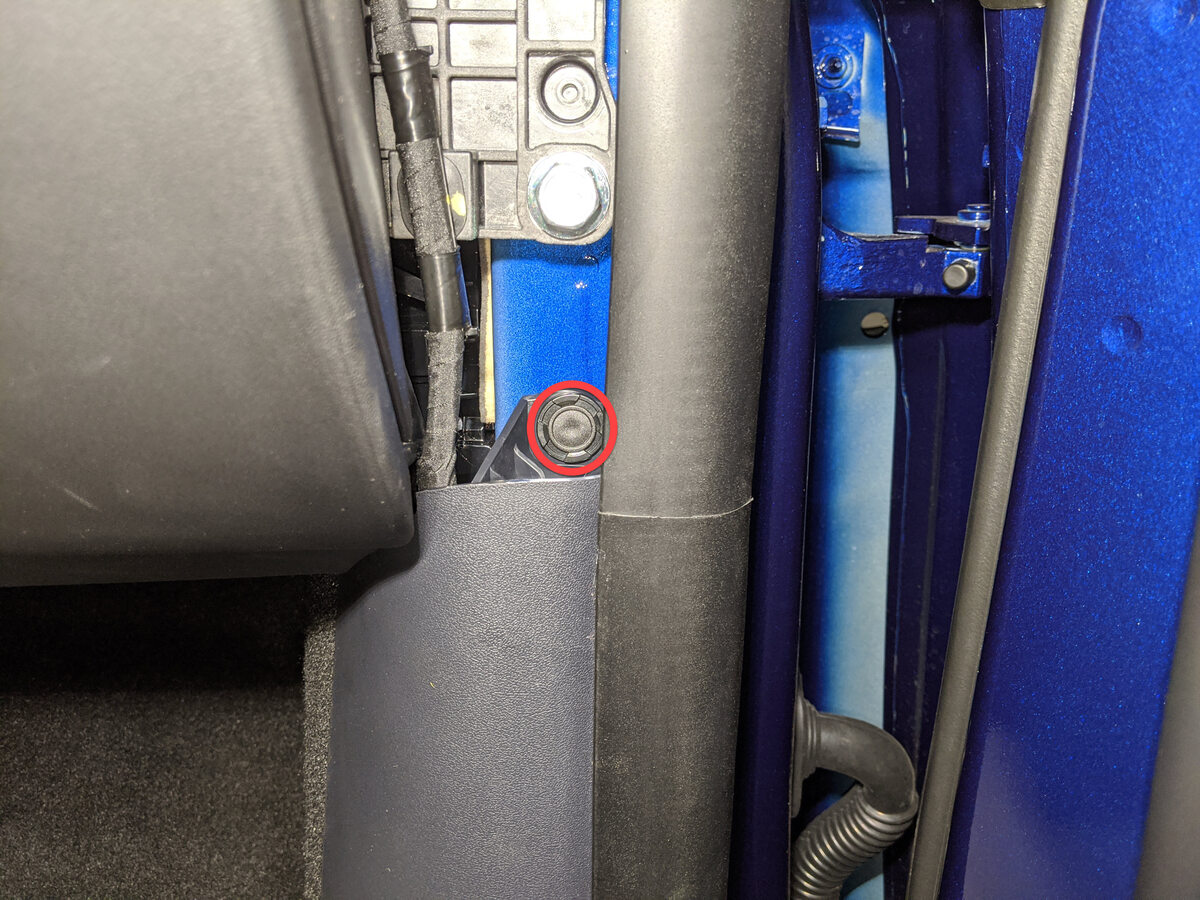
Remove clip for RH lower A-pillar trim
注1x push clip
-
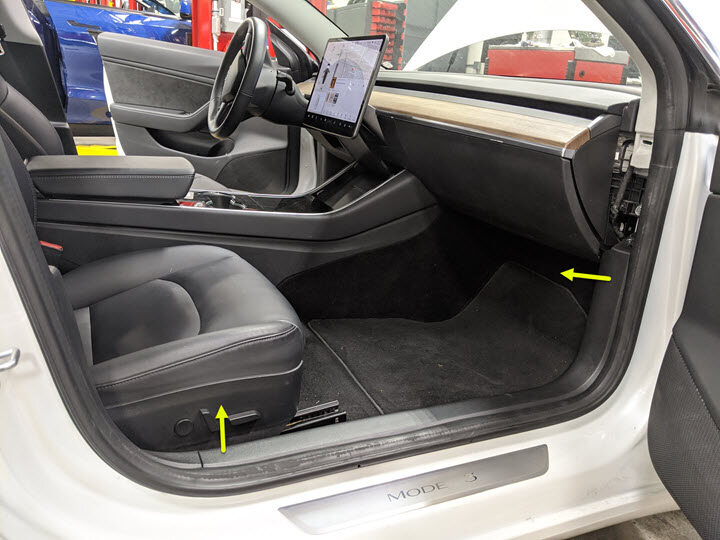
Remove RH lower A-pillar trim
注1x clip, 2 guide tabs, Pull rear of lower A-pillar upward to release clip then pull rearward to release front tabs from carpet
-
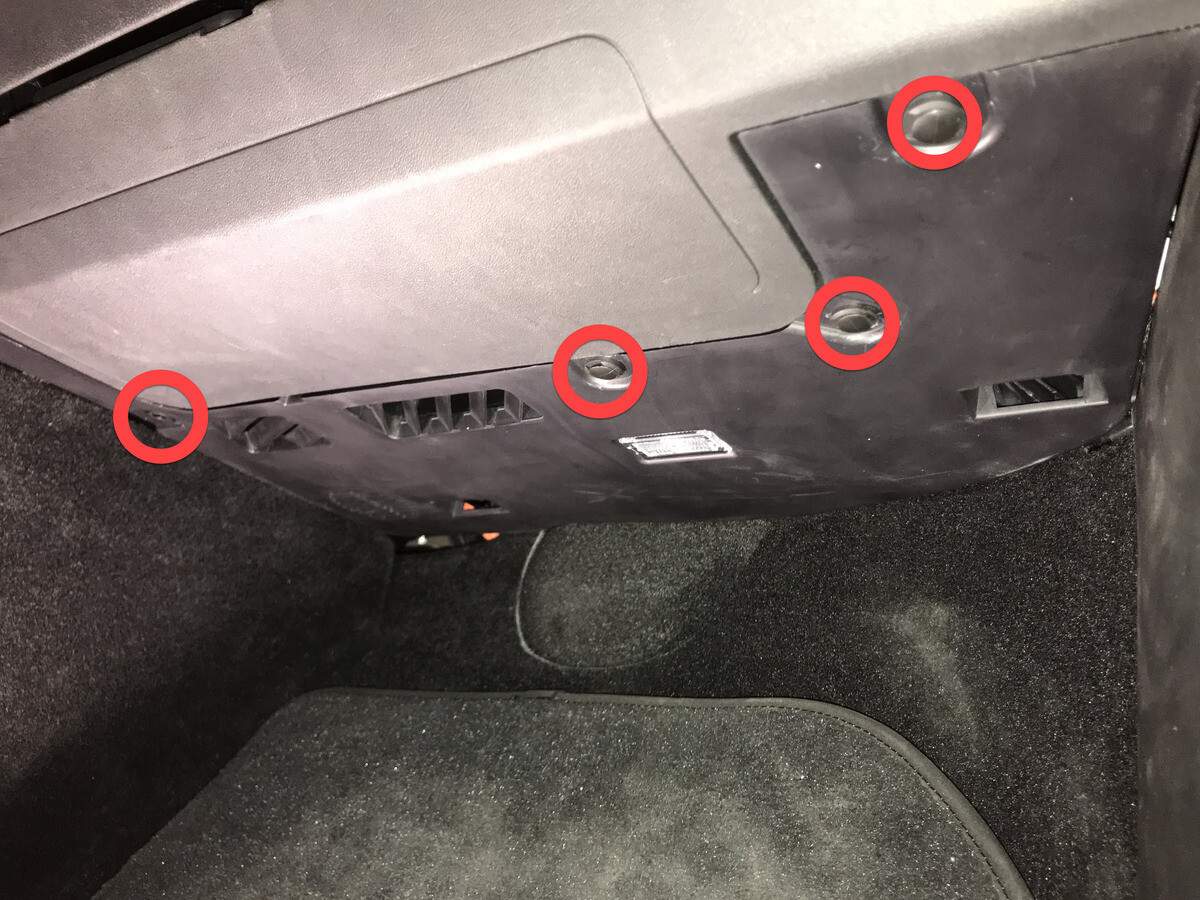
Remove clips securing RH footwell assembly
注4x push clips
-
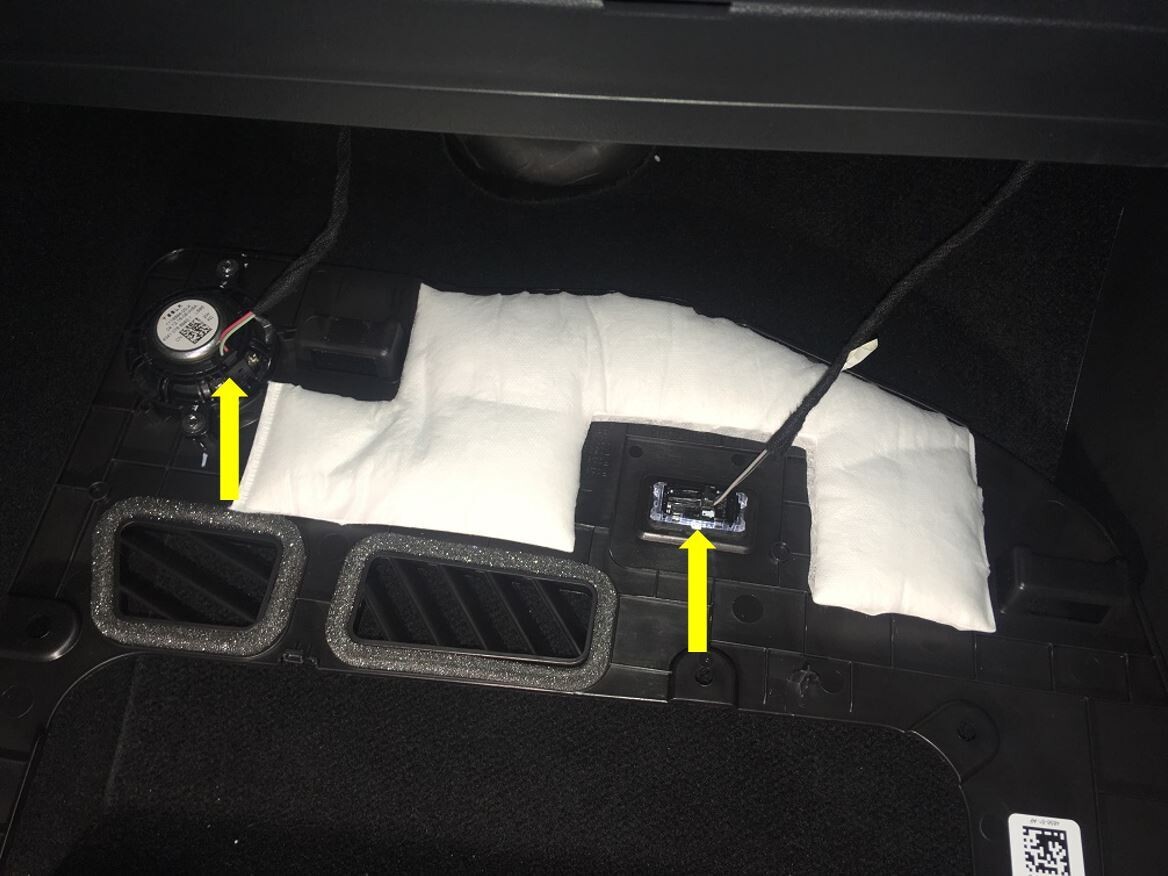
Disconnect RH foot well assembly connectors and remove from vehicle
注2x electrical connectors
-
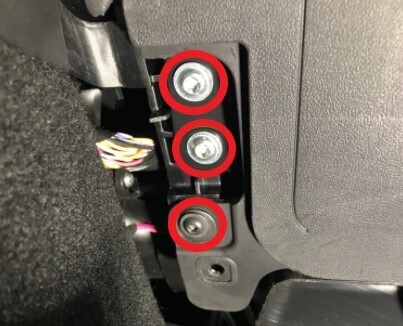
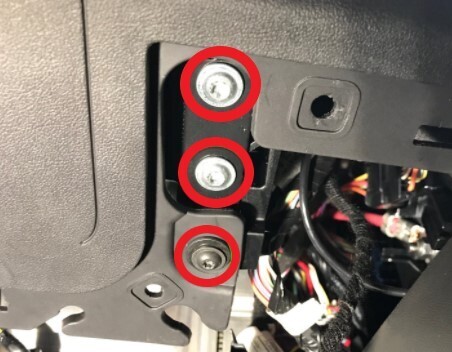
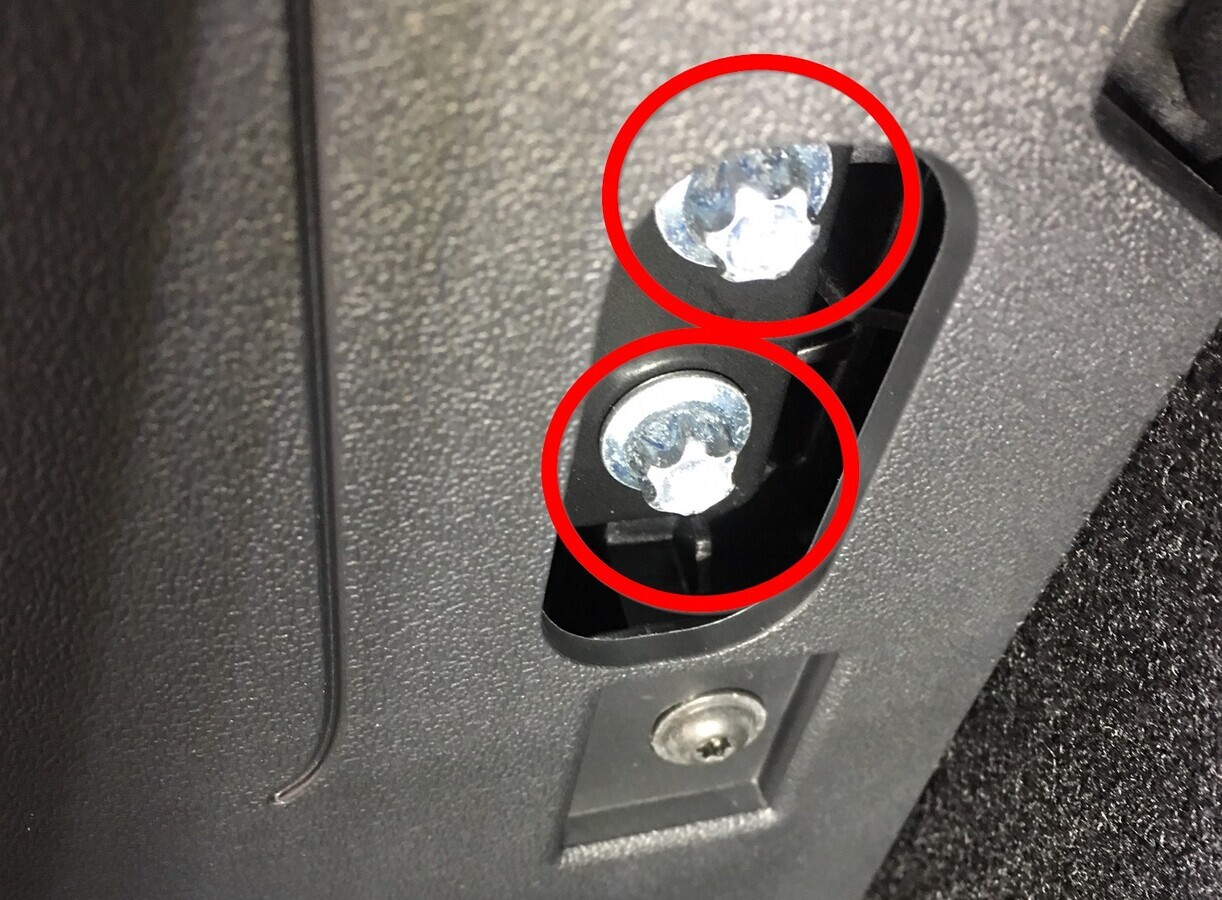
Remove bolts securing passenger knee air bag onto vehicle
注4x patch bolts, T30, 8 Nm, Discard after removal, 2x screws, T20, 2 Nm, 1x push clip, Newer vehicles have 4x E10 patch bolts
-
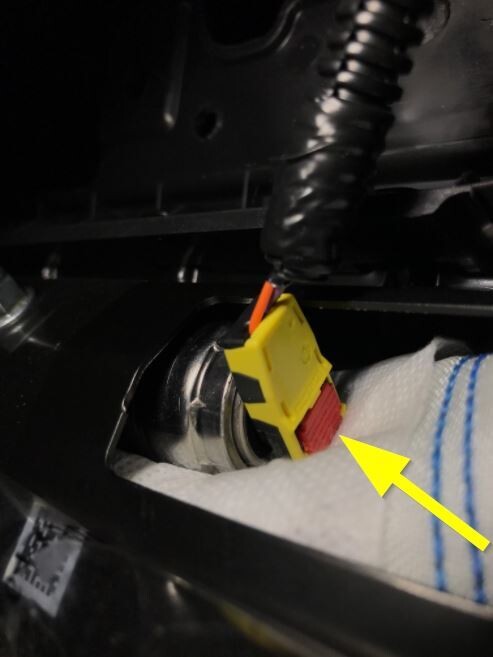
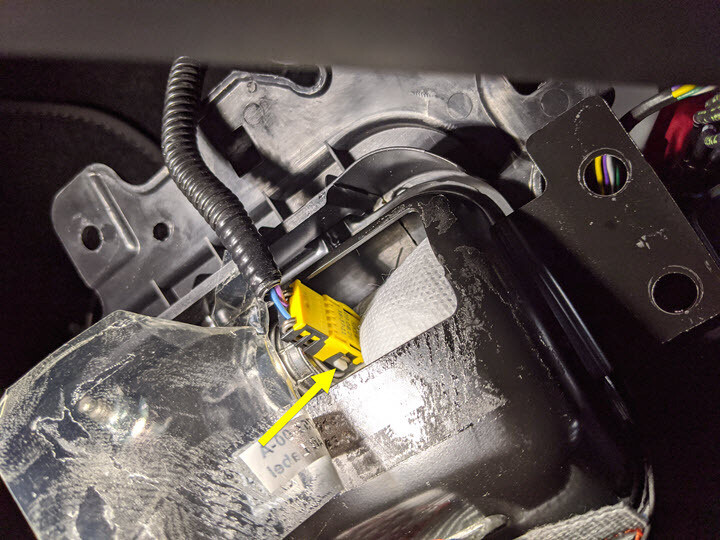
Remove passenger knee air bag from vehicle
注1x connector, Release locking tab, Connector release may vary
-
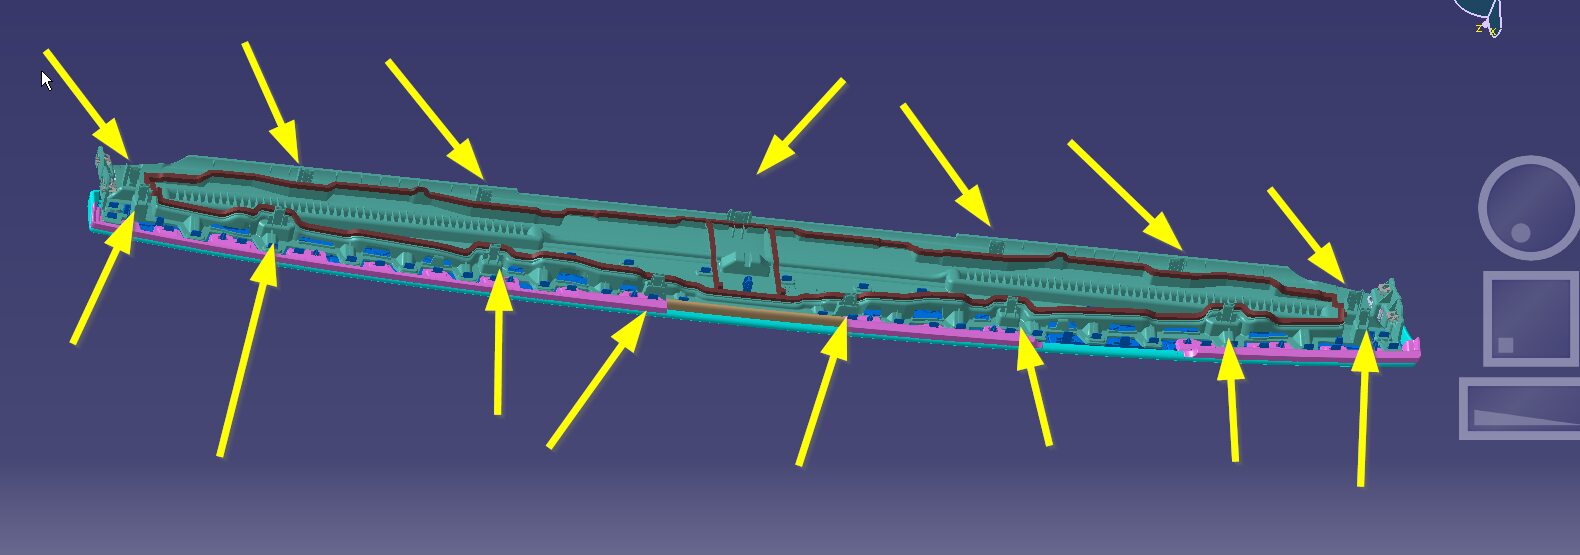
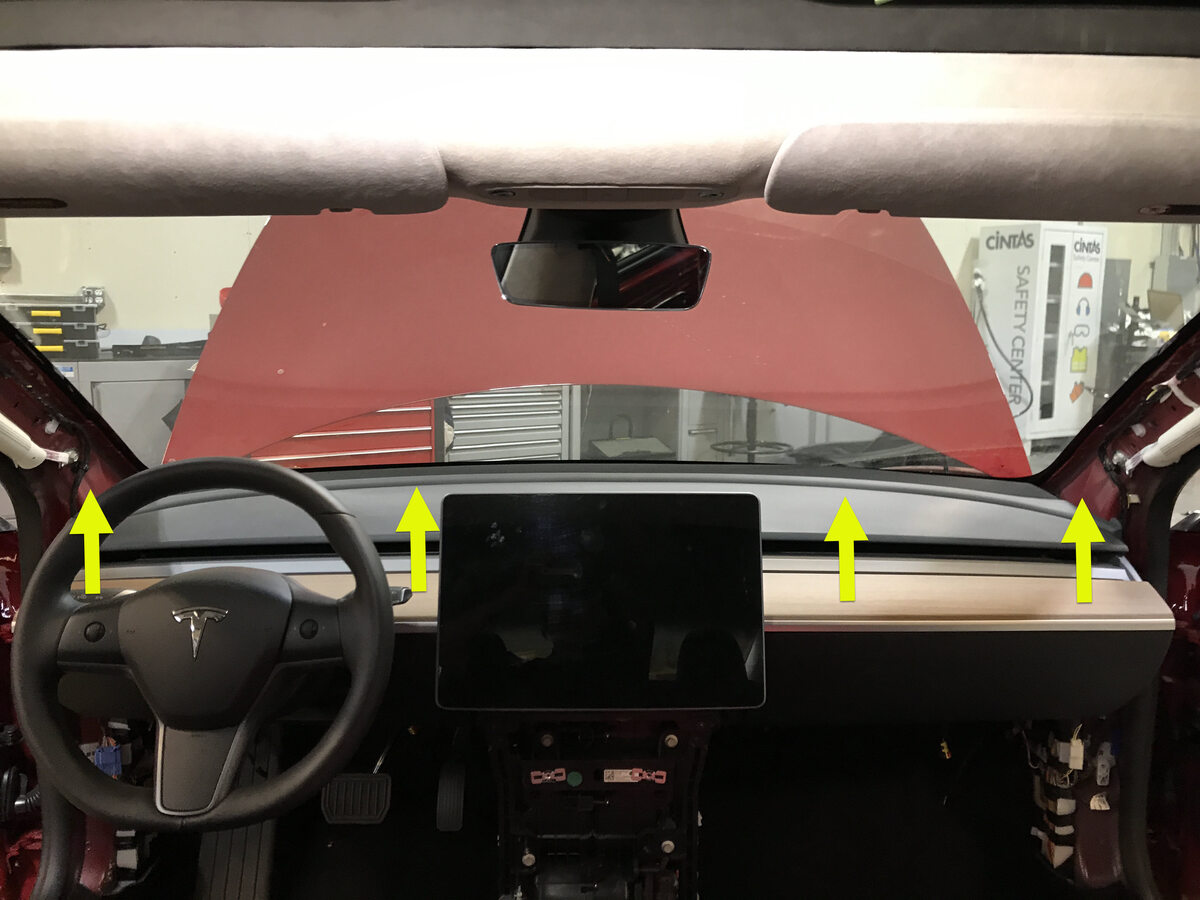
Remove main decor assembly
注15x clips, Entire decor does not need to come off for glove box removal, If you lift RH side of decor then you will have access to 3x torx screws securing top of glove box, Replace securing clips as needed
-
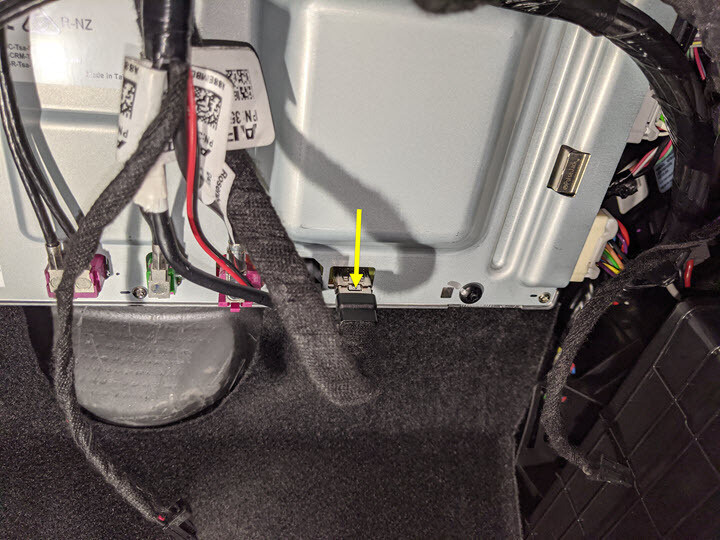
Disconnect glove box USB cable from car computer
注1x connector, Depress latch on top of USB cable to release internal latches, then release from car computer
-
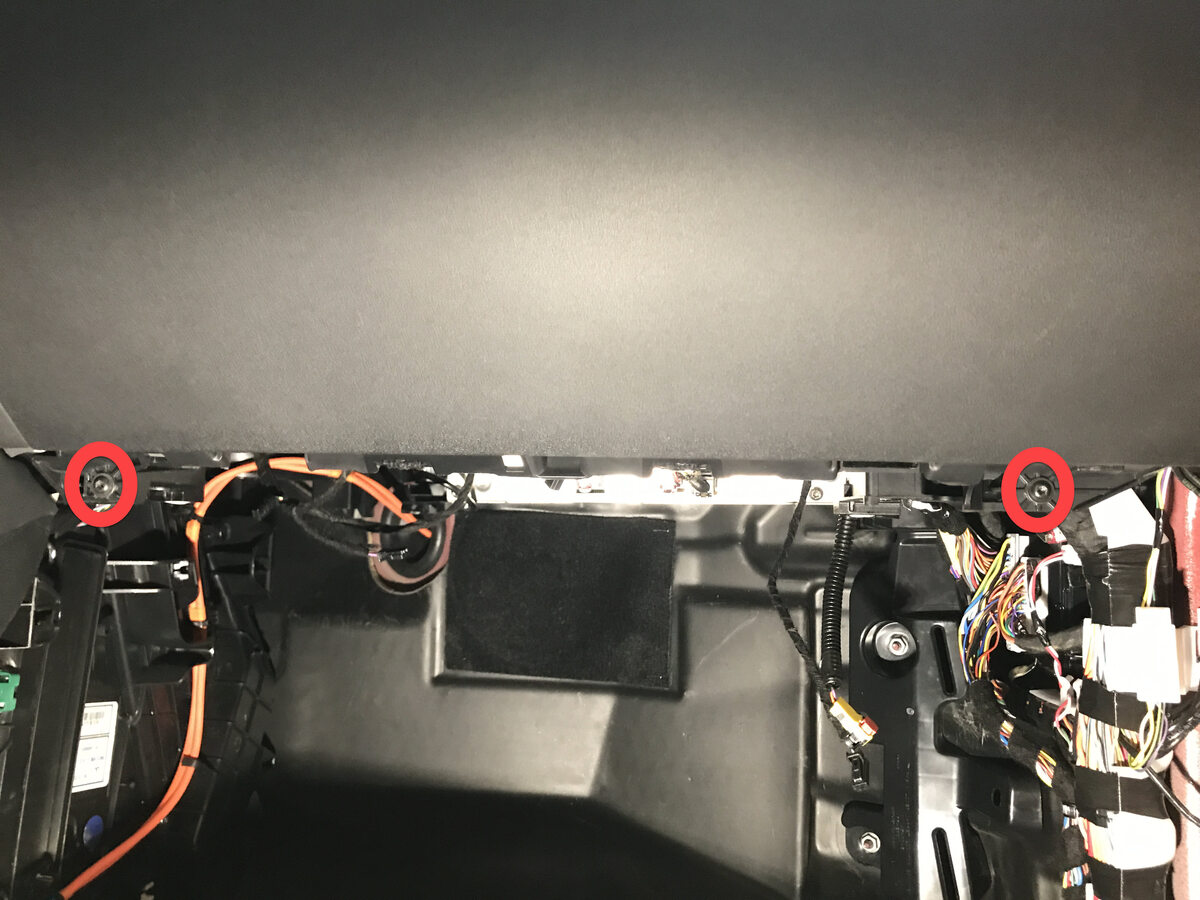
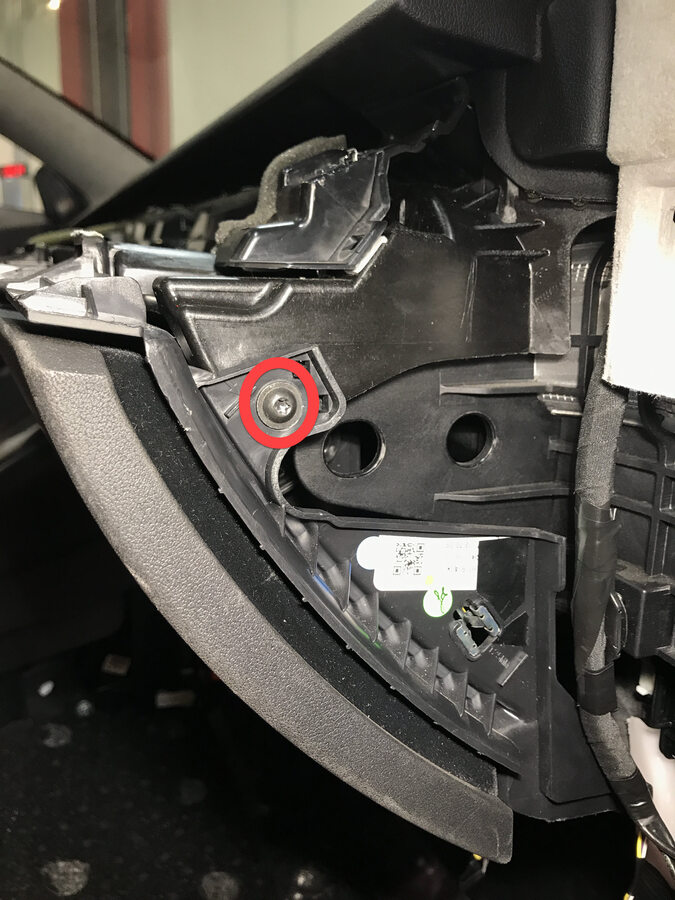
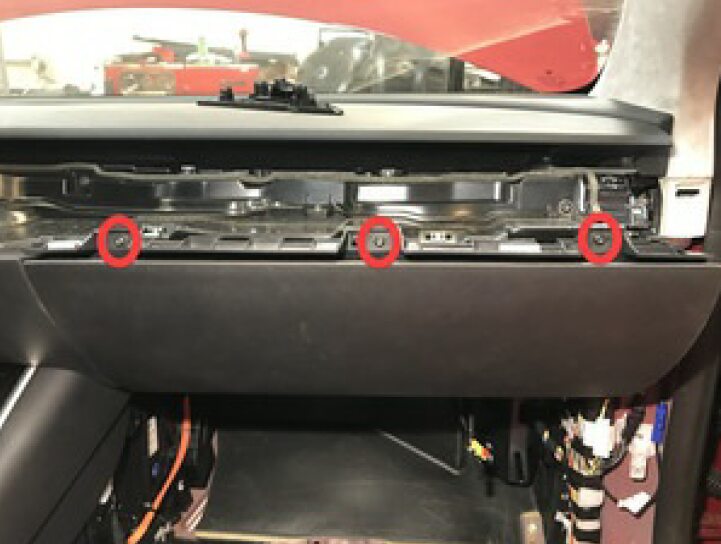
Remove screws securing glove box assembly to IP carrier
注6x screws, T20, 2.3 Nm
-
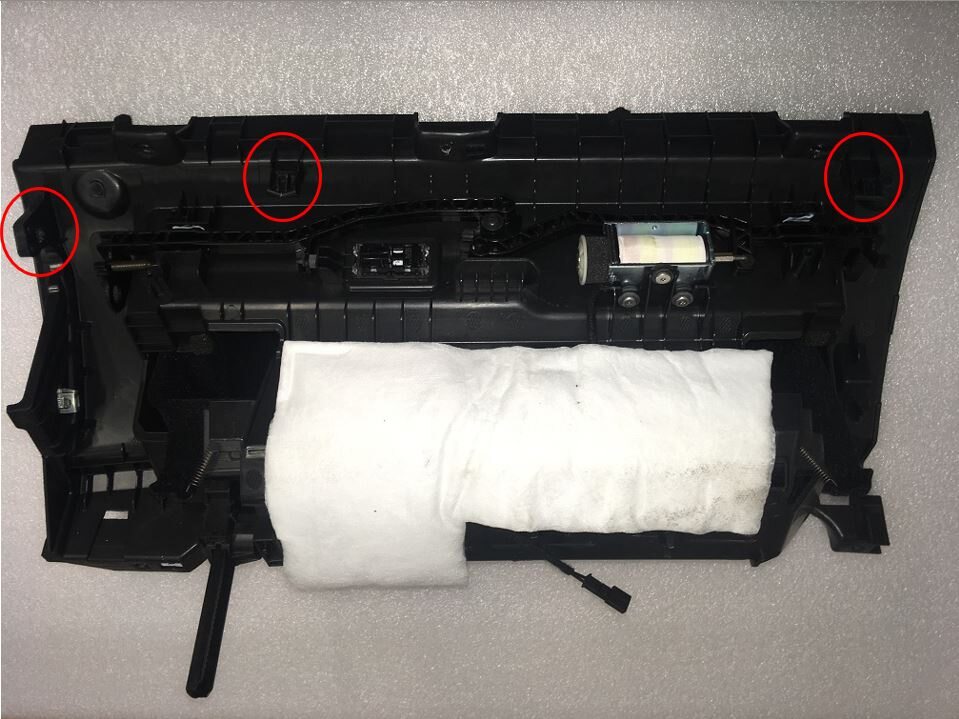
Remove glove box from IP carrier
注3x clips
-
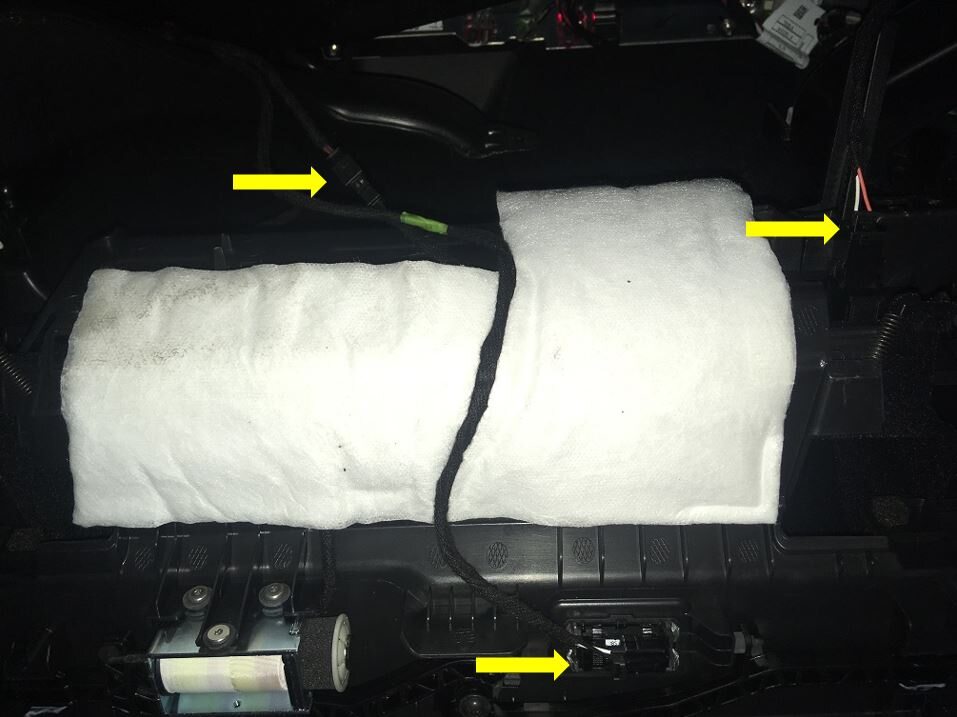
Disconnect glove box assembly connectors
注3x electrical connectors
-
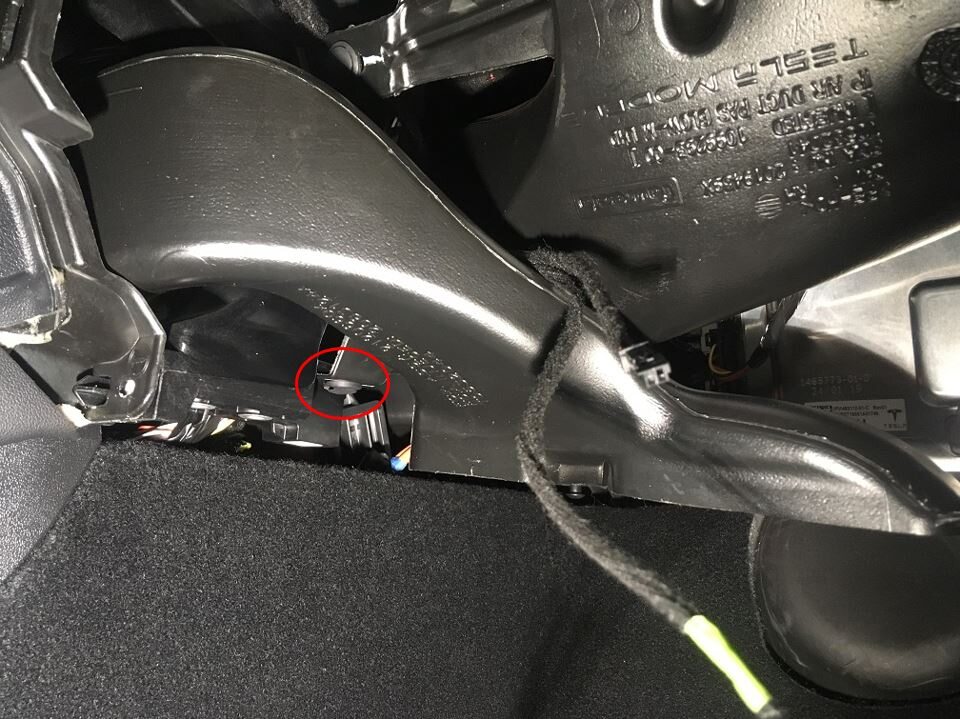
Remove passenger footwell air duct
注1x push clip
-
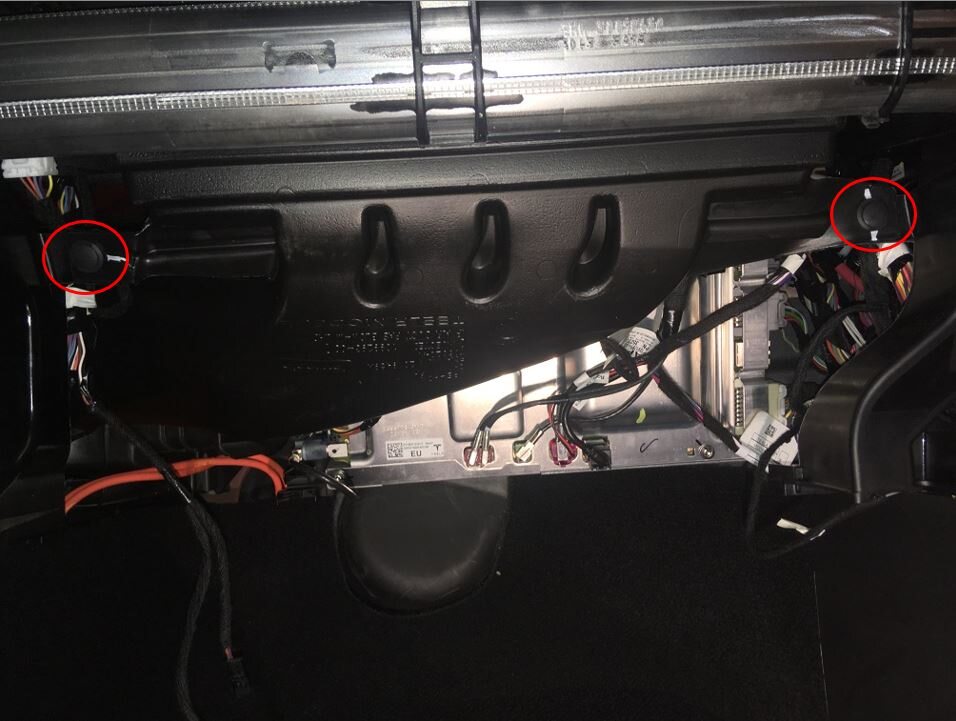
Remove RH IP air wave duct
注2x push clips
-
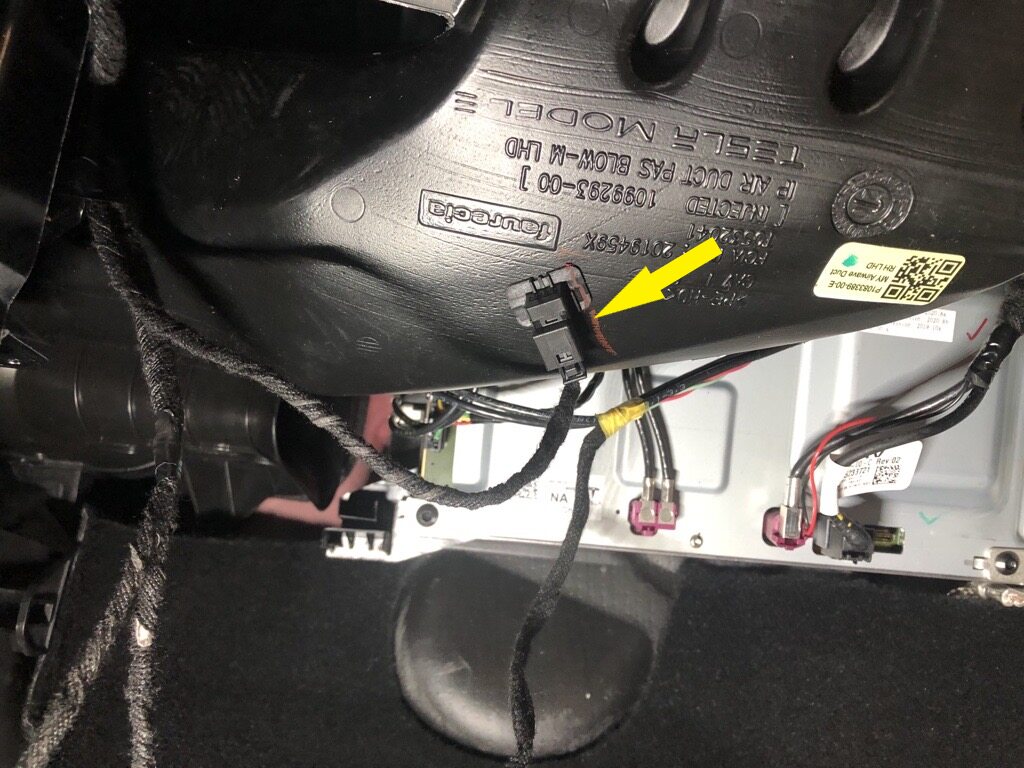
Disconnect RH upper duct thermistor from RH IP air wave duct
注1x connector
-
Release spring clip securing driver air bag assembly to steering wheel and pull driver air bag assembly away from steering wheel
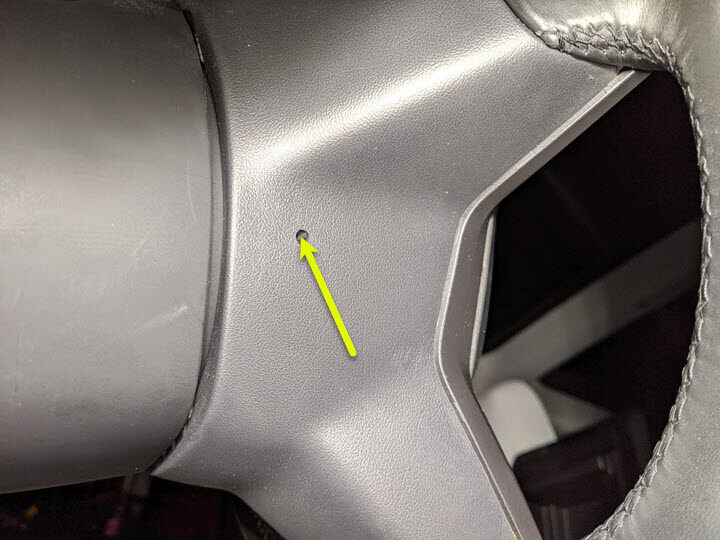
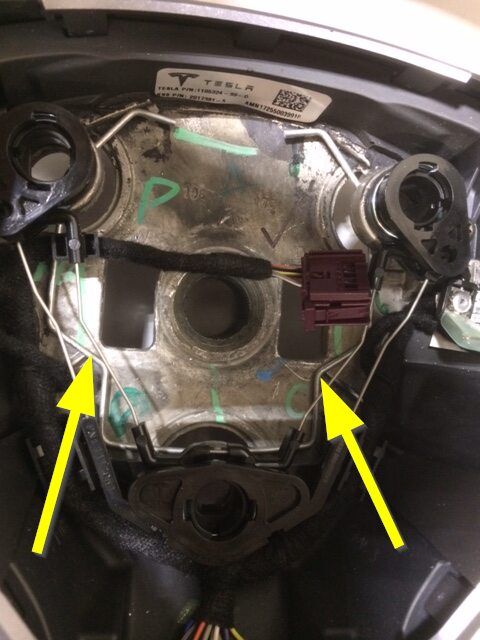
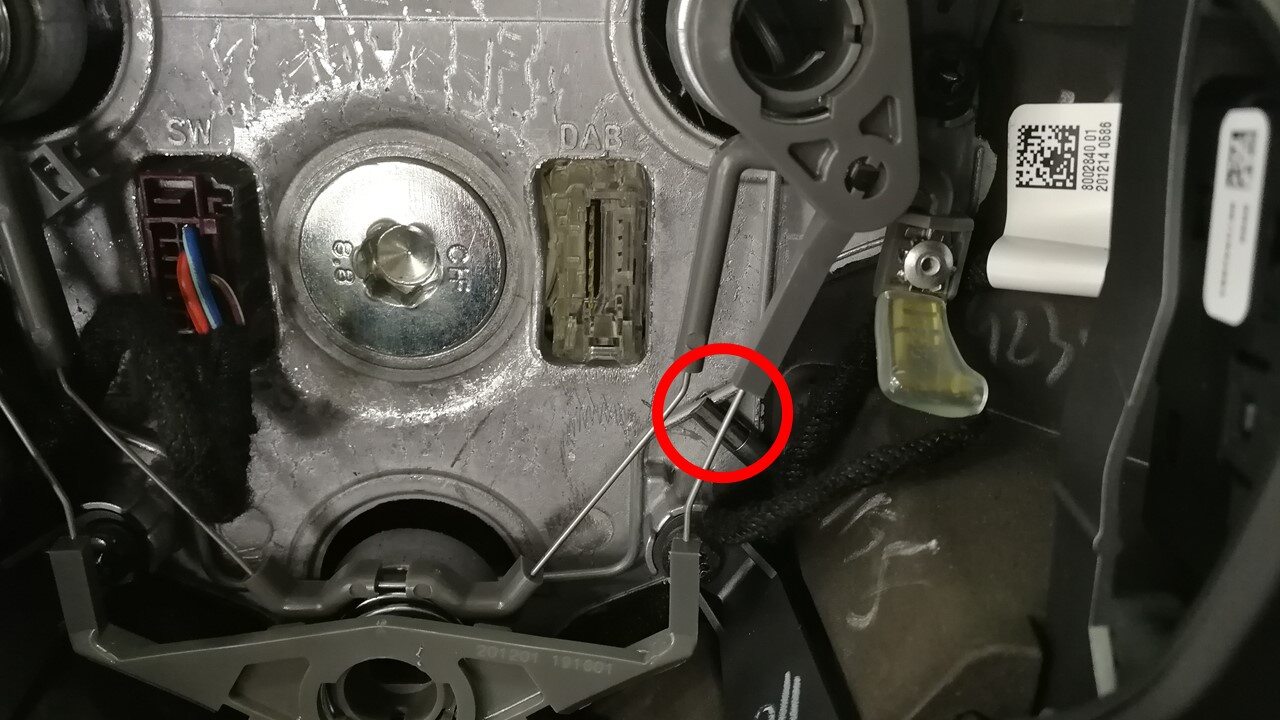
注2x spring clips, 3x datums, Press the spring simultaneously from two access holes to release, Access holes located at 4 and 8 o’clock position, Do not insert tool too far as air bag connector could be damaged
-
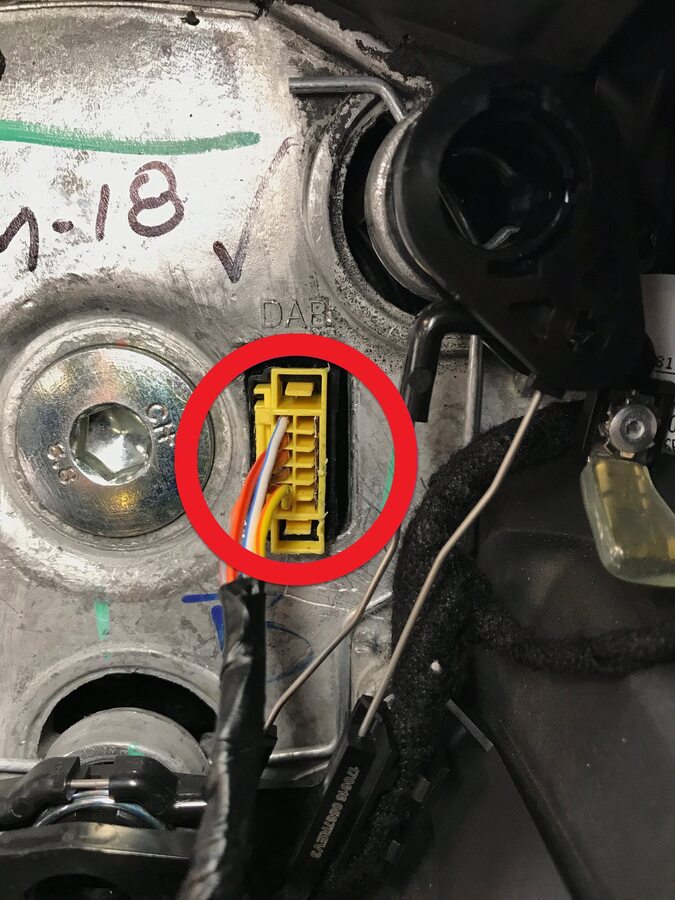
Disconnect driver air bag connector and remove driver air bag assembly
注1x connector
-
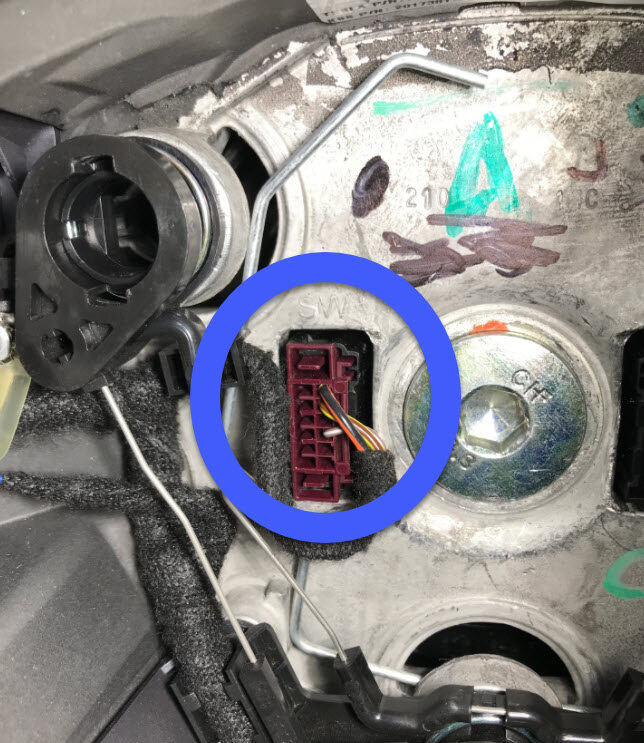
Disconnect steering wheel connector
注1x connector
-
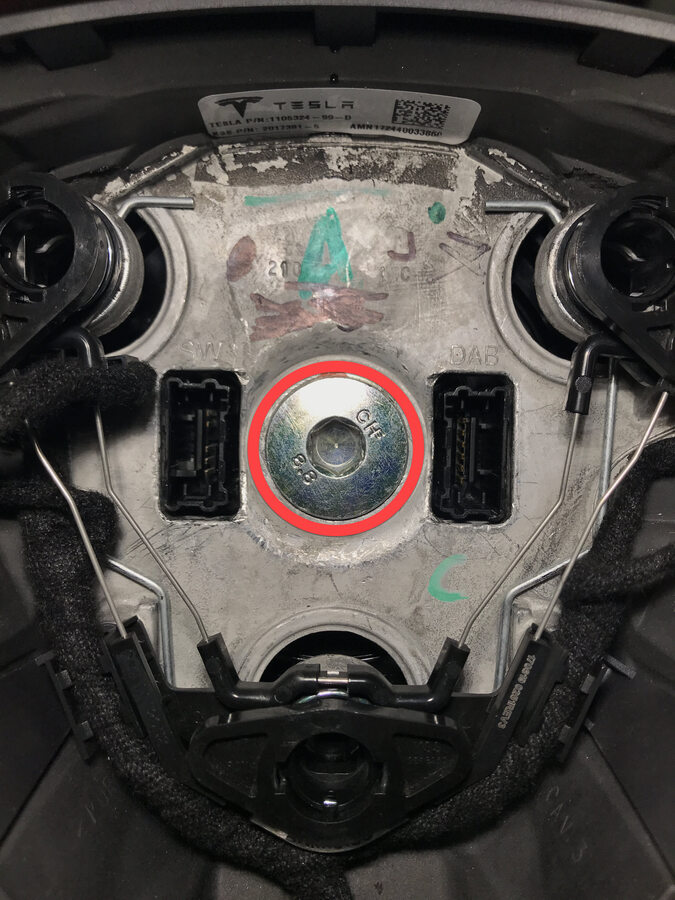
Remove bolt securing steering wheel to steering column
注1x patch bolt, 10mm hex, 80 Nm, Discard after removal, Counter hold the steering wheel when breaking bolt loose
-
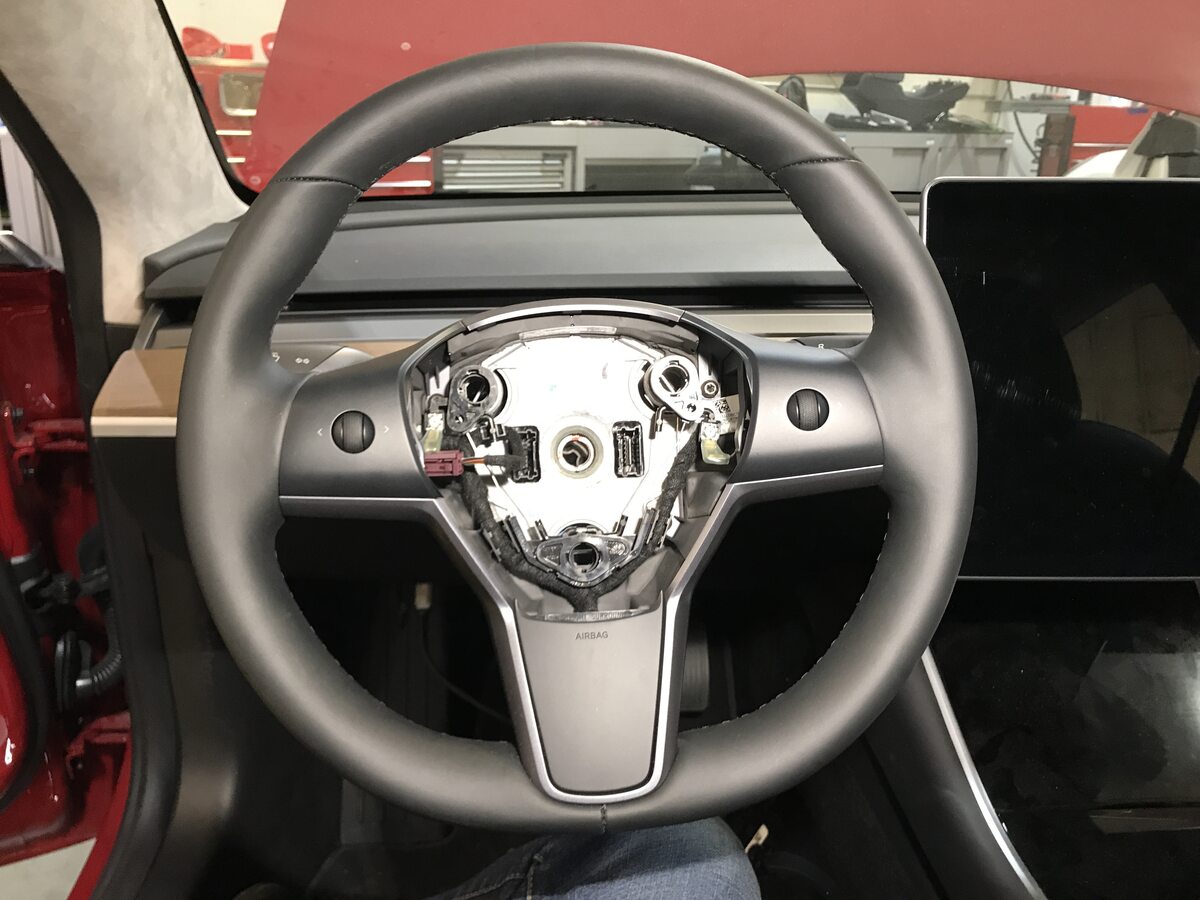
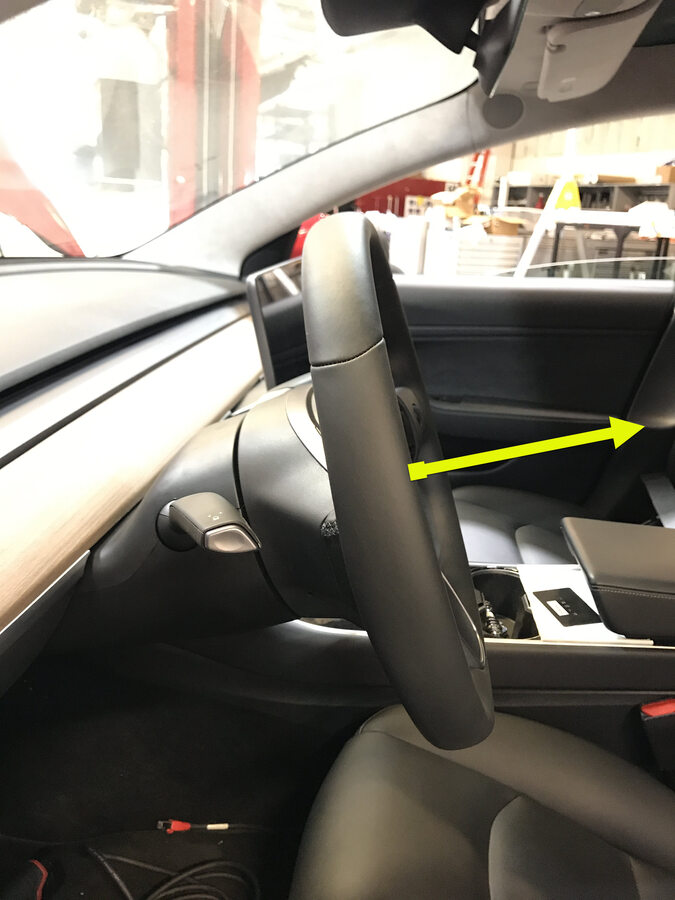
Remove steering wheel from steering column
-
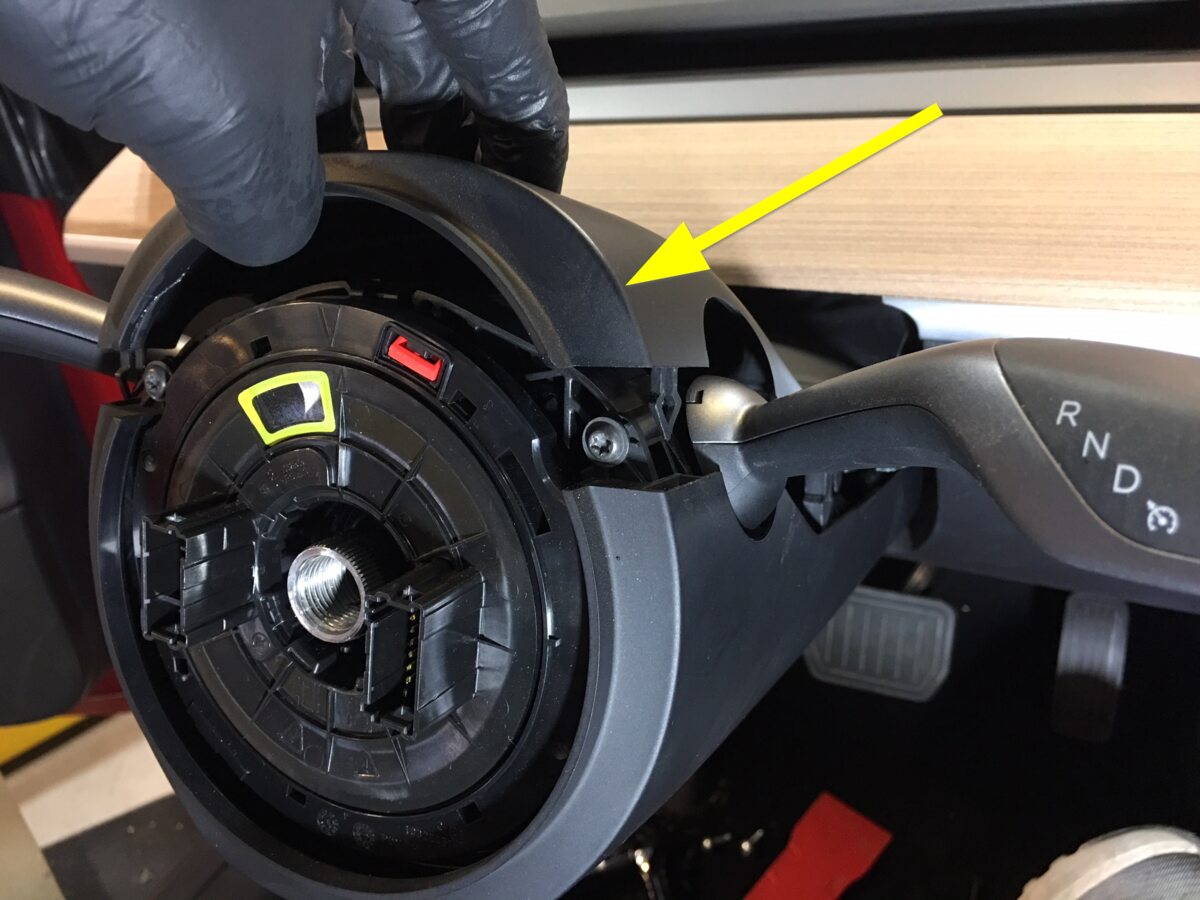
Pull upward to release steering column upper shroud from lower shroud
注4x clips
-
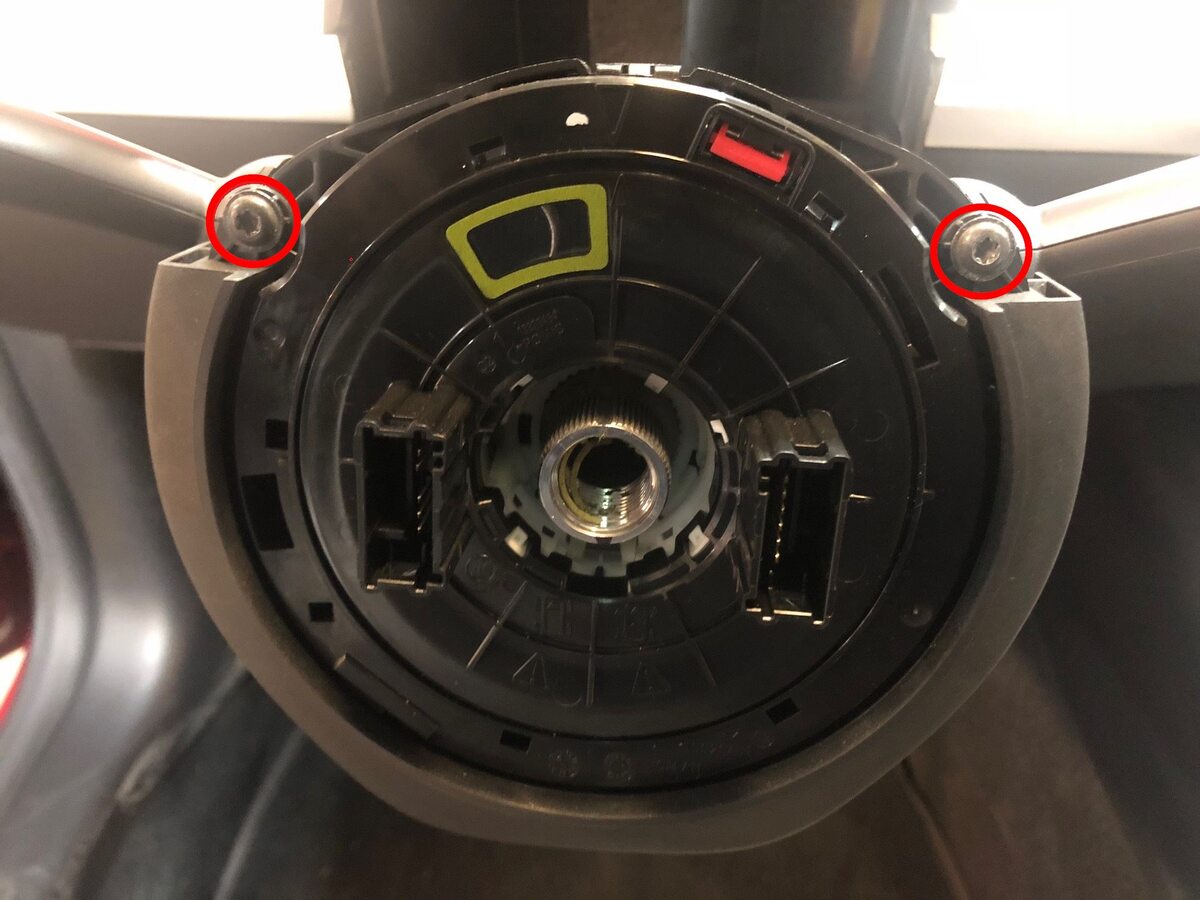
Remove upper screws securing lower shroud to steering column
注2x screws, T20, 1.5 Nm
-
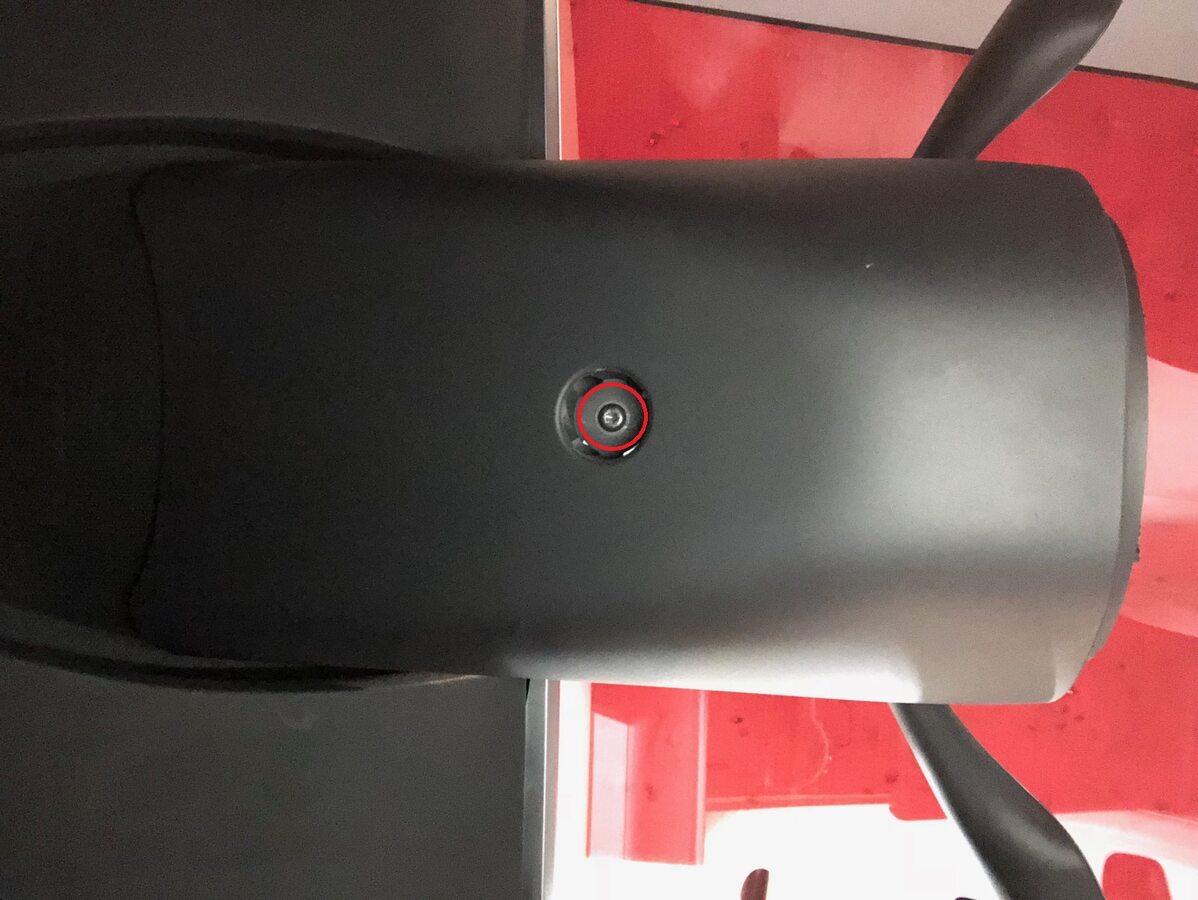
Remove lower screw securing lower shroud to steering column
注1x screw, T20, 1.5 Nm
-
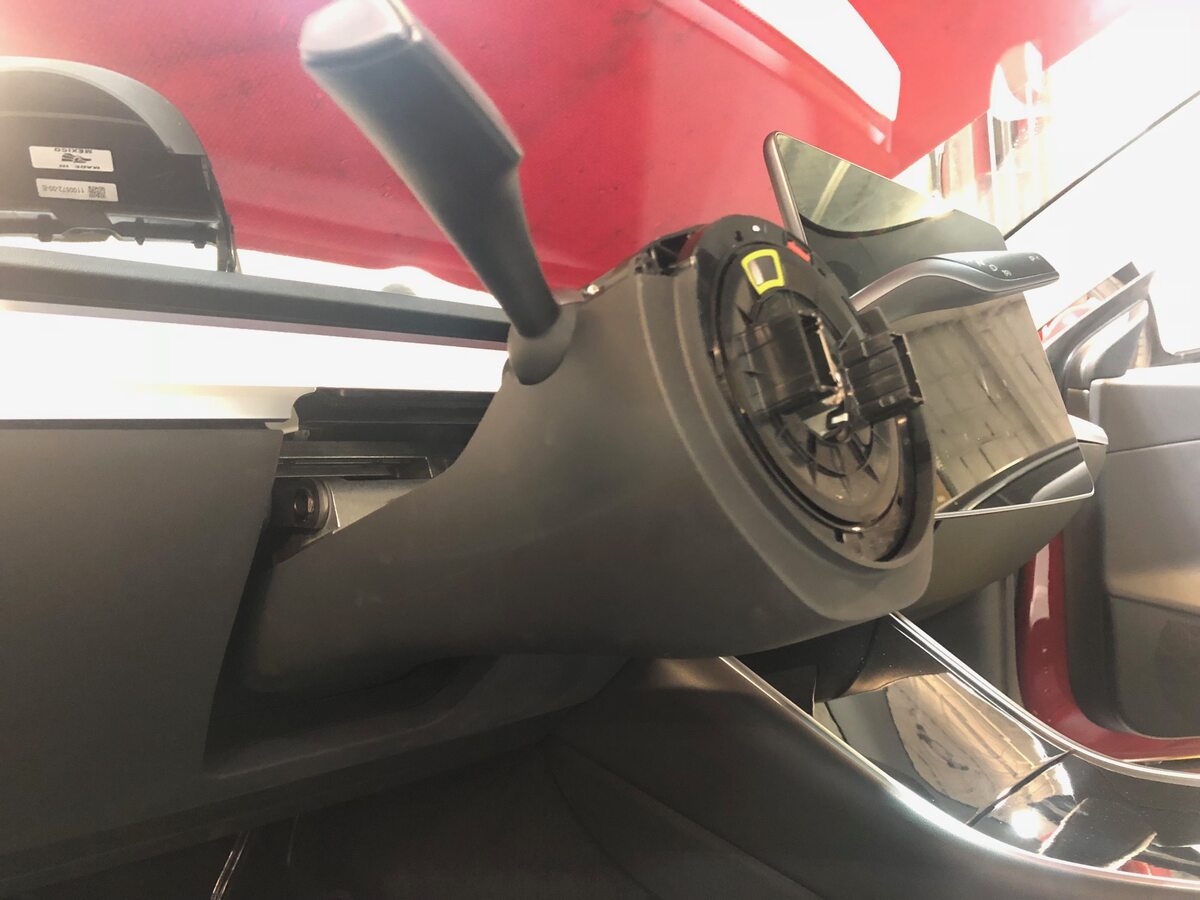
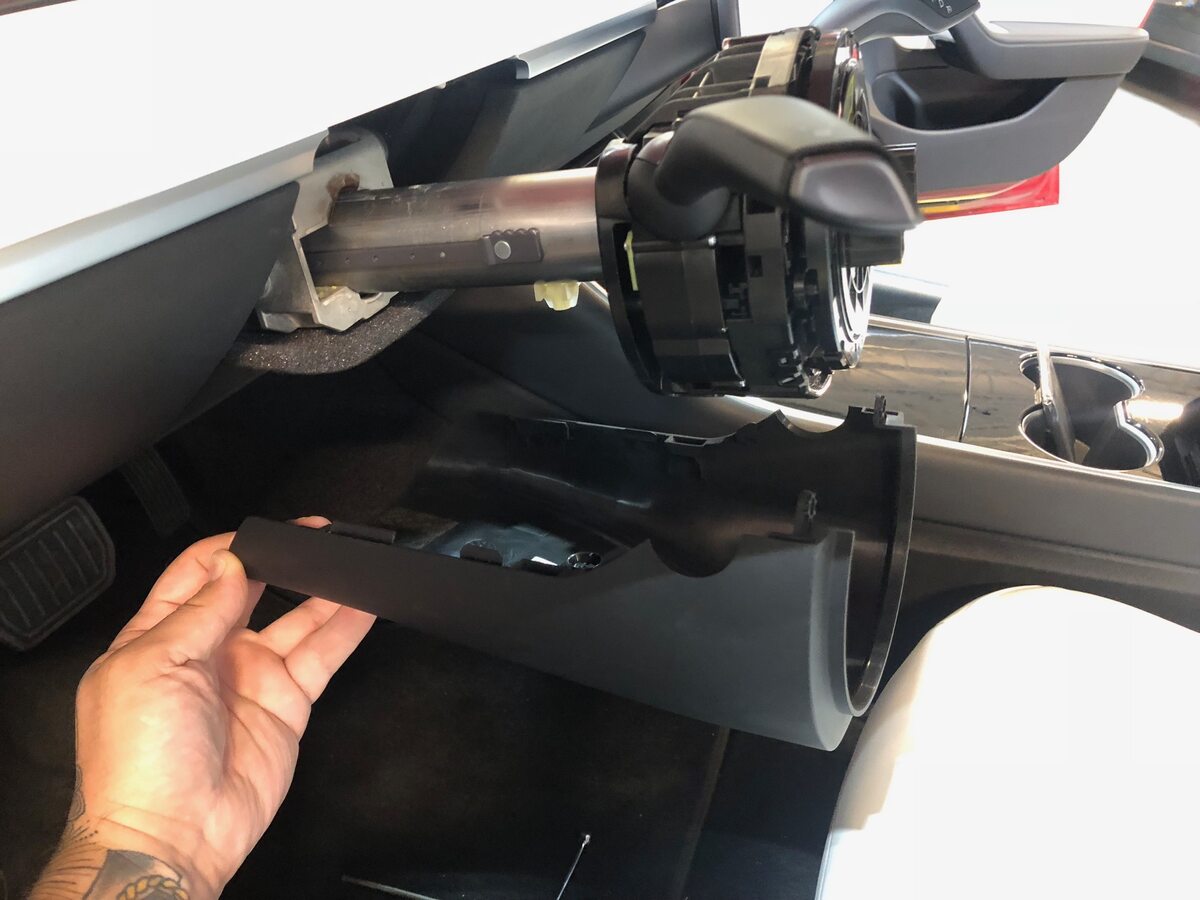
Remove lower shroud from steering column
-
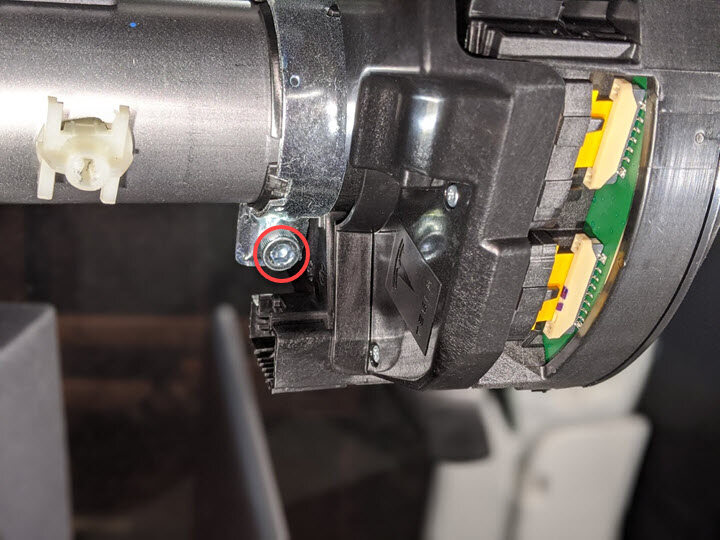
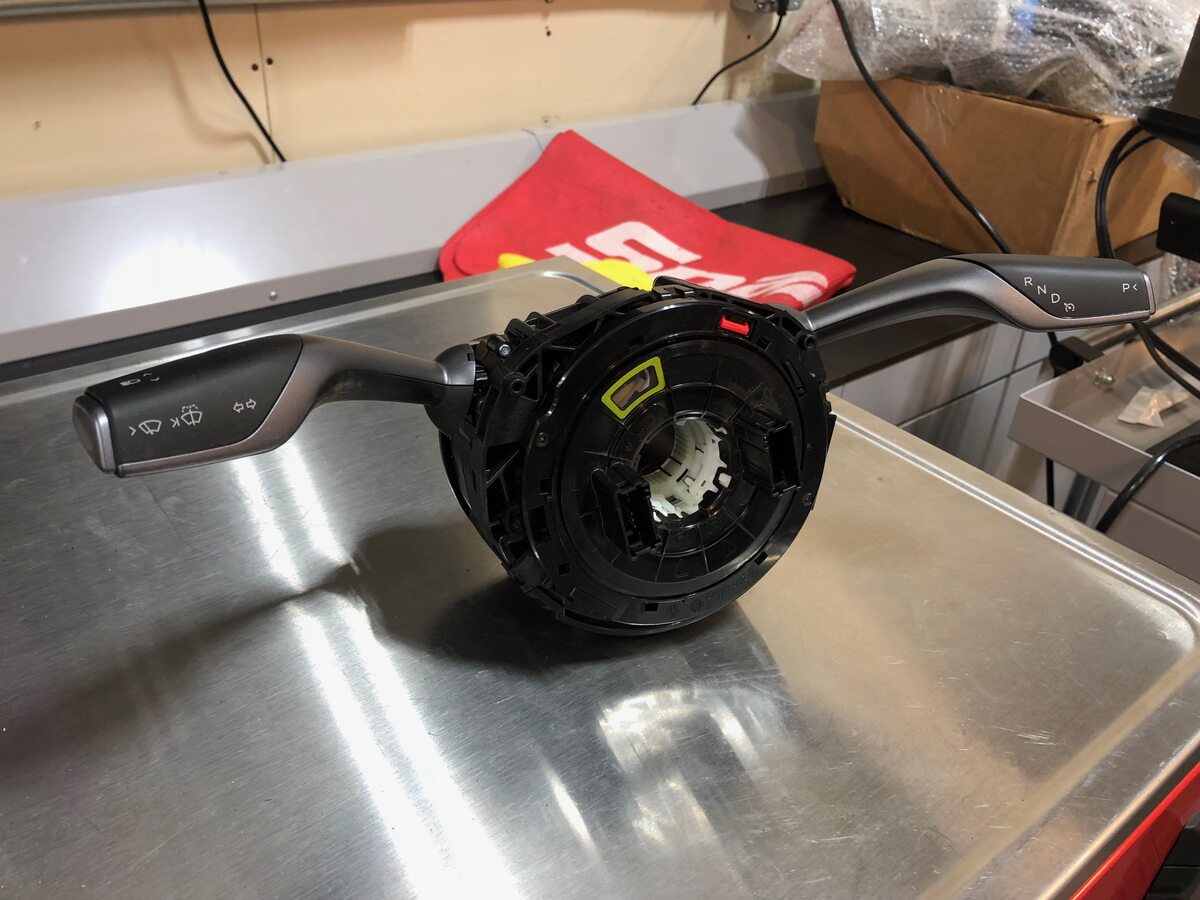
Remove bolt securing SCCM to steering column
注1x bolt, 5mm allen, 9 Nm
-
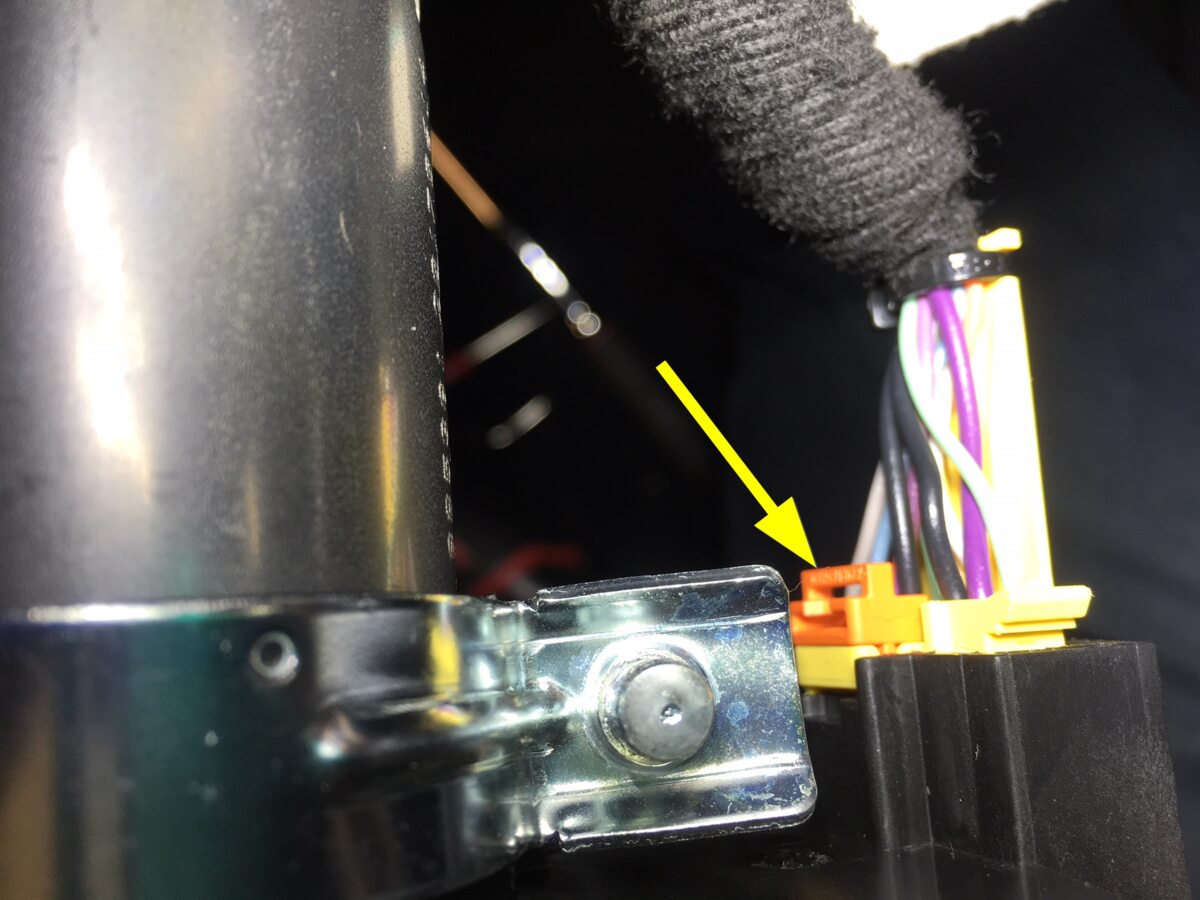
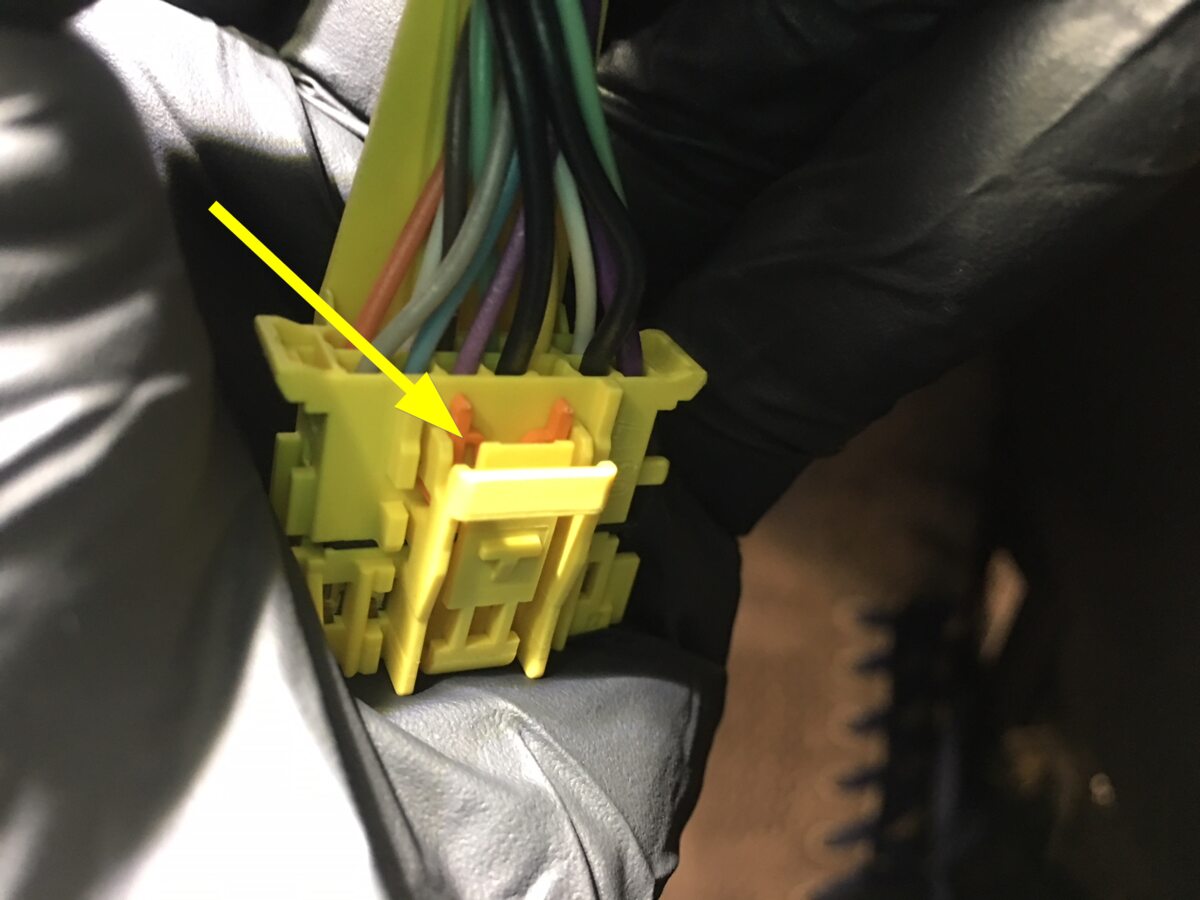
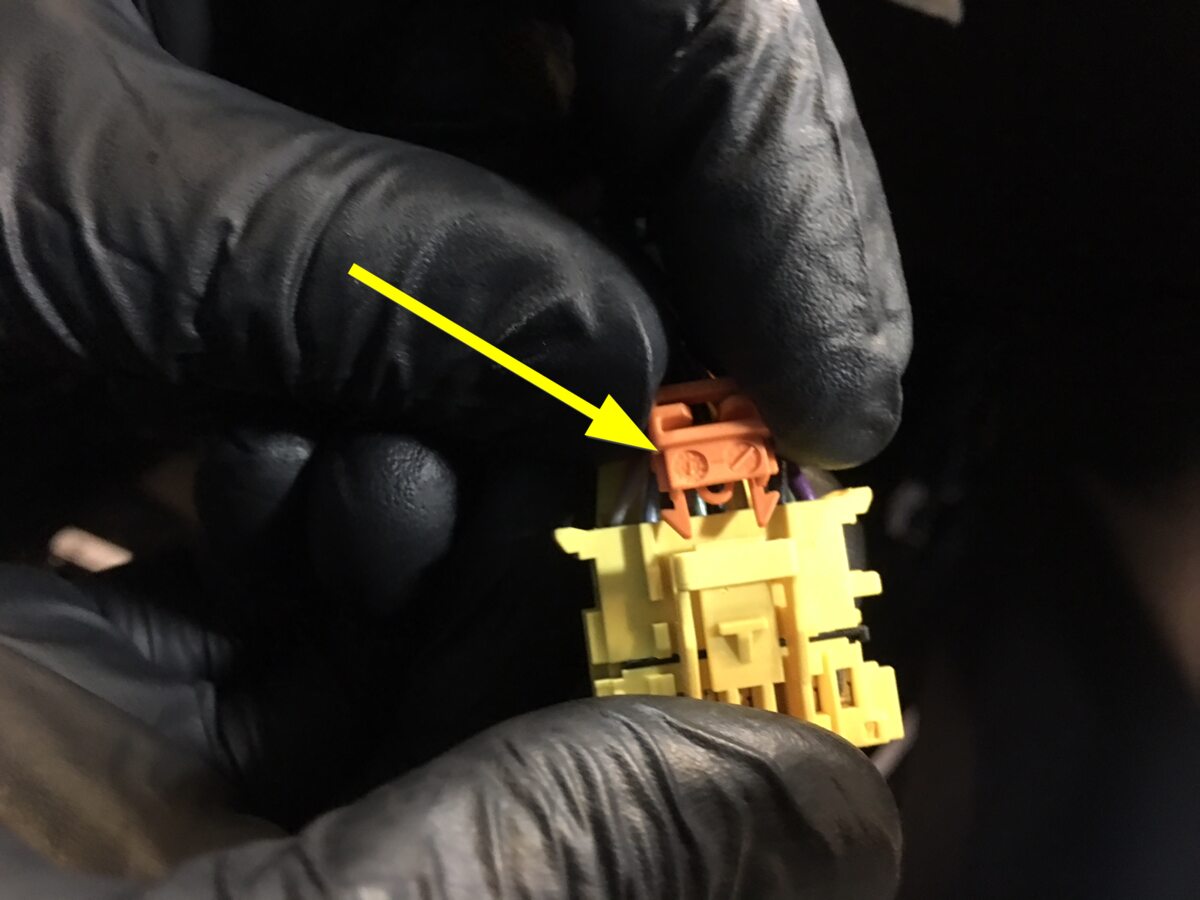
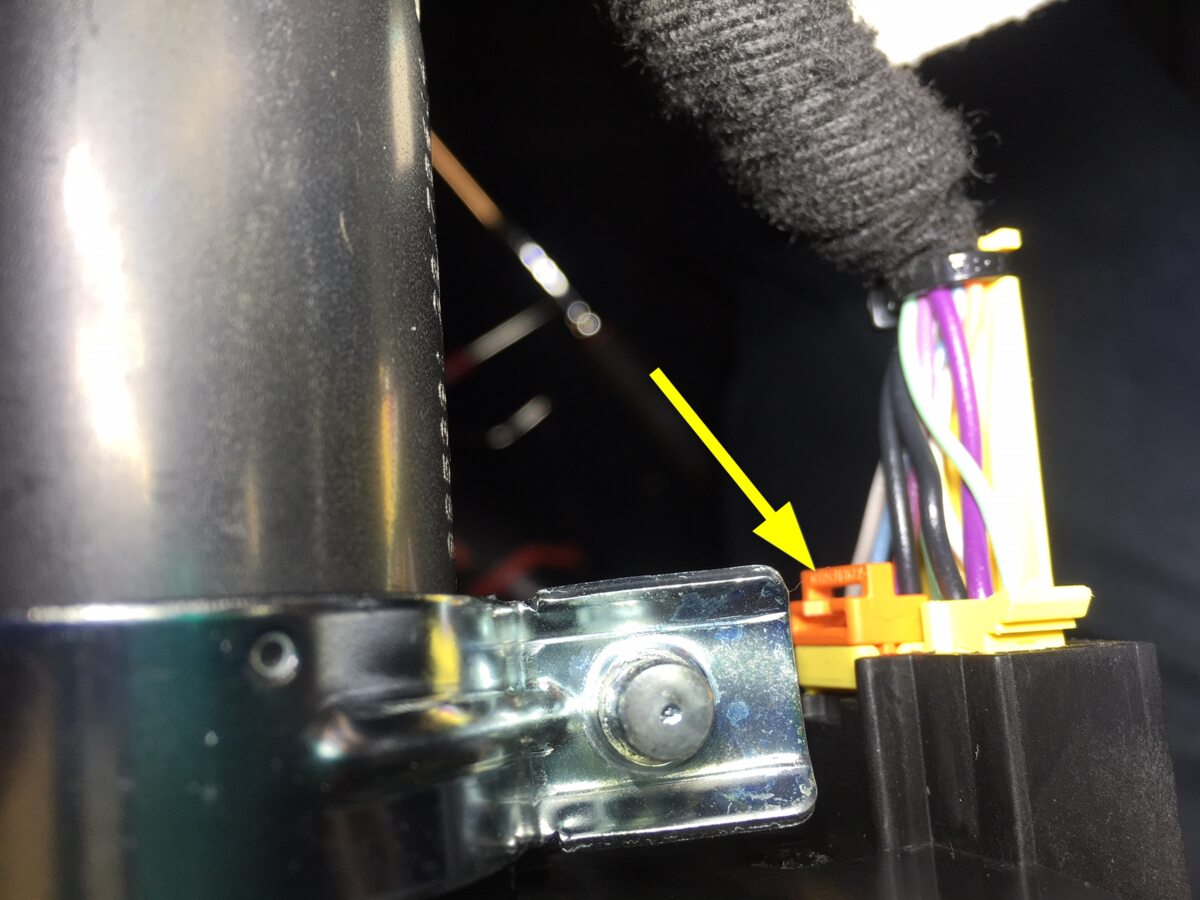
Disconnect steering column control module (SCCM) assembly connector
注1x connector, Remove retaining clip on the connector, release connector, then remove the remaining broken clip from connector, Discard retaining clip after removal, Originally installed clip is black, Replacement clip is orange
-
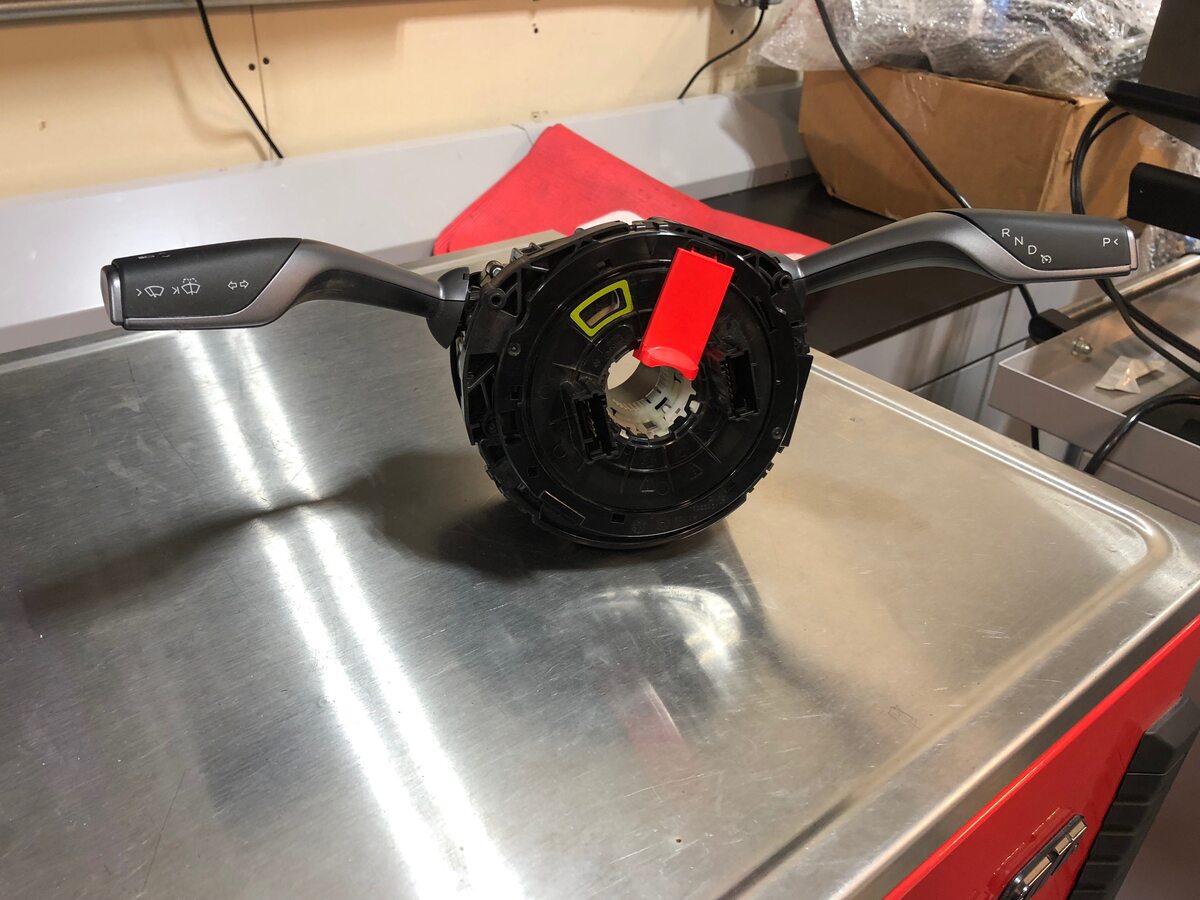
Remove SCCM from steering column
-
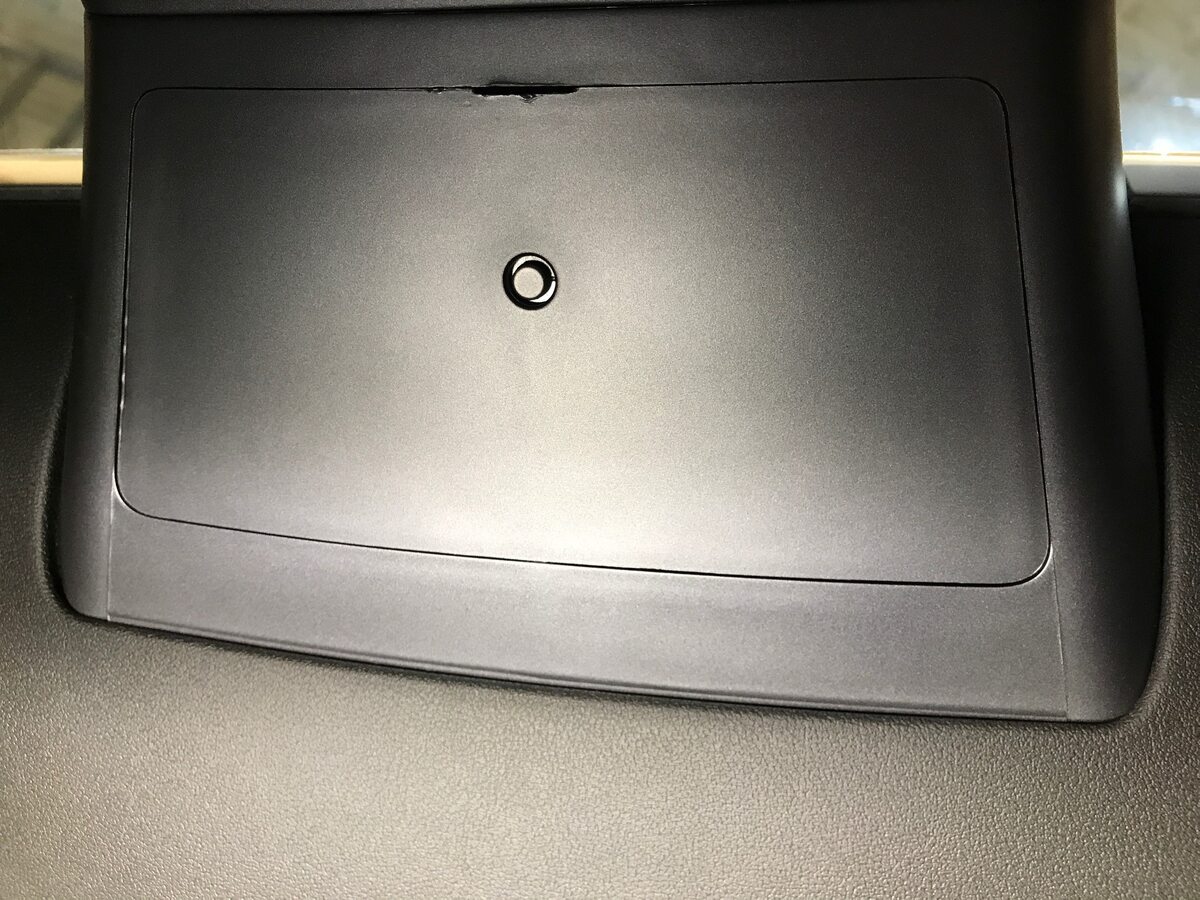
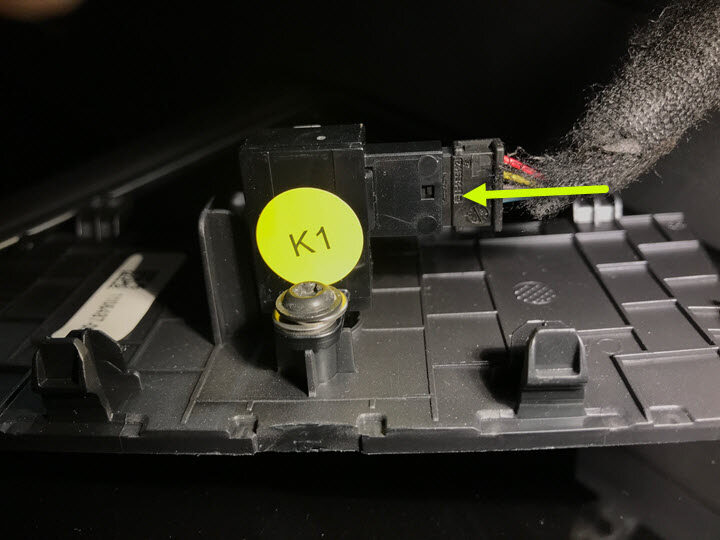
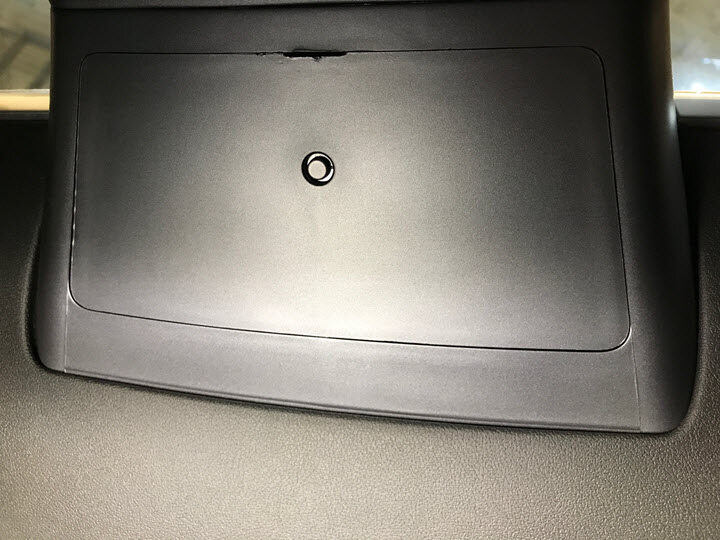
Release IP service panel from IP and disconnect temperature sensor connector
注4x clips, 4x tabs, 1x connector
-
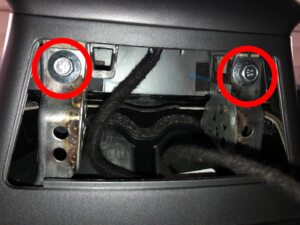
Remove bolts securing center display to IP carrier
注Vehicle may be equipped with either: 2x patch bolts, T30, 12 Nm or 2x patch bolts, 10mm, 16 Nm, Discard after removal, Slide towards rear of vehicle to remove
-
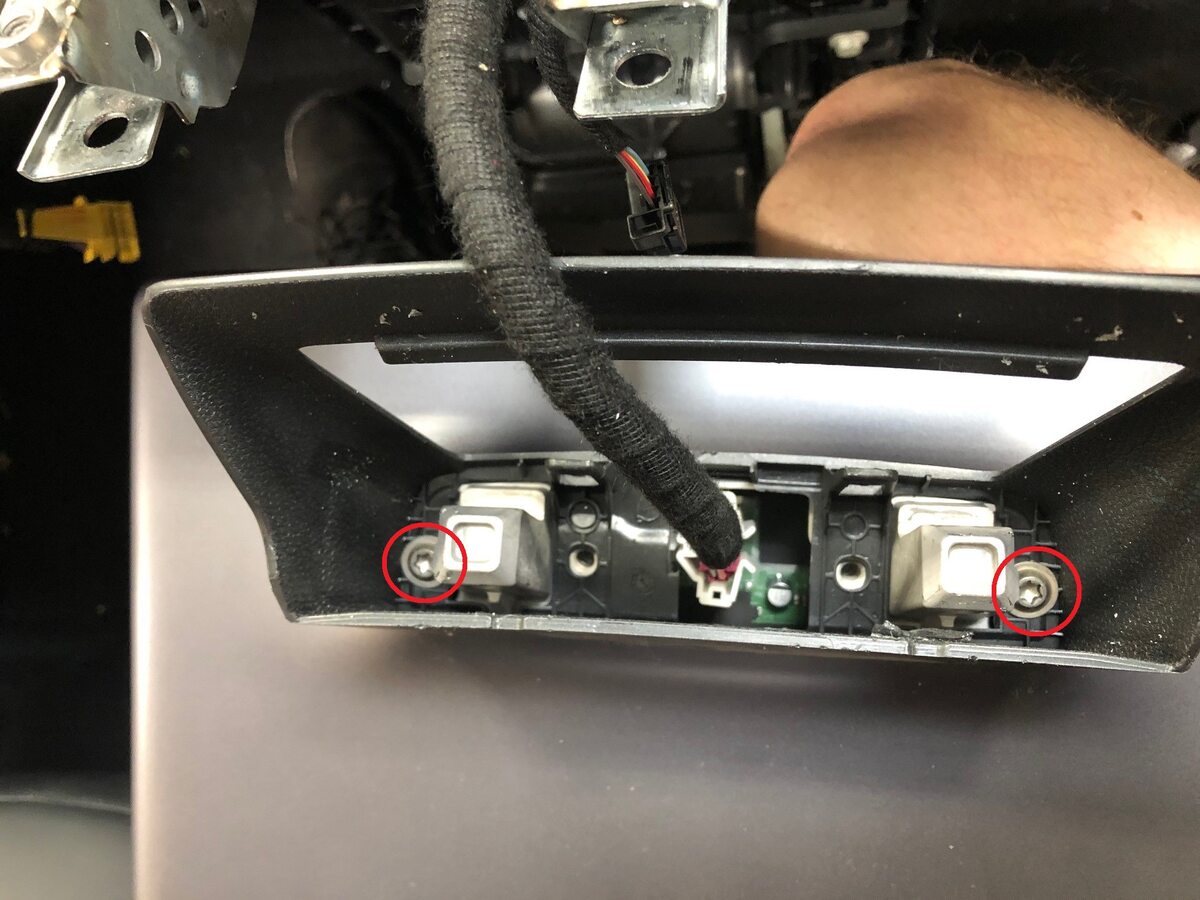
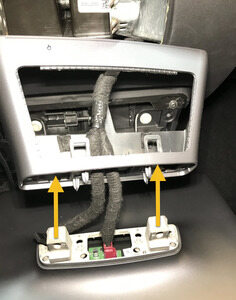
Remove bolts securing housing neck to center display and slide away from display
注2x bolts, T30, 3 Nm, Number of fasteners on older vehicles may vary
-
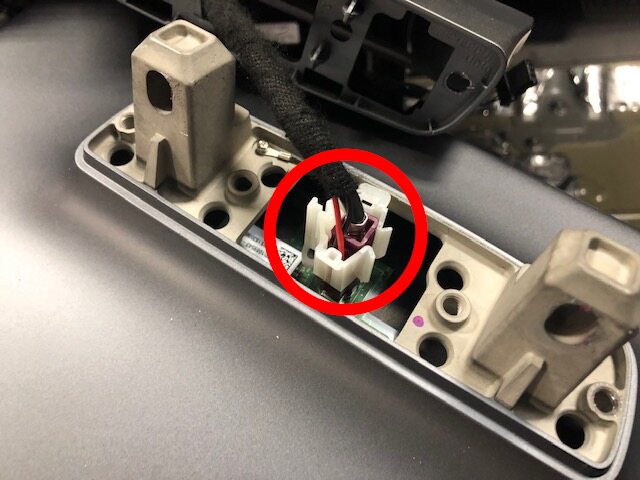
Remove retaining clip from display connector
注1x clip
-
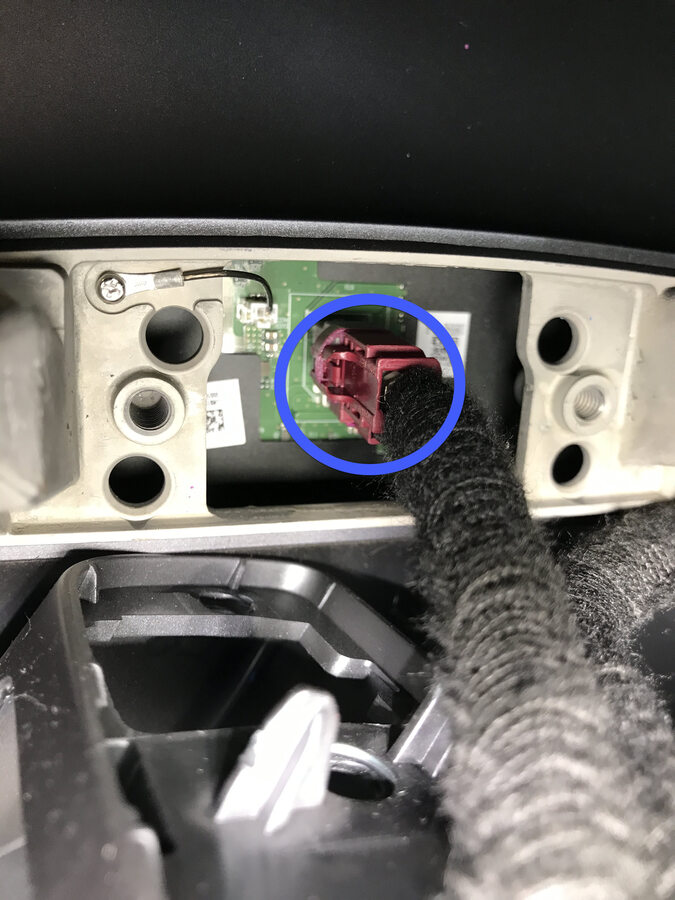
Disconnect harness connector from center display
注1x connector
-
Remove center display from vehicle
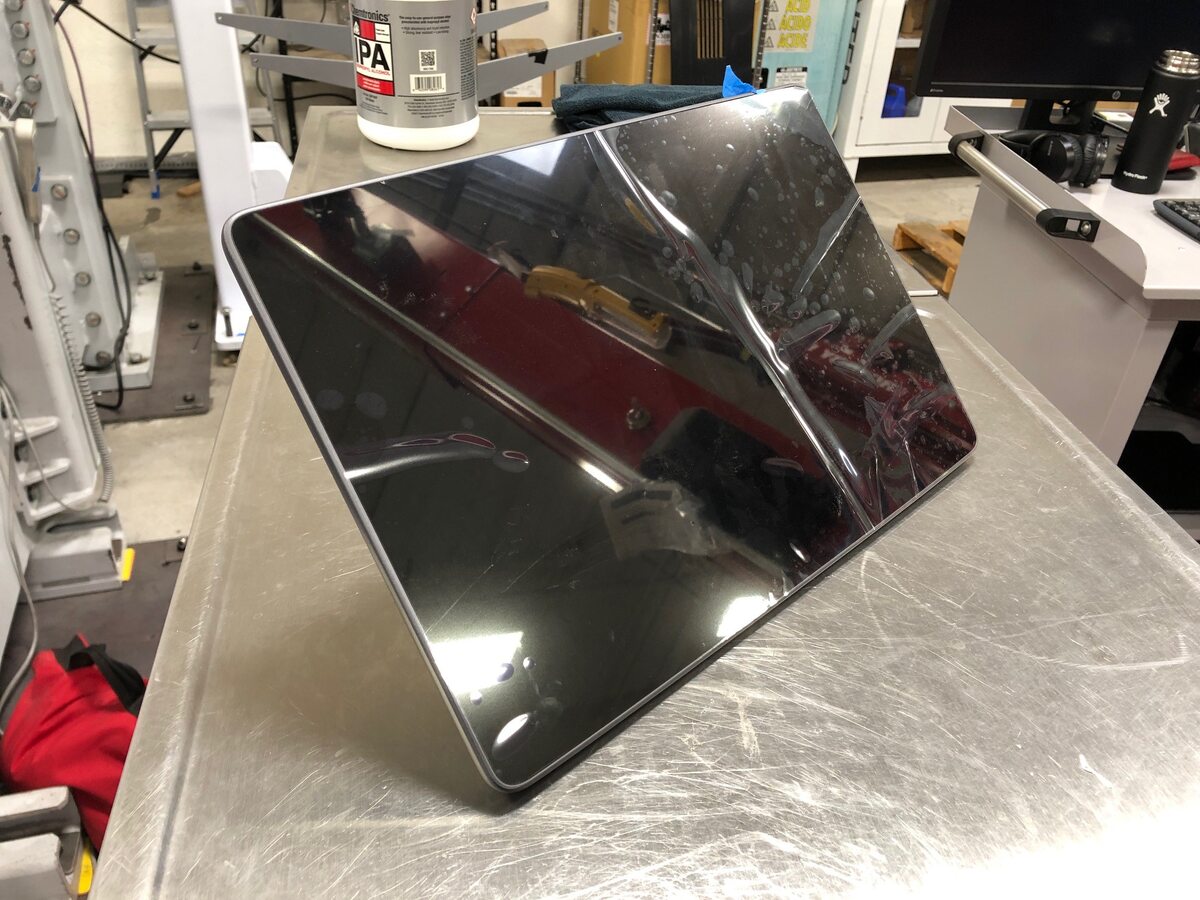
-
Remove center display neck housing from vehicle
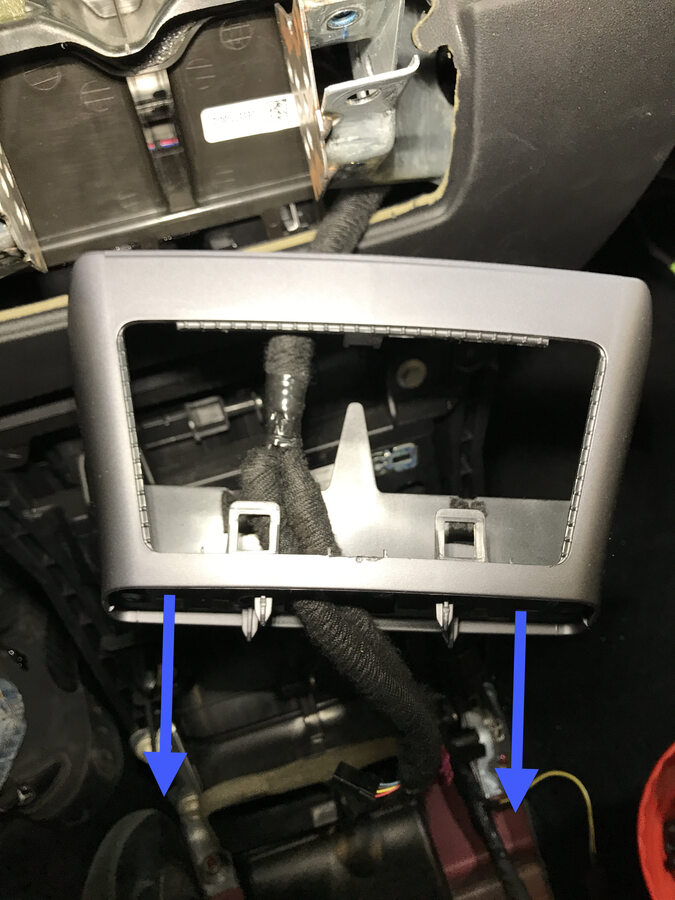
-
Remove screws securing LH side of IP brow finisher
注4x screws, T20, 2.3 Nm, Fastener count may vary, Older production vehicles may have 5x screws

-
Remove screws securing RH side of IP brow finisher
注4x screws, T20, 2.3 Nm, Fastener count may vary, Older production vehicles may have 5x screws
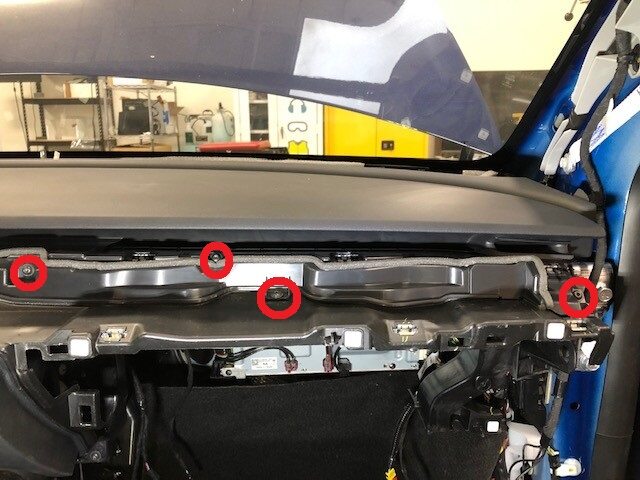
-
Remove IP brow finisher from vehicle
注16x clips, Need to lift top pad up slightly to insert trim tool and release clips, Then slide IP brow finisher towards rear of vehicle
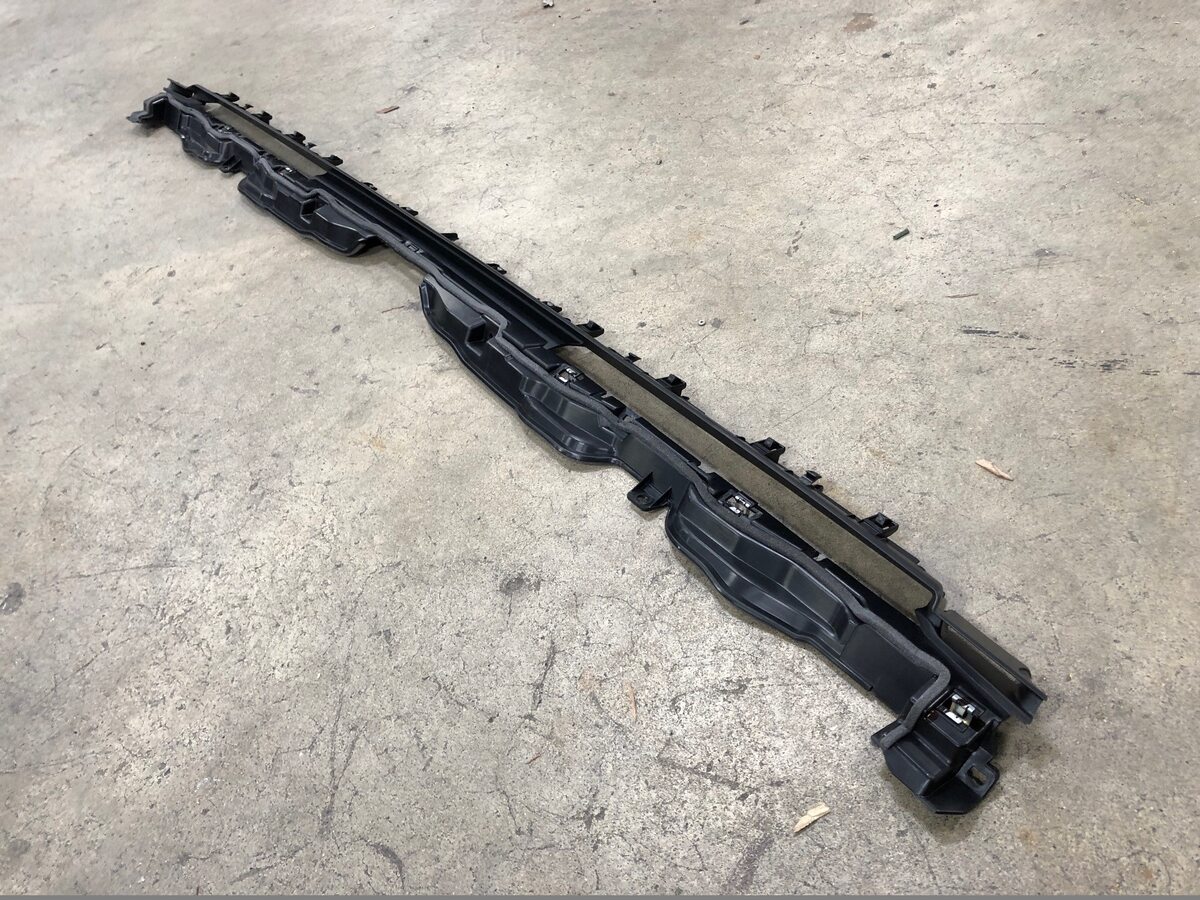
-
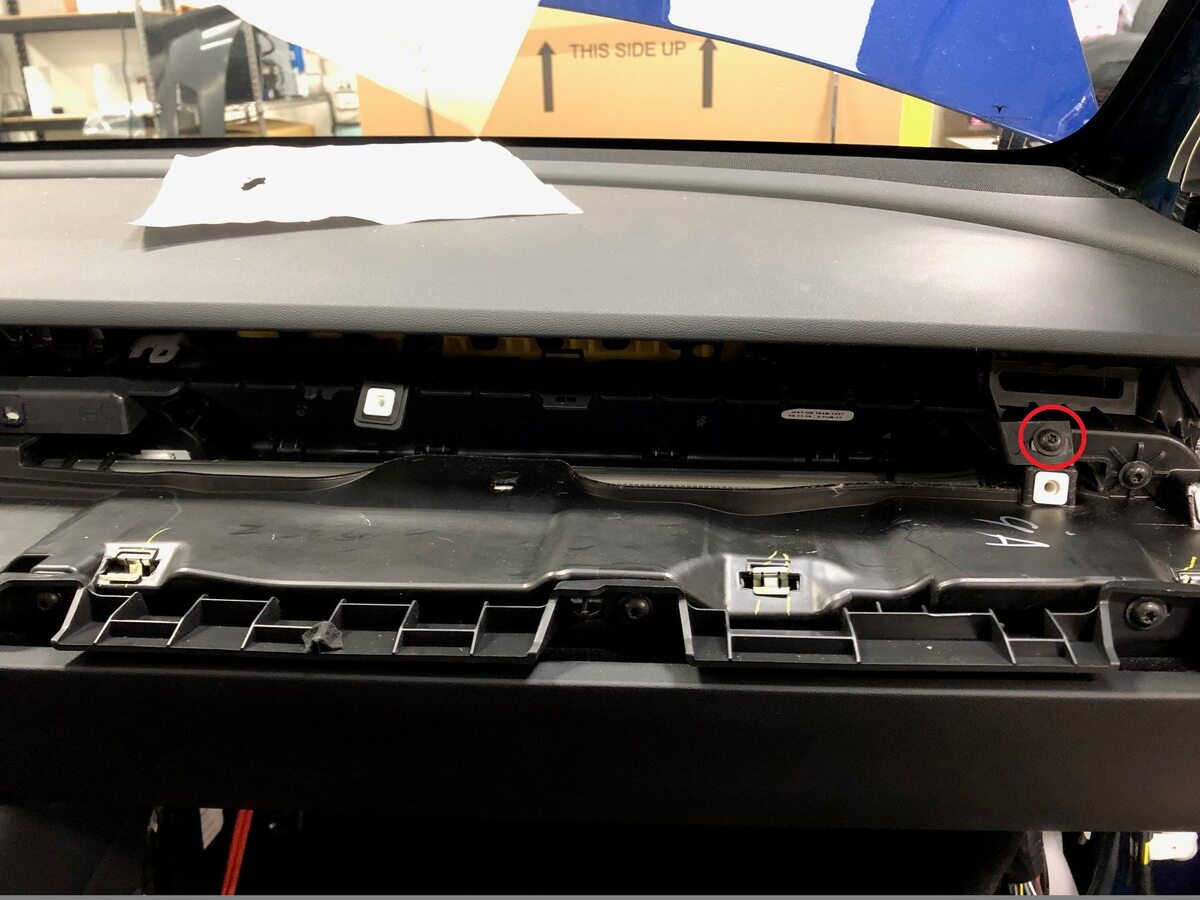
Pull RH side of RH air duct out and release from IP
注1x screw, T20, 2.3 Nm
-
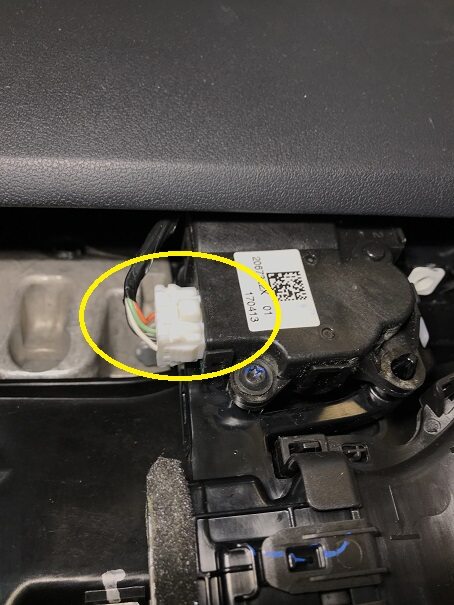
Disconnect harness connector from RH air duct and remove duct
注1x connector
-
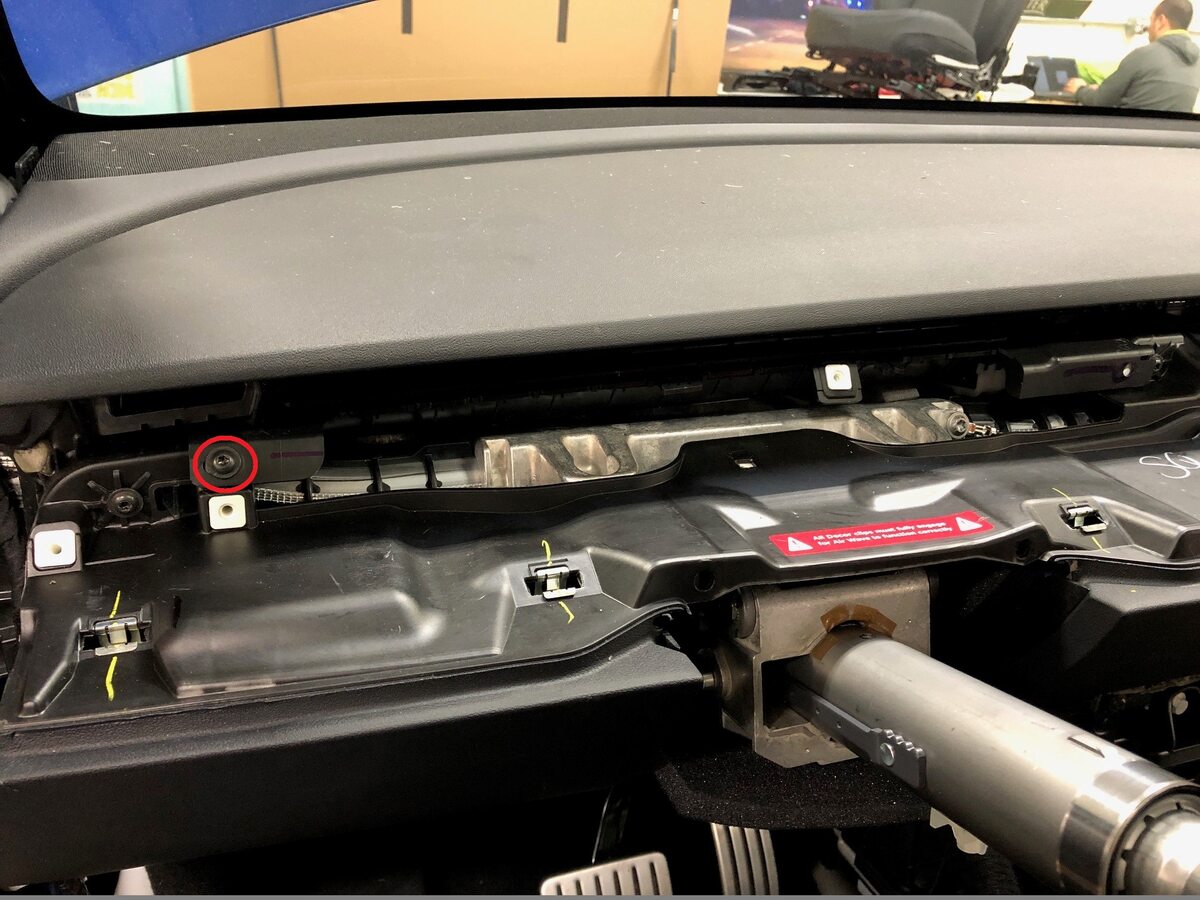
Pull LH side of LH air duct out and release from IP
注1x screw, T20, 2.3 Nm
-
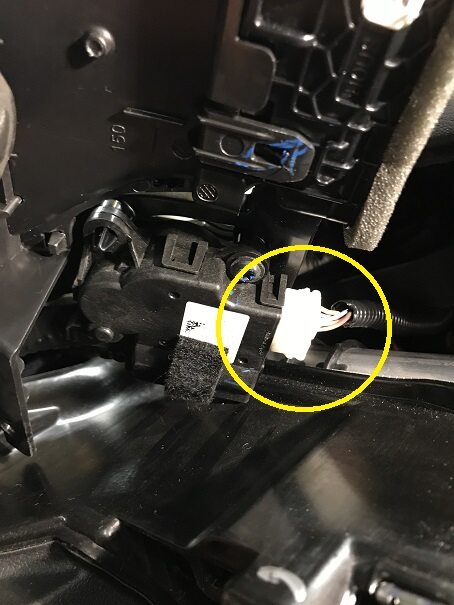
Disconnect harness connector from LH air duct and remove duct
注1x connector
-
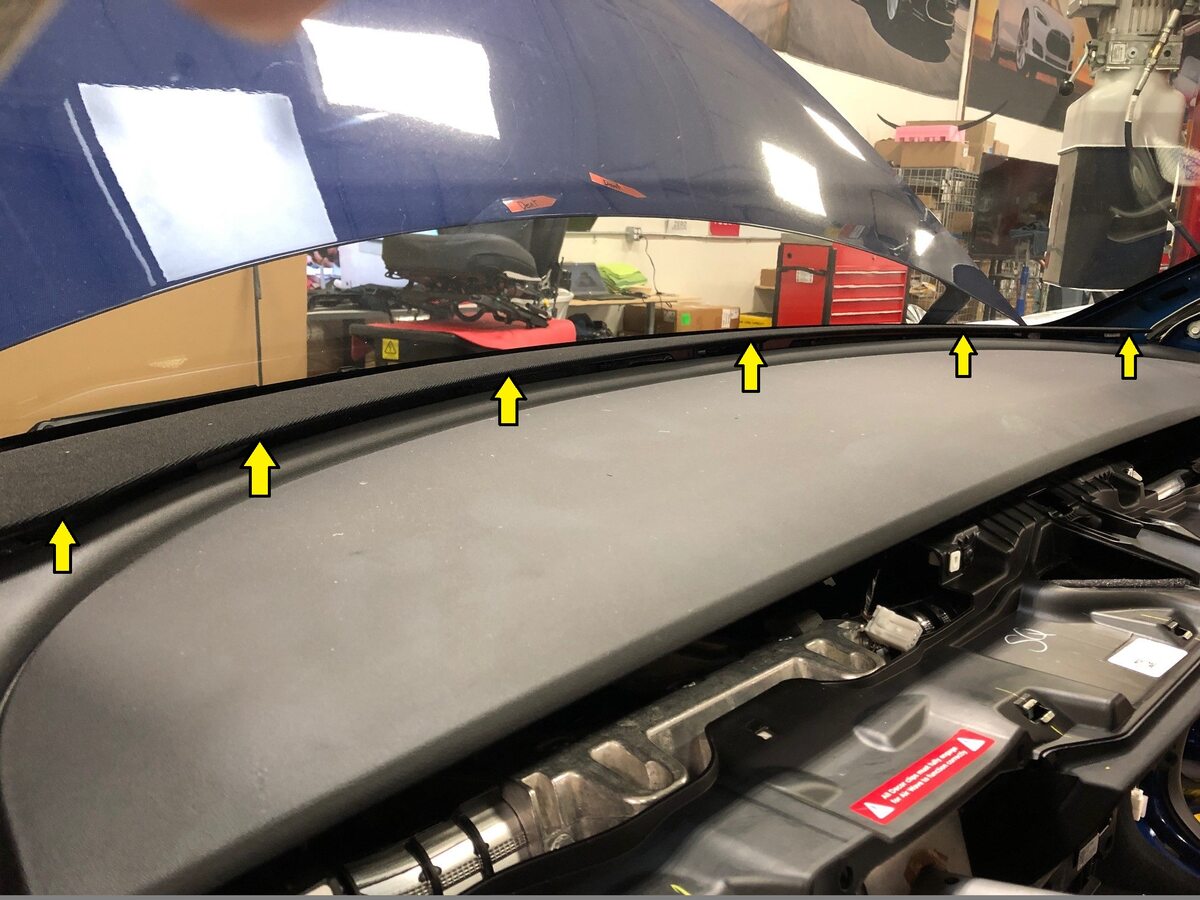
Release clips securing defroster grill
注8x clips, Replace any damaged clips
-
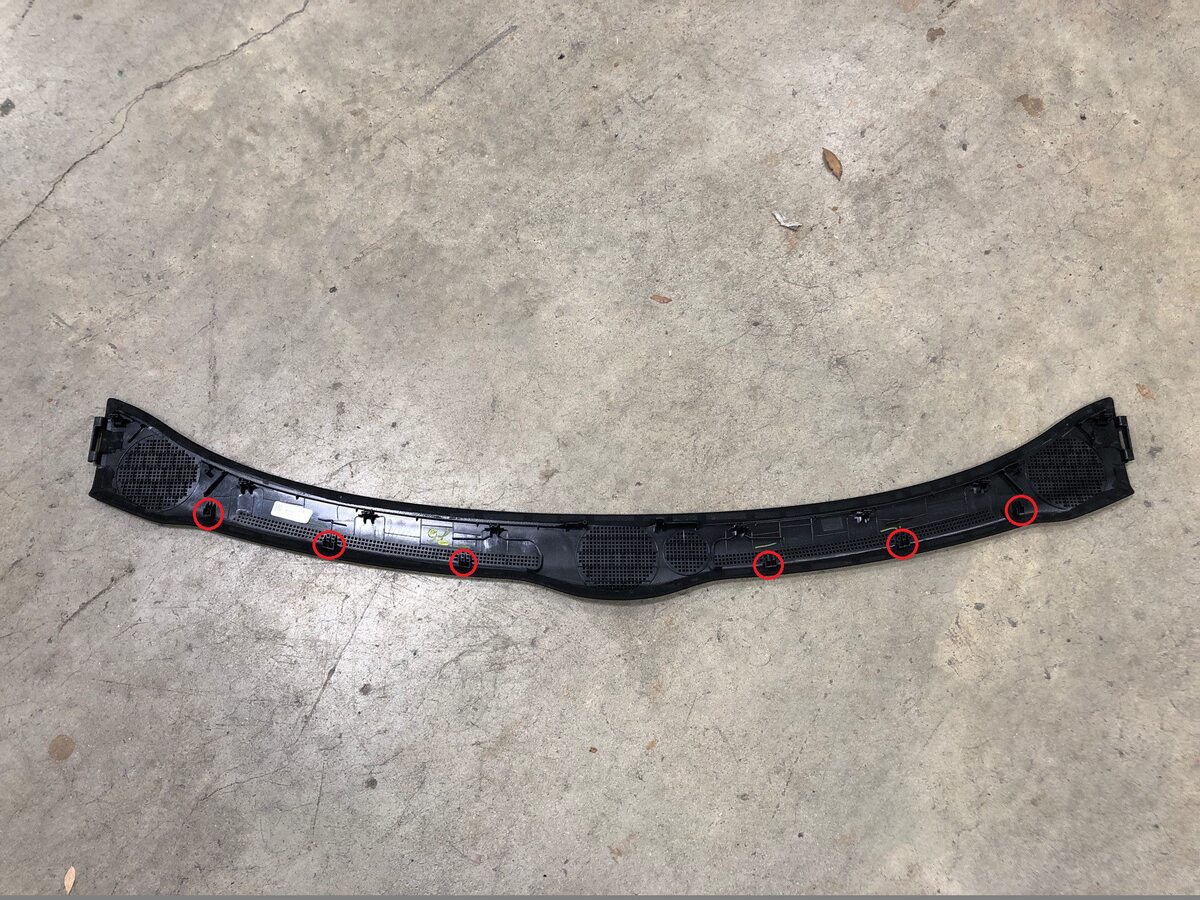
Pivot rear edge of defroster grill up and release tabs from IP
注6x tabs
-
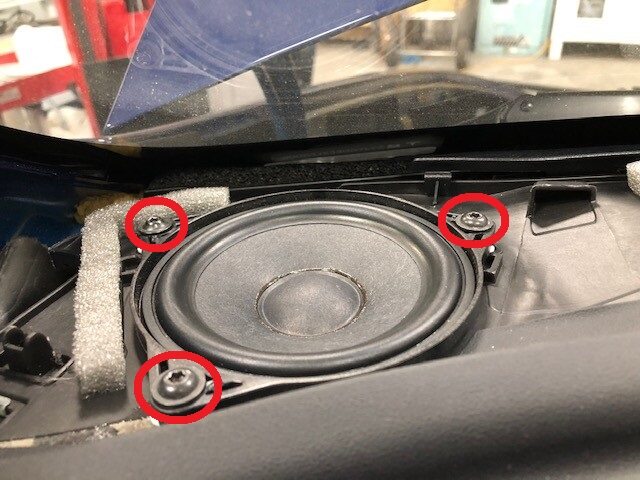
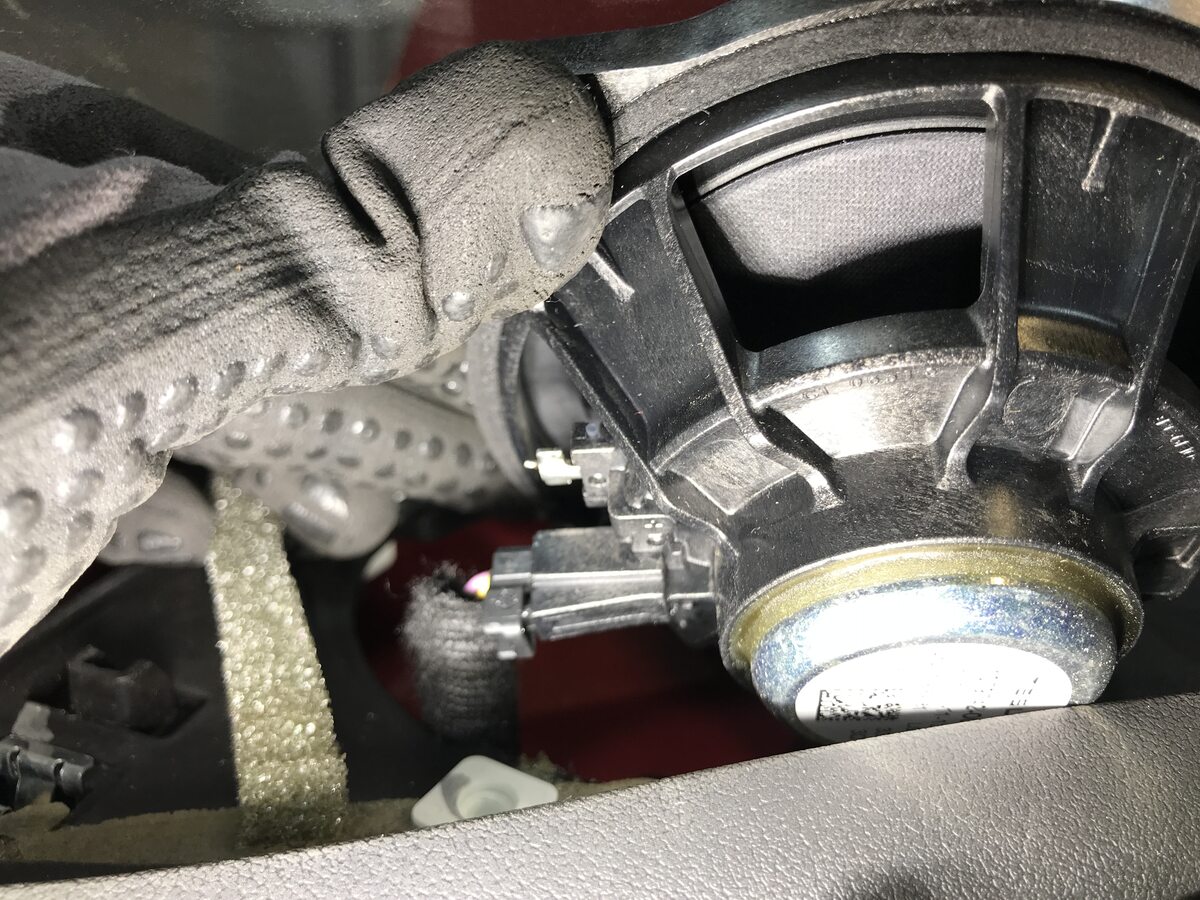
Remove screws securing LH speaker to IP and remove speaker
注3x screws, T20, 2.3 Nm, 1x connector
-
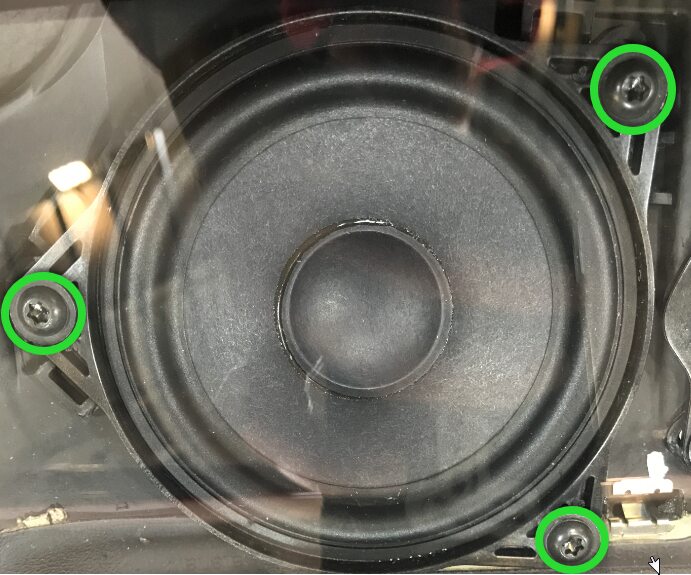
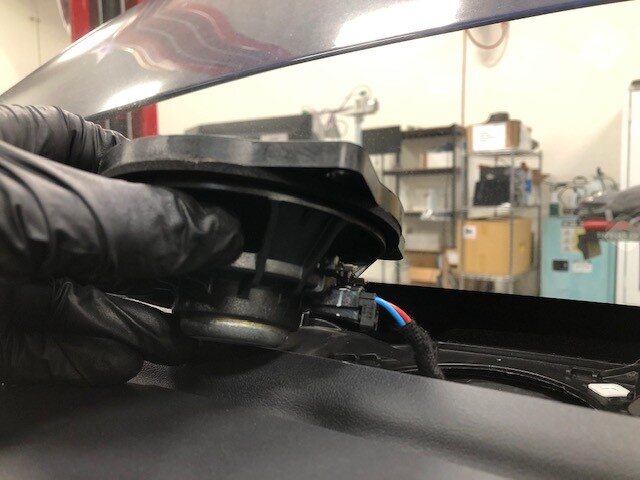
Remove screws securing center speaker to IP and remove speaker
注1x connector, 3x screws, T20, 2.3 Nm
-
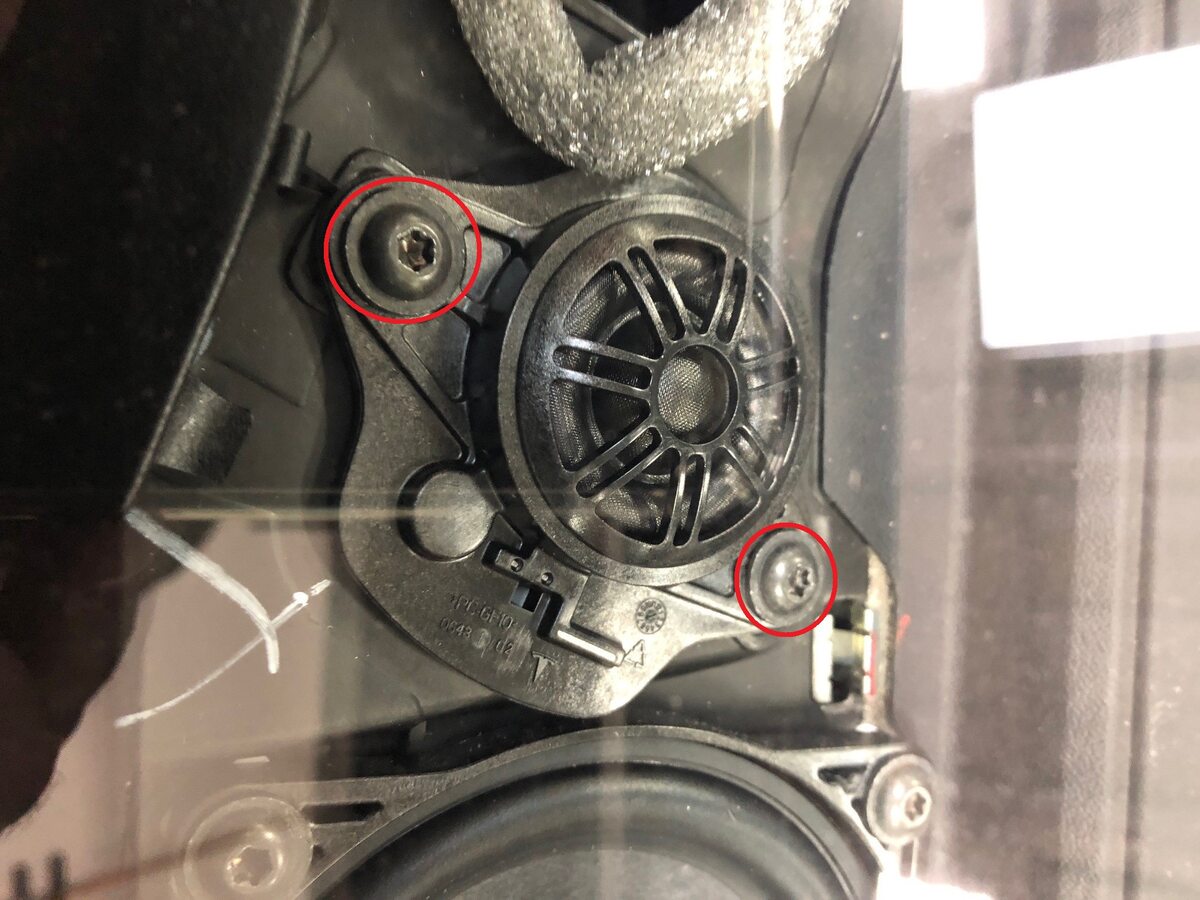
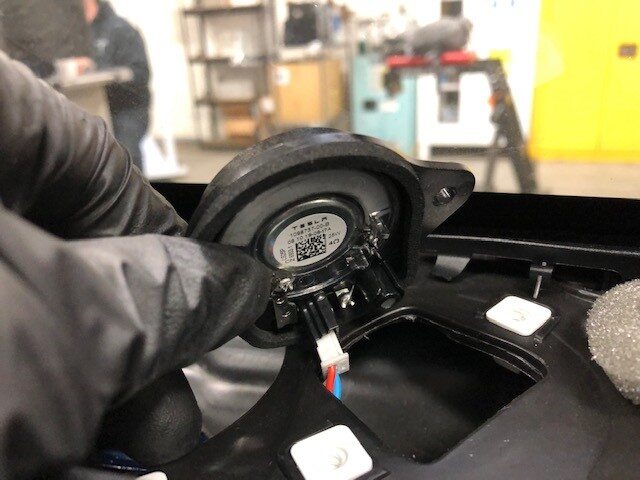
Remove screws securing center tweeter to IP and remove speaker
注1x connector, 2x screws, T20, 2.3 Nm, Discard tweeter and screws after removal
-
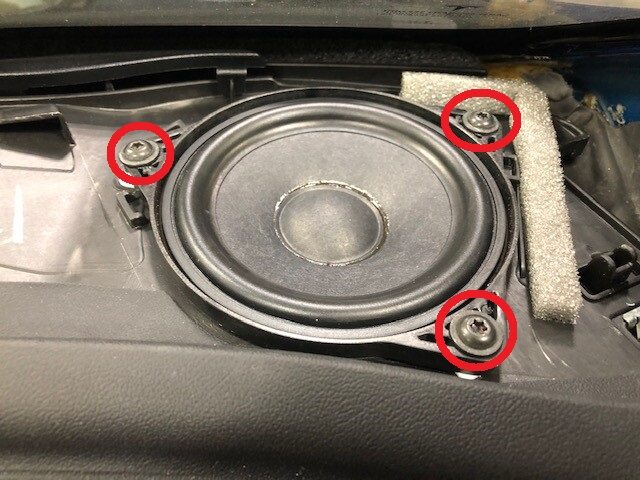
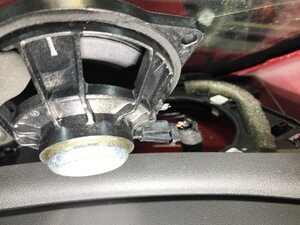
Remove screws securing RH speaker to IP and remove speaker
注3x screws, T20, 2.3 Nm, 1x connector
-
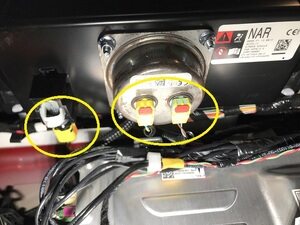
Disconnect connectors for passenger air bag assembly
注3x connectors, 2x connectors for regions other than North America, Connector release may vary
-
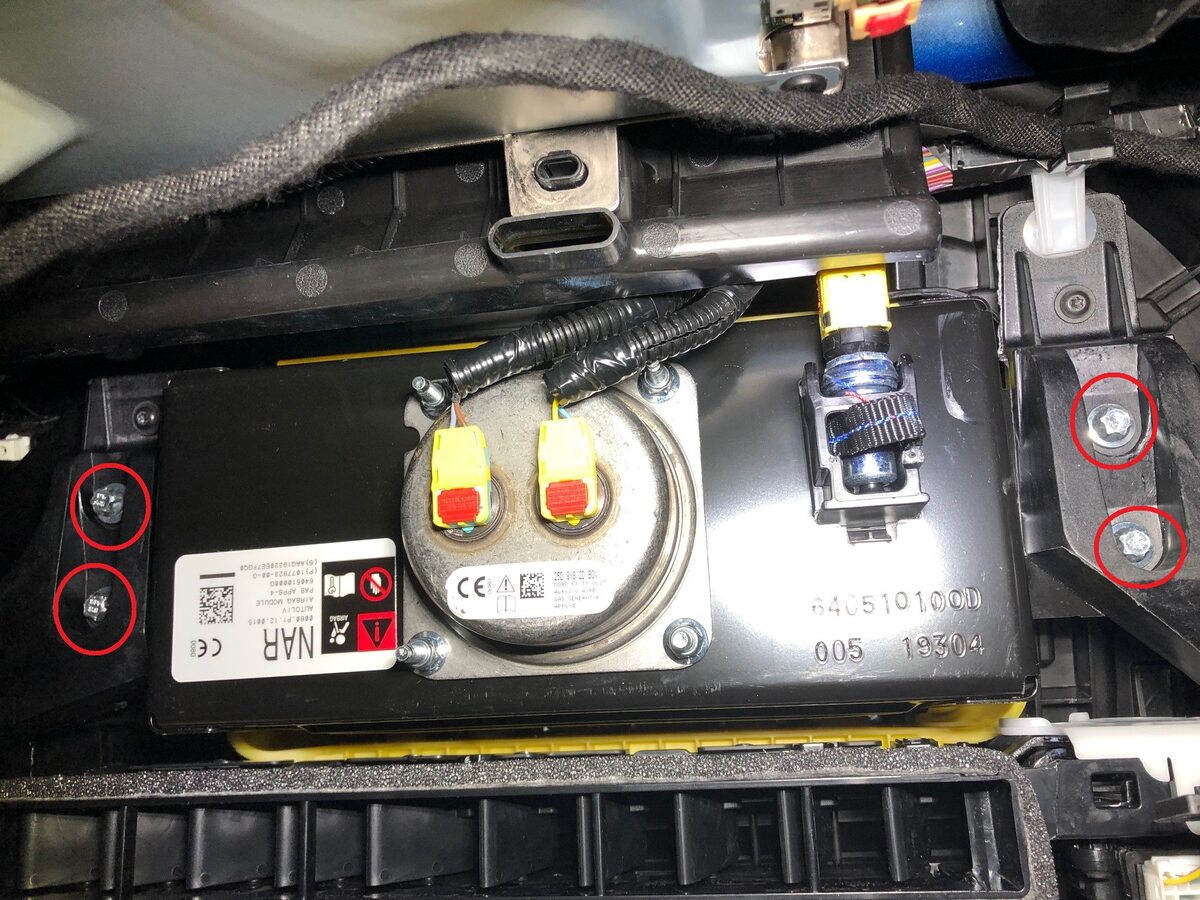
Remove bolts securing passenger air bag assembly to cross car beam
注4x patch bolts, T30, 8 Nm, Newer vehicles have 4x E10 patch bolts, Discard after removal
-
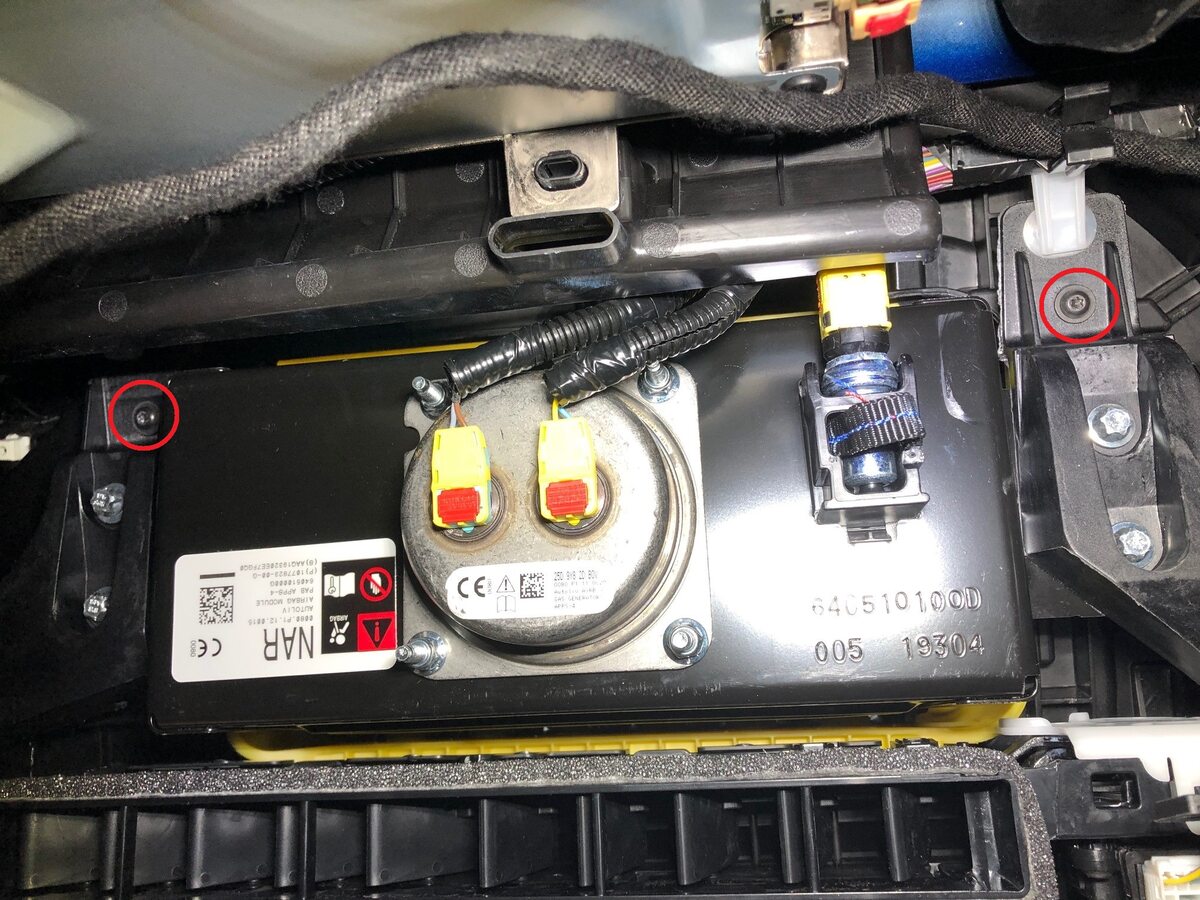
Remove screws securing IP carrier to cross car beam near passenger air bag
注2x screws, T20, 2.3 Nm
-
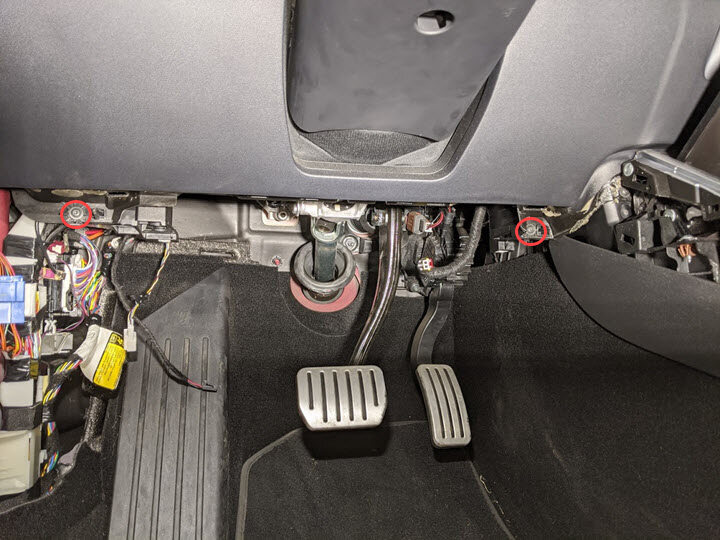
Remove screws securing IP carrier to cross car beam on lower LH side
注2x screws, T20, 2.3 Nm
-
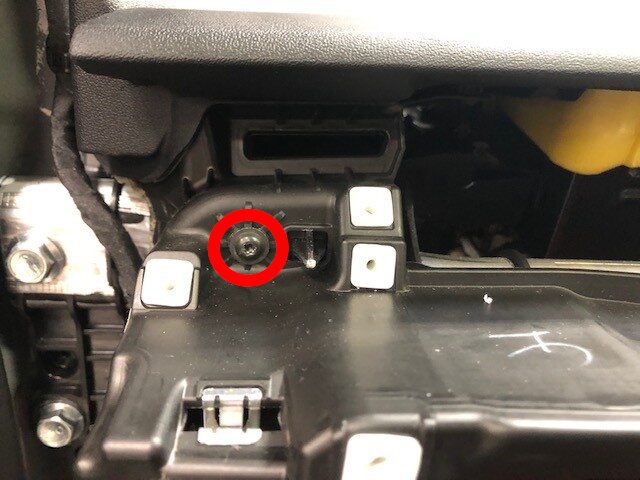
Remove screw securing IP carrier to cross car beam on upper LH side
注1x screw, T20, 2.3 Nm
-
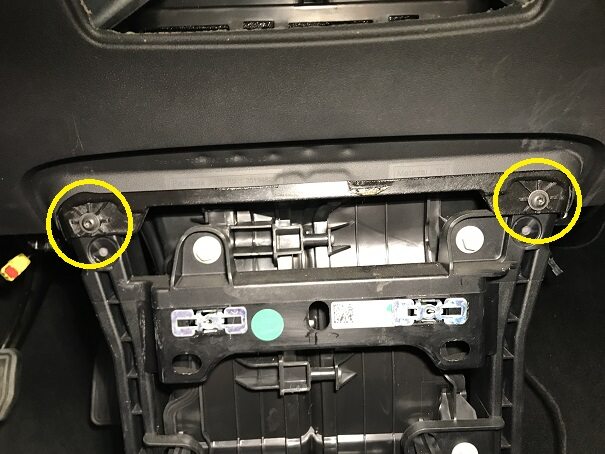
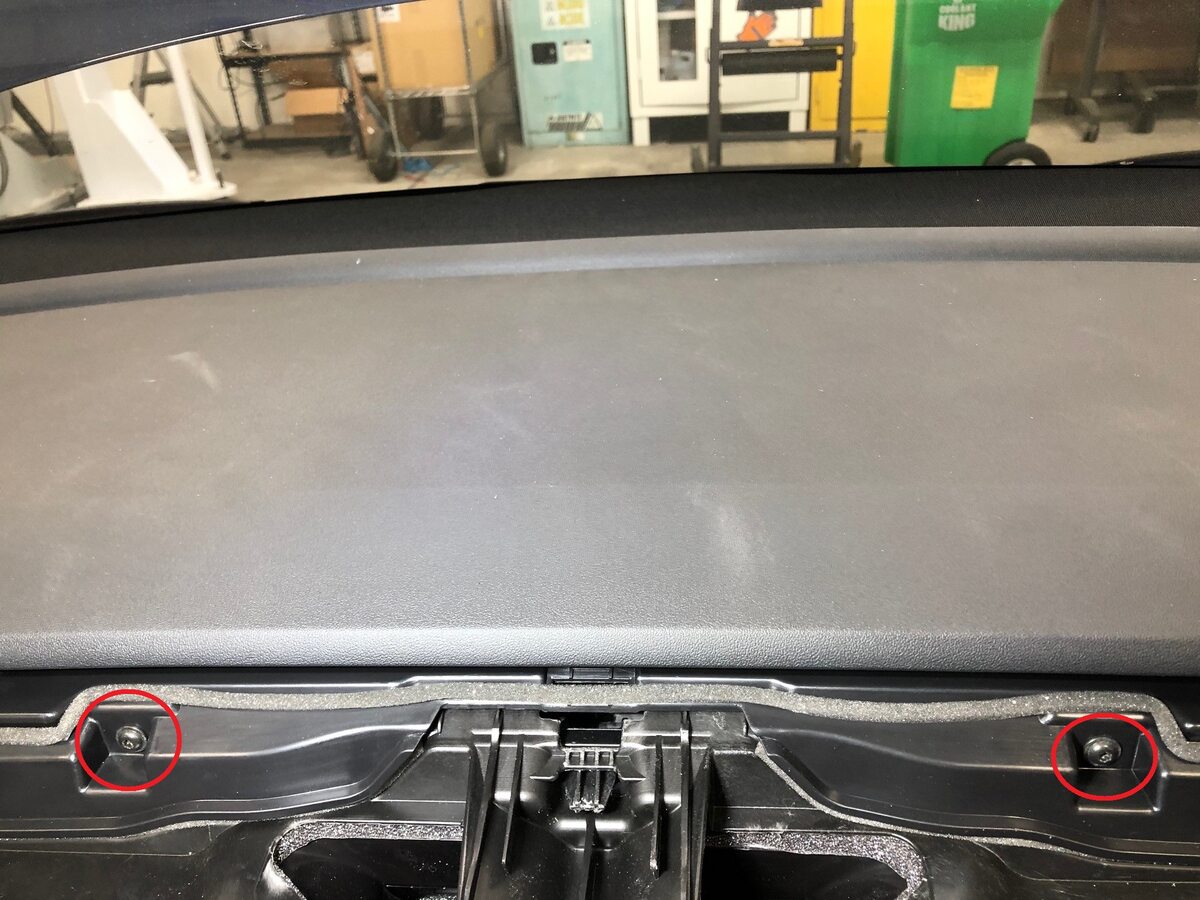
Remove screws securing IP carrier to cross car beam at lower center
注2x screws, T20, 2.3 Nm
-
Remove screws securing IP carrier to cross car beam at upper center
注2x screws, T20, 2.3 Nm
-
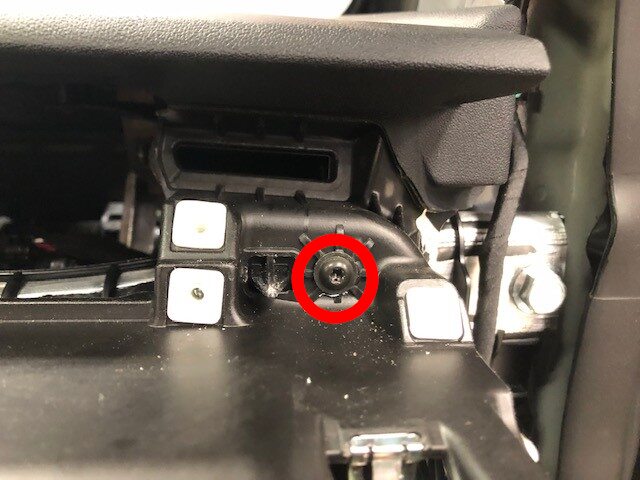
Remove screw securing IP carrier to cross car beam on upper RH side
注1x screw, T20, 2.3 Nm
-
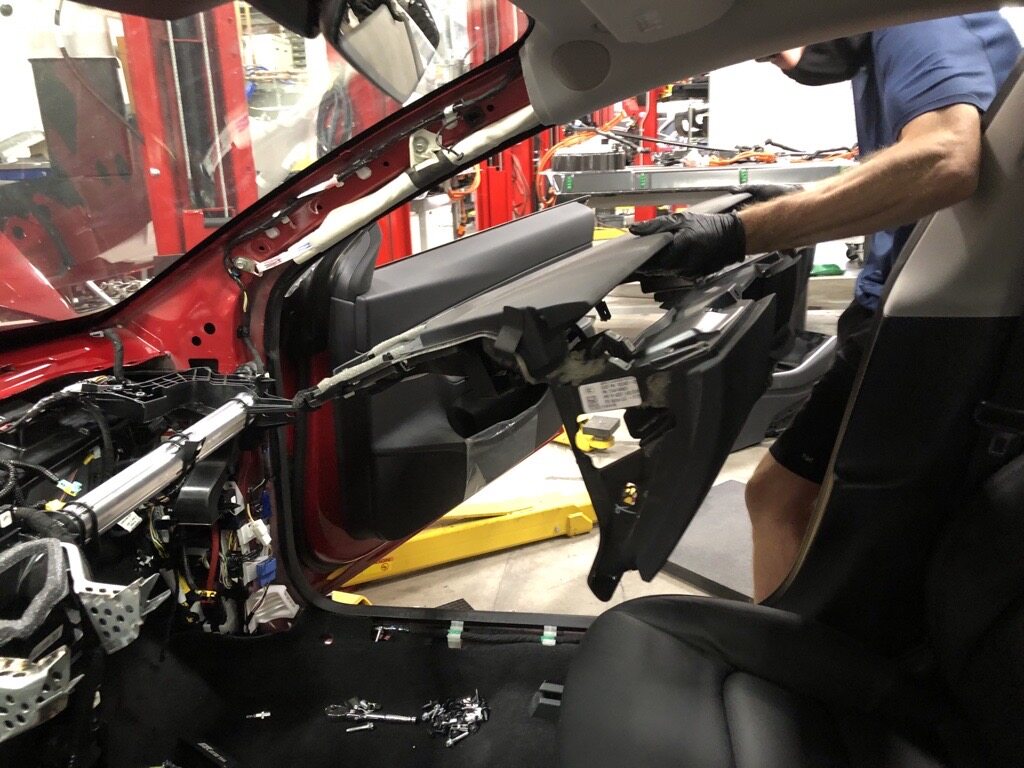
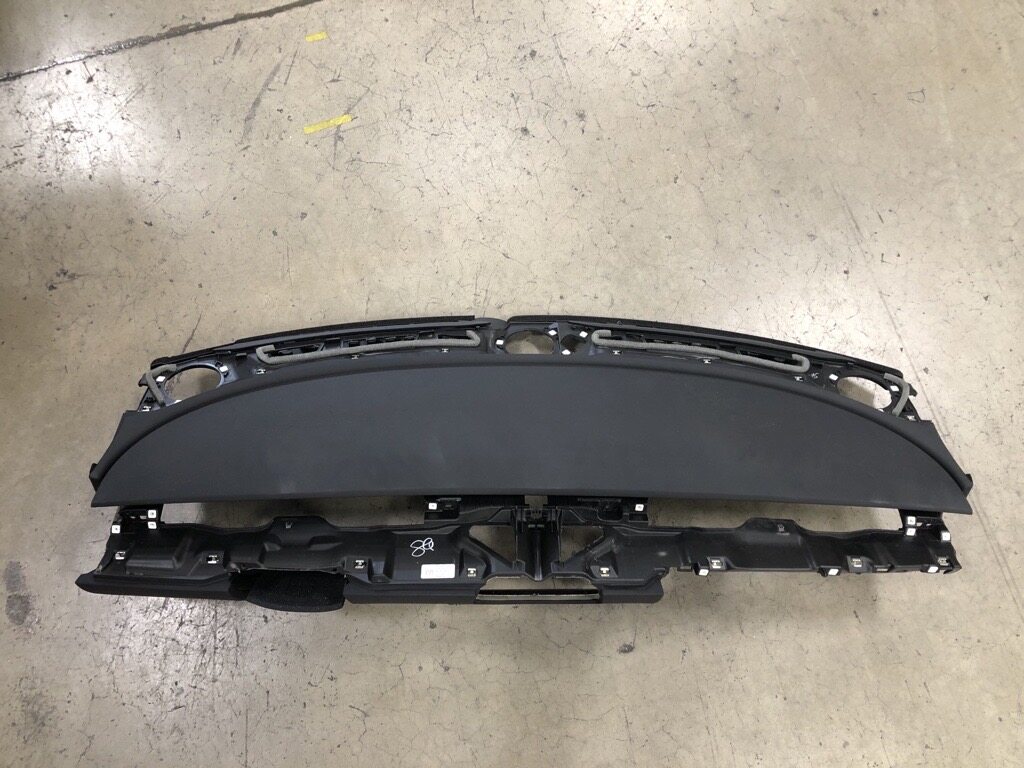
Remove IP carrier from cross car beam
注Recommend assistance. Be cautious to clear the harness clipped at top center of HVAC assembly, This will also ease removal, Remove IP carrier through passenger front door
-
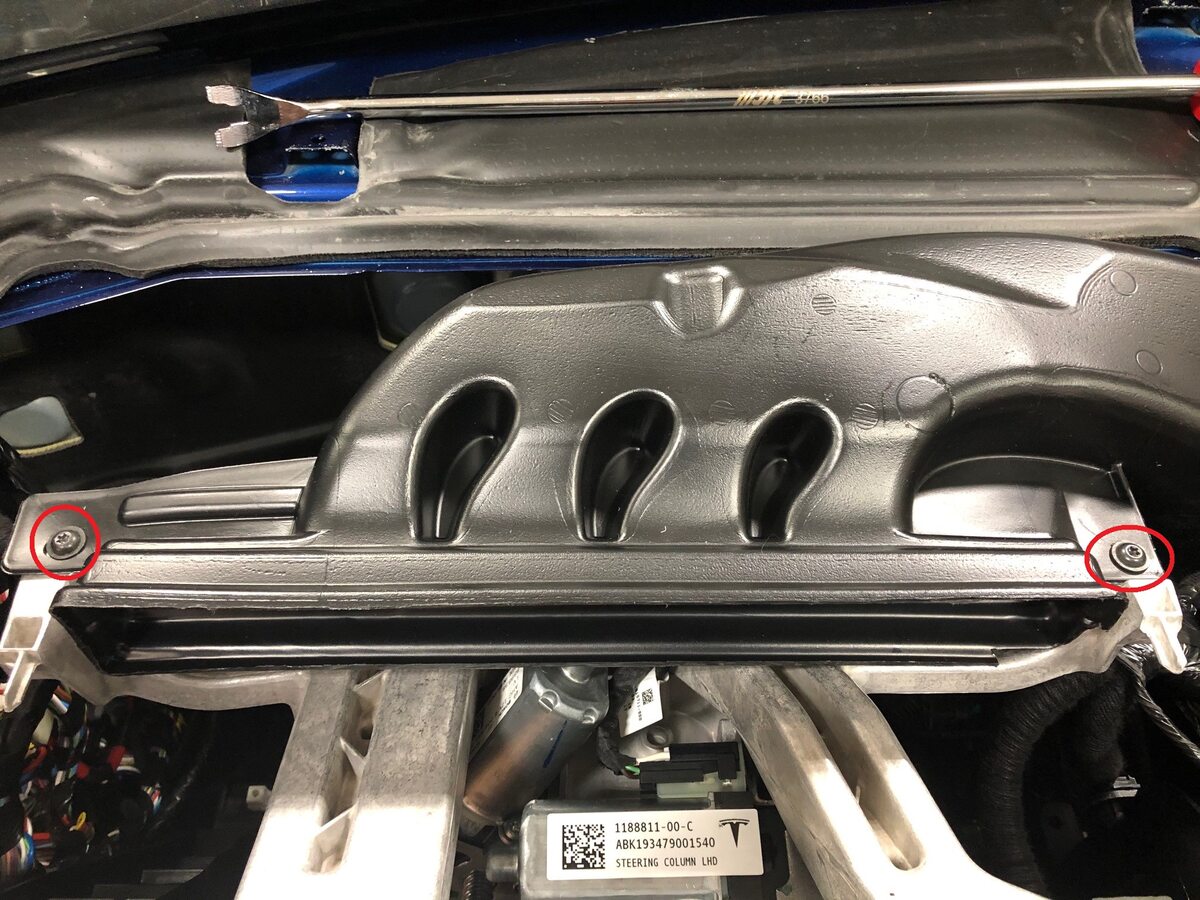
Remove screws securing driver air wave duct to cross car beam
注2x screws, T20, 2.3 Nm
-
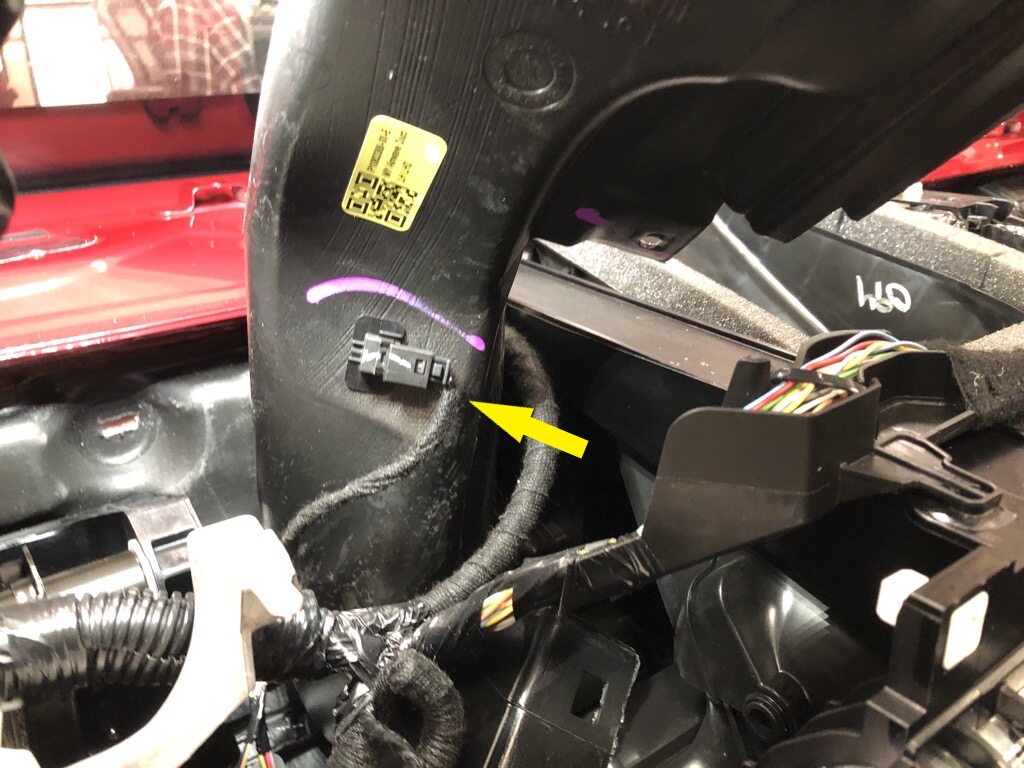
Disconnect LH upper duct thermistor from drivers air wave duct
注1x connector
-
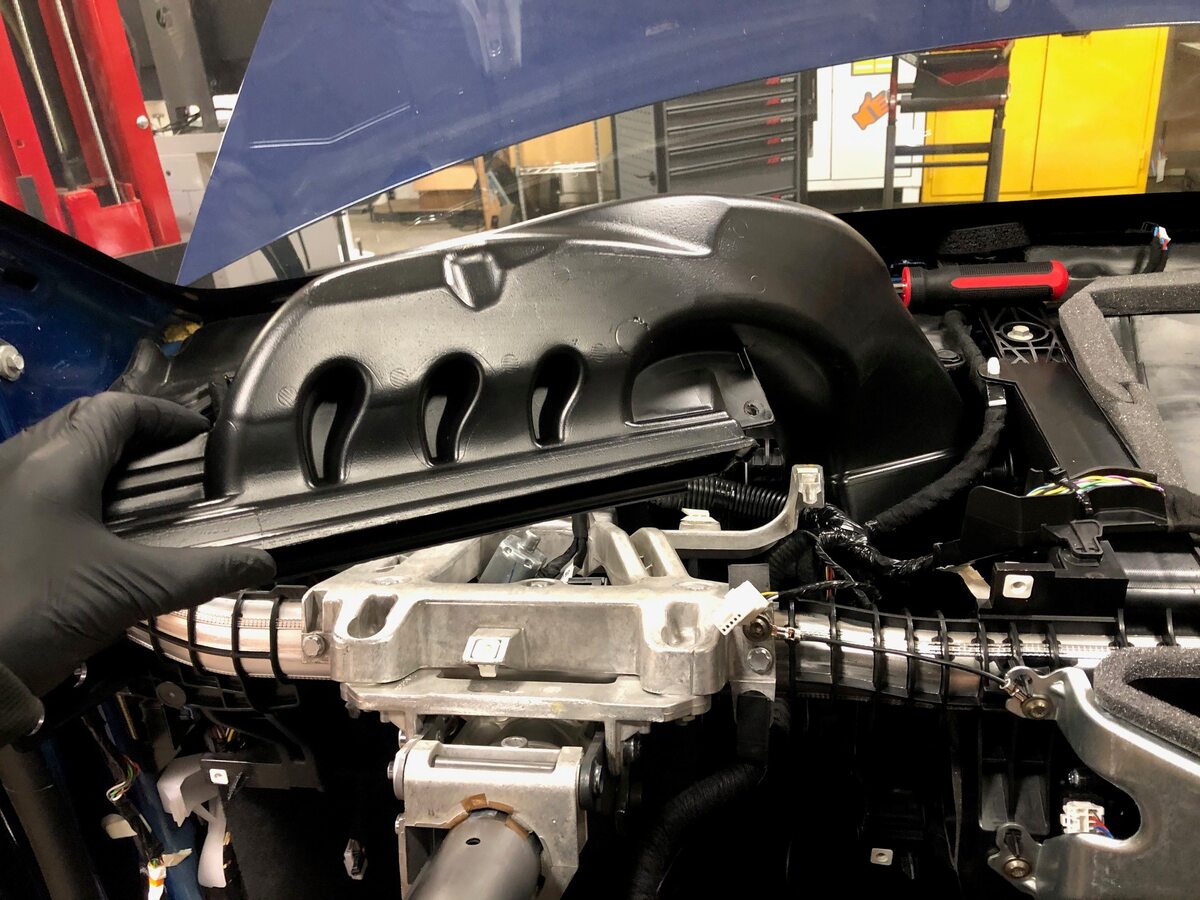
Remove driver air wave duct from HVAC assembly
-
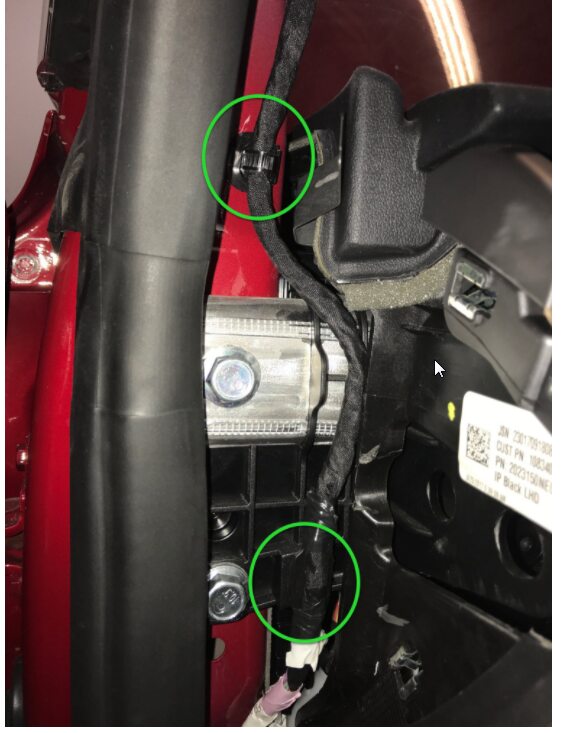
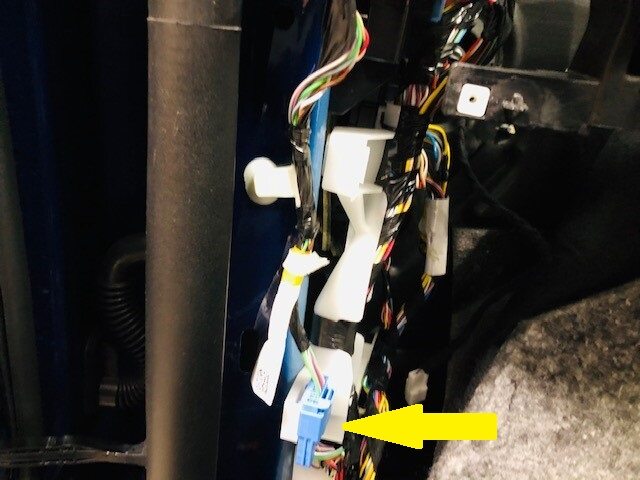
Remove headliner harness clips on LH lower a-pillar
注2x clips
-
Disconnect the headliner harness connector from LH lower a-pillar
注1x connector
-
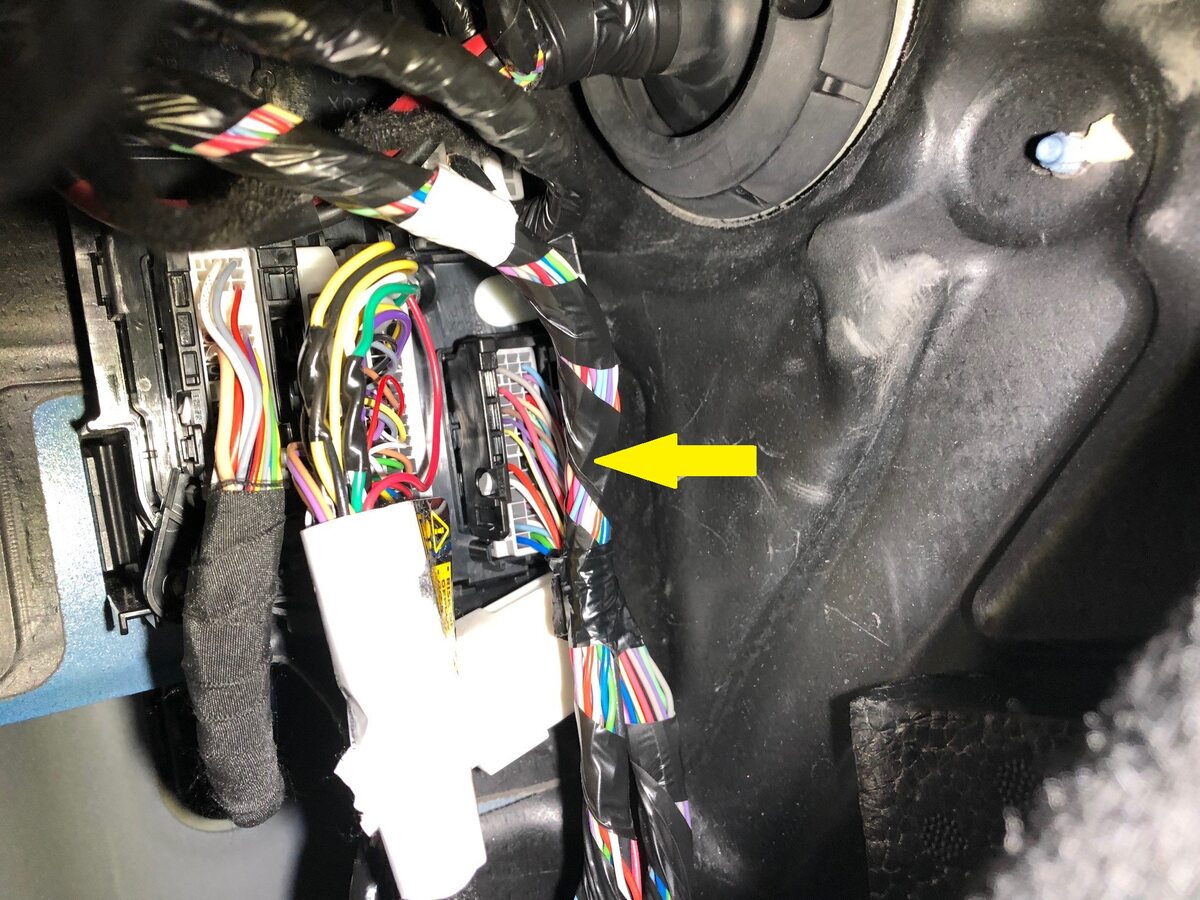
Disconnect the dash connector from the left body controller
注1x connector, Release locking tab and gently pull down to release connector
-
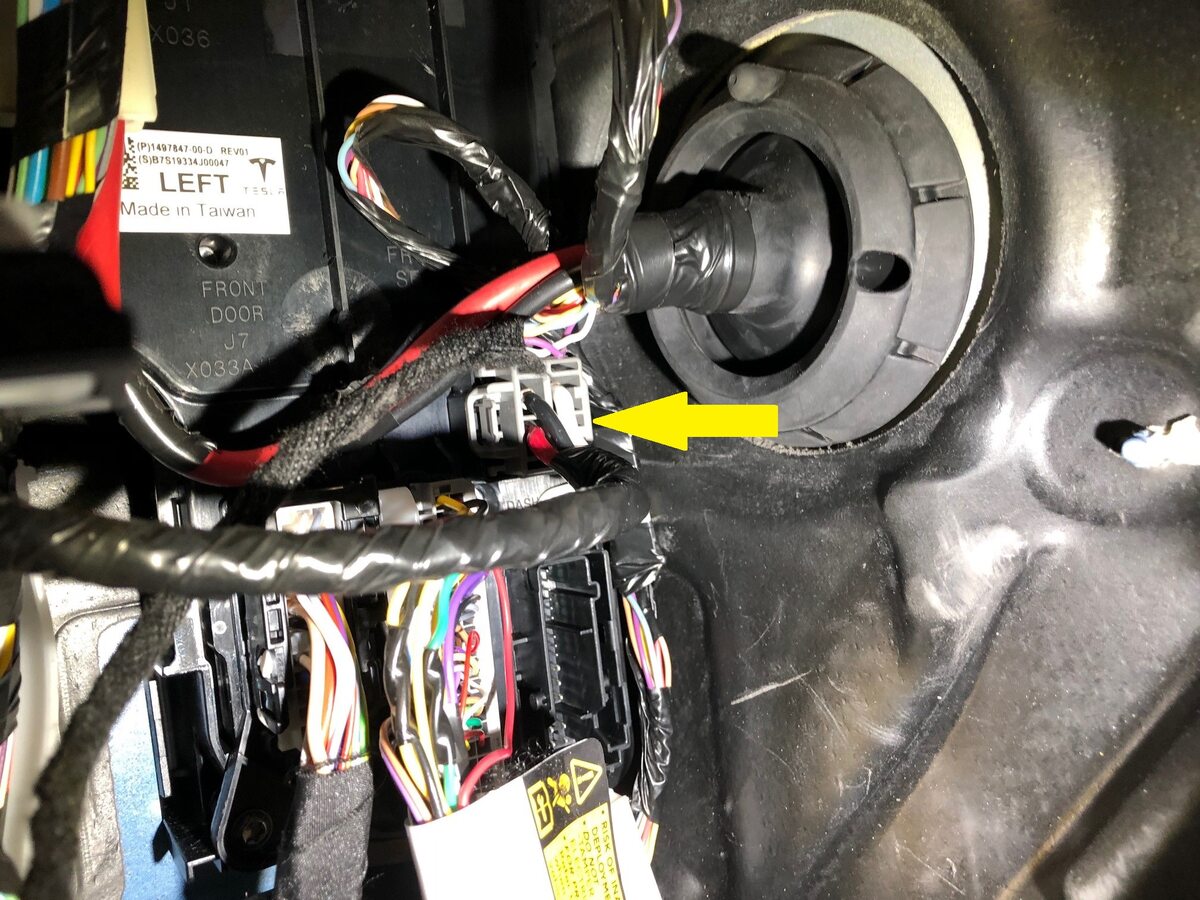
Disconnect the HVAC connector from the left body controller
注1x connector
-
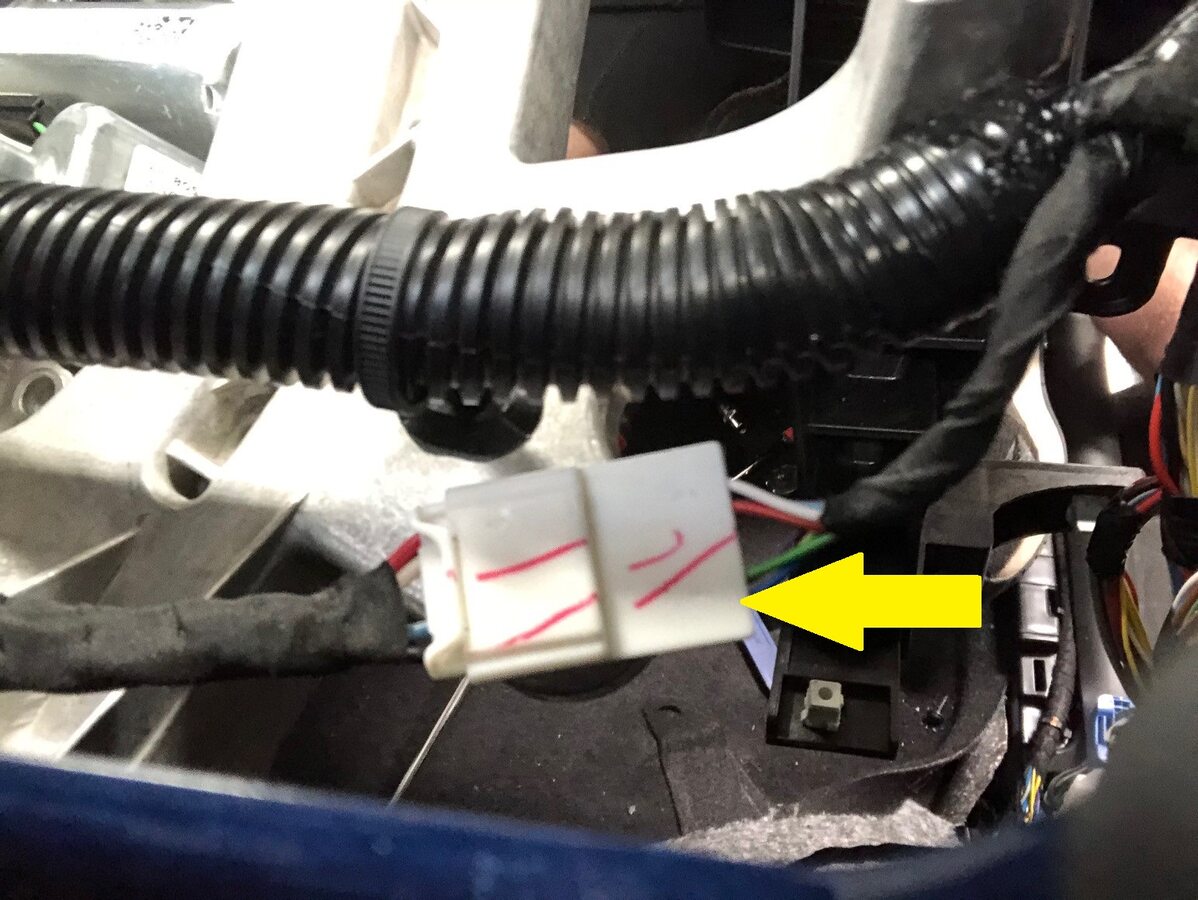
Disconnect IP harness connector from electronic steering column
注1x connector
-
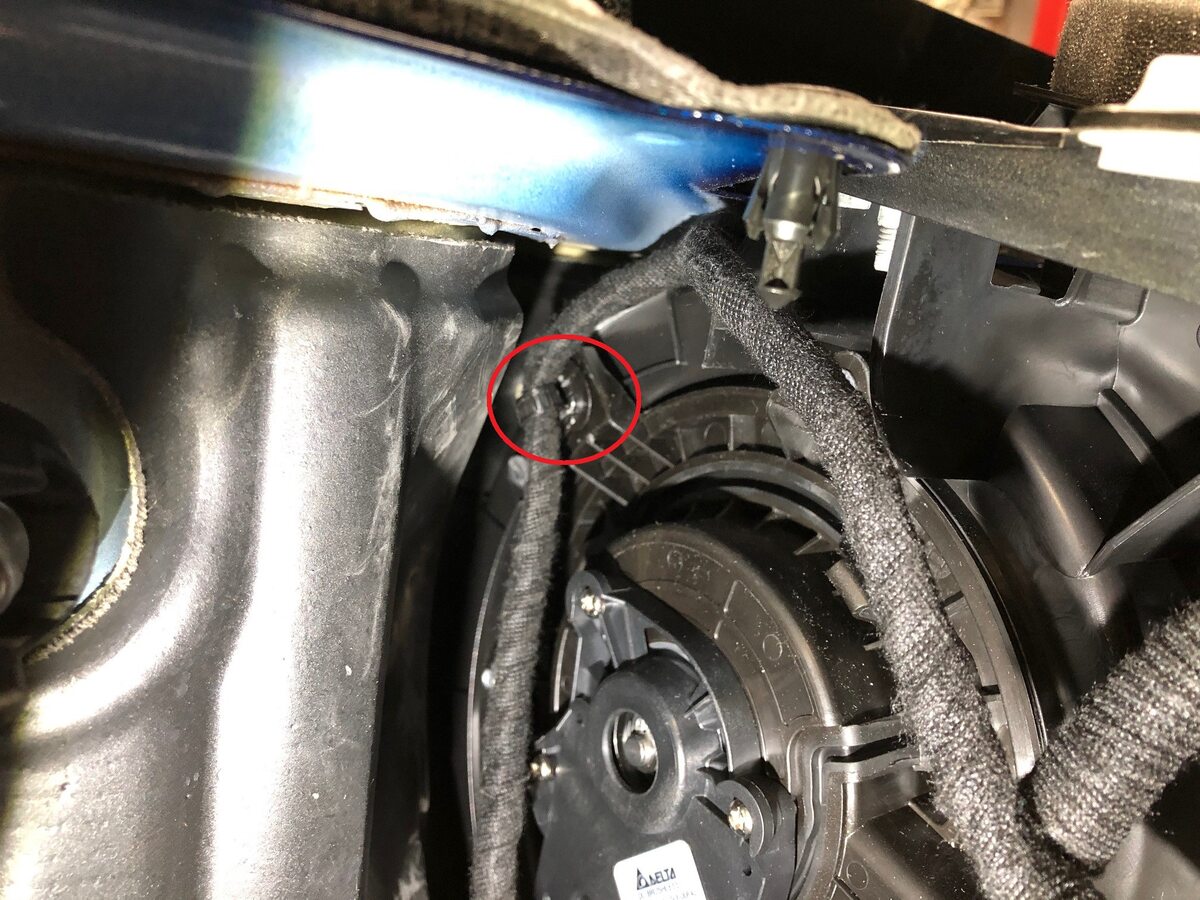
Release the IP harness clip located on the blower motor assembly
注1x harness clip
-
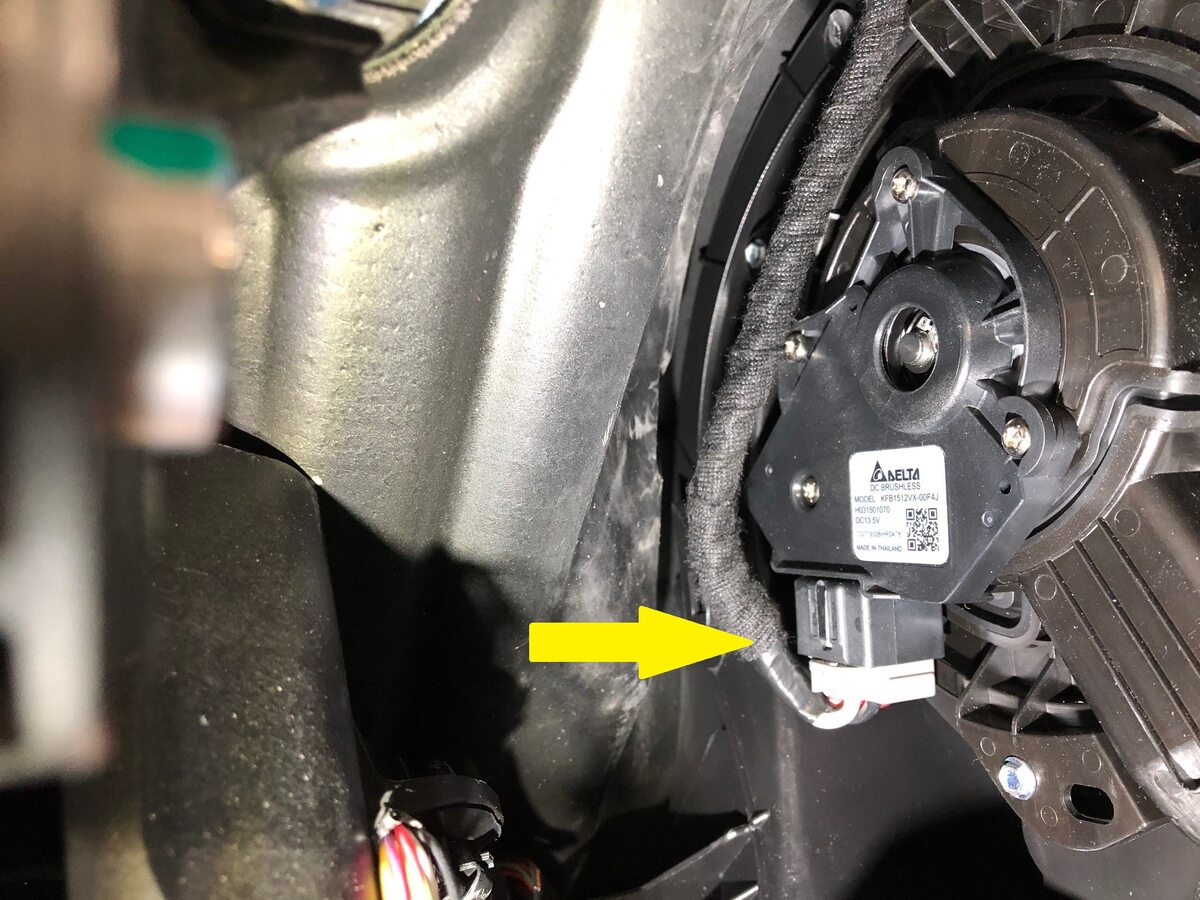
Disconnect blower motor connector
注1x connector
-
Release clip securing center speaker harness to HVAC assembly
注1x clip

-
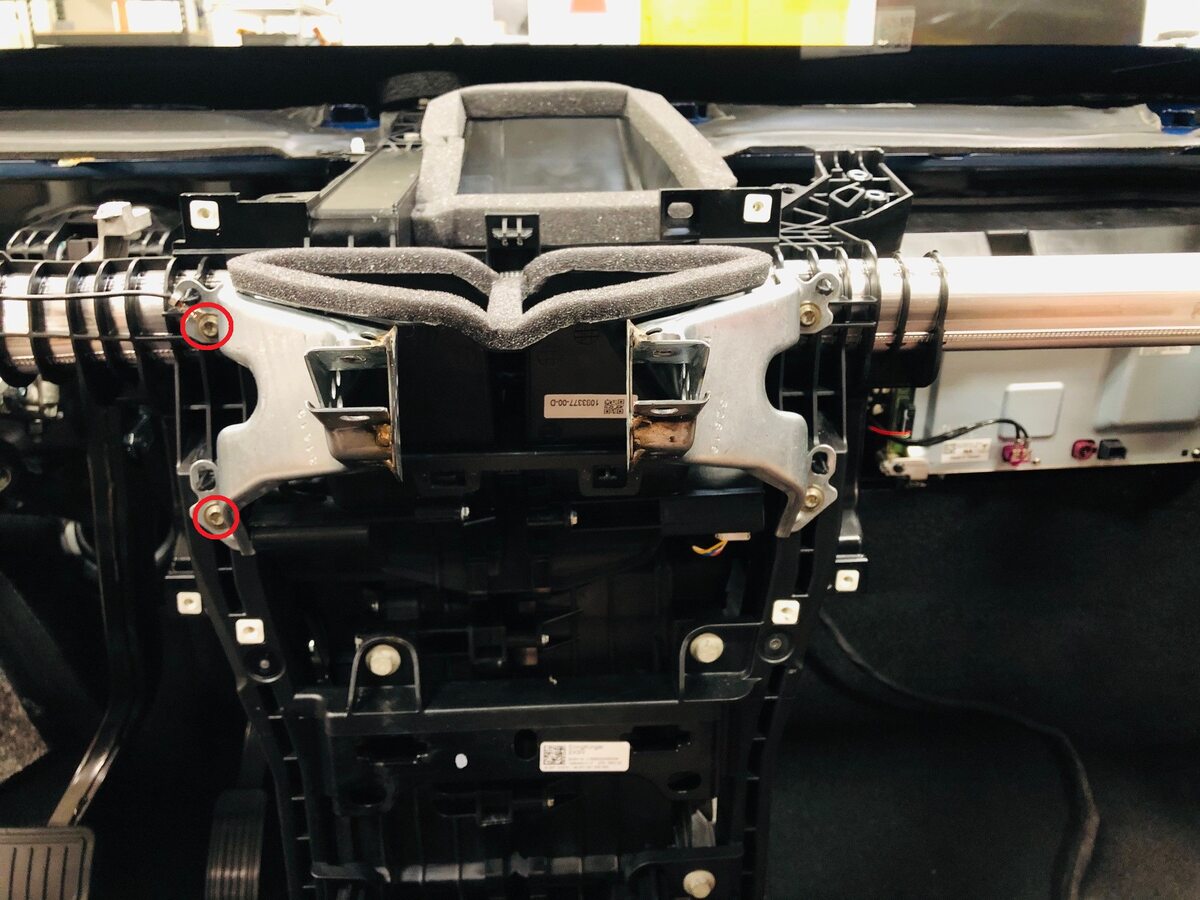
Remove LH center display bracket
注2x bolts, T30, 12 Nm
-
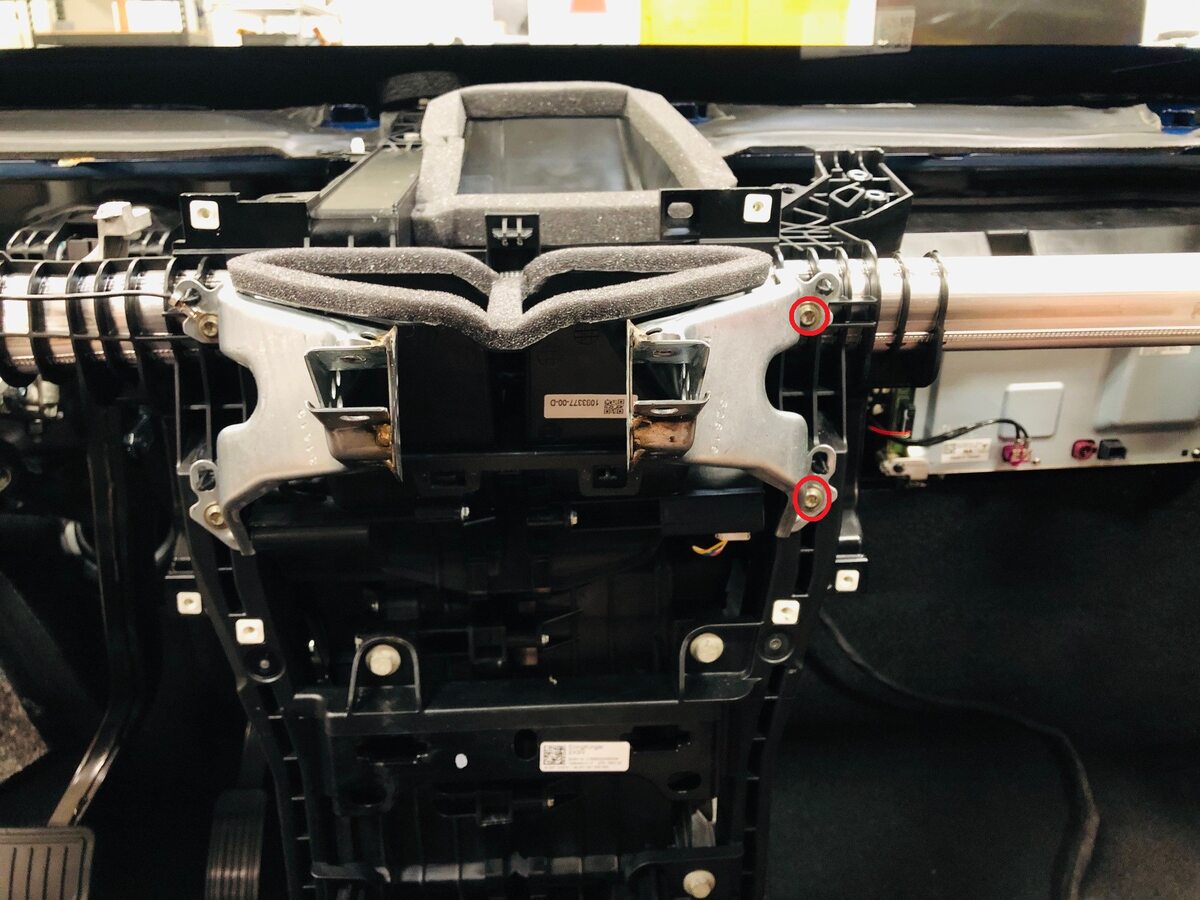
Remove RH center display bracket
注2x bolts, T30, 12 Nm
-
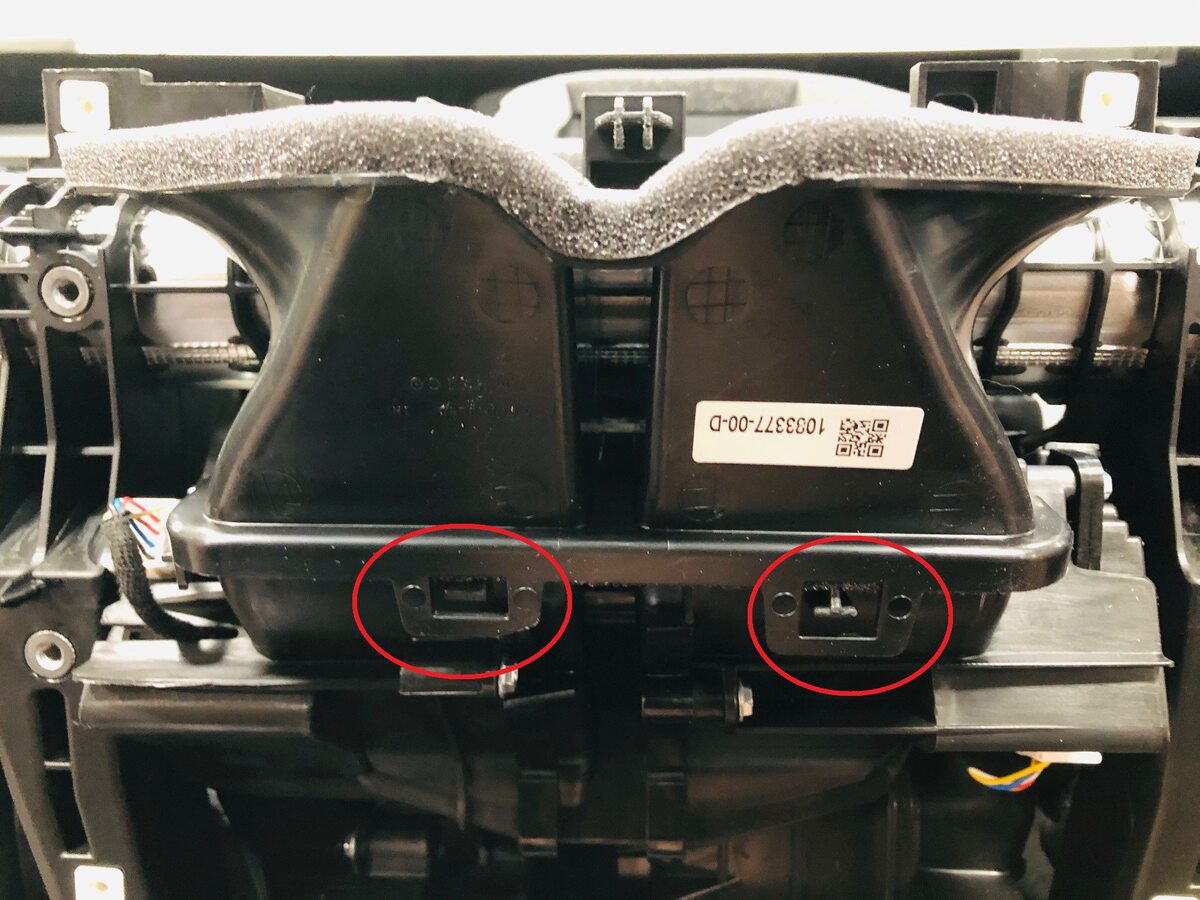
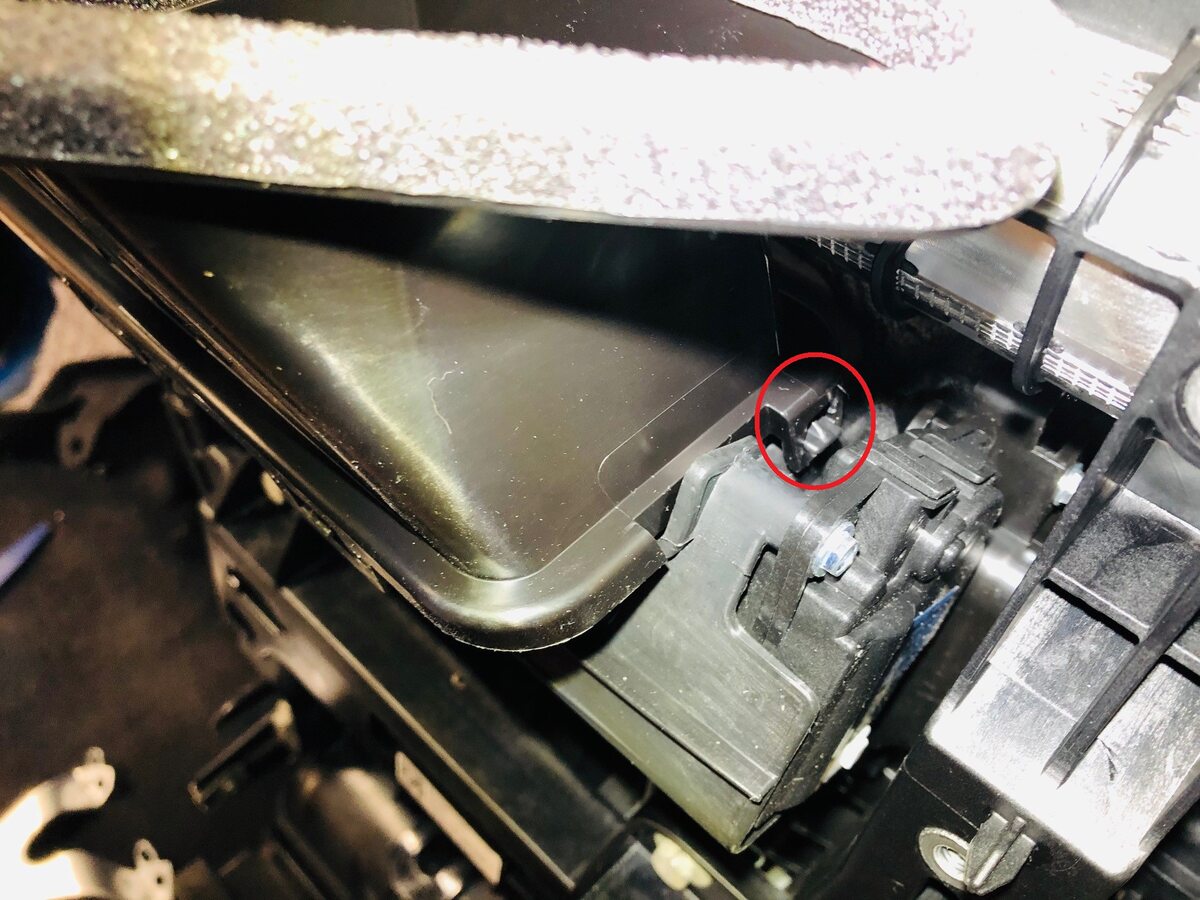
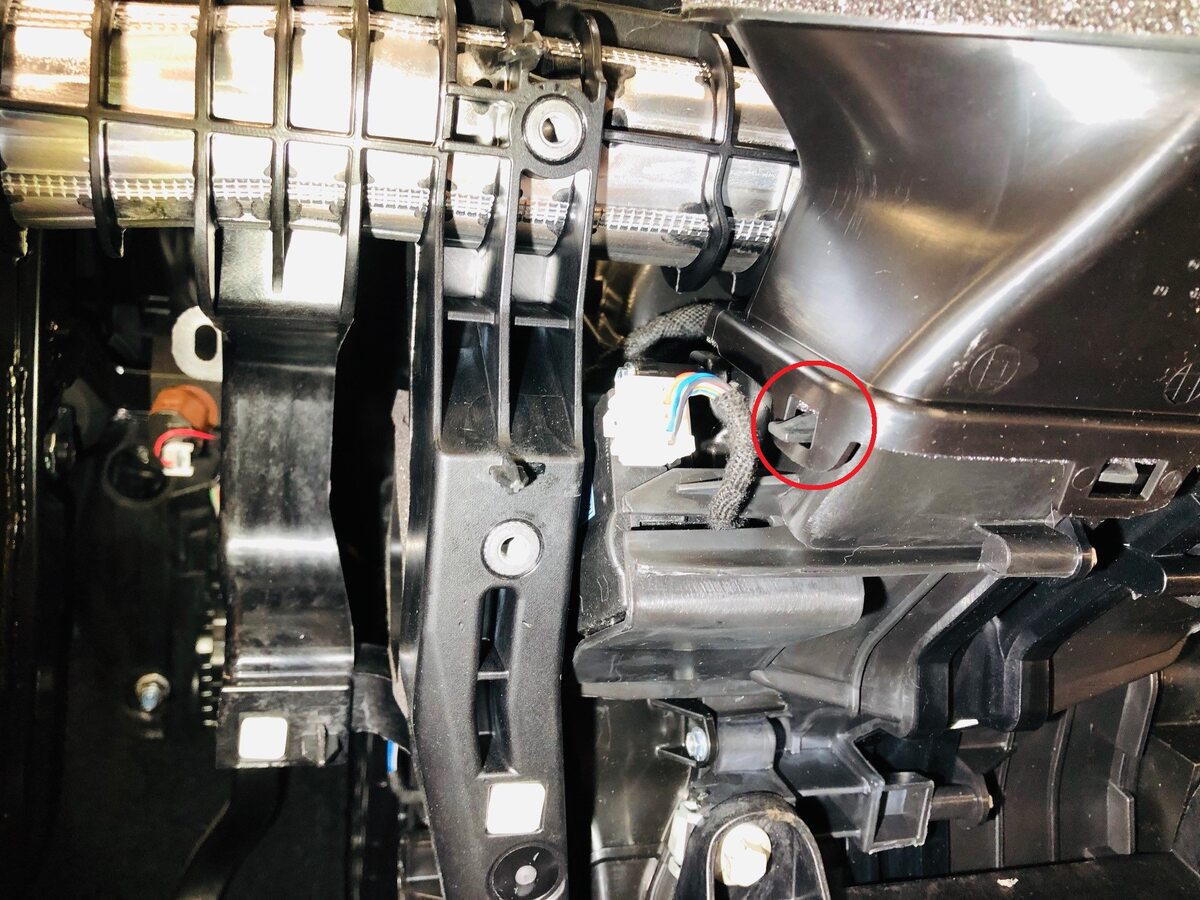
Remove bleeder duct adapter from HVAC assembly
注4x clips
-
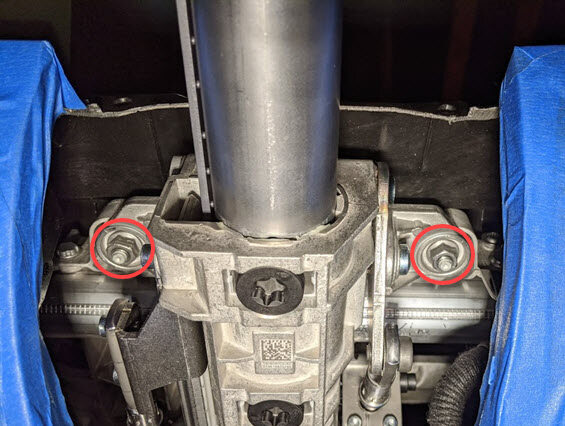
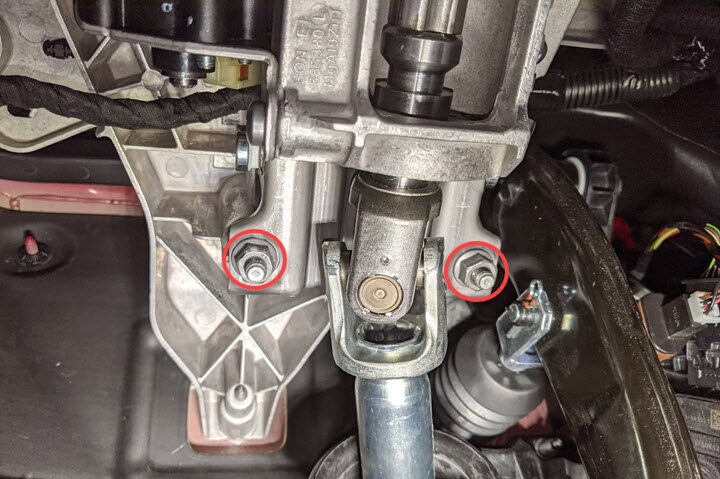
Remove nuts securing steering column to cross car beam and carefully lower steering column
注4x nuts, 13mm, 15 Nm
-
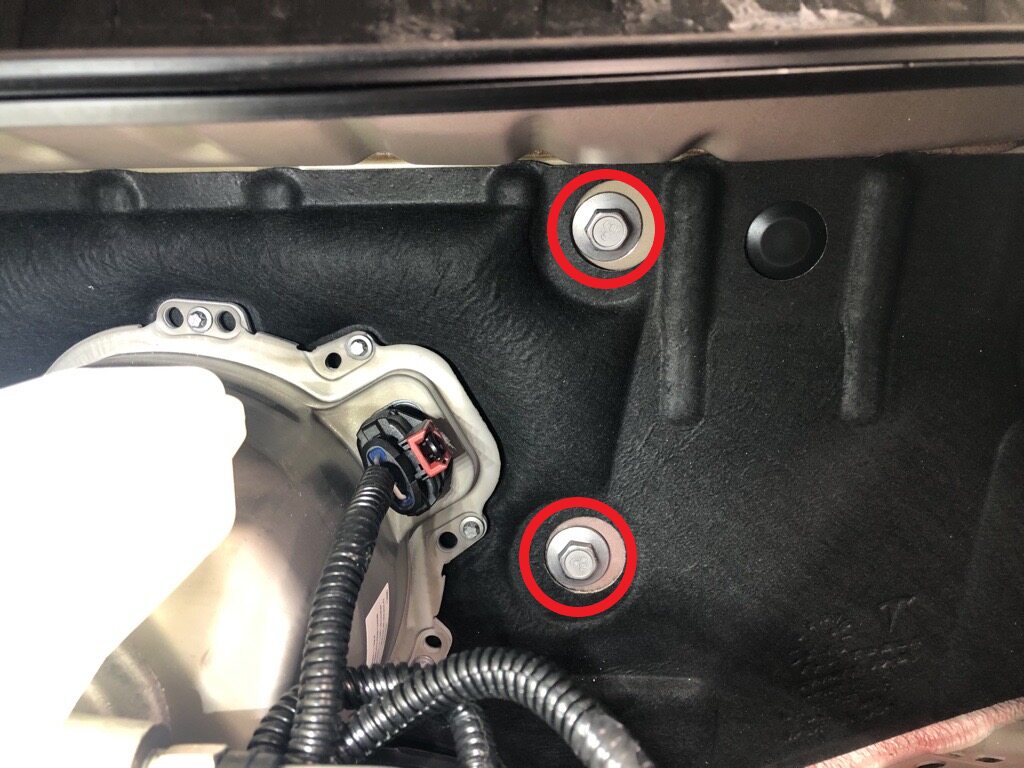
Remove bolts securing cross car beam to LH side of bulkhead
注2x bolts, 13mm, 25 Nm
-
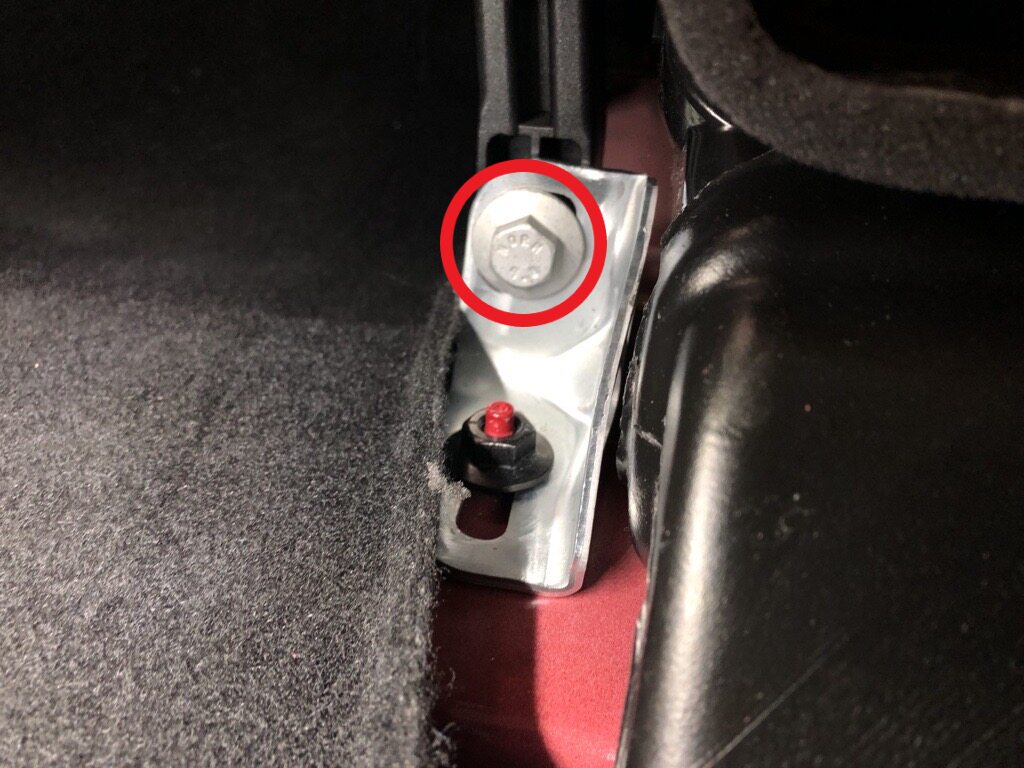
Remove bolt securing LH cross car beam bracket to cross beam
注1x bolt, 13mm, 25 Nm
-
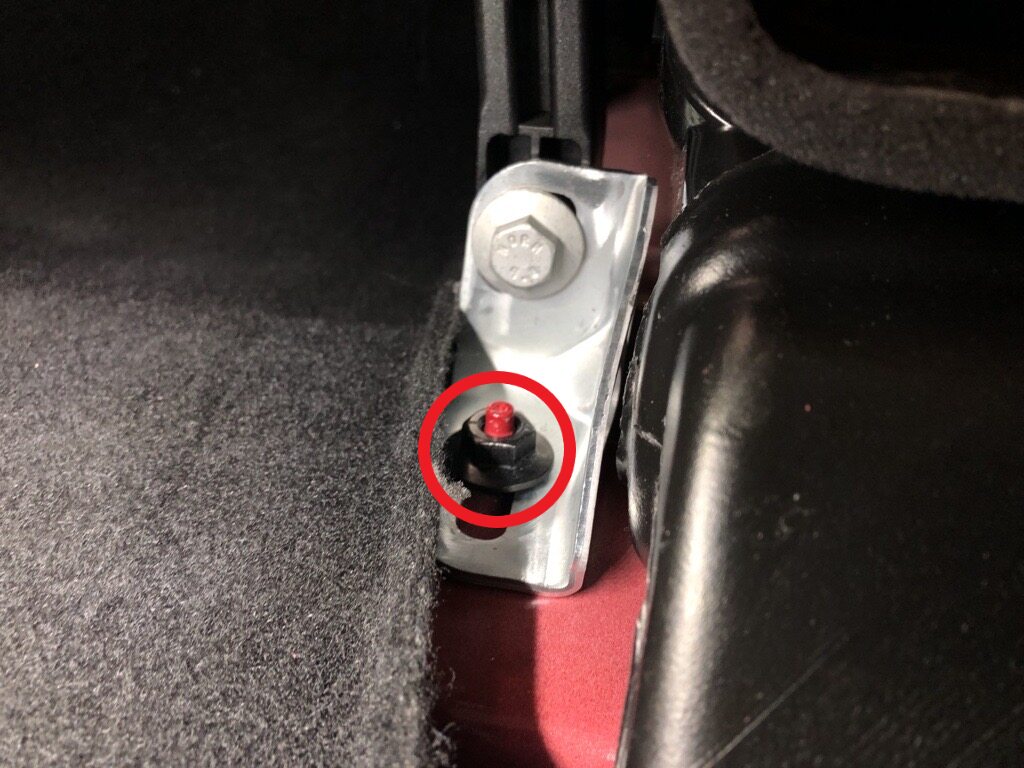
Remove the nut securing the LH cross car beam bracket to body
注1x nut, 13mm, 25 Nm
-
Remove LH cross car beam bracket from vehicle
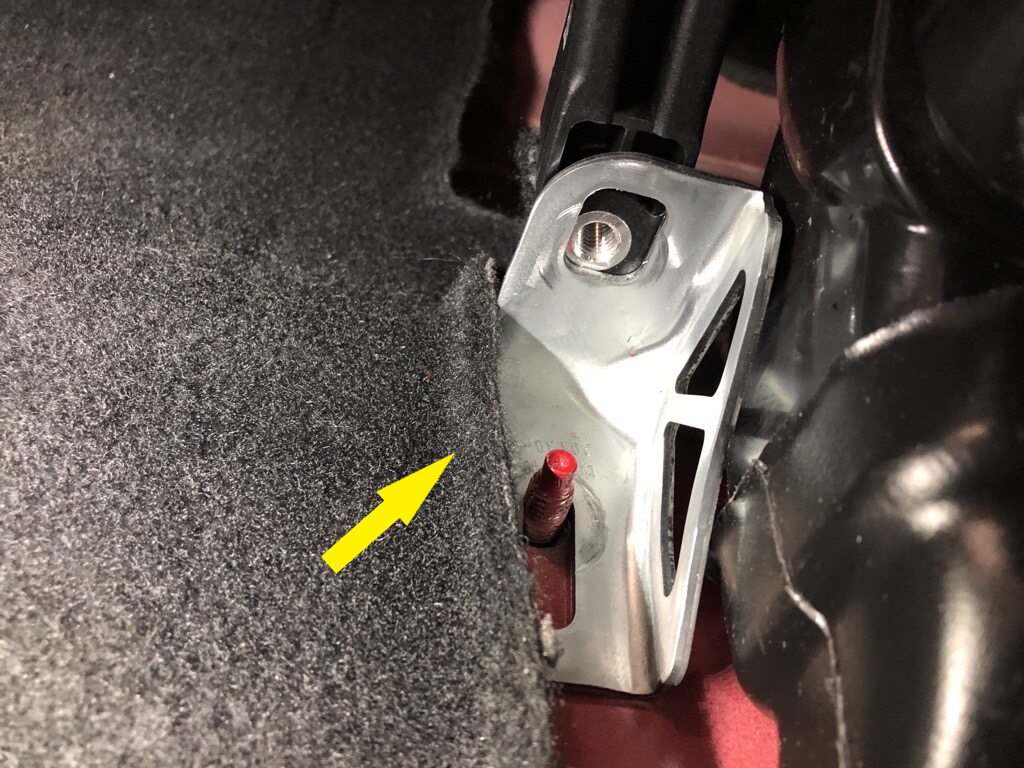
-
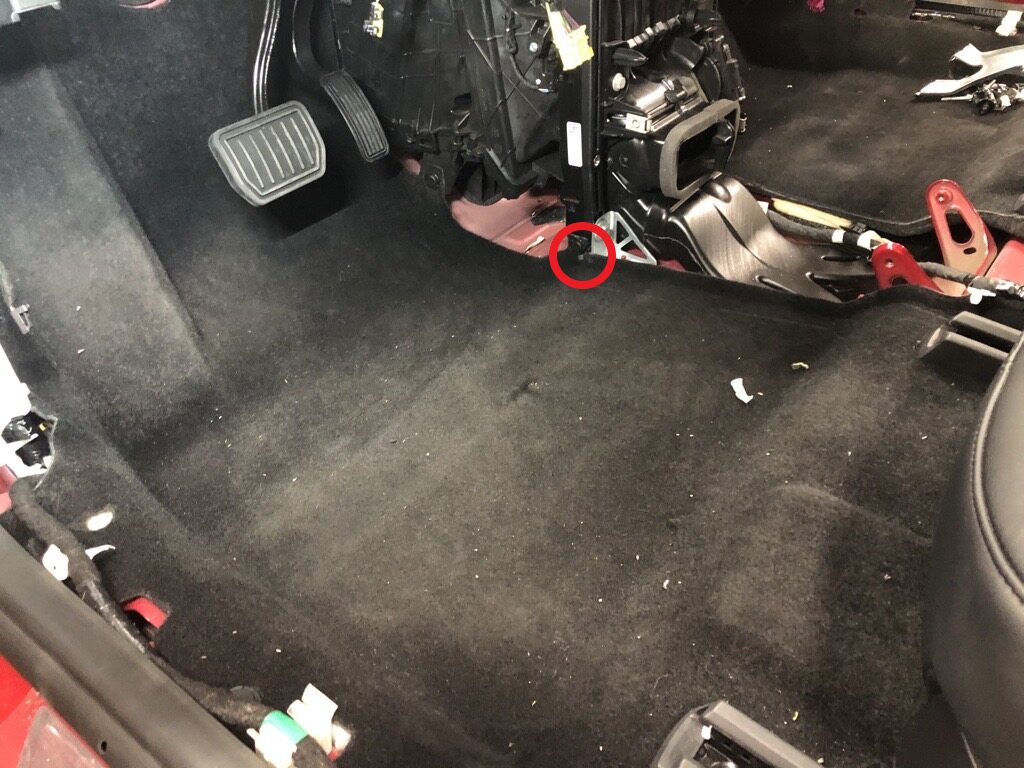
Remove clip securing LH front main carpet to cross car beam
注1x clips
-
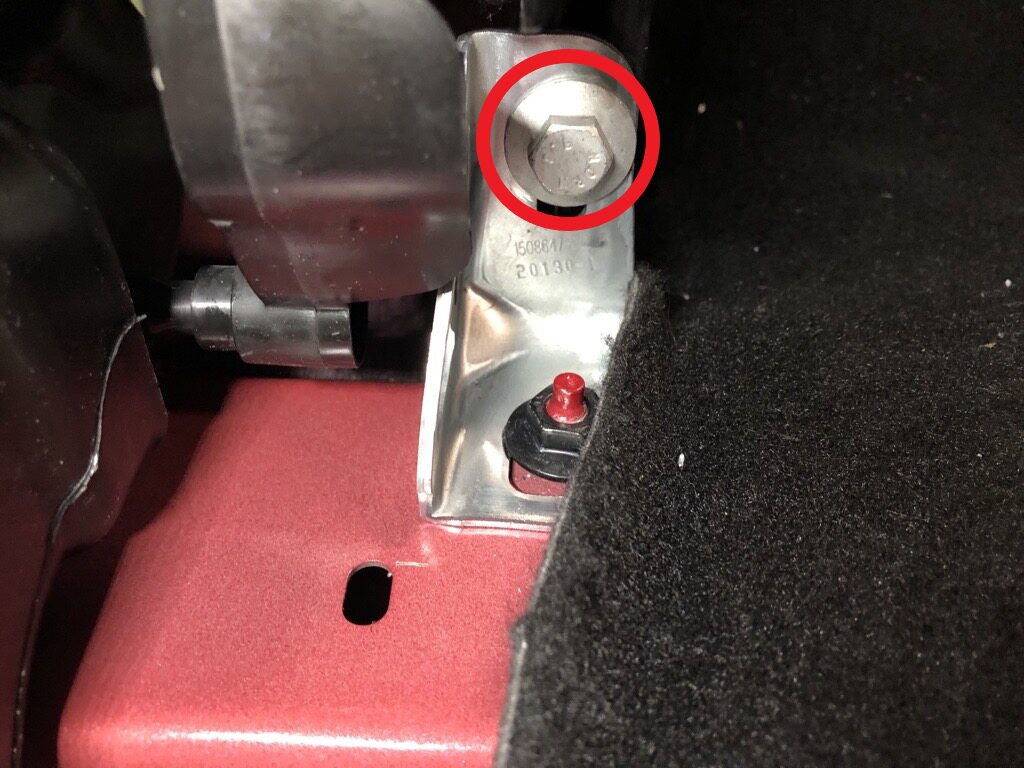
Remove bolt securing RH cross car beam bracket to cross beam
注1x bolt, 13mm, 25 Nm
-
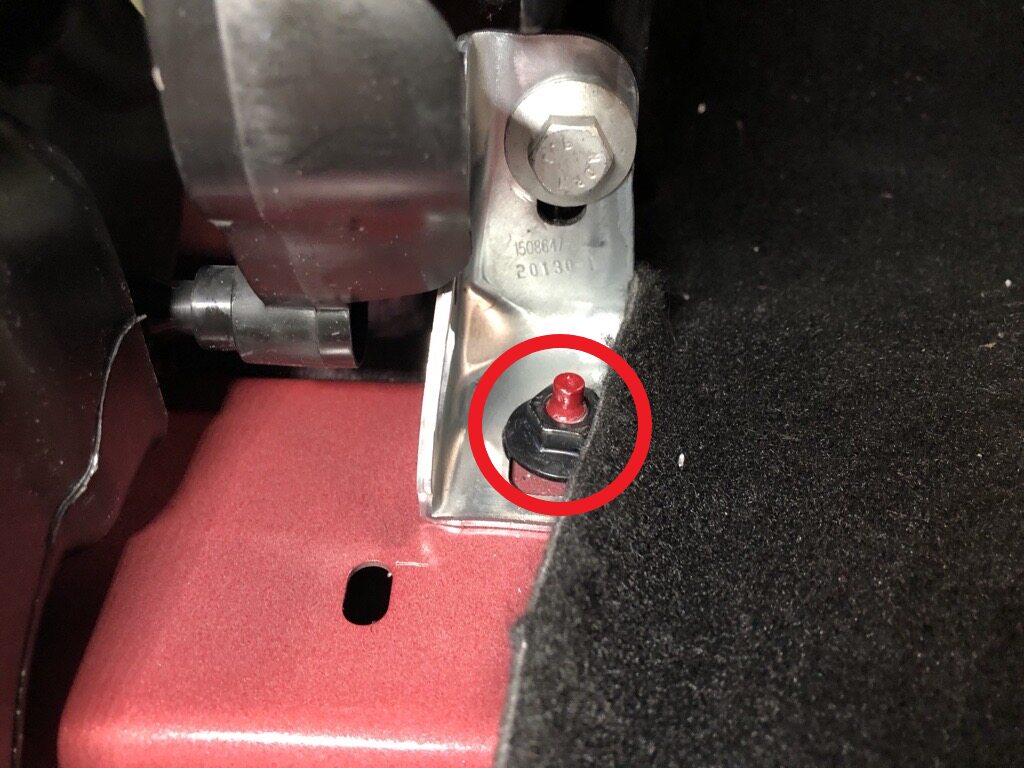
Remove nut securing RH cross car beam bracket to body
注1x nut, 13mm, 25 Nm
-
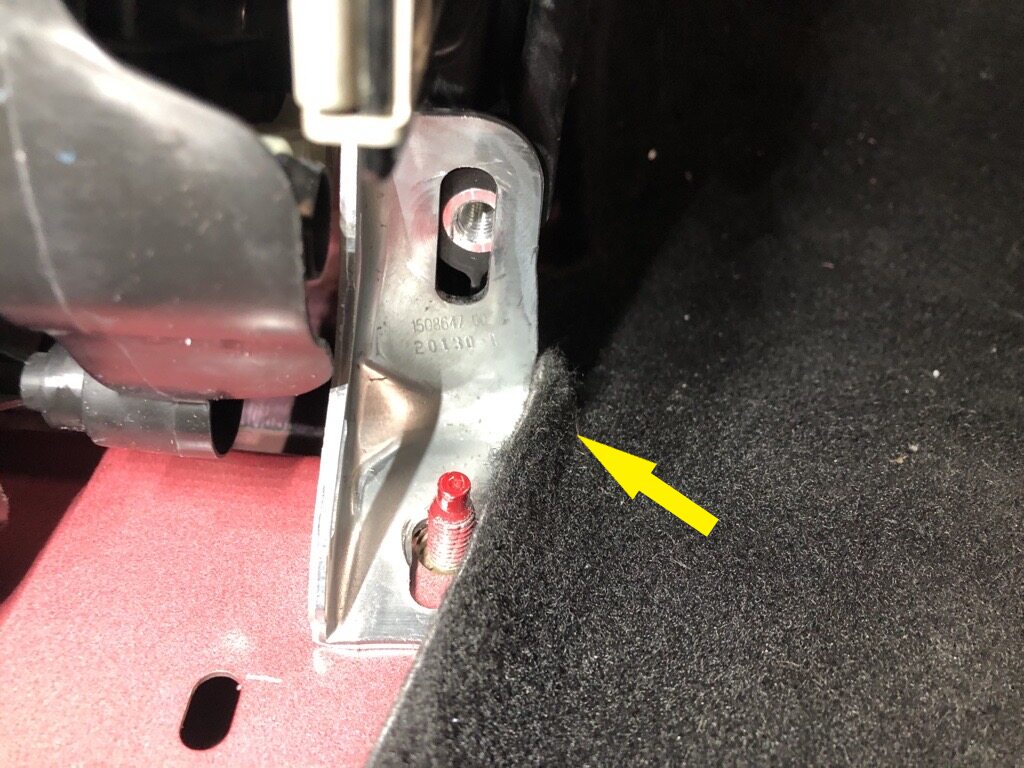
Remove the RH cross car beam bracket from vehicle
-
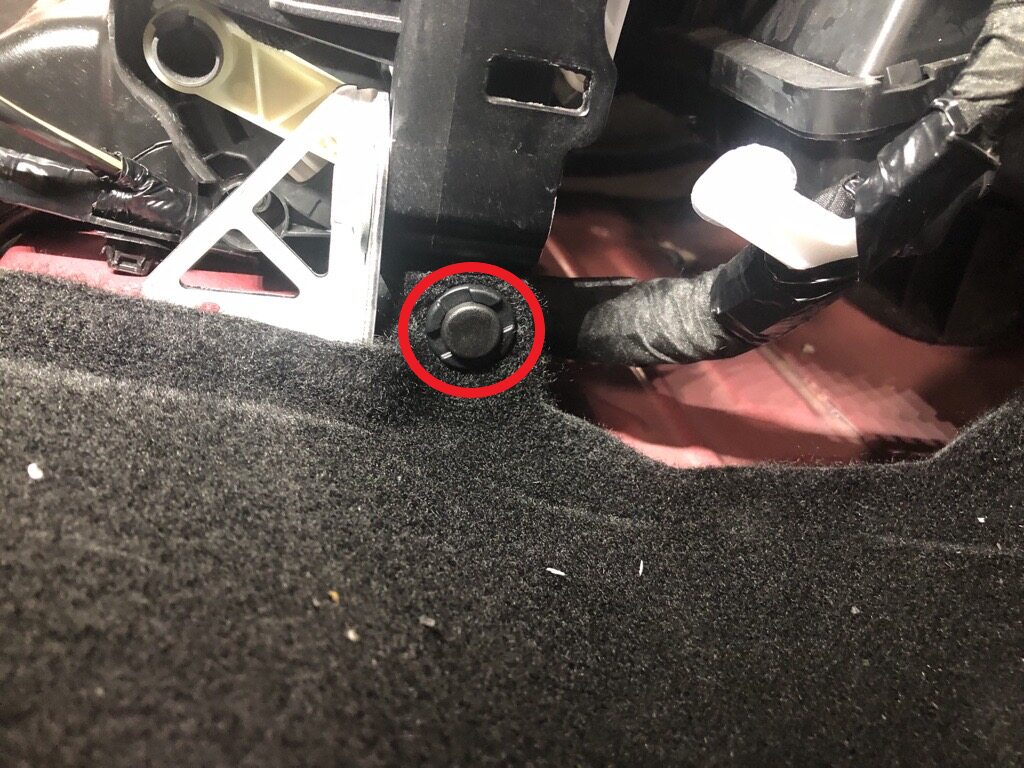
Remove clip securing RH front main carpet to cross car beam
注1 clip
-
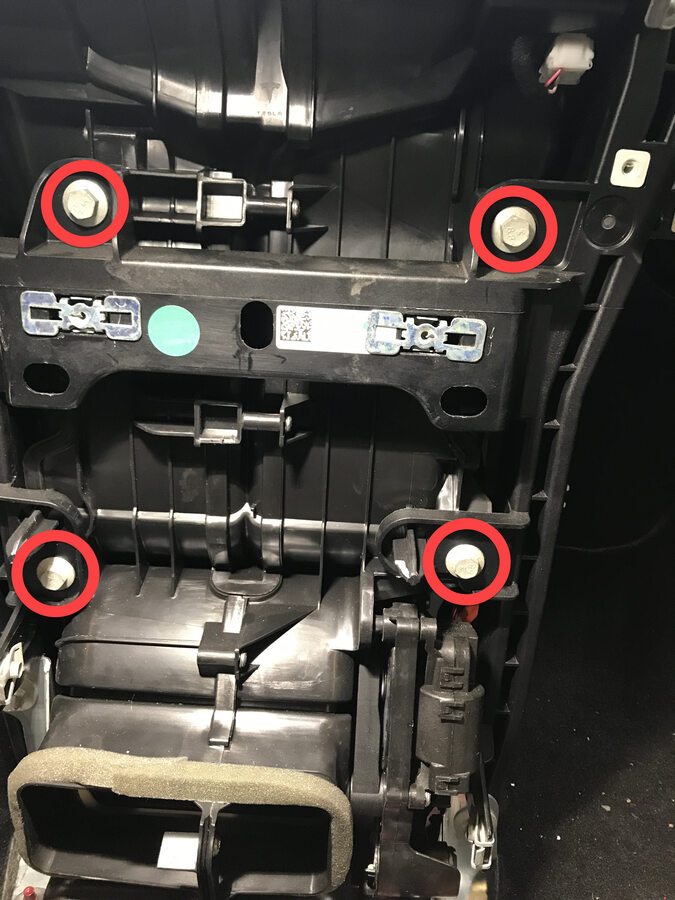
Remove bolts securing the cross car beam to HVAC assembly
注4x bolts, 10mm, 5.5 Nm
-
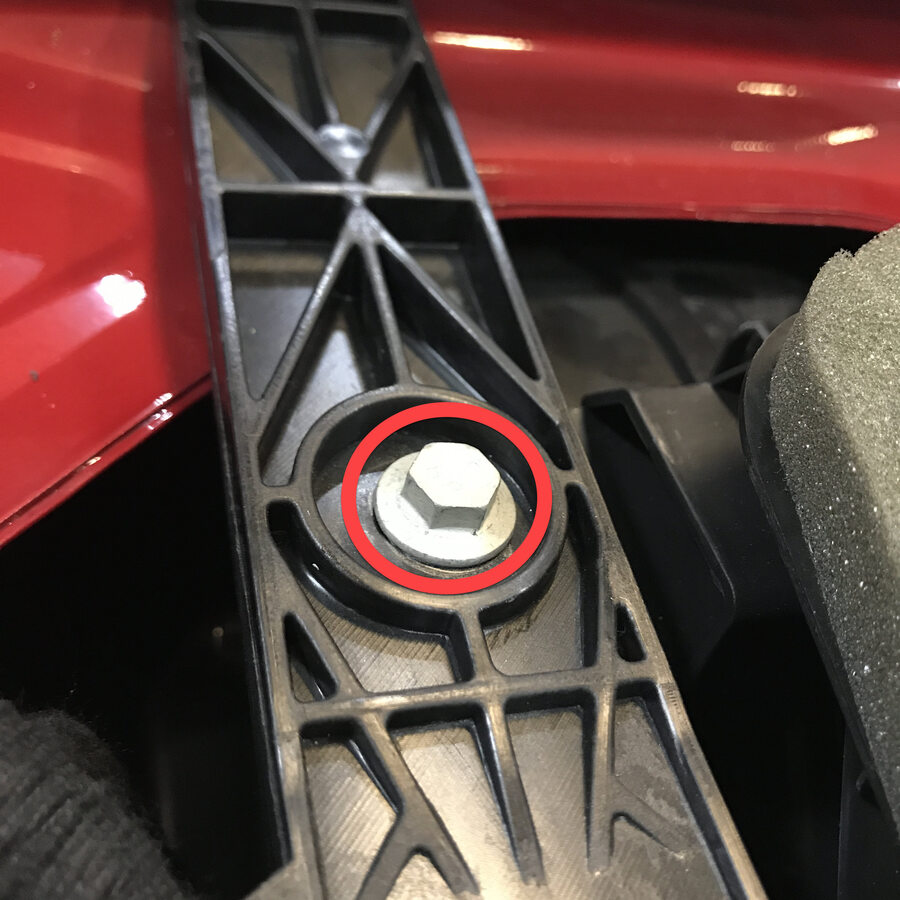
Remove bolt securing the cross car beam to HVAC assembly
注1x bolt, 10mm, 5.5 Nm
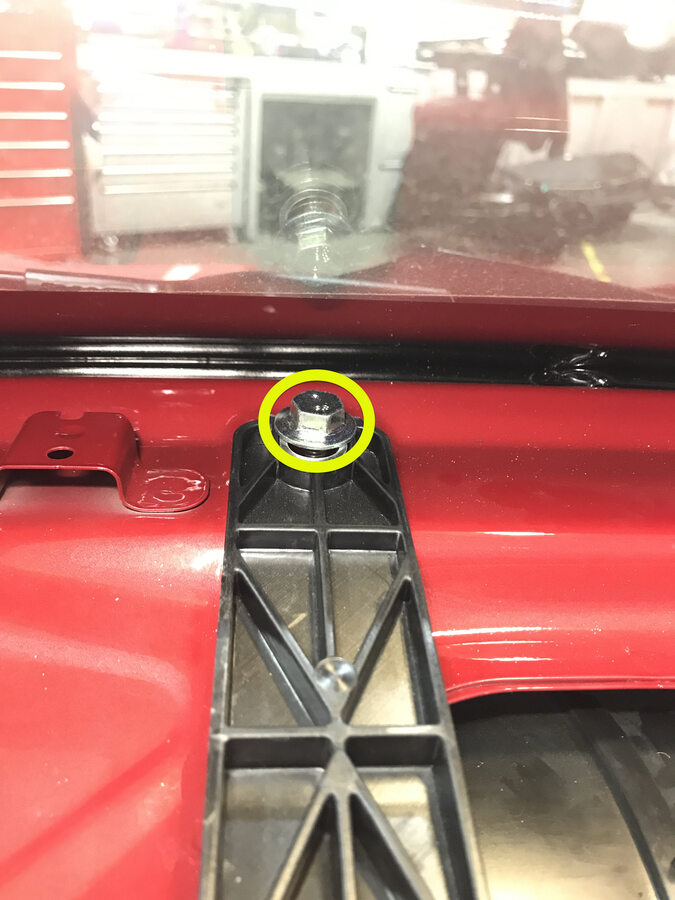
-
Loosen bolt securing cross car beam to upper cowl
注1x bolt, 13mm, 25 Nm
-
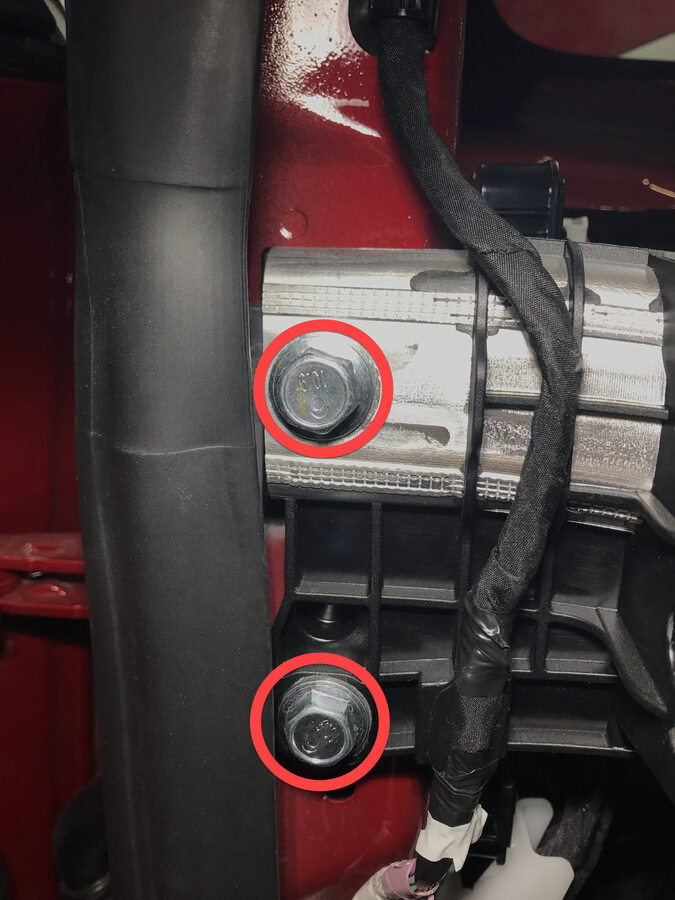
Remove the bolts securing the LH cross car beam to body
注2x bolts, 15mm, 29 Nm
-
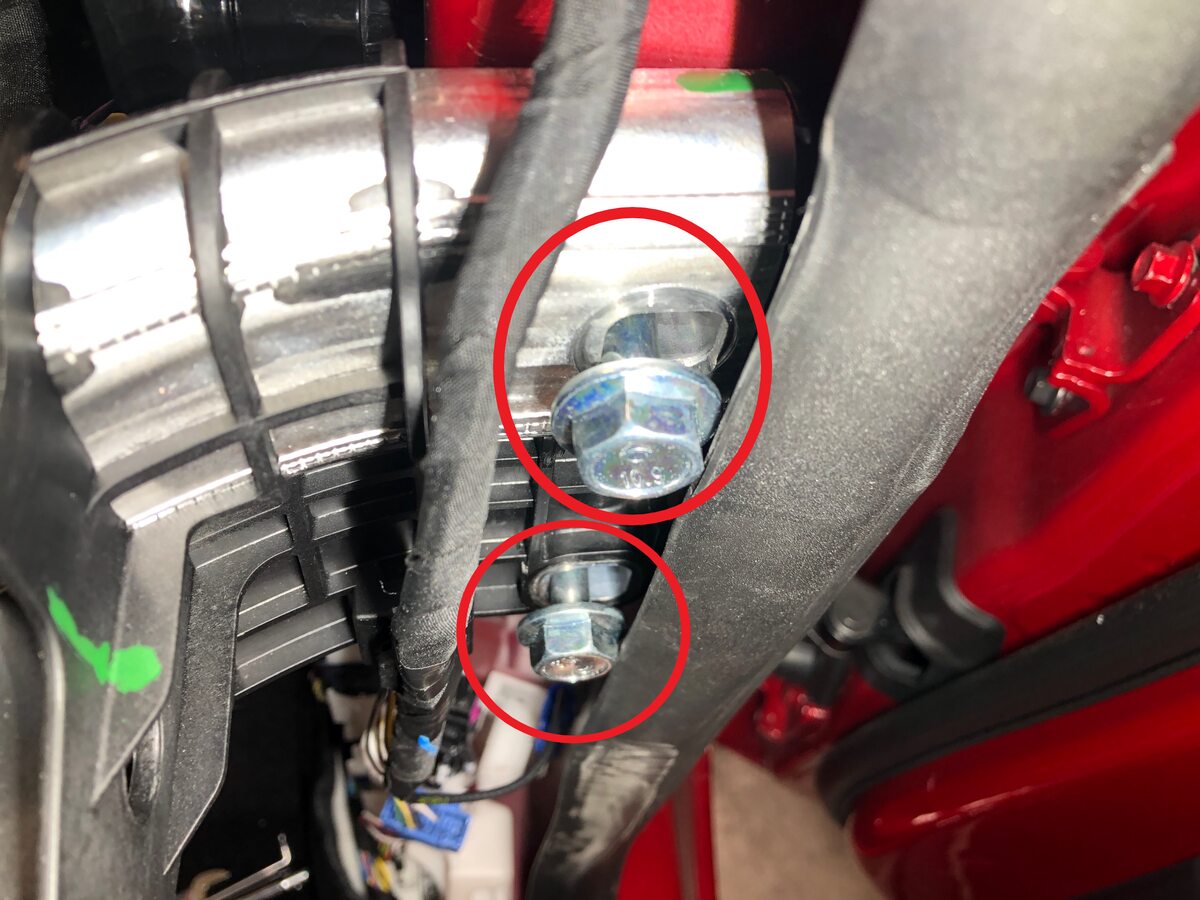
Partially remove bolts securing RH cross car beam to body
注2x bolts, 15mm, 29 Nm, Leave a few threads of RH cross car beam bolts installed inside body of vehicle, This will avoid cross car beam from falling
-
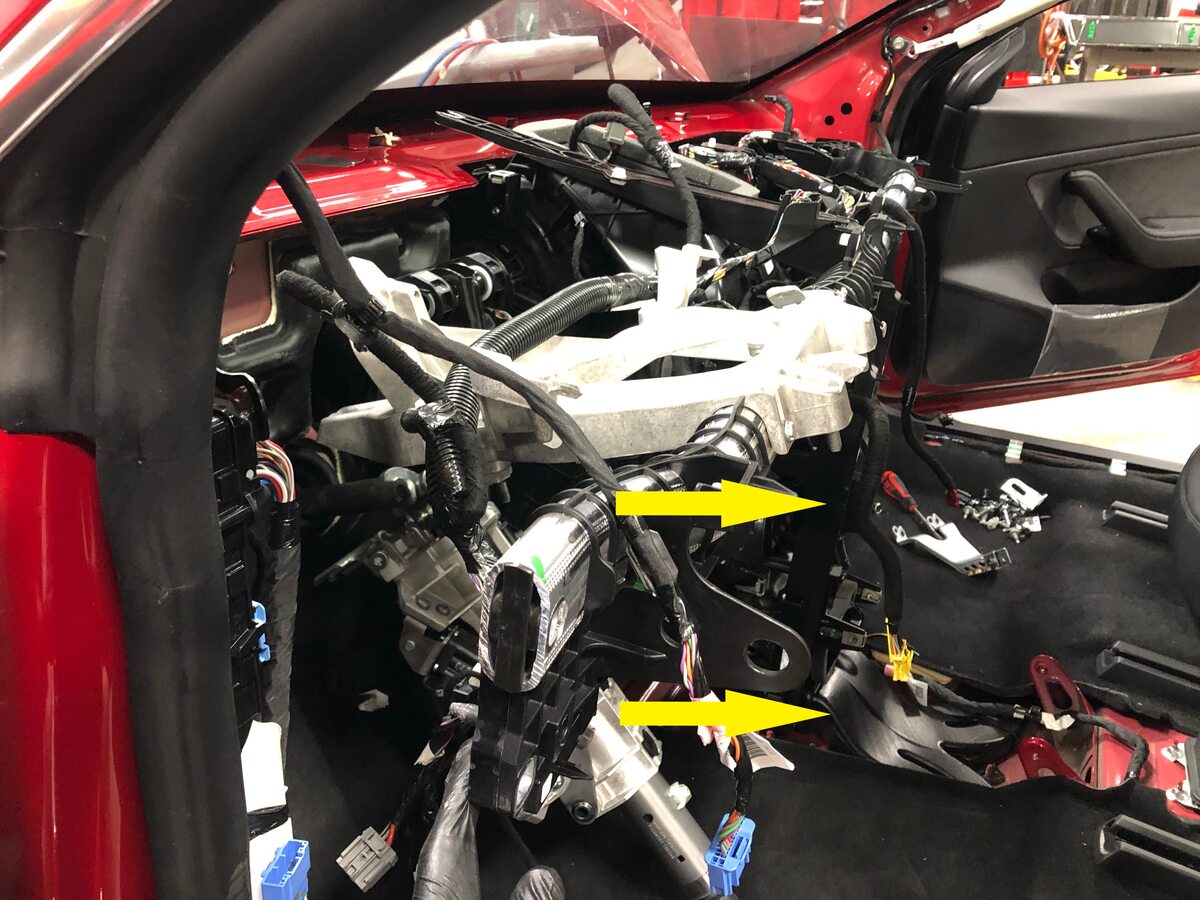
Partially remove LH side of cross car beam
注Recommend assistance, Use caution not to damage the interior
-
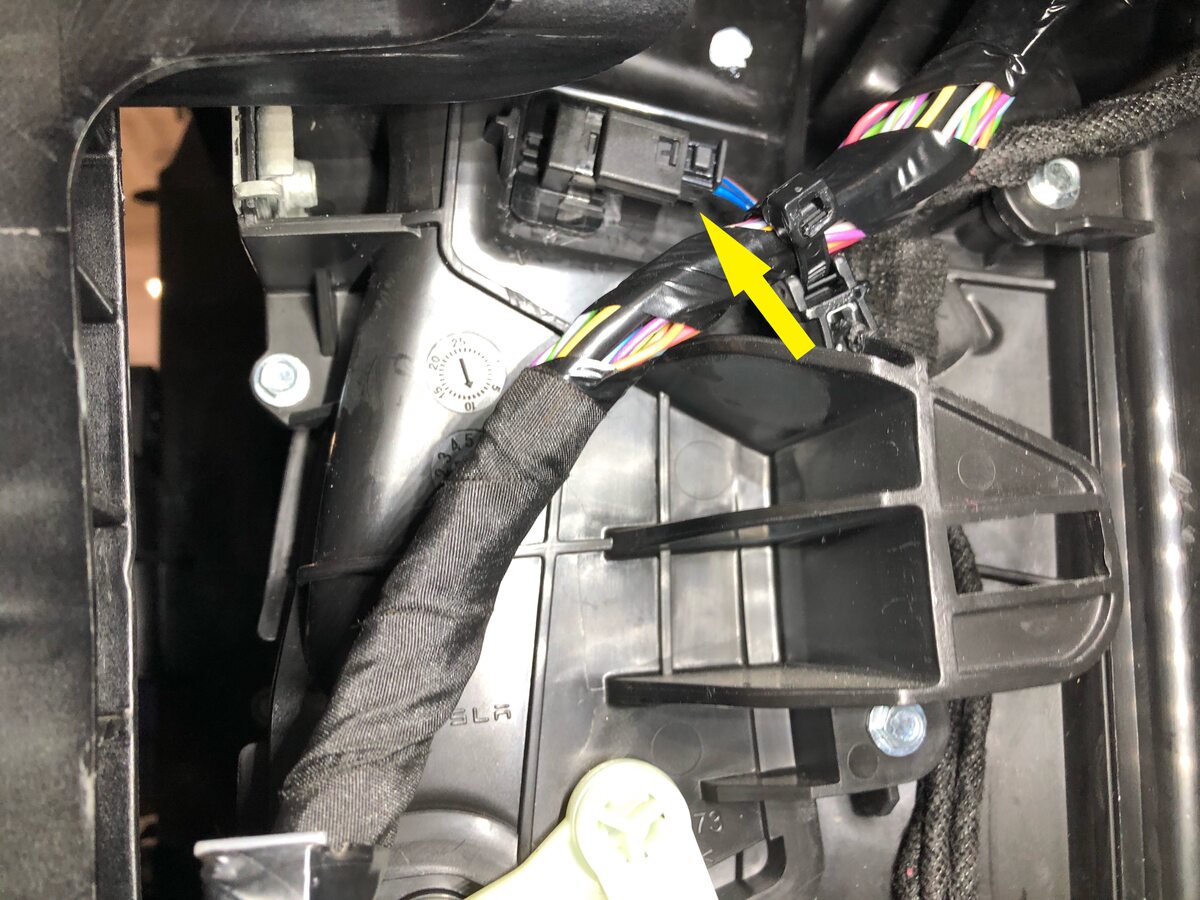
Disconnect RH lower duct thermistor connector
注1x connector
-
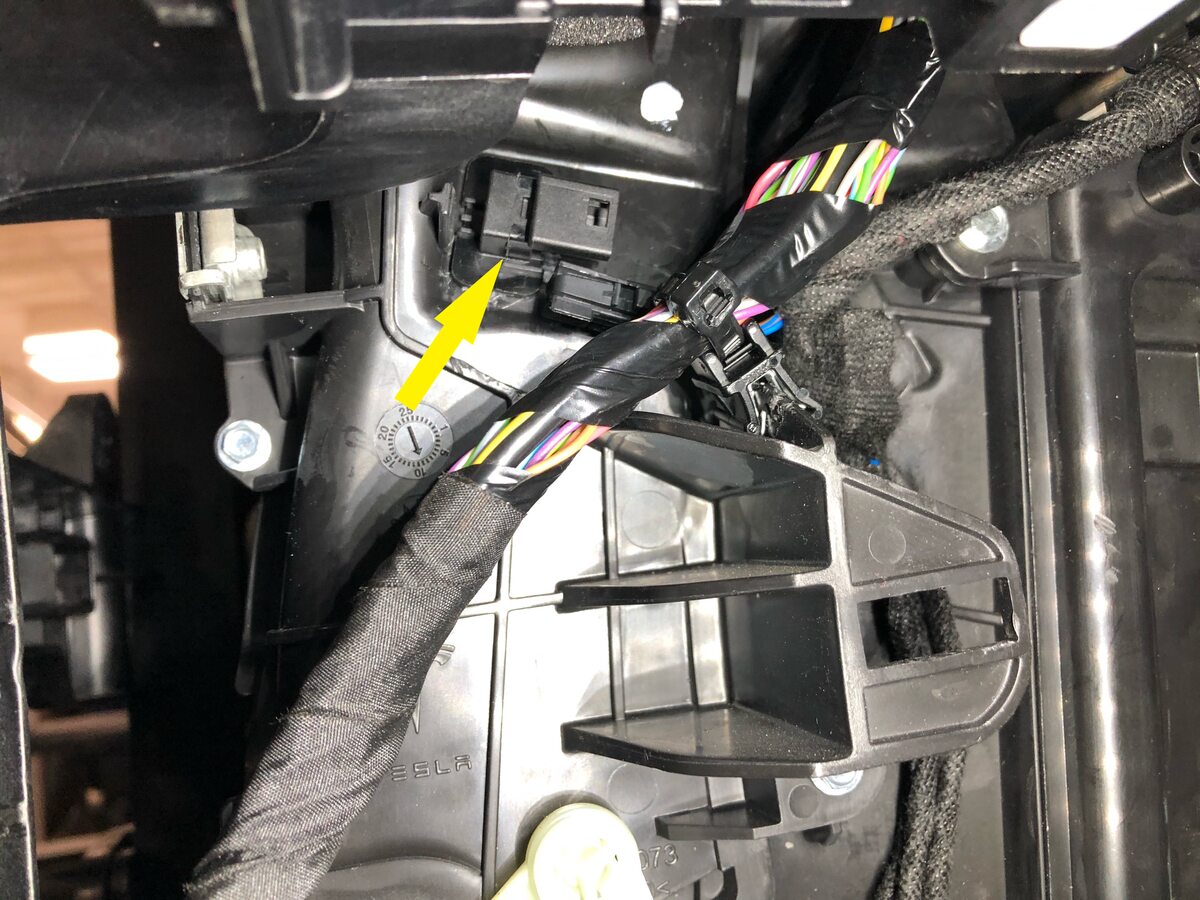
Remove RH lower duct thermistor from HVAC assembly
注2x tabs


安装
-
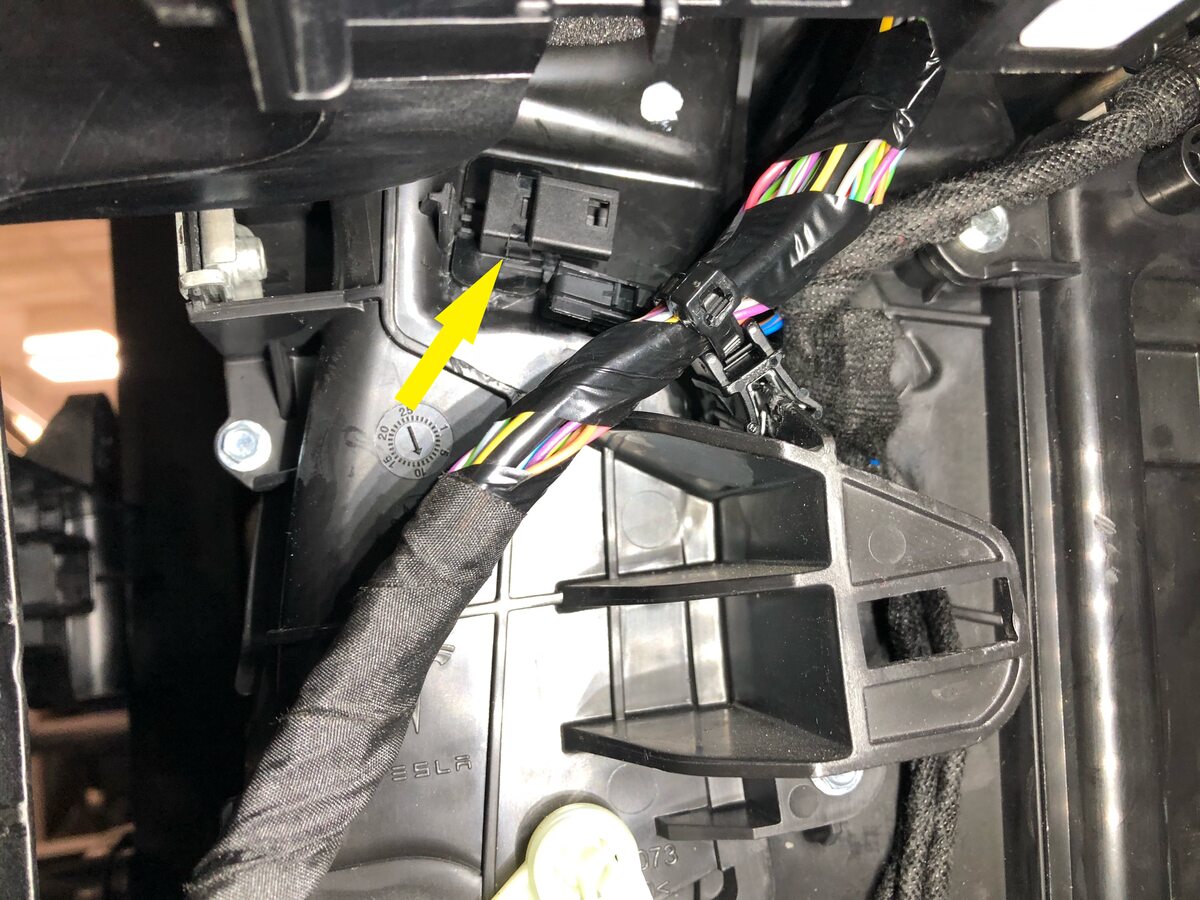
Install RH lower duct thermistor into HVAC assembly
注2x tabs
-
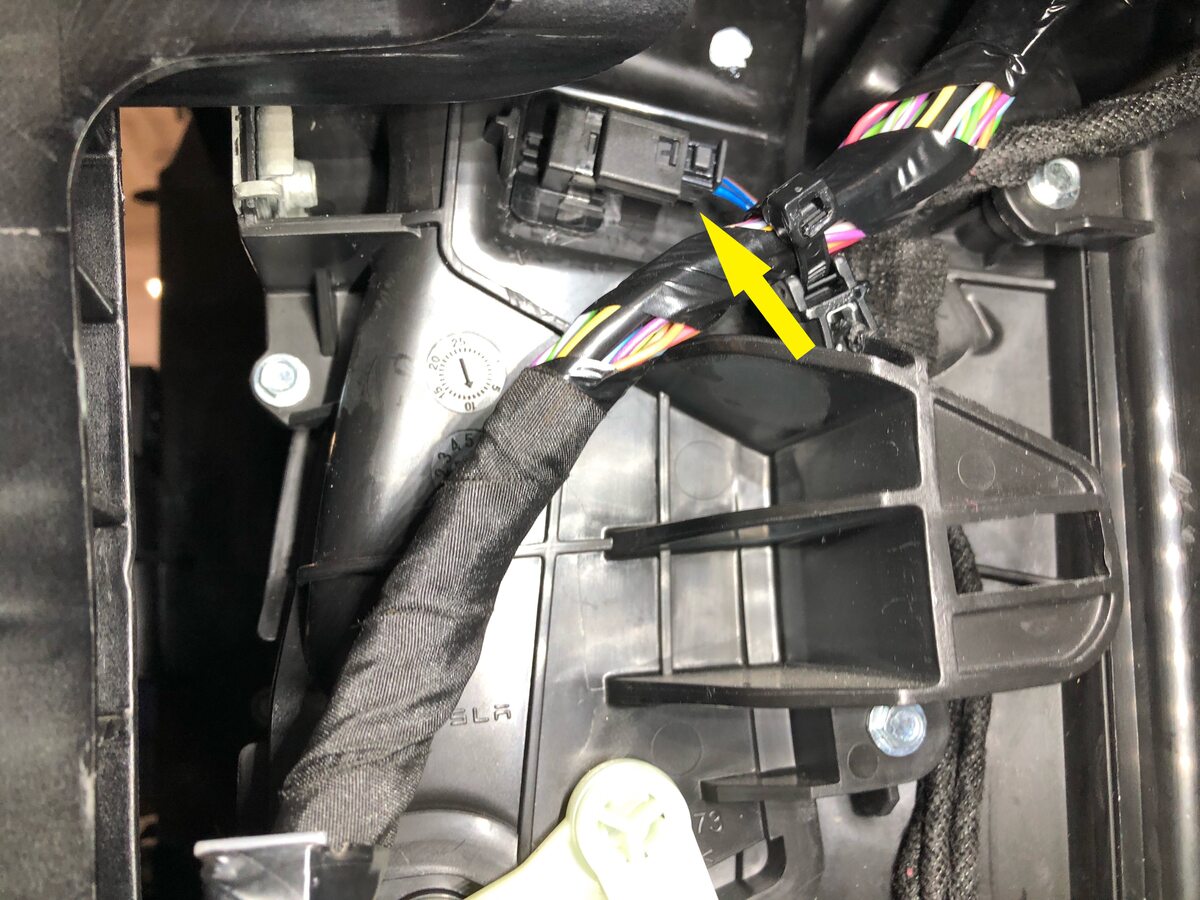
Connect RH lower duct thermistor connector
注1x connector
-
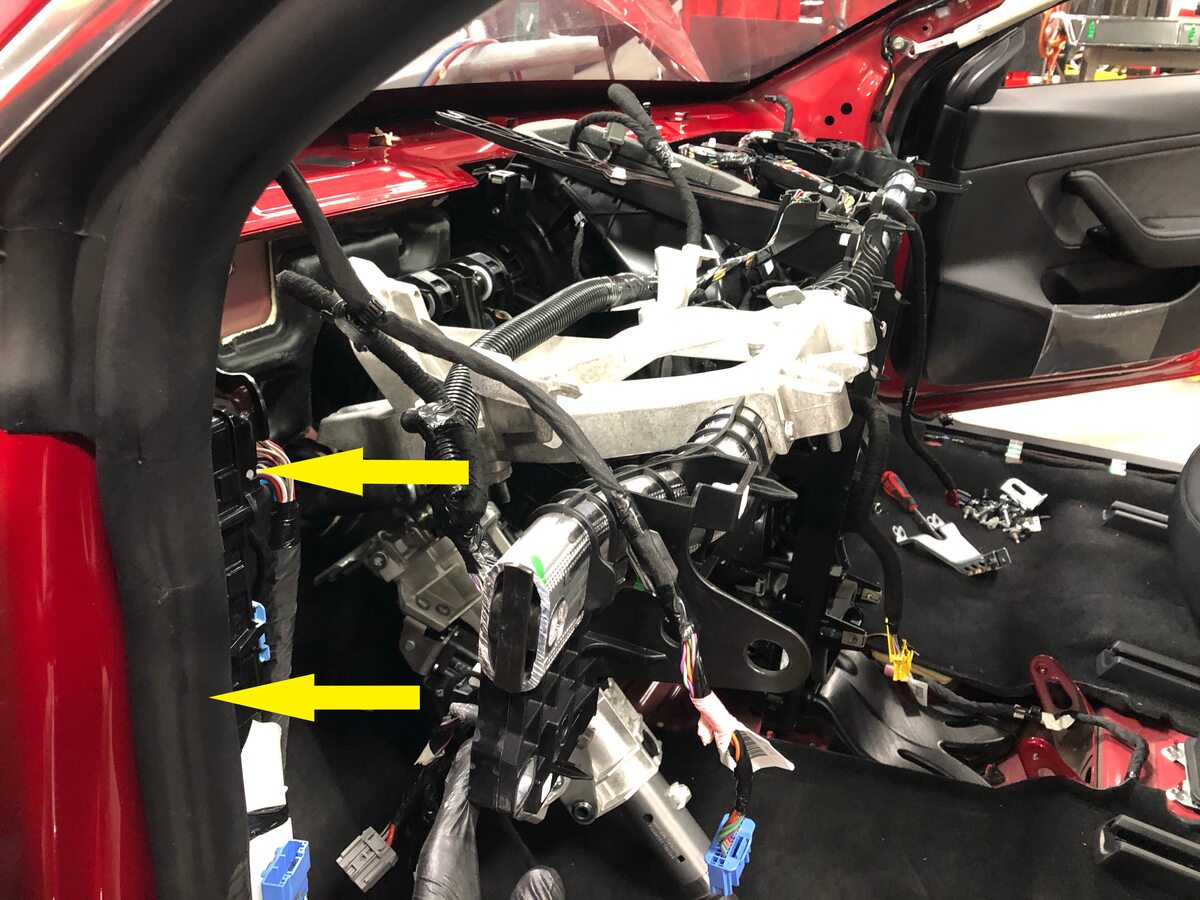
Install cross car beam into position for installation
-
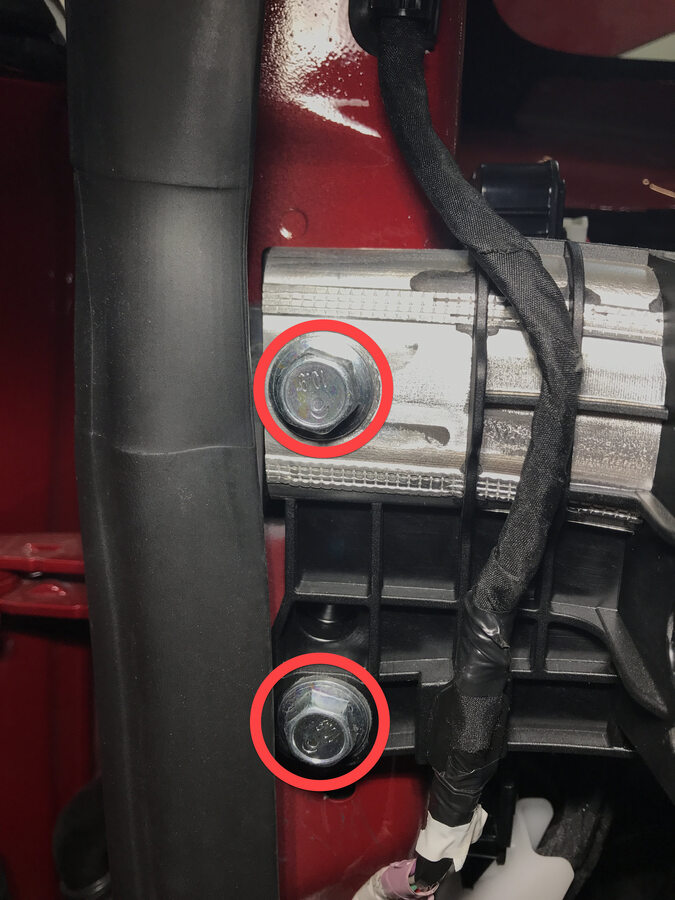
Loosely install bolts securing LH cross car beam to body
注2x bolts, 15mm, 29 Nm, Torque at later step
-
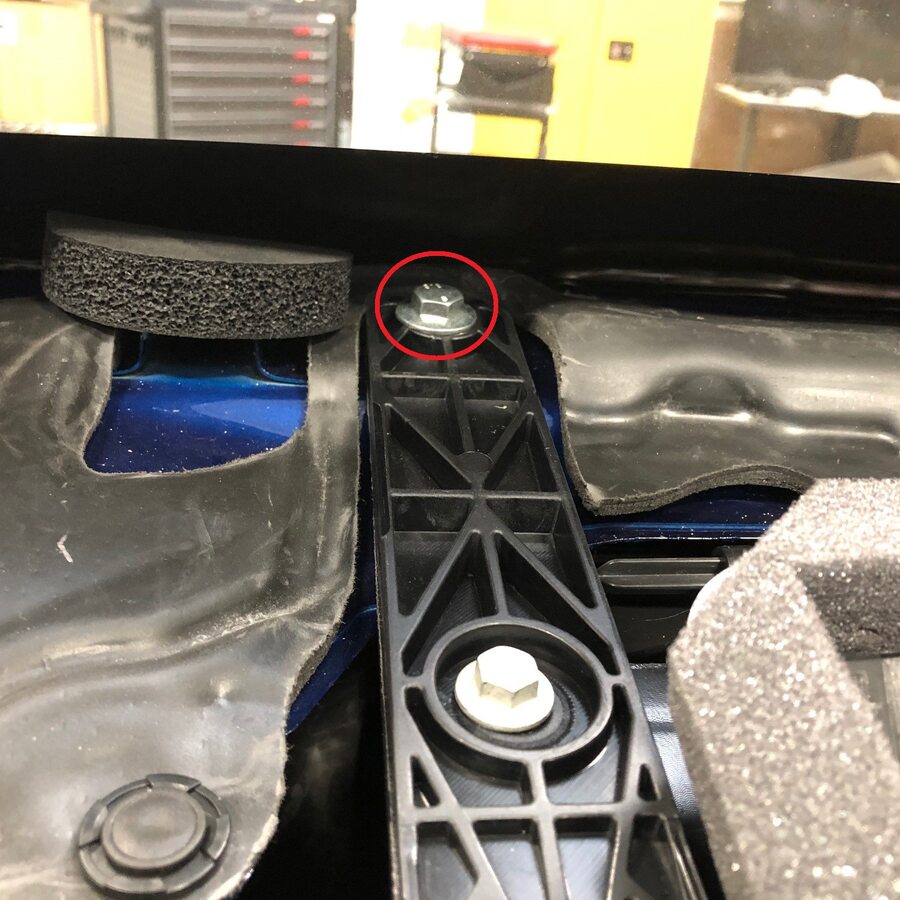
Loosely install bolt securing cross car beam to upper cowl
注1x bolt, 13mm, 25 Nm
-
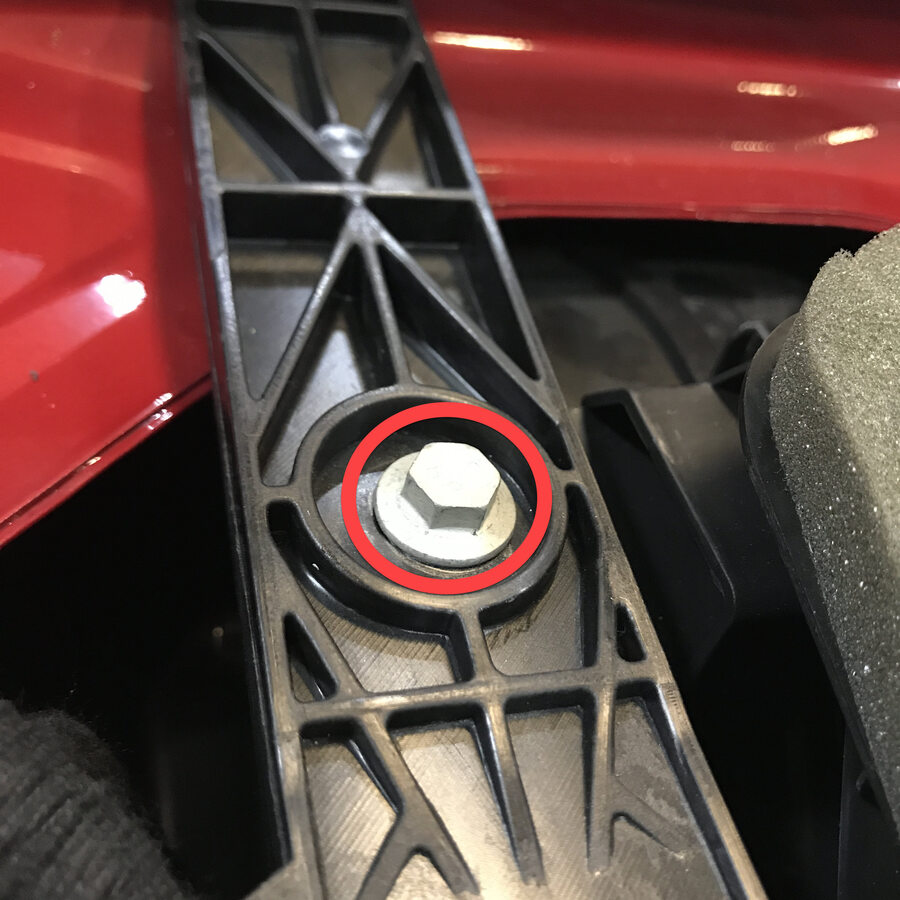
Loosely install bolt securing cross car beam to HVAC assembly
注1x bolt, 10mm, 5.5 Nm, Torque at later step
-
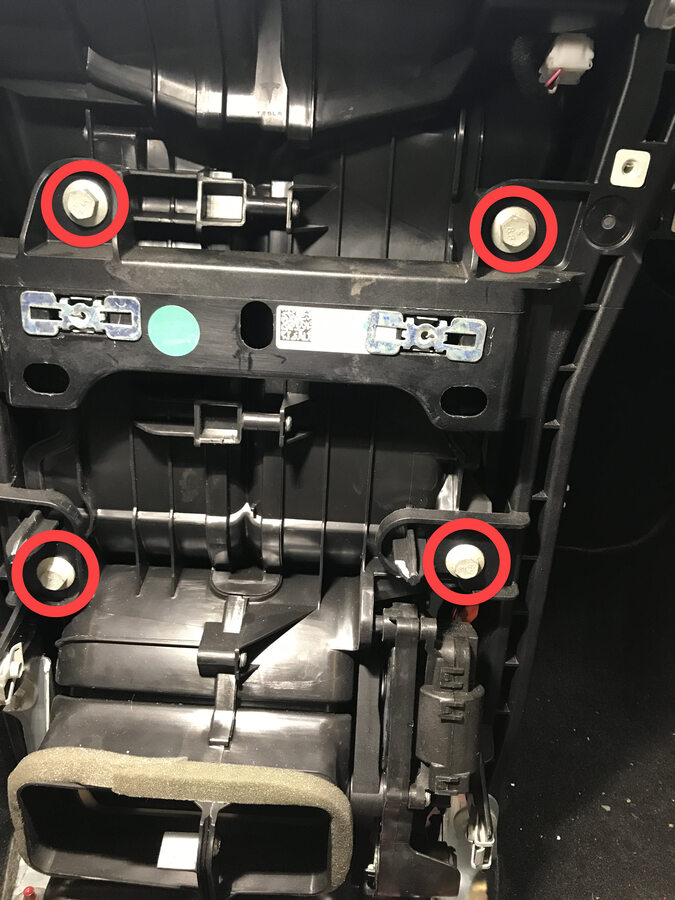
Loosely install bolts securing cross car beam to HVAC assembly
注4x bolts, 10mm, 5.5 Nm, Torque at later step
-
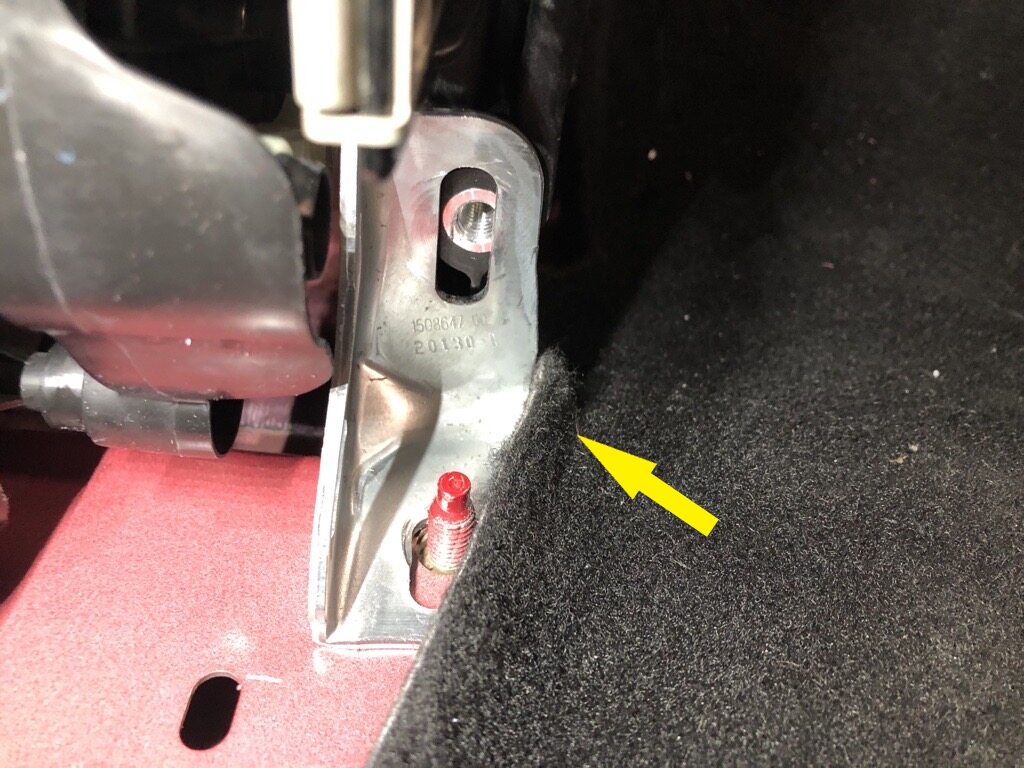
Position RH cross car beam bracket to vehicle for installation
-
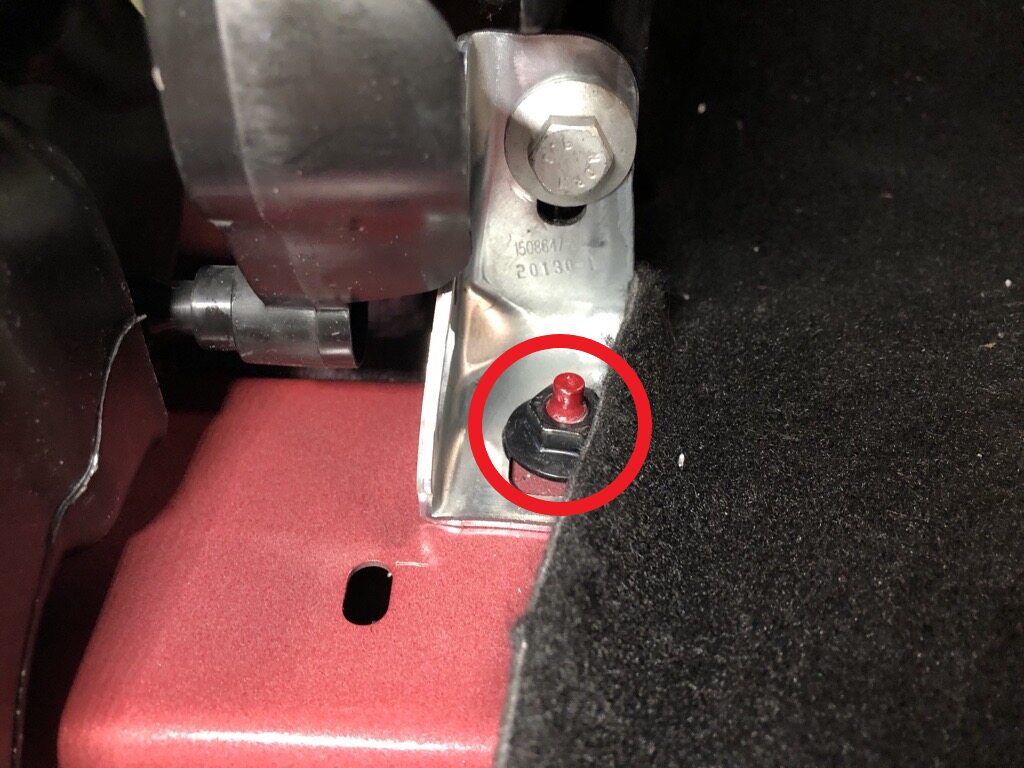
Loosely install the nut securing the RH cross car beam bracket to body
注1x nut, 13mm, 25 Nm, Torque at later step
-
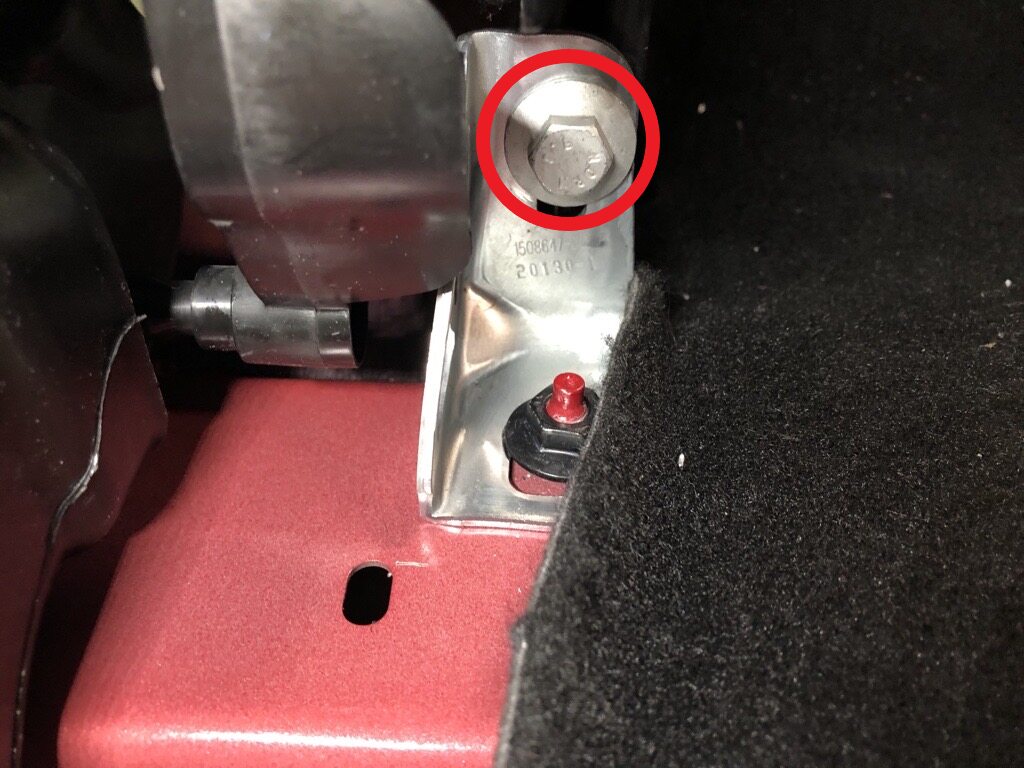
Loosely install bolt securing RH cross car beam bracket to cross car beam
注1x bolt, 13mm, 25 Nm, Torque at later step
-
Position LH cross car beam bracket to vehicle for installation
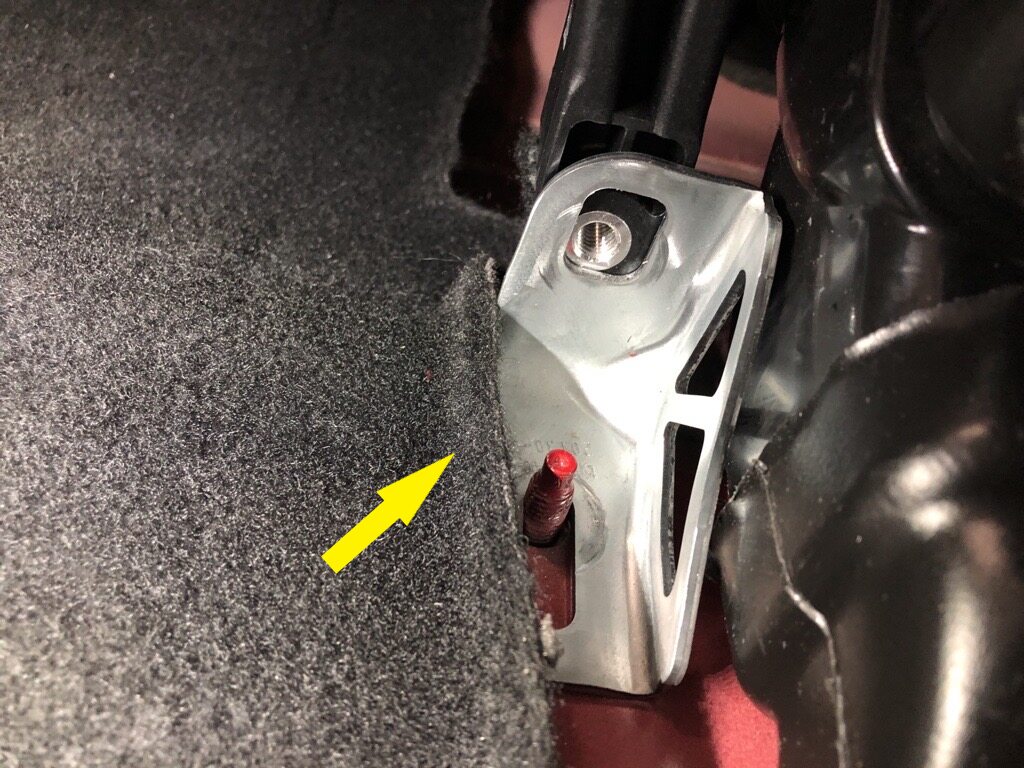
-
Loosely Install the nut securing the LH cross car beam bracket to body
注1x nut, 13mm, 25 Nm, Torque at later step
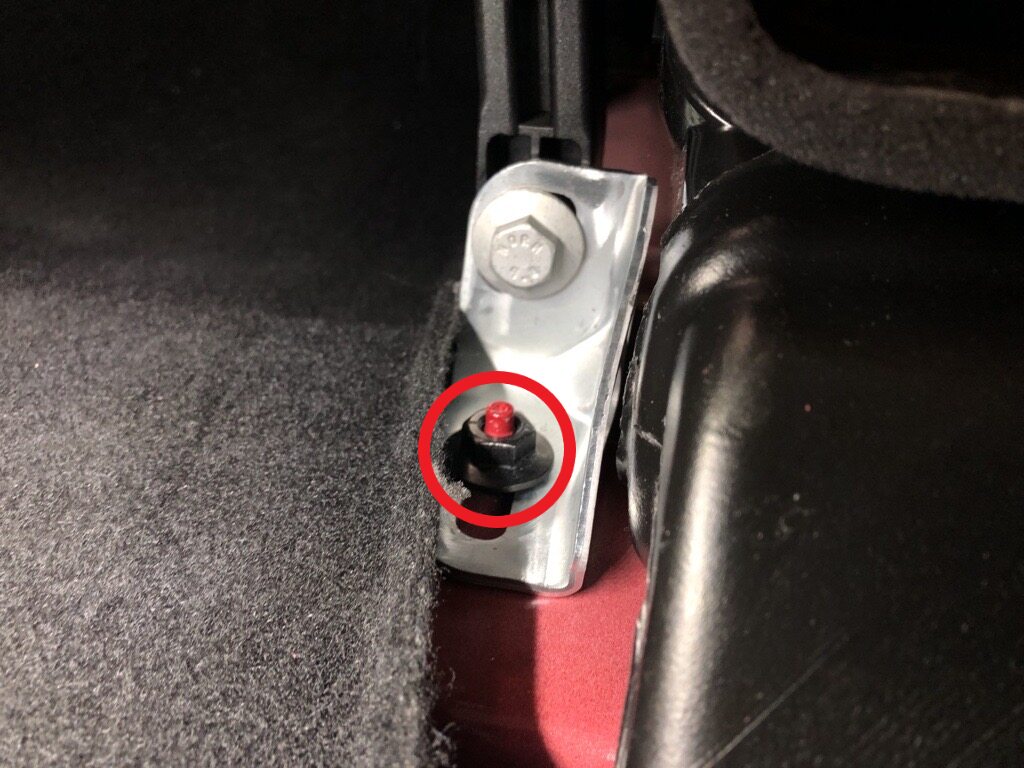
-
Loosely install bolt securing cross car beam to LH cross car beam bracket
注1x bolt, 13mm, 25 Nm, Torque at later step
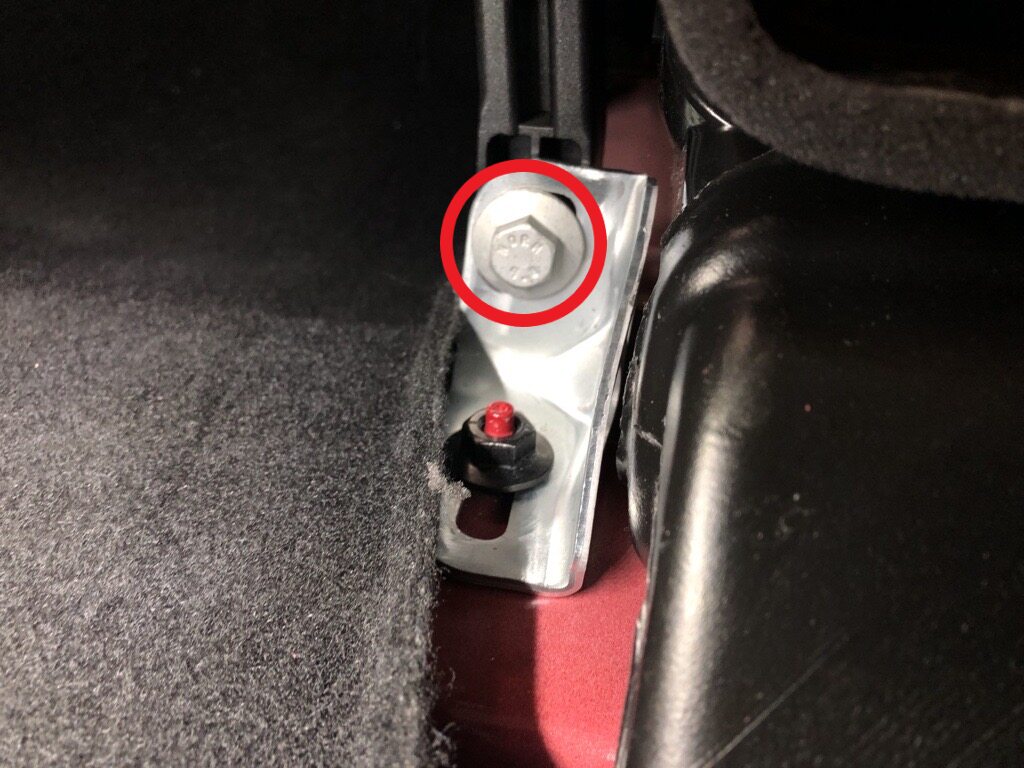
-
Install bolts securing cross car beam to LH side of bulkhead
注2x bolts, 13mm, 25 Nm
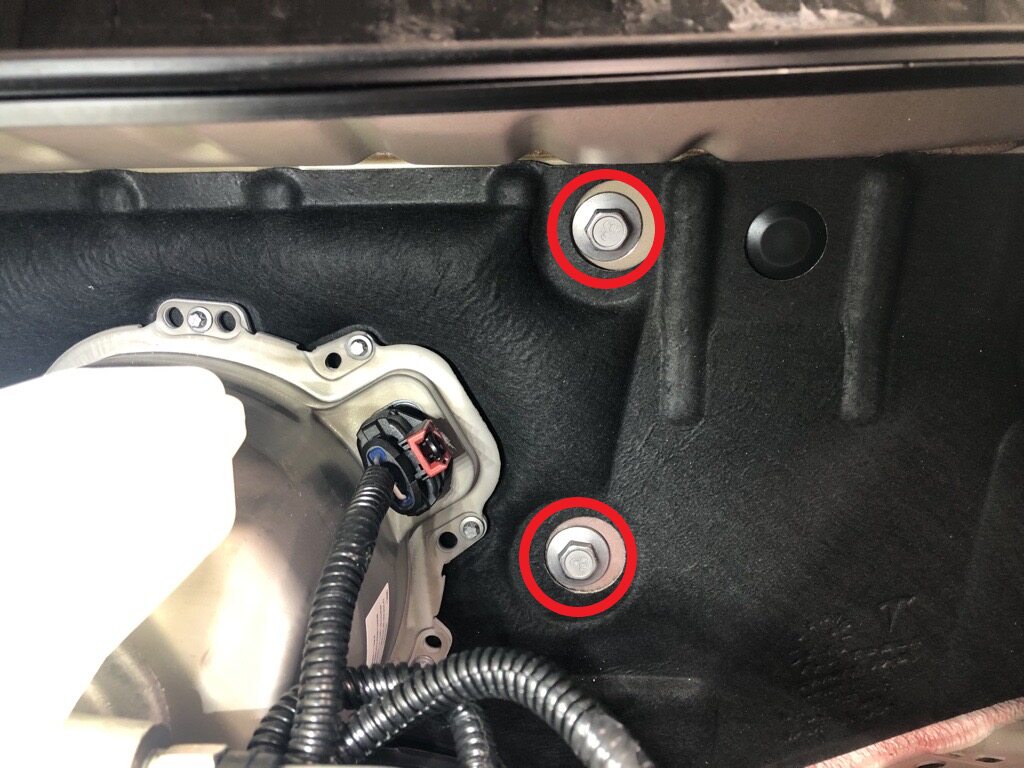
-
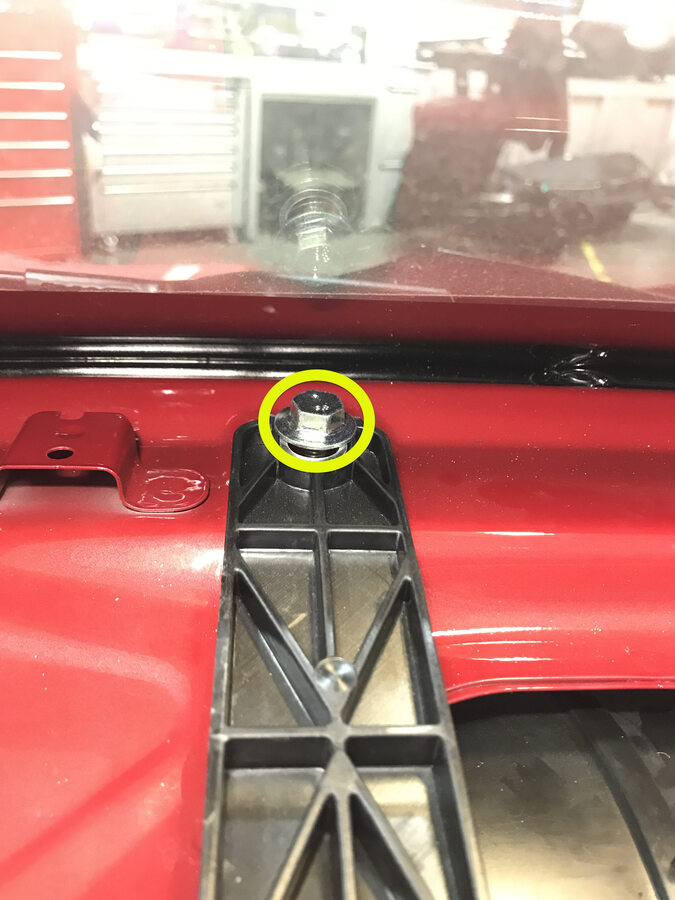
Torque bolt securing cross car beam to upper cowl
注1x bolts, 13mm, 25 Nm
-
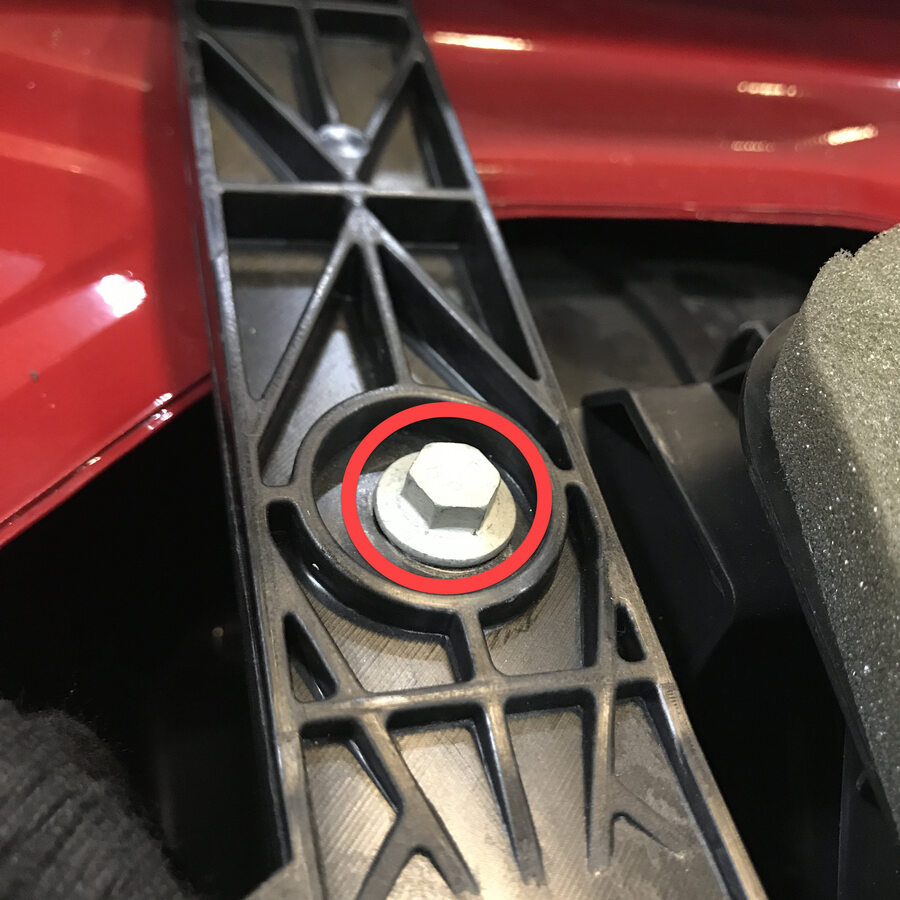
Torque bolt securing the cross car beam to HVAC assembly
注1x bolts, 10mm, 5.5 Nm
-
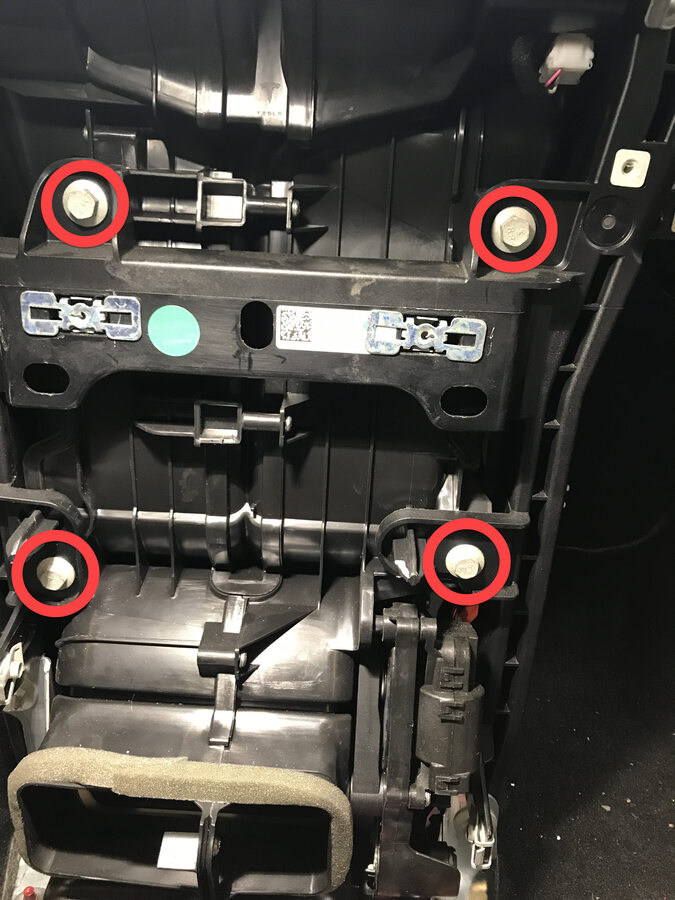
Torque bolts securing the cross car beam to HVAC module
注4x bolts, 10mm, 5.5 Nm
-
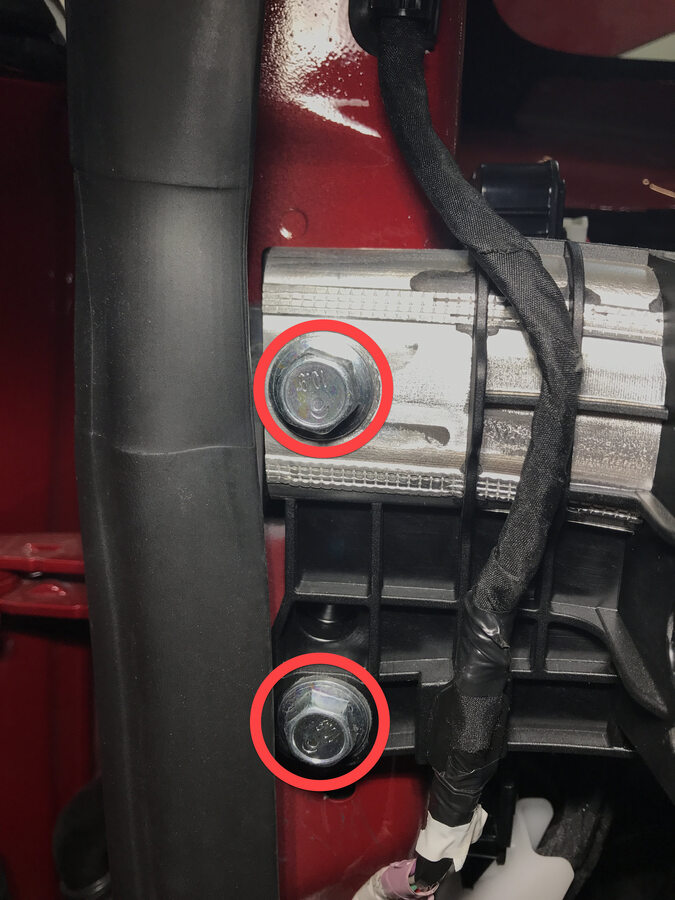
Torque bolts securing the LH cross car beam to body
注2x bolts, 15mm, 29 Nm
-
Torque bolts securing the RH cross car beam to body
注2x bolts, 15mm, 29 Nm
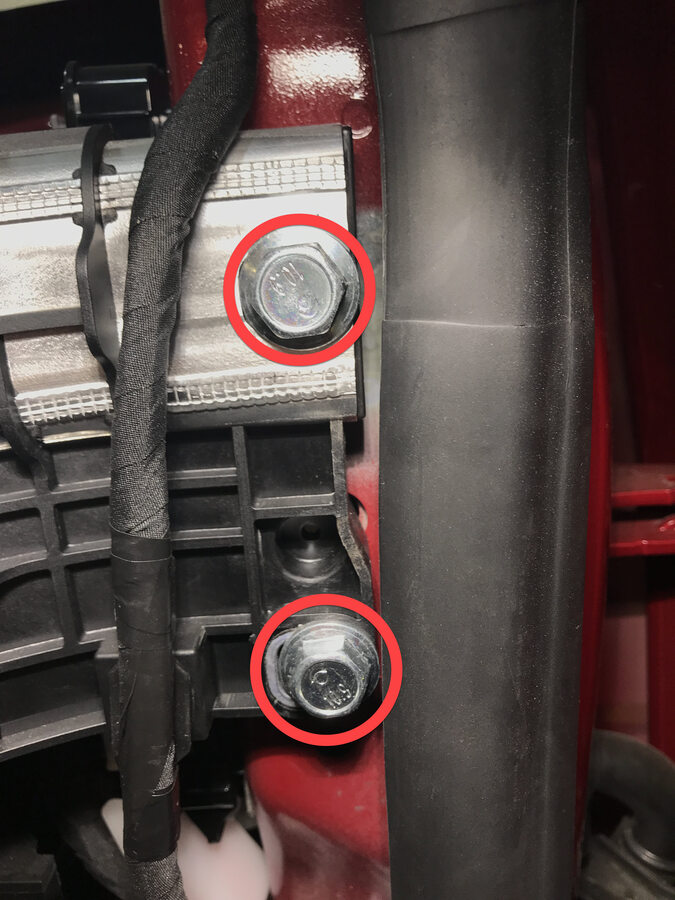
-
Torque the nut securing the RH cross car beam bracket to body
注1x nut, 13mm, 25 Nm
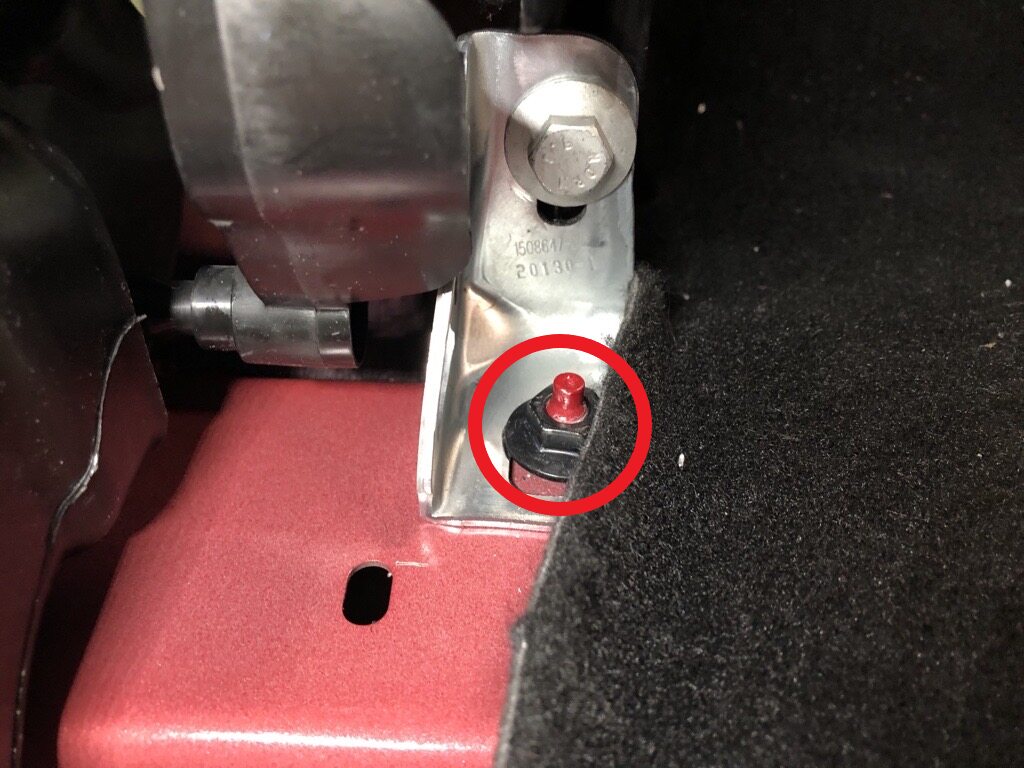
-
Torque bolt securing RH cross car beam bracket to cross car beam
注1x bolt, 13mm, 25 Nm
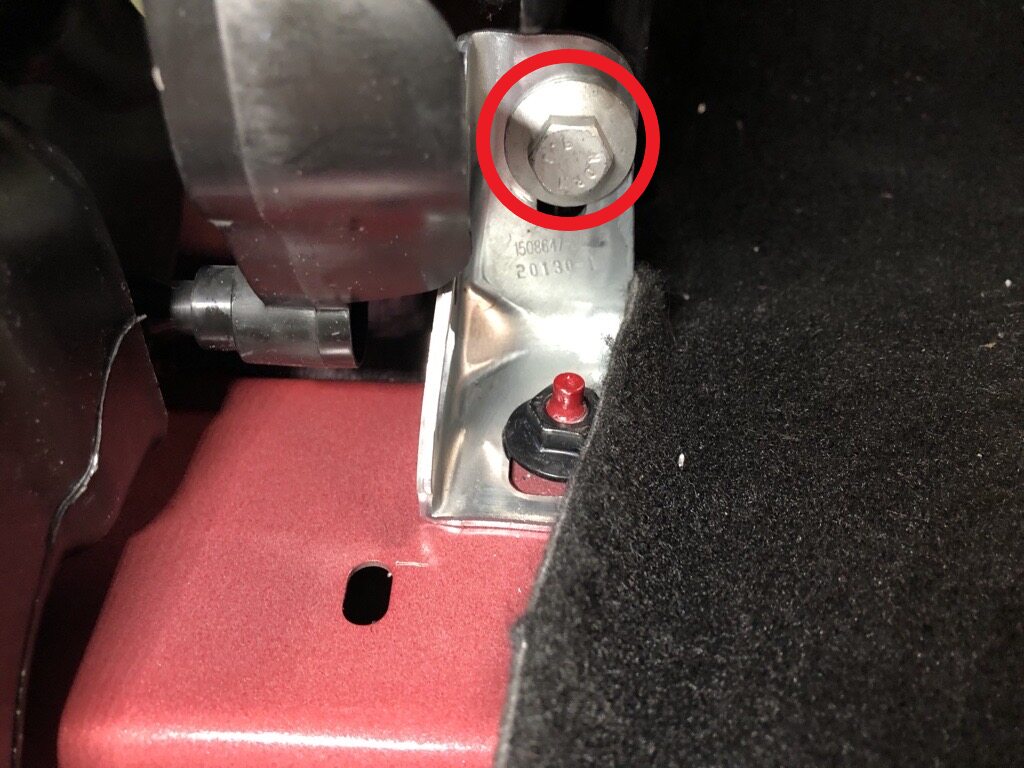
-
Install clip securing RH front main carpet to cross car beam
注1x clip
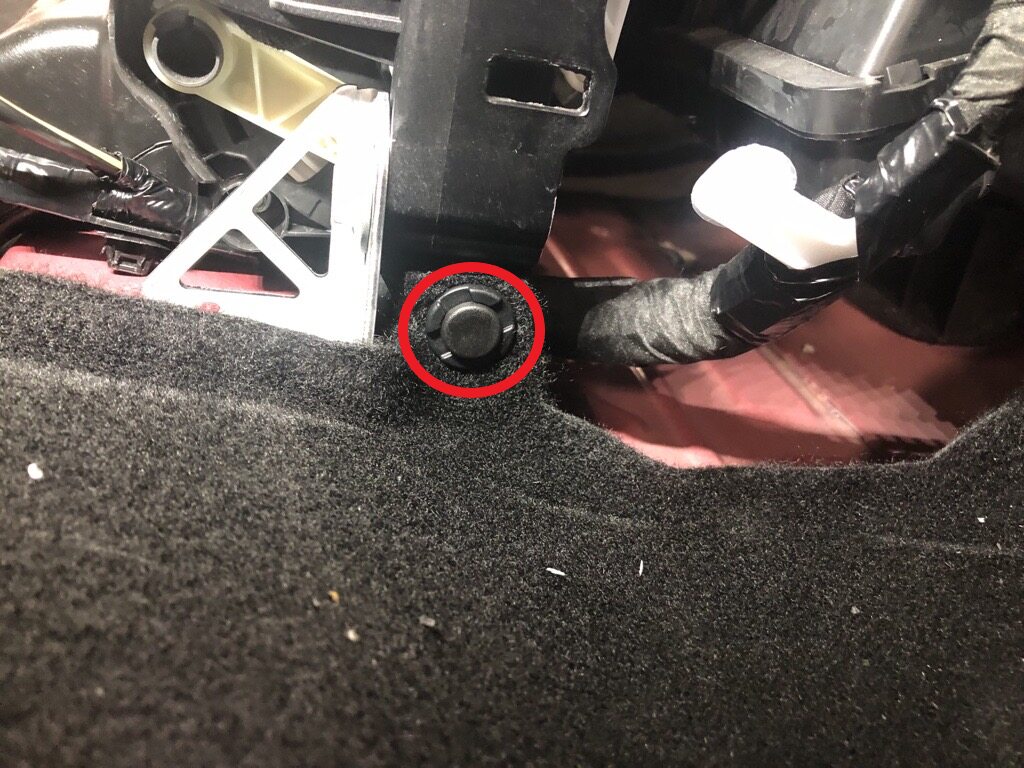
-
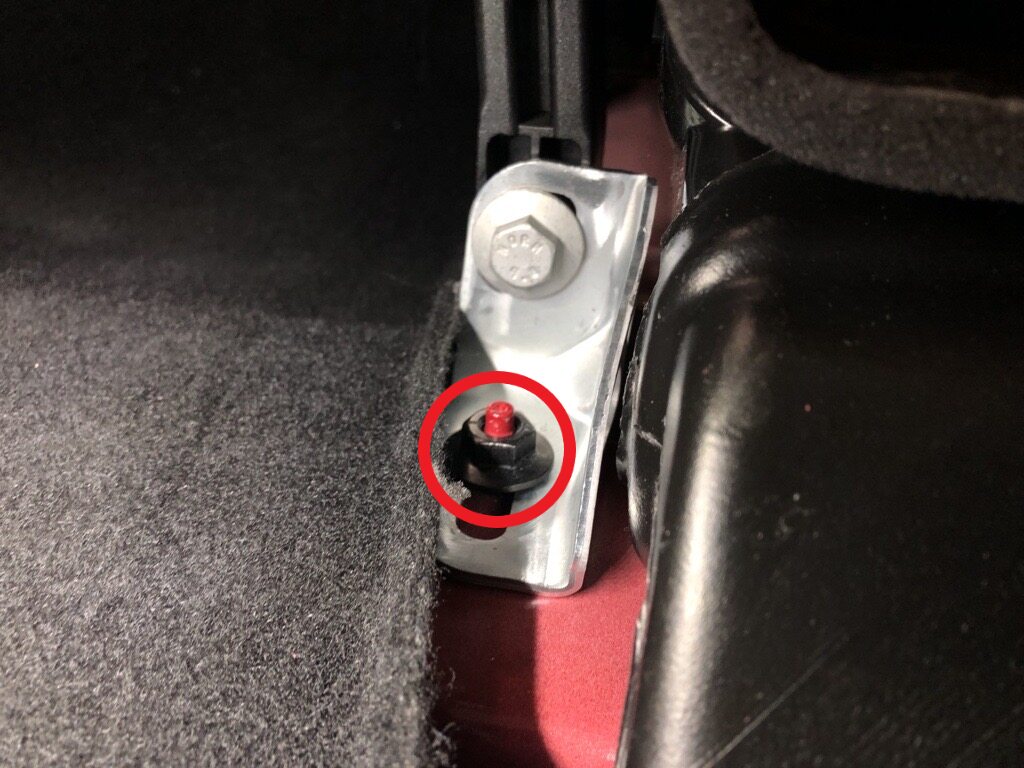
Torque the nut securing the LH cross car beam bracket to vehicle
注1x nut, 13mm, 25 Nm
-
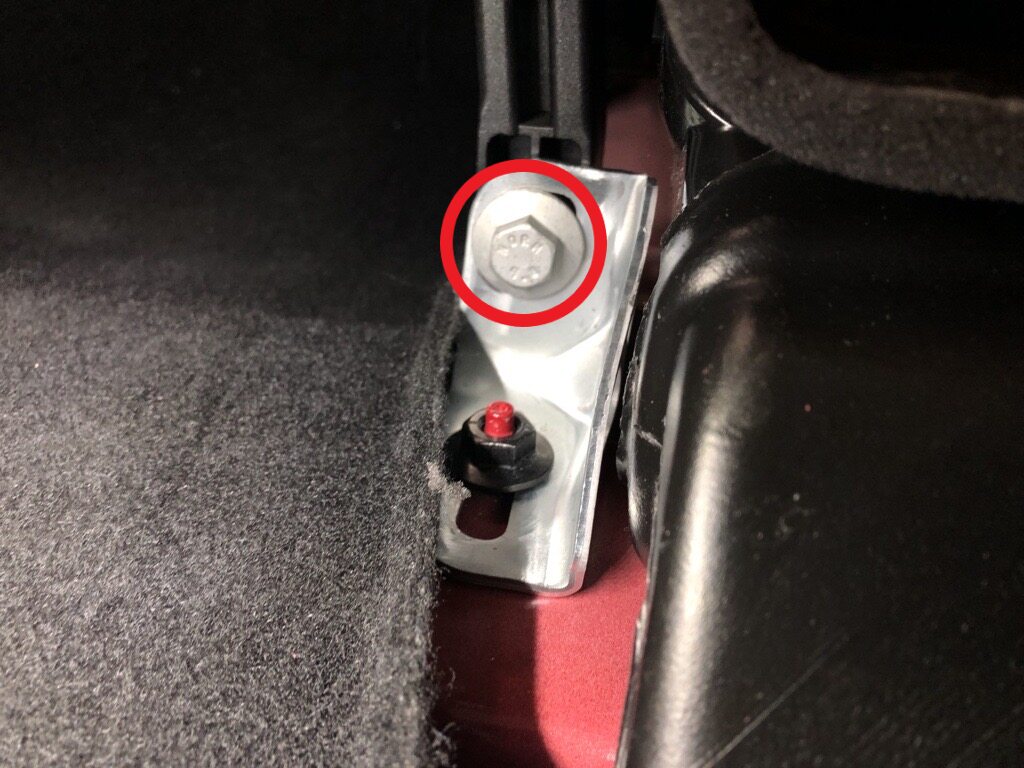
Torque bolt securing LH cross car beam bracket to cross car beam
注1x bolt, 13mm, 25 Nm
-
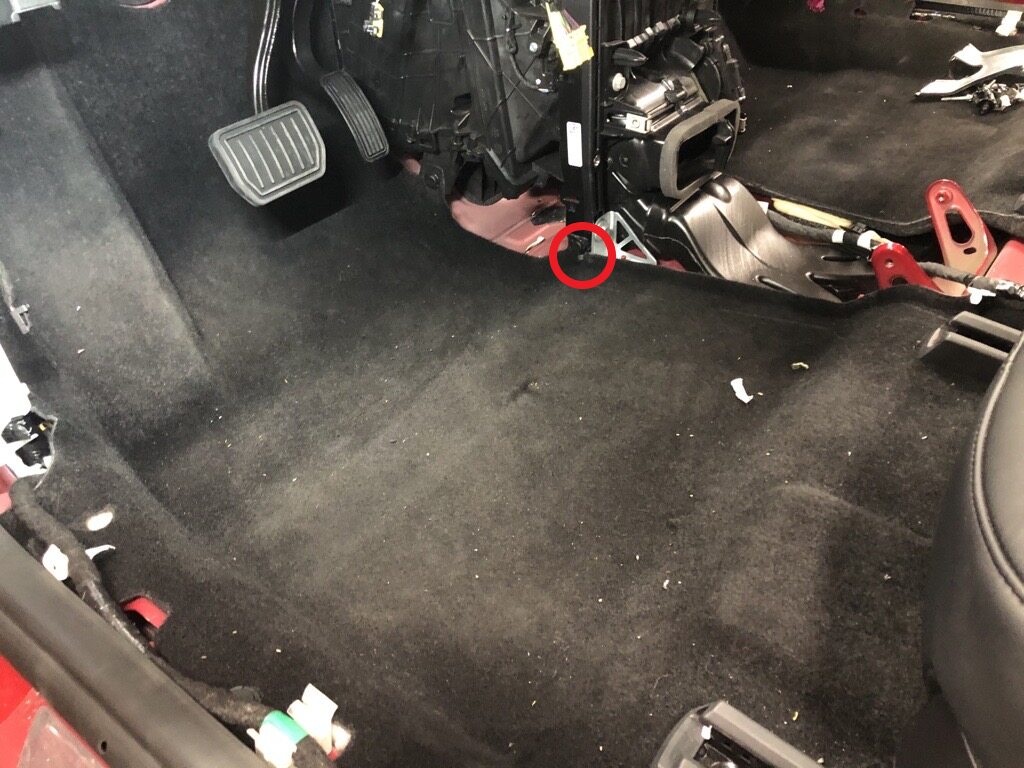
Install clip securing LH front main carpet to cross car beam
注1x clip
-
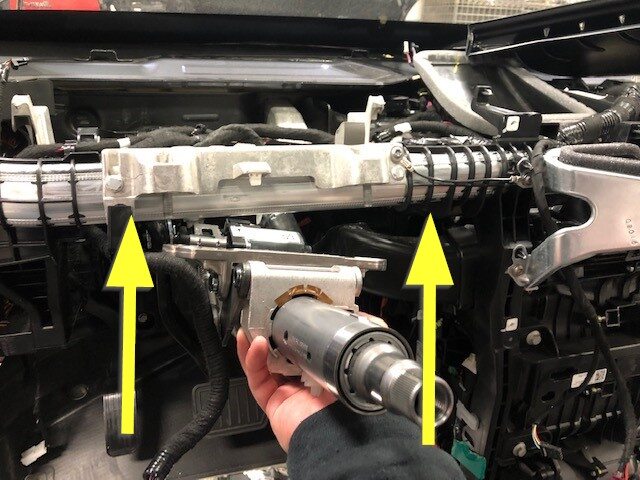
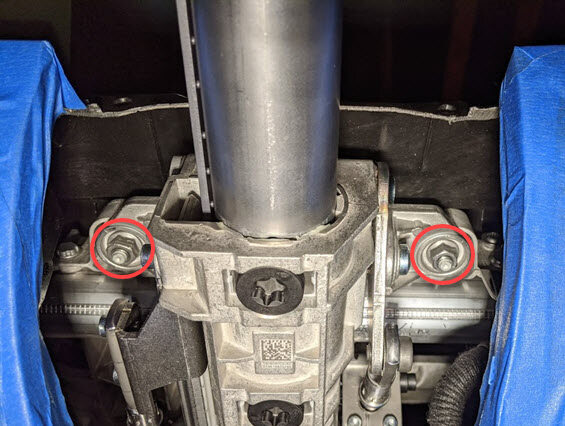
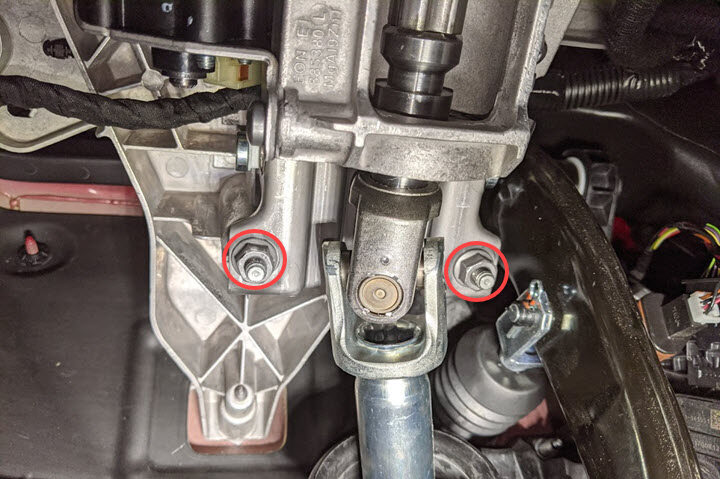
Position the steering column for installation
-
Install the nuts securing the steering column to cross car beam
注4x nuts, 13mm, 15 Nm
-
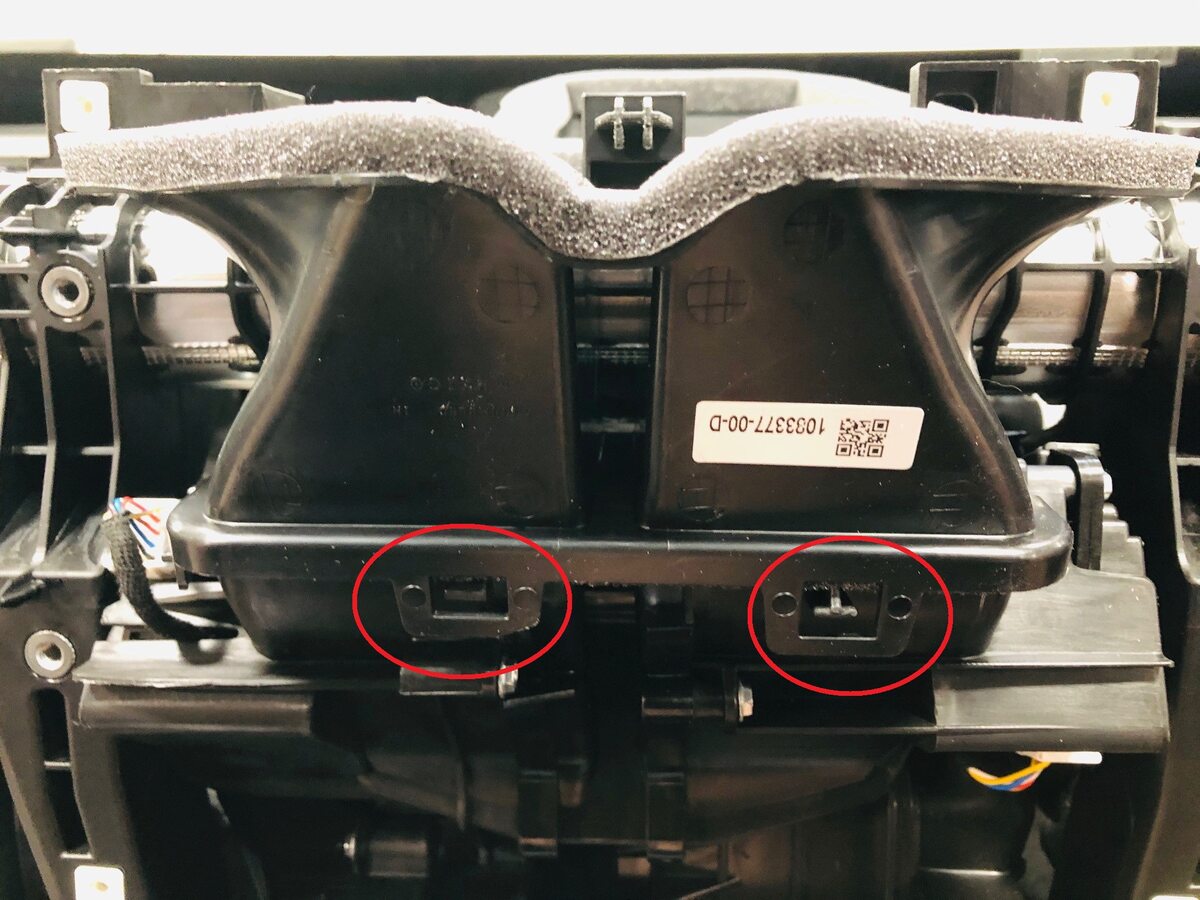
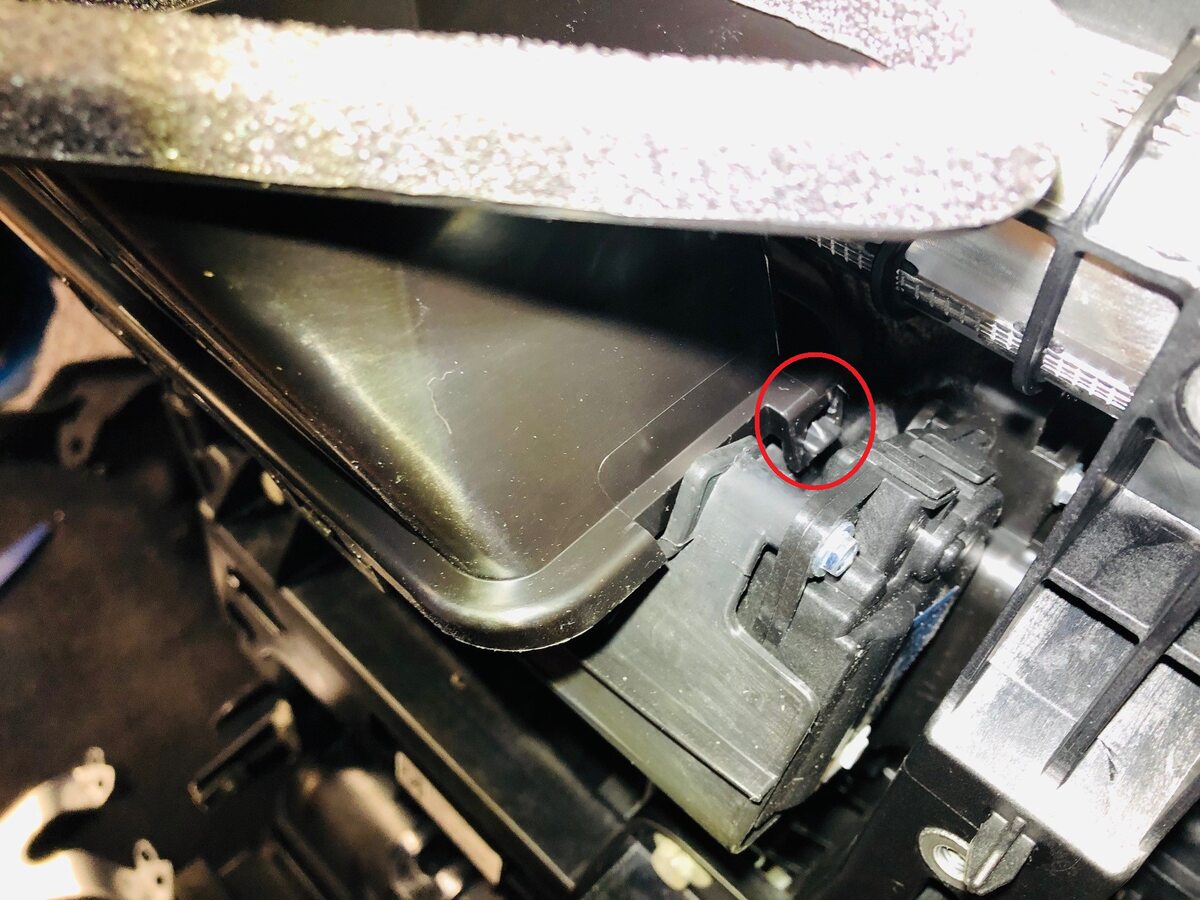
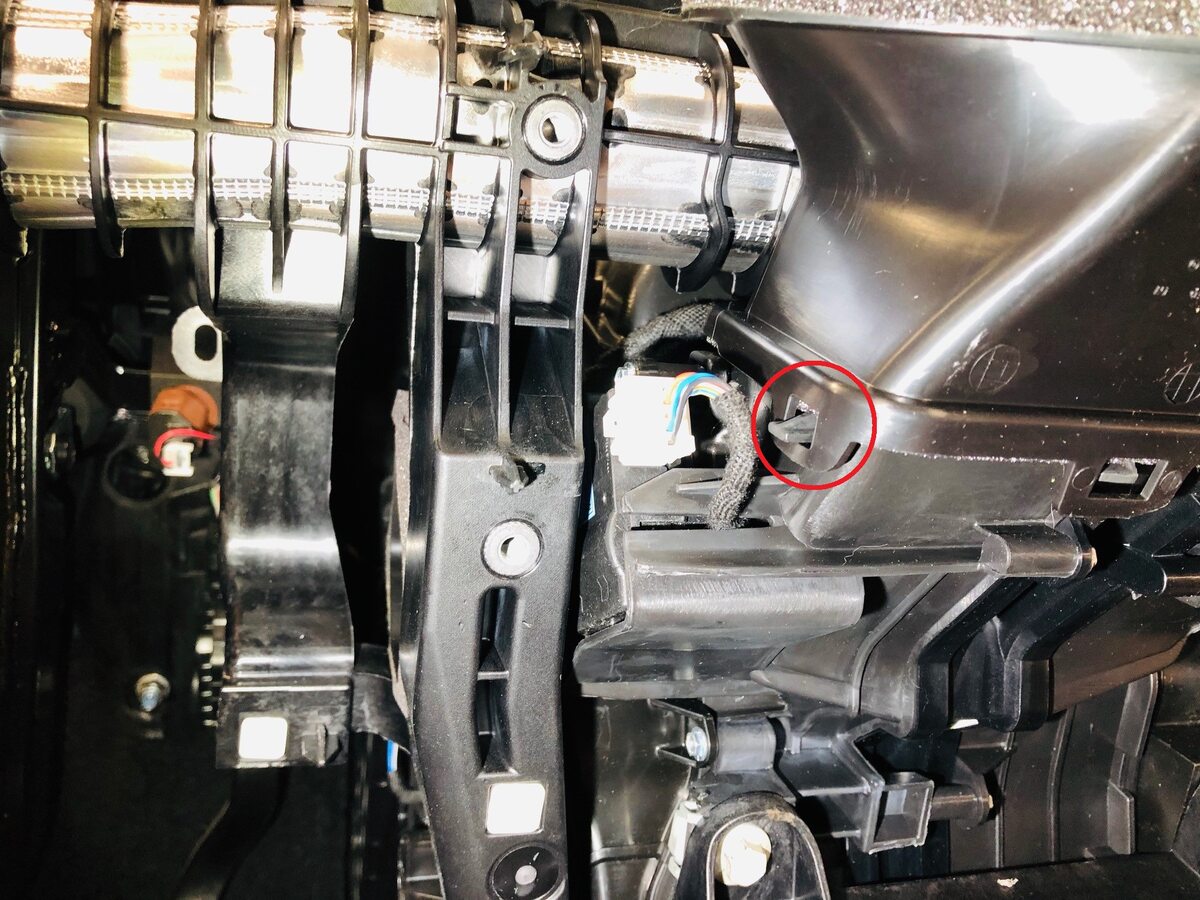
Install bleeder duct adapter to HVAC
注4x clips
-
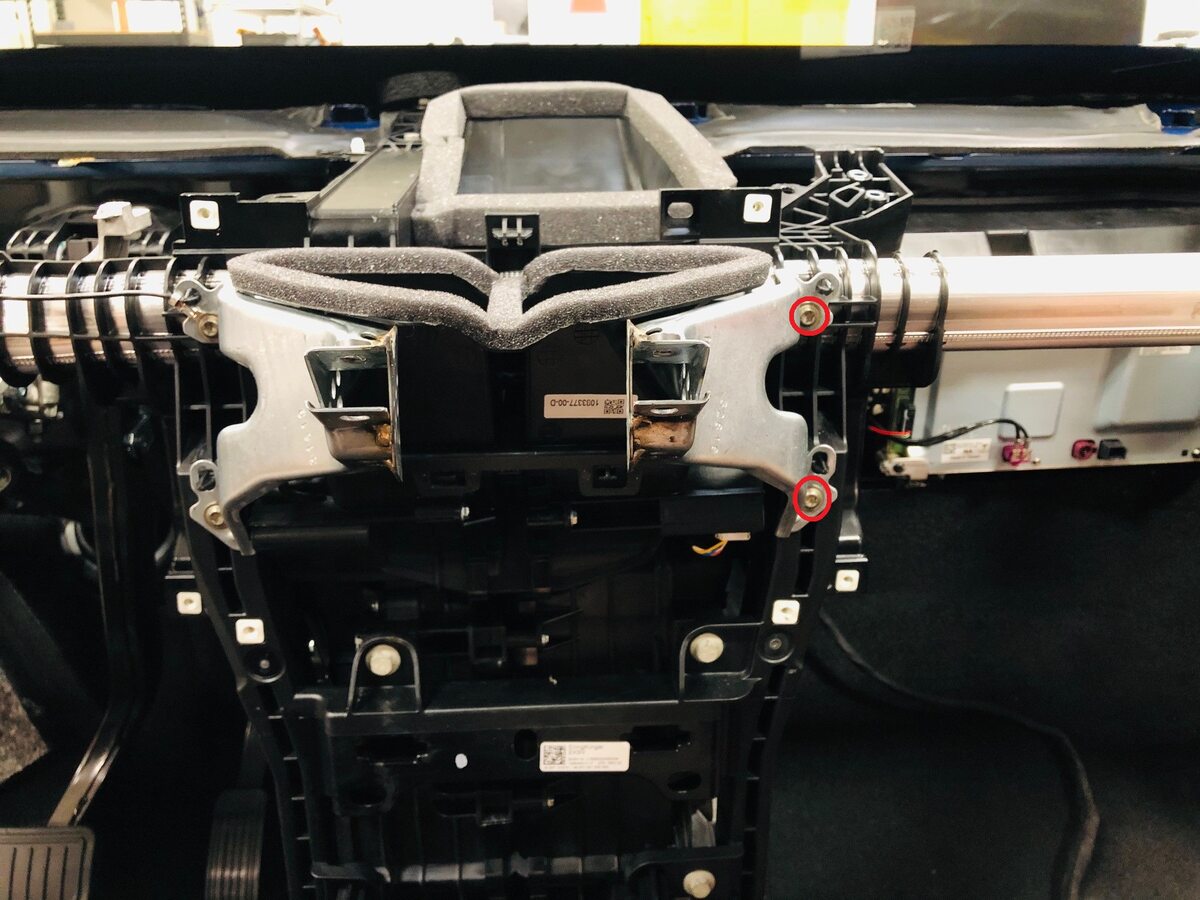
Install the RH center display bracket
注2x bolts, T30, 12 Nm
-
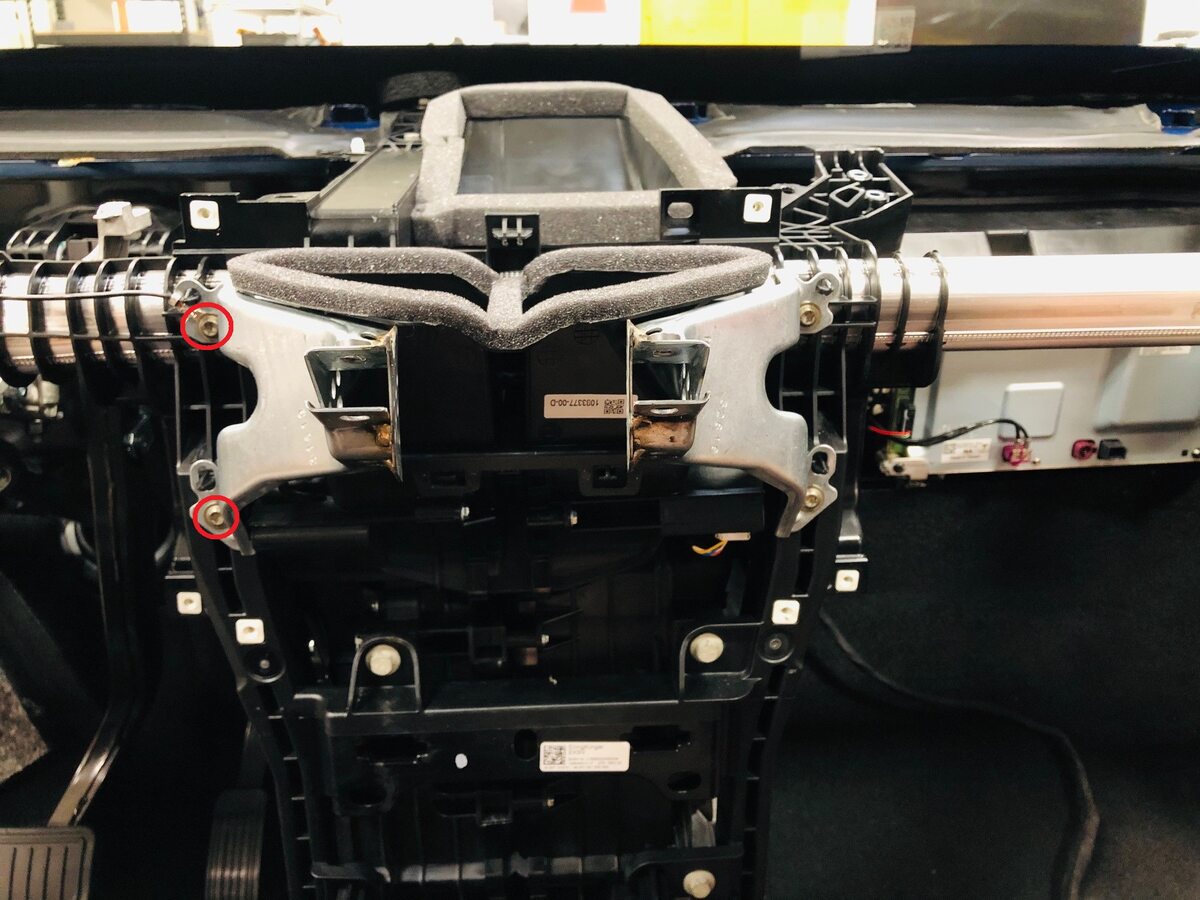
Install the LH center display bracket
注2x bolts, T30, 12 Nm
-
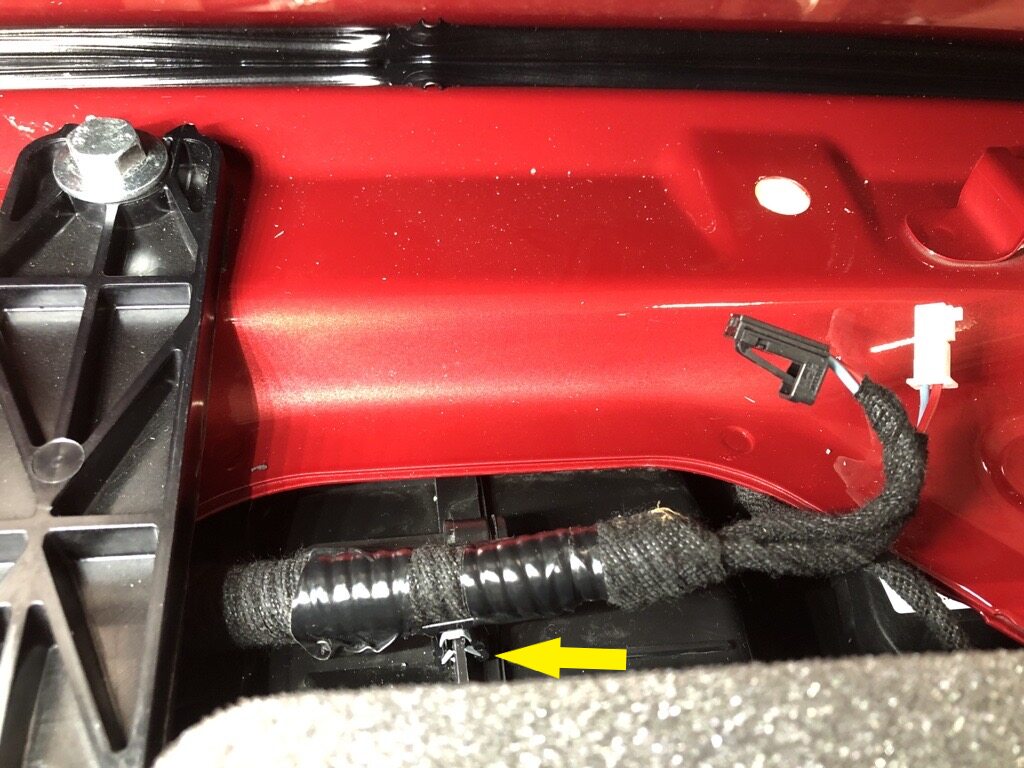
Install clip securing center speaker harness to HVAC assembly
注1x clip
-
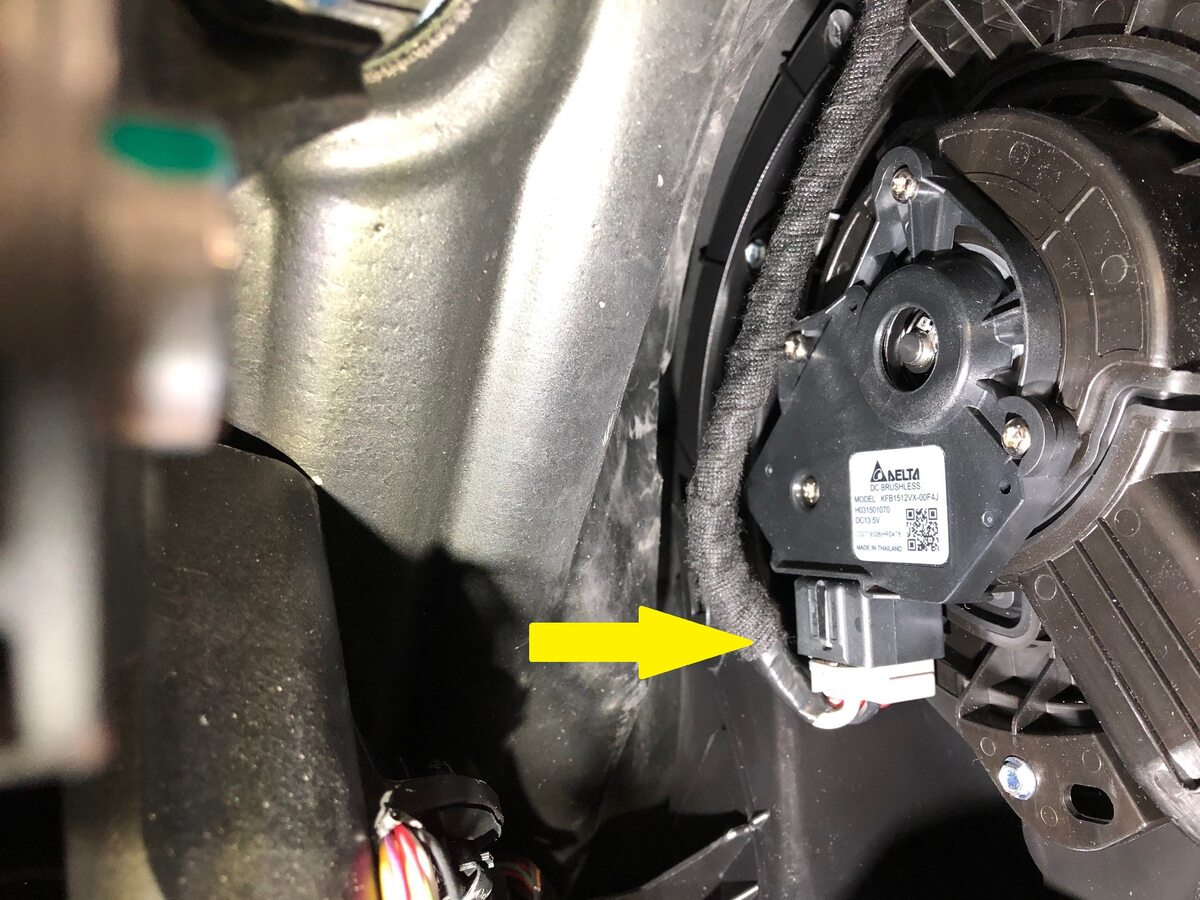
Connect blower motor connector
注1x connector
-
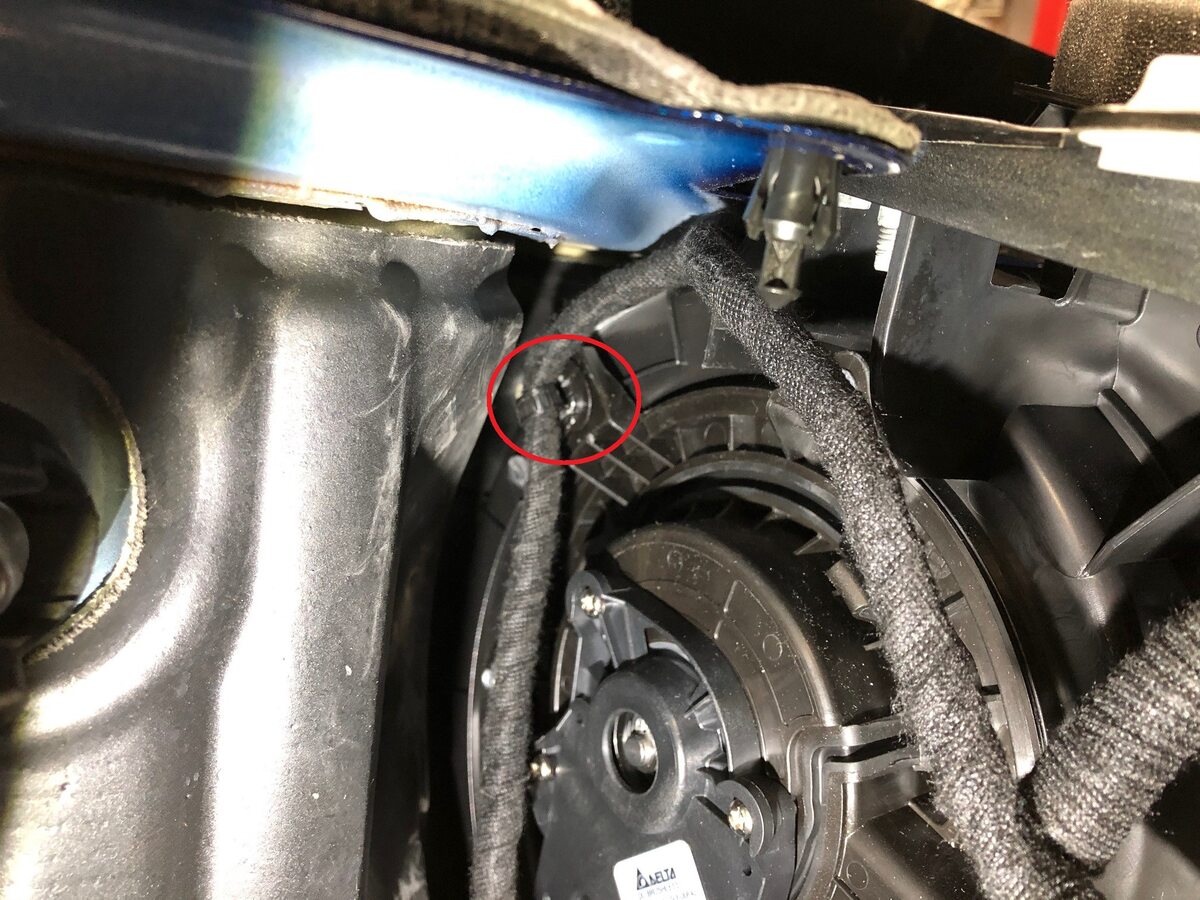
Install blower motor harness clip to HVAC assembly
注1x clip
-
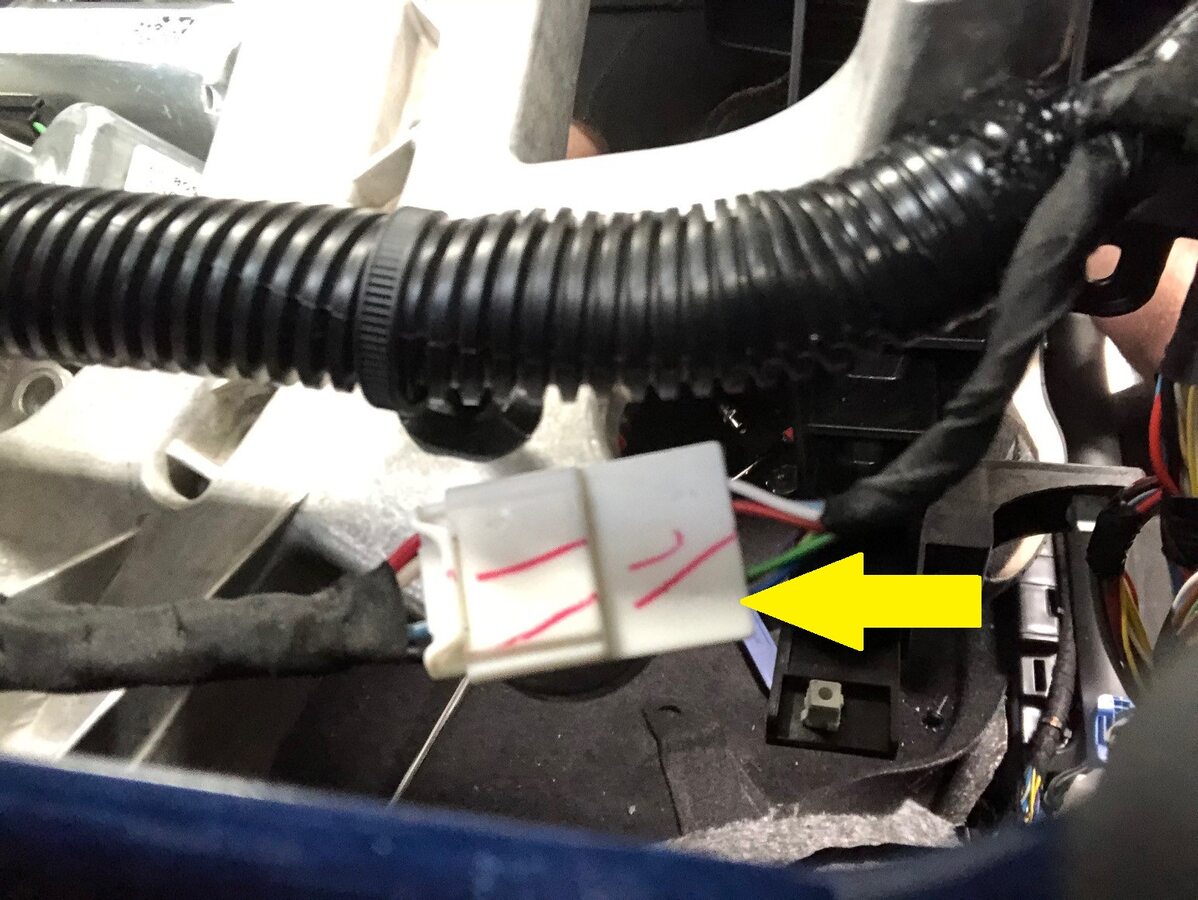
Connect IP harness connector to electronic steering column
注1x connector
-
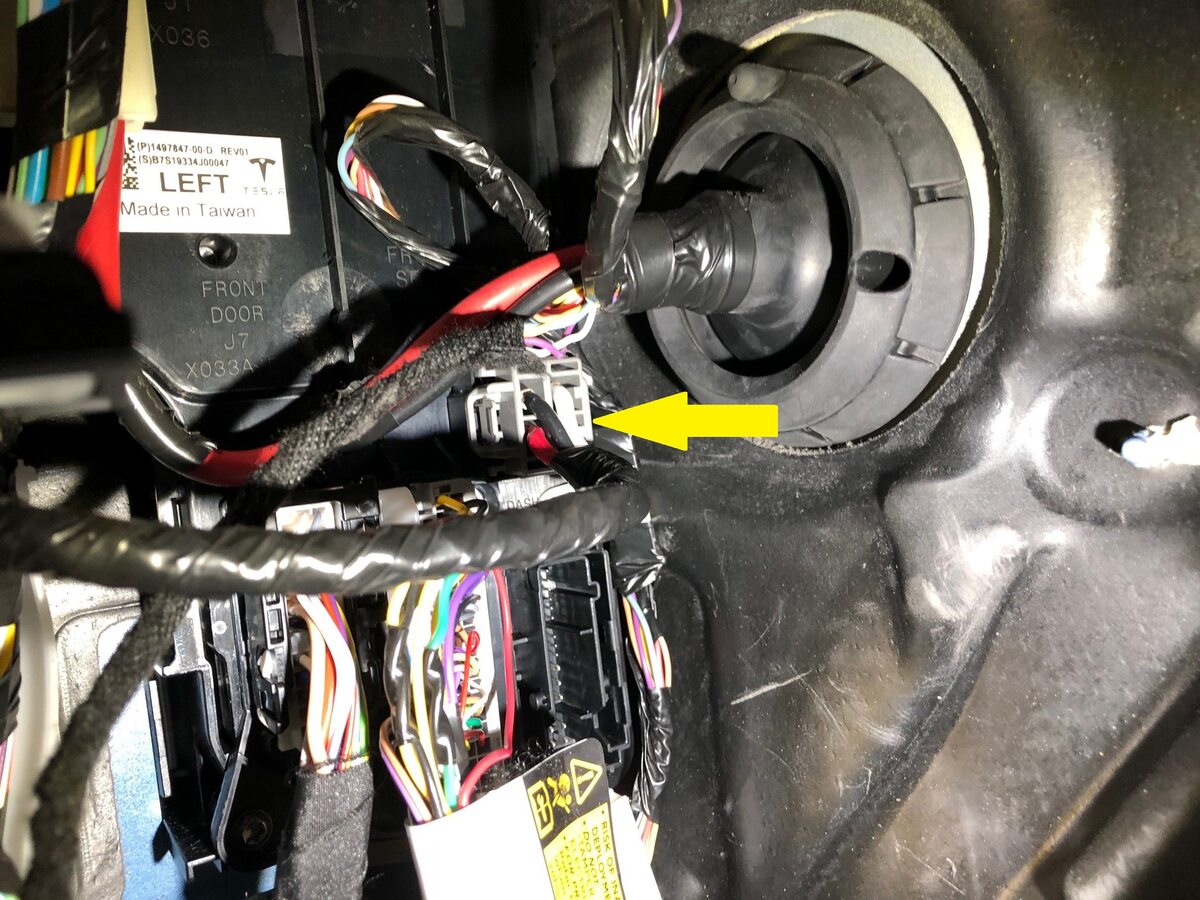
Connect the HVAC connector to the left body controller
注1x connector
-
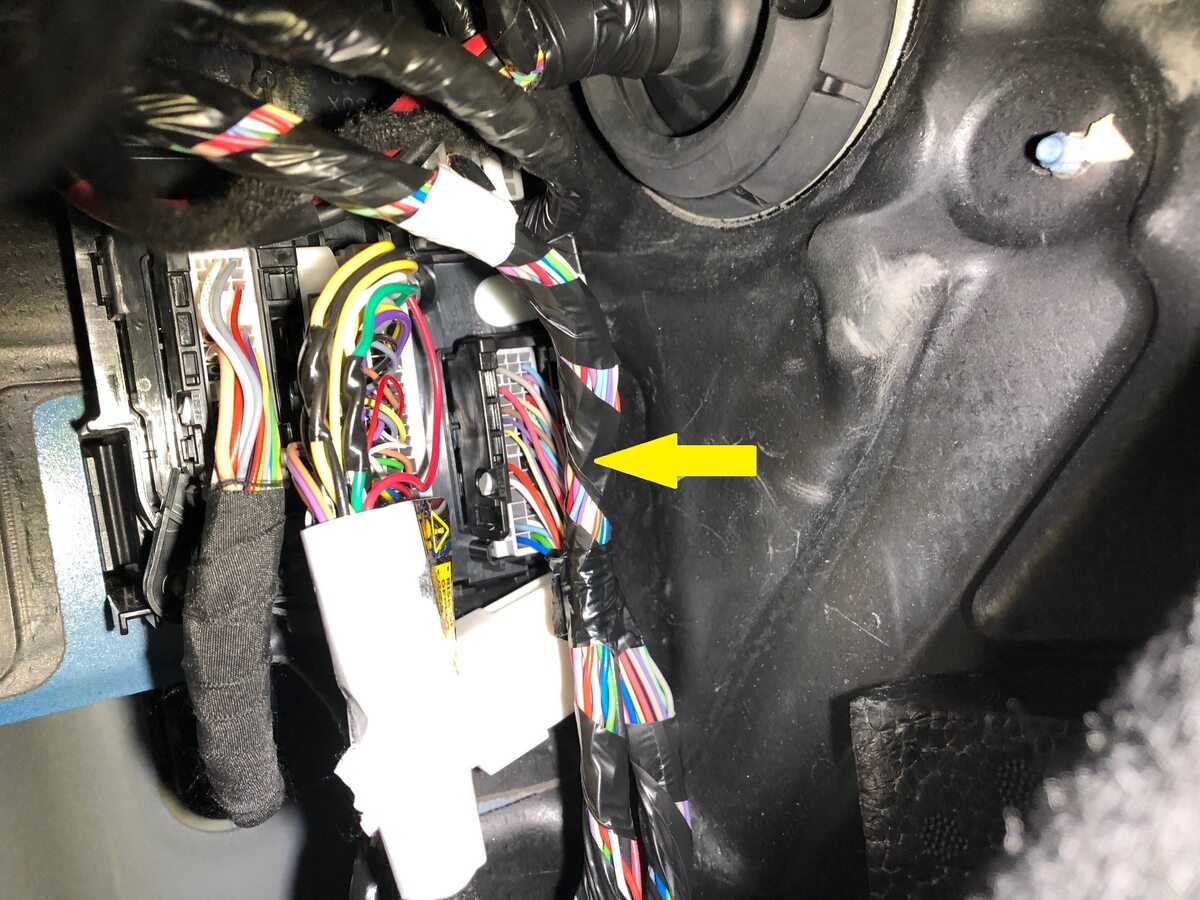
Connect the dash connector to the left body controller
注1x connector, Fully seat connector and pull release tab into locking position
-
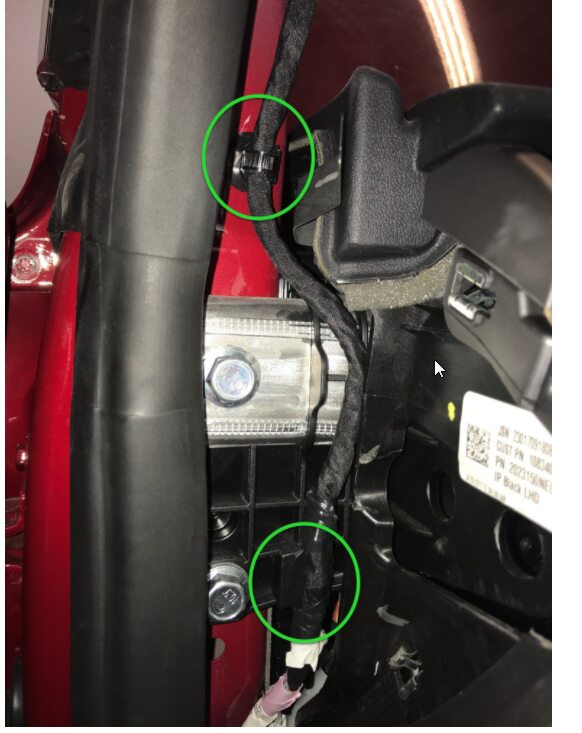
Install headliner harness clips to lower a-pillar
注2x clips
-
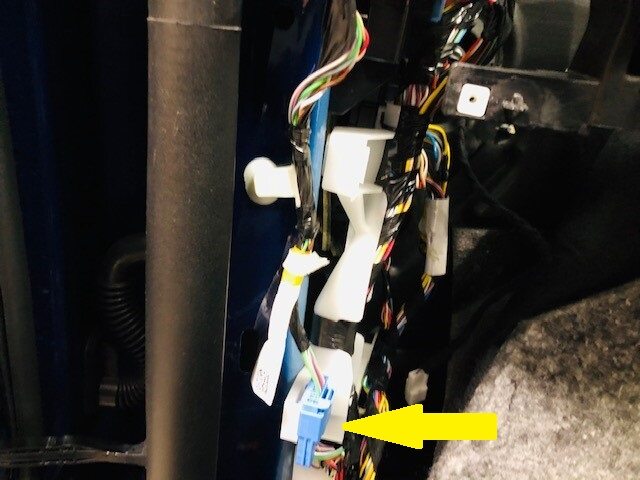
Connect headliner harness connector
注1x connector
-
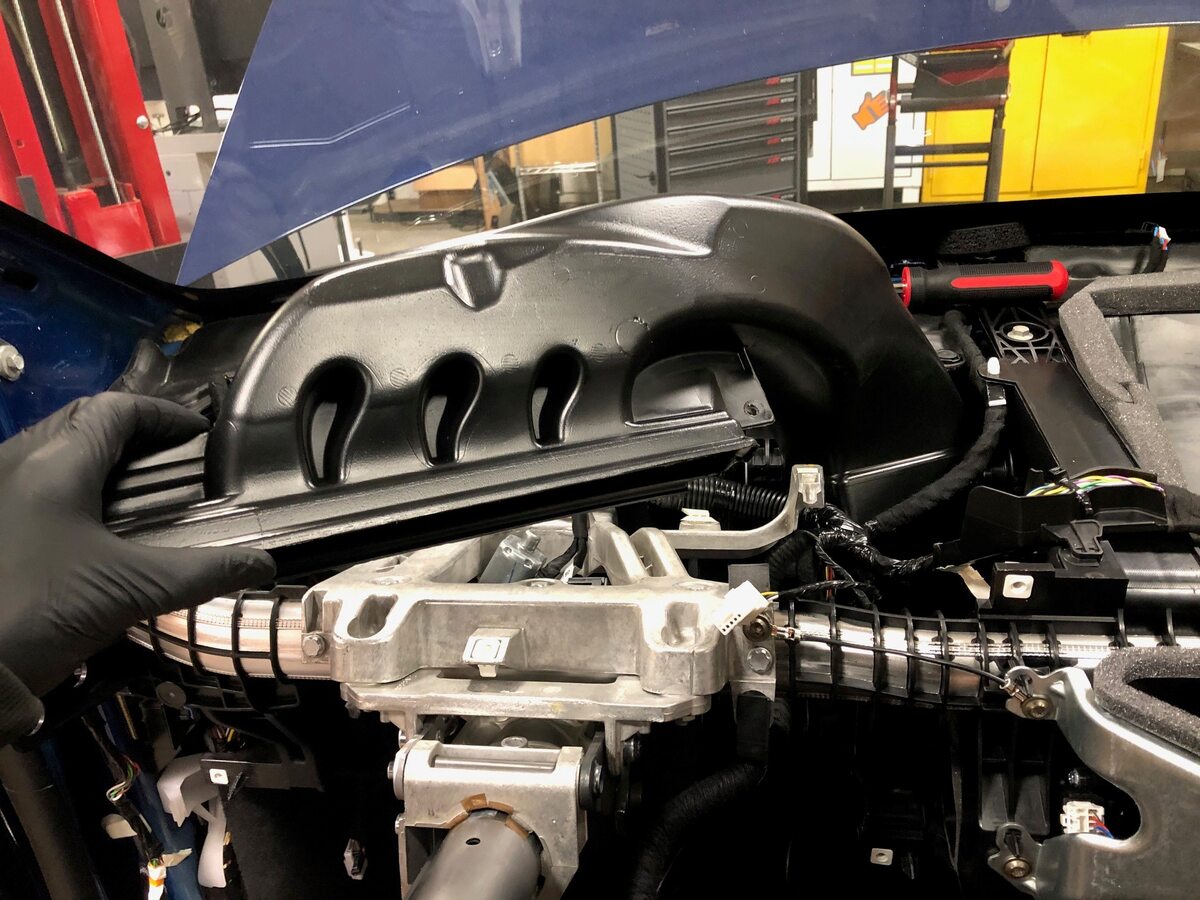
Install driver air wave duct into HVAC assembly
-
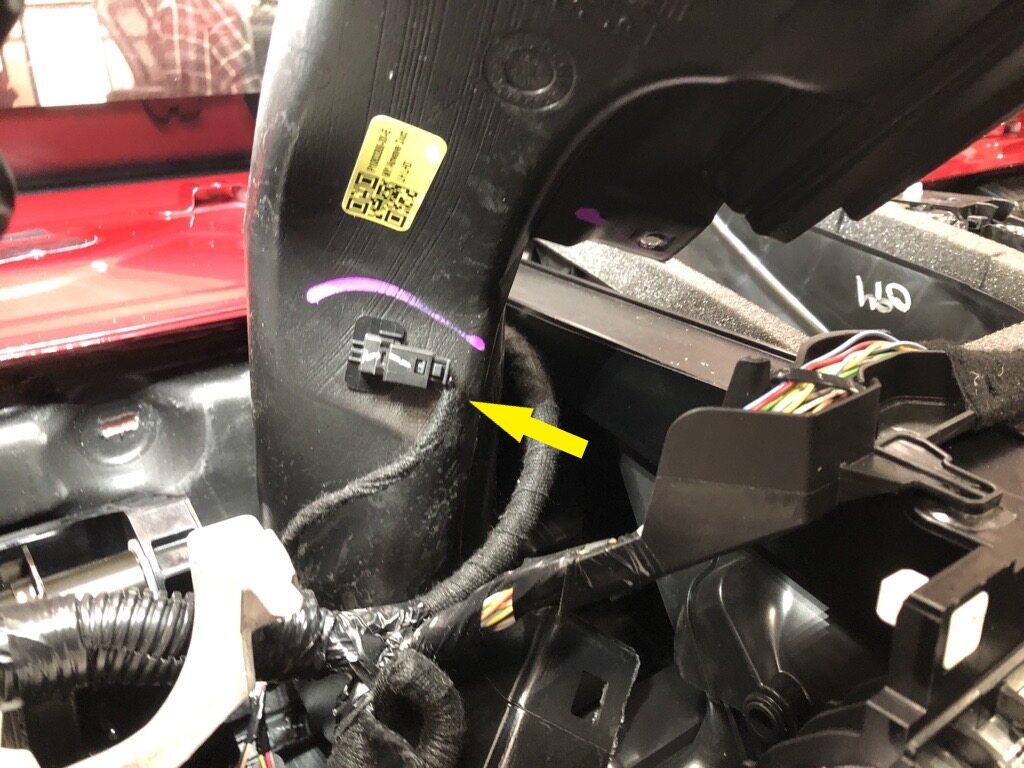
Connect LH upper duct thermistor to driver air wave duct
注1x connector
-
Install screws securing driver air wave duct to cross car beam
注2x screws, T20, 2.3 Nm

-
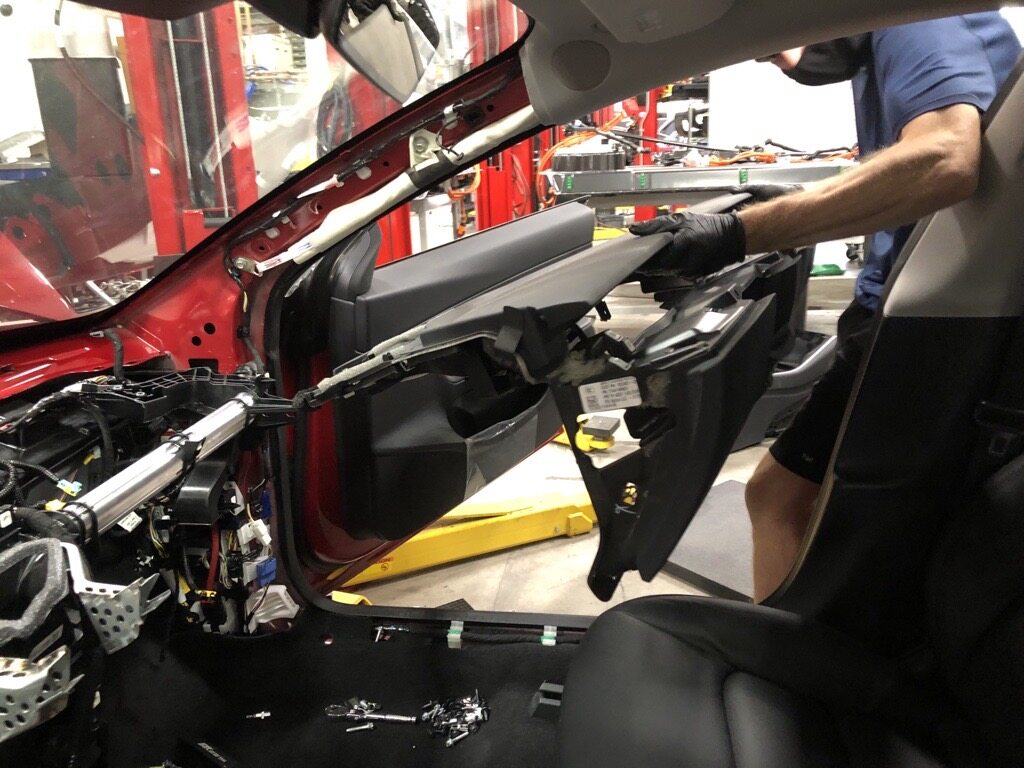
Install IP carrier onto cross car beam
注4x mounting tabs, Recommend assistance, Slide mounting tabs on IP carrier into brackets on vehicle, Be cautious to clear the harness clipped at top center of HVAC assembly, This will also ease installation
-
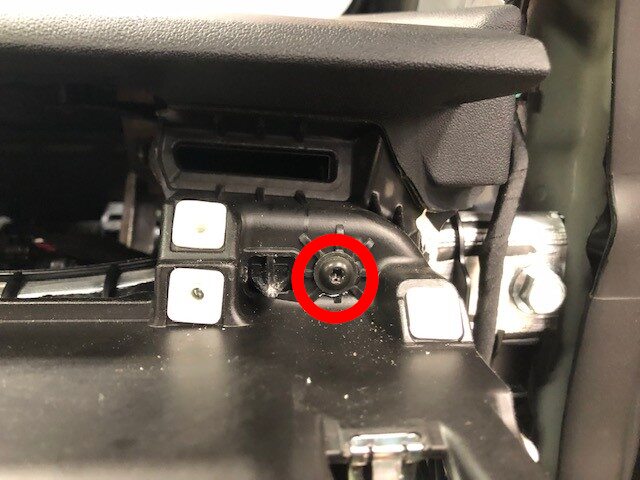
Install screw securing IP carrier to cross car beam on upper RH side
注1x screw, T20, 2.3 Nm
-
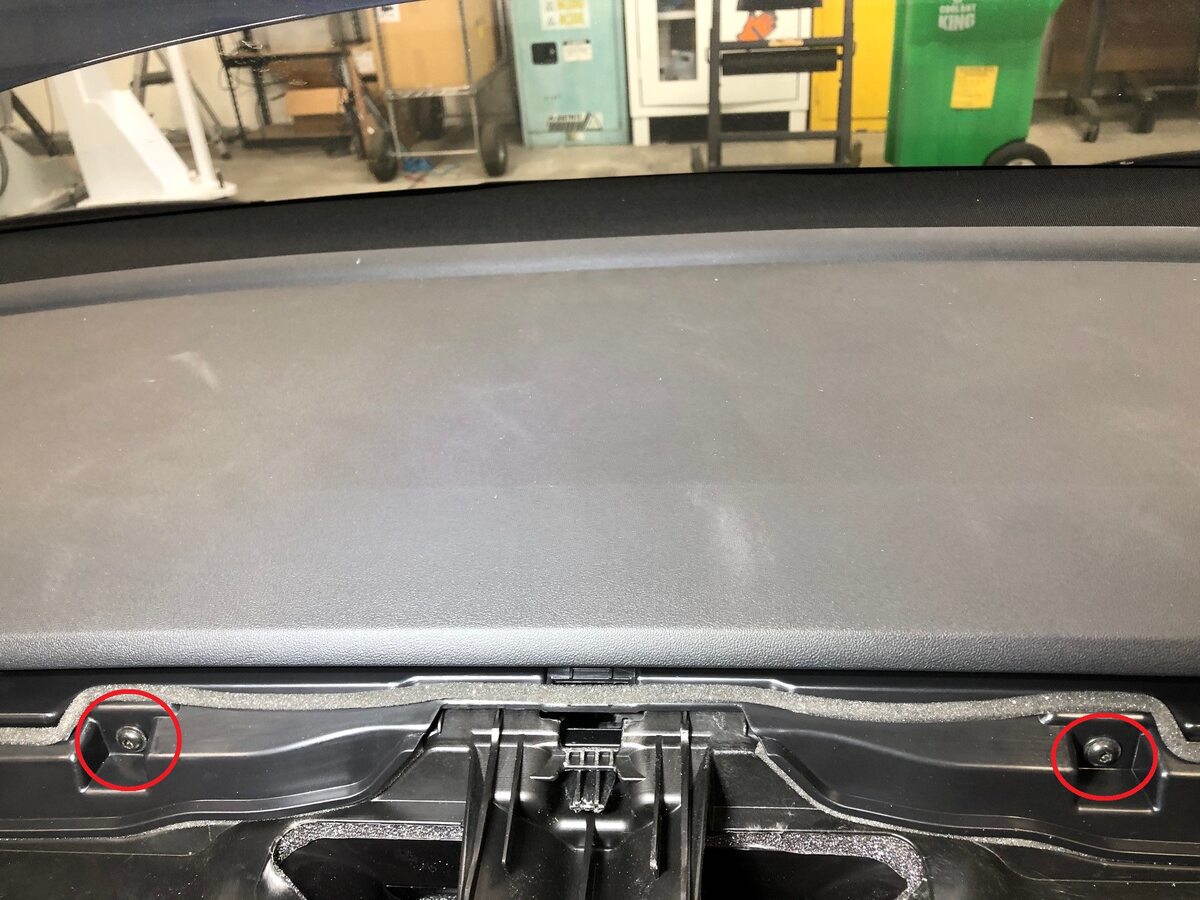
Install screws securing IP carrier to cross car beam at upper center
注2x screws, T20, 2.3 Nm
-
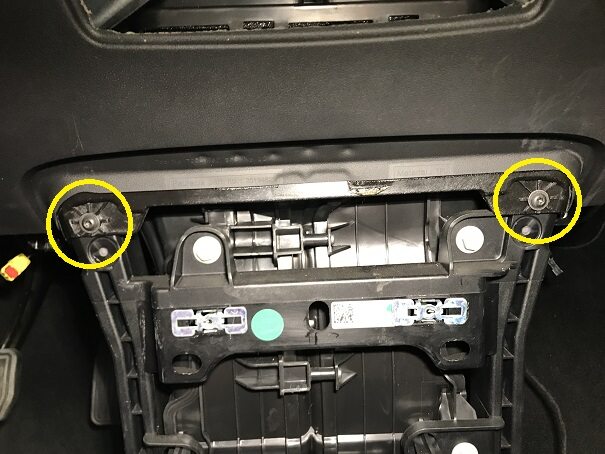
Install screws securing IP carrier to cross car beam at lower center
注2x screws, T20, 2.3 Nm
-
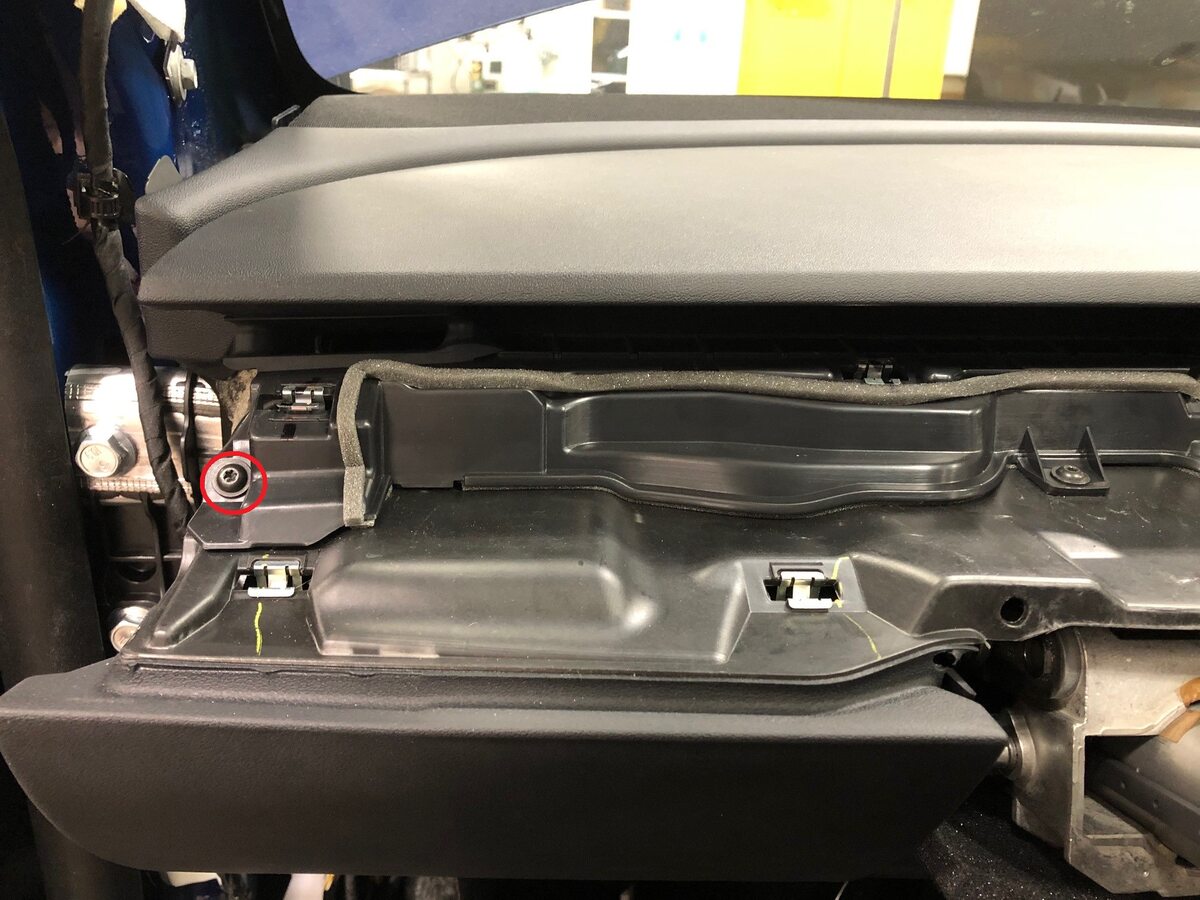
Install screw securing IP carrier to cross car beam on upper LH side
注1x screw, T20, 2.3 Nm
-
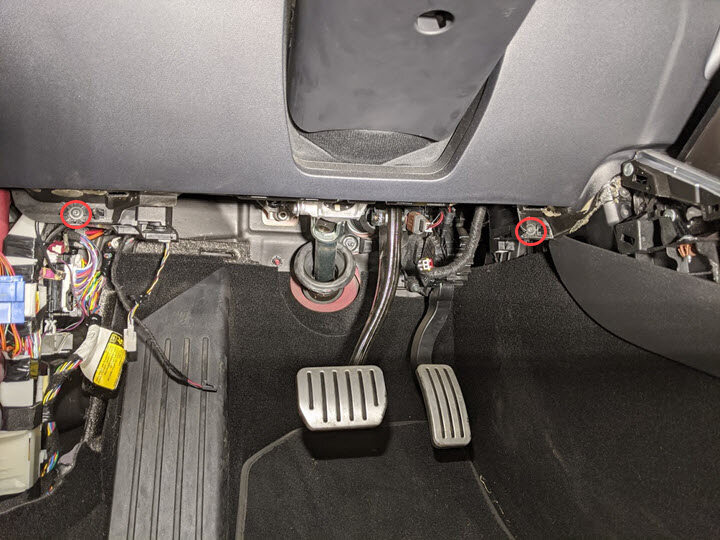
Install screws securing IP carrier to cross car beam on lower LH side
注2x screws, T20, 2.3 Nm
-
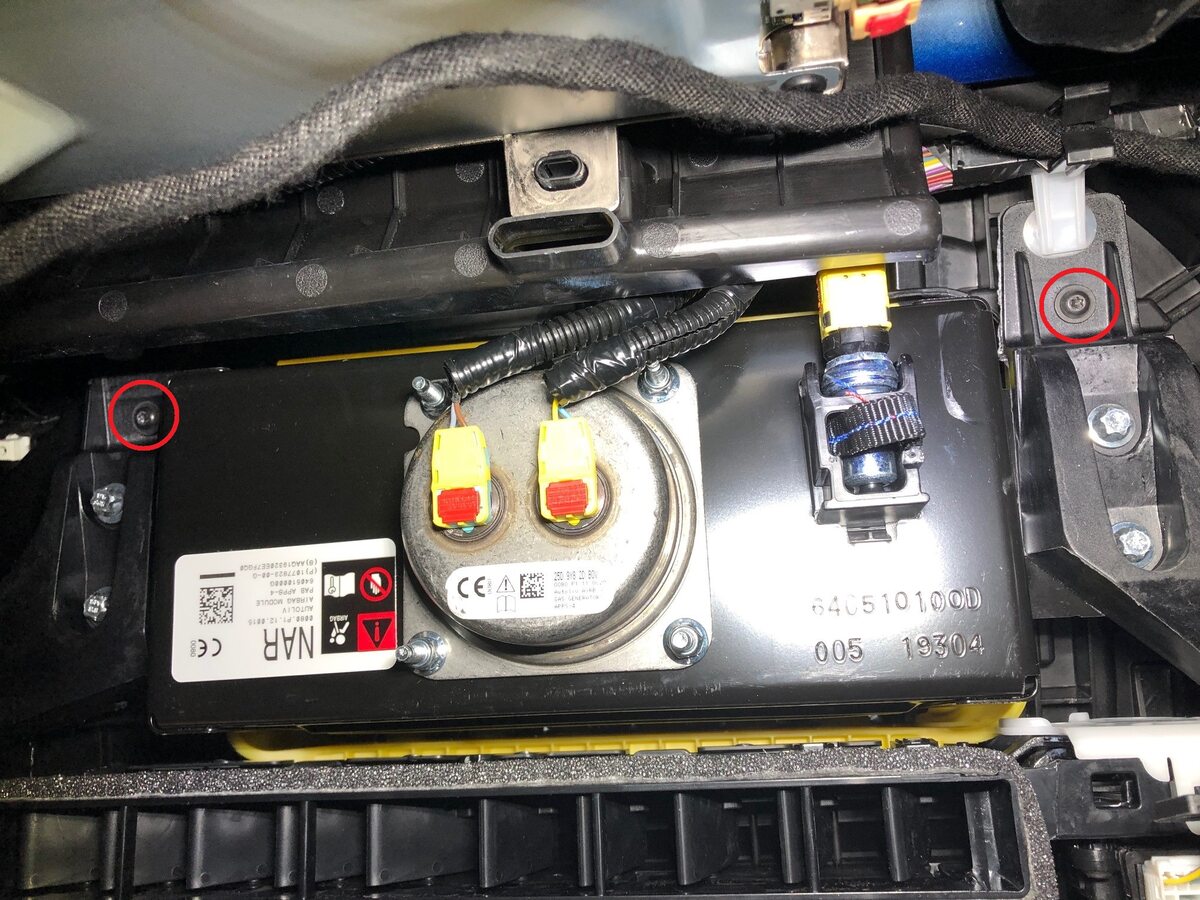
Install screws securing IP carrier to cross car beam near passenger air bag
注2x screws, T20, 2.3 Nm
-
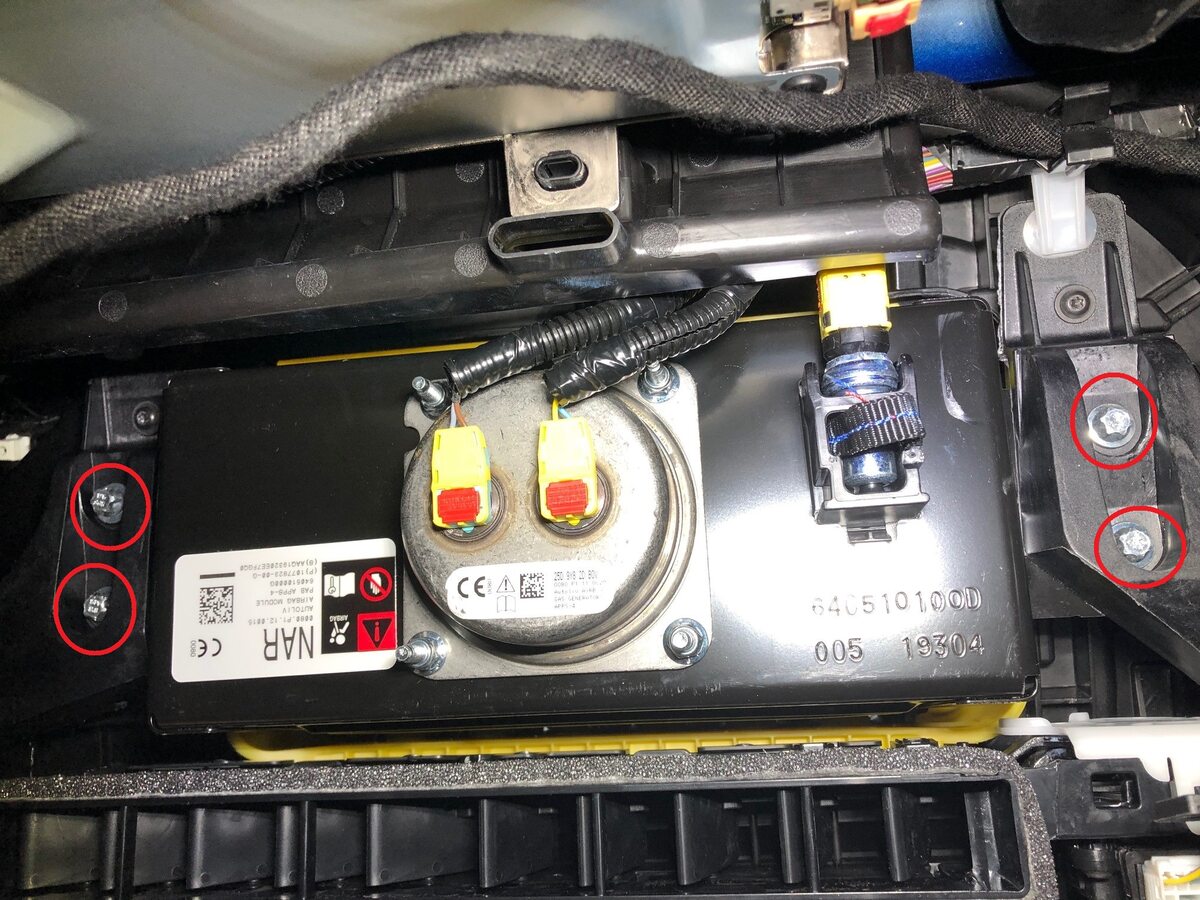
Install bolts securing passenger air bag assembly to cross car beam
注4x patch bolts, E10, 8 Nm, Install new patch bolts
-
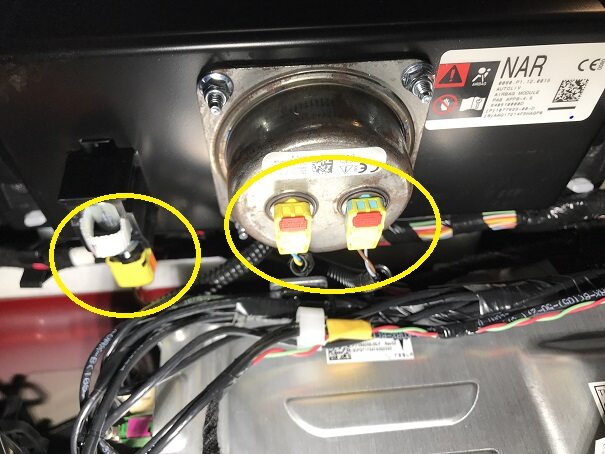
Install connectors for passenger air bag
注3x connectors, 2x connectors for regions other than North America
-
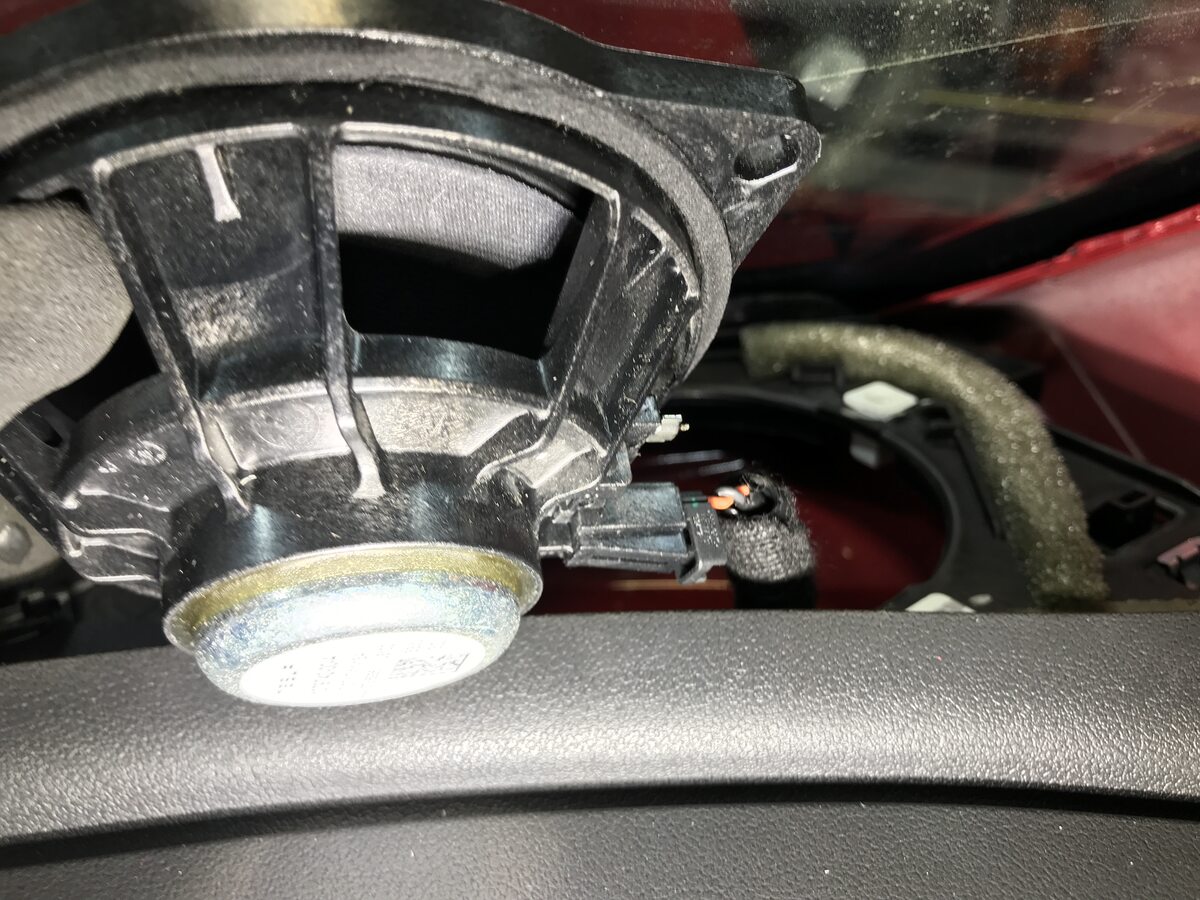
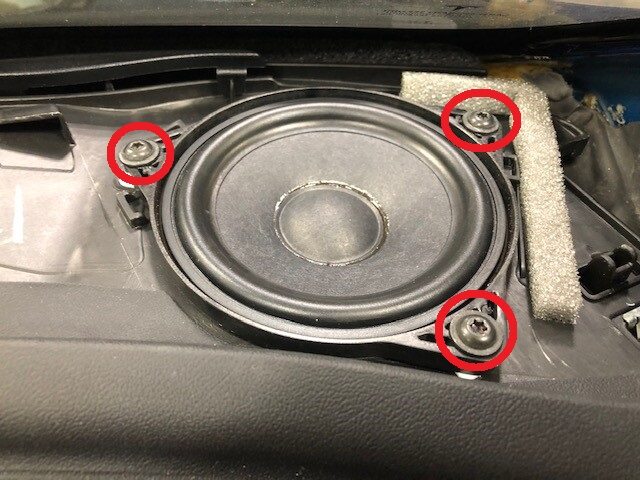
Install RH speaker to IP carrier
注1x connector, 3x screws, T20, 2.3 Nm
-
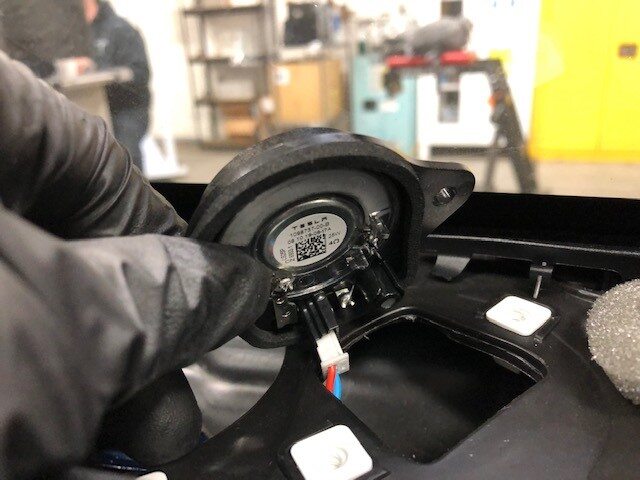
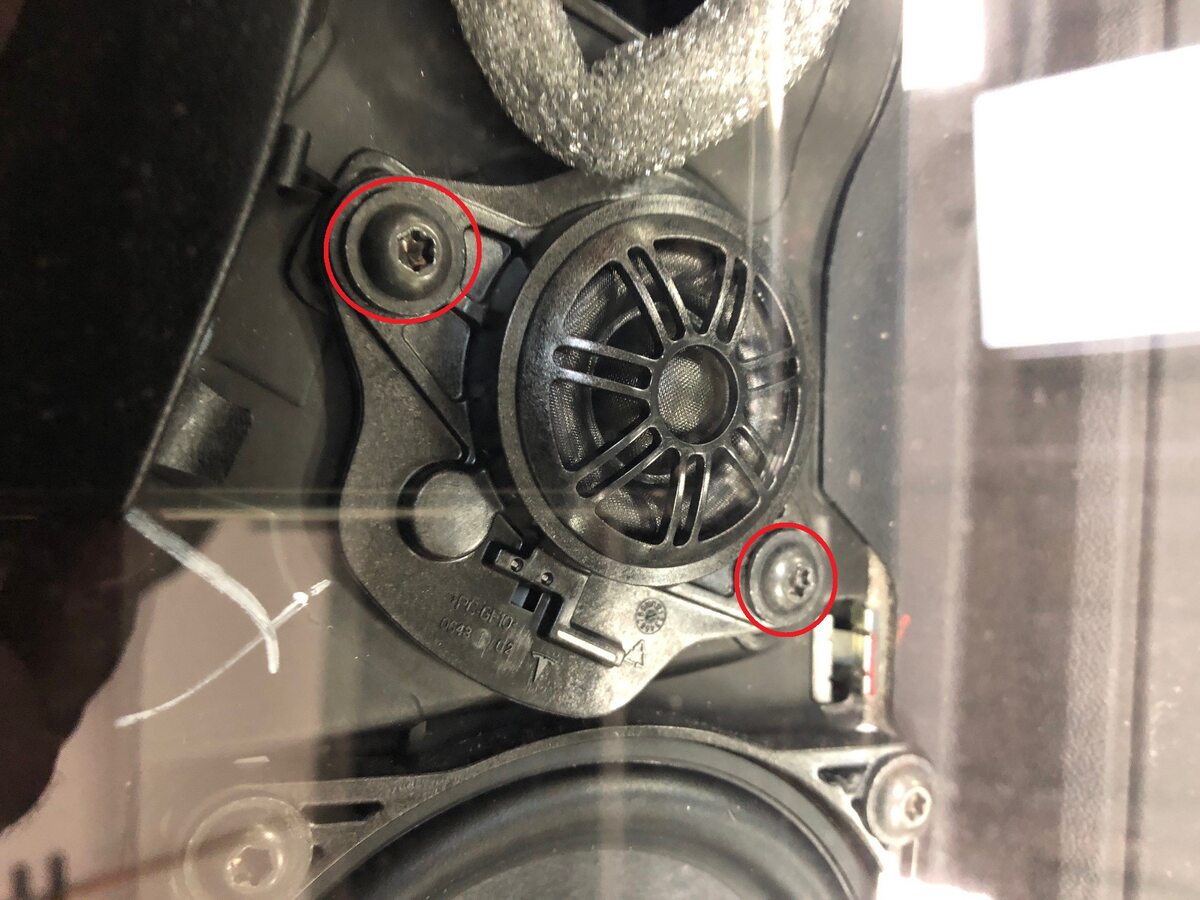
Install center tweeter to IP carrier
注1x connector, 2x screws, T20, 2.3 Nm
-
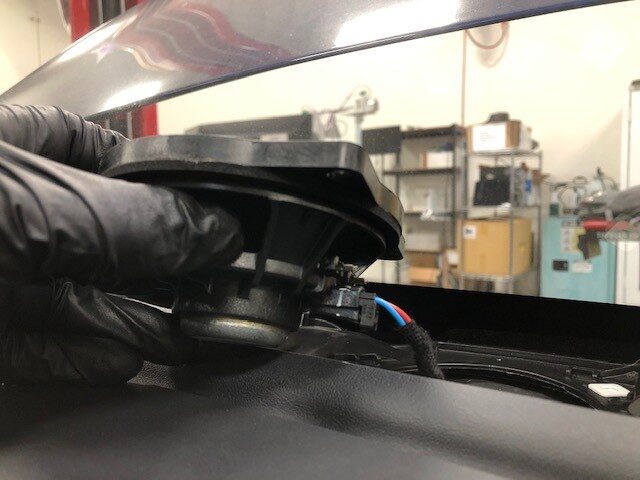
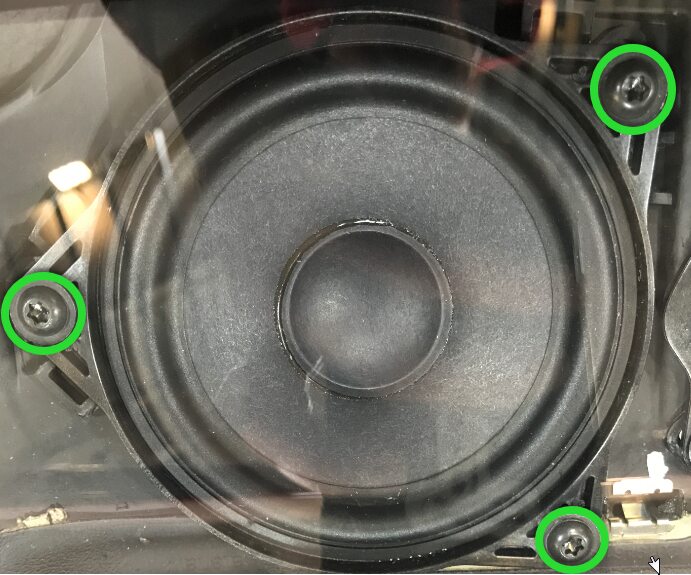
Install center speaker to IP
注3x screws, T20, 2.3 Nm, 1x connector
-
Install LH speaker to IP carrier
注3x screws, T20, 2.3 Nm, 1x connector
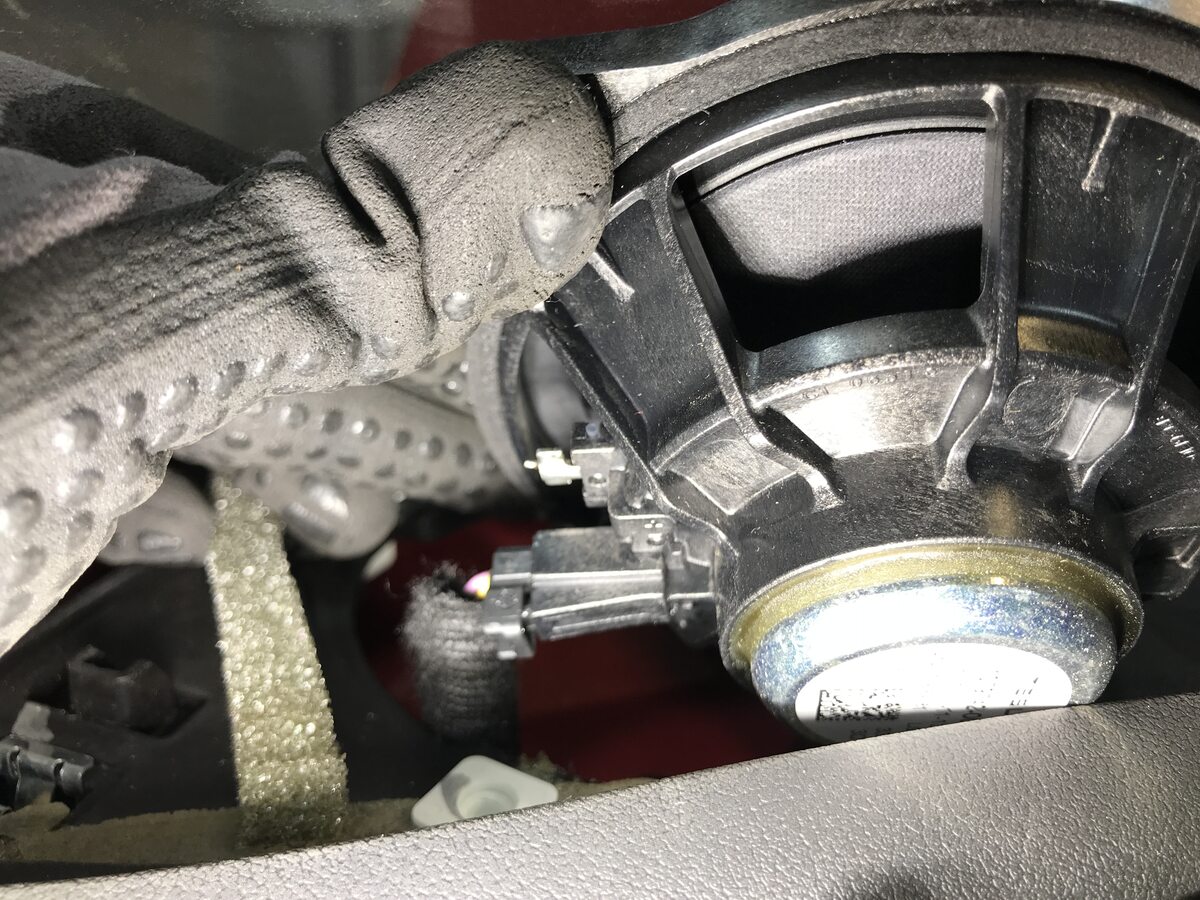
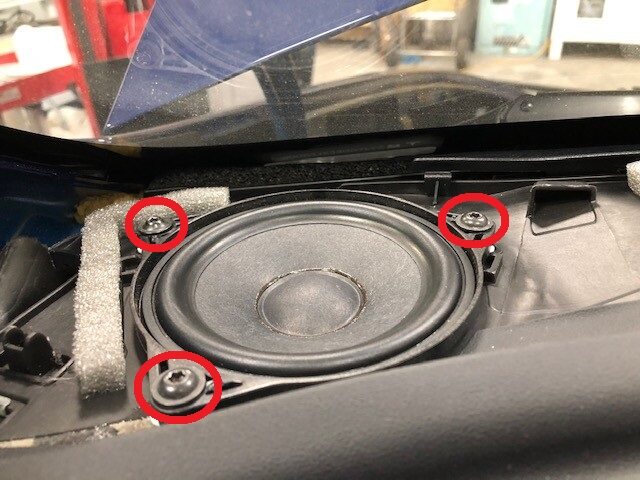
-
Position defroster grill and lower tabs into position on IP
注6x tabs
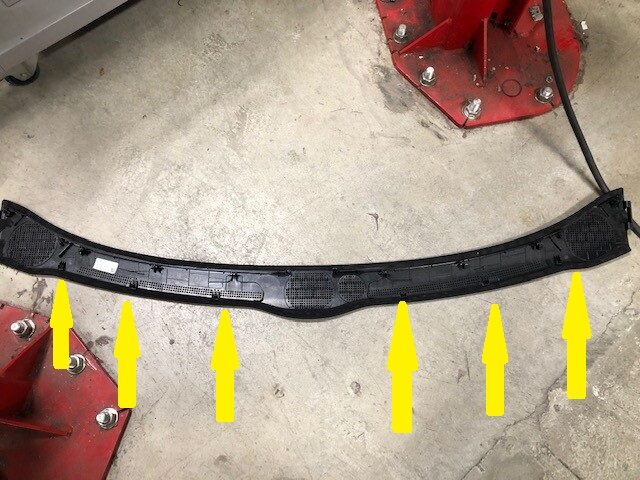
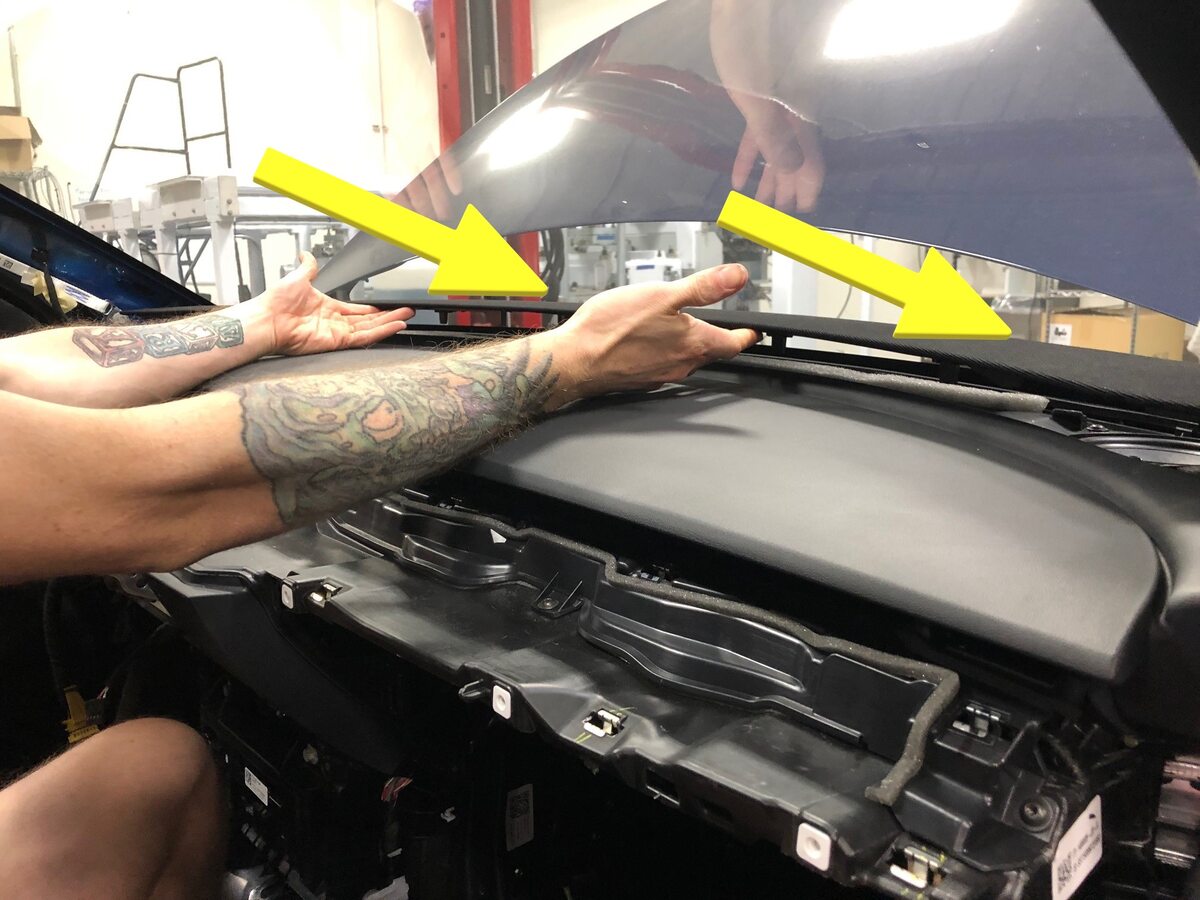
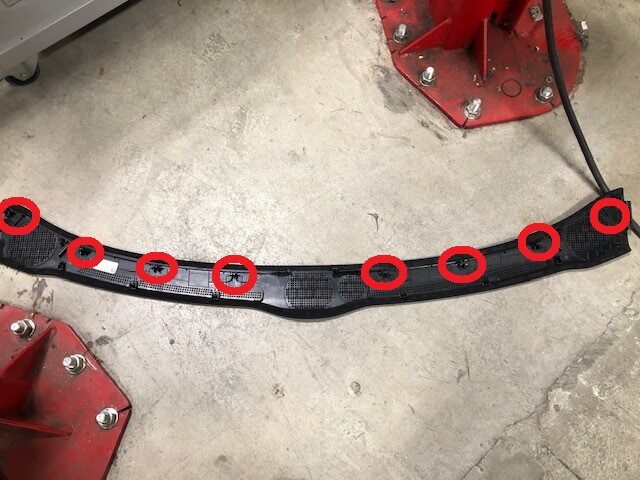
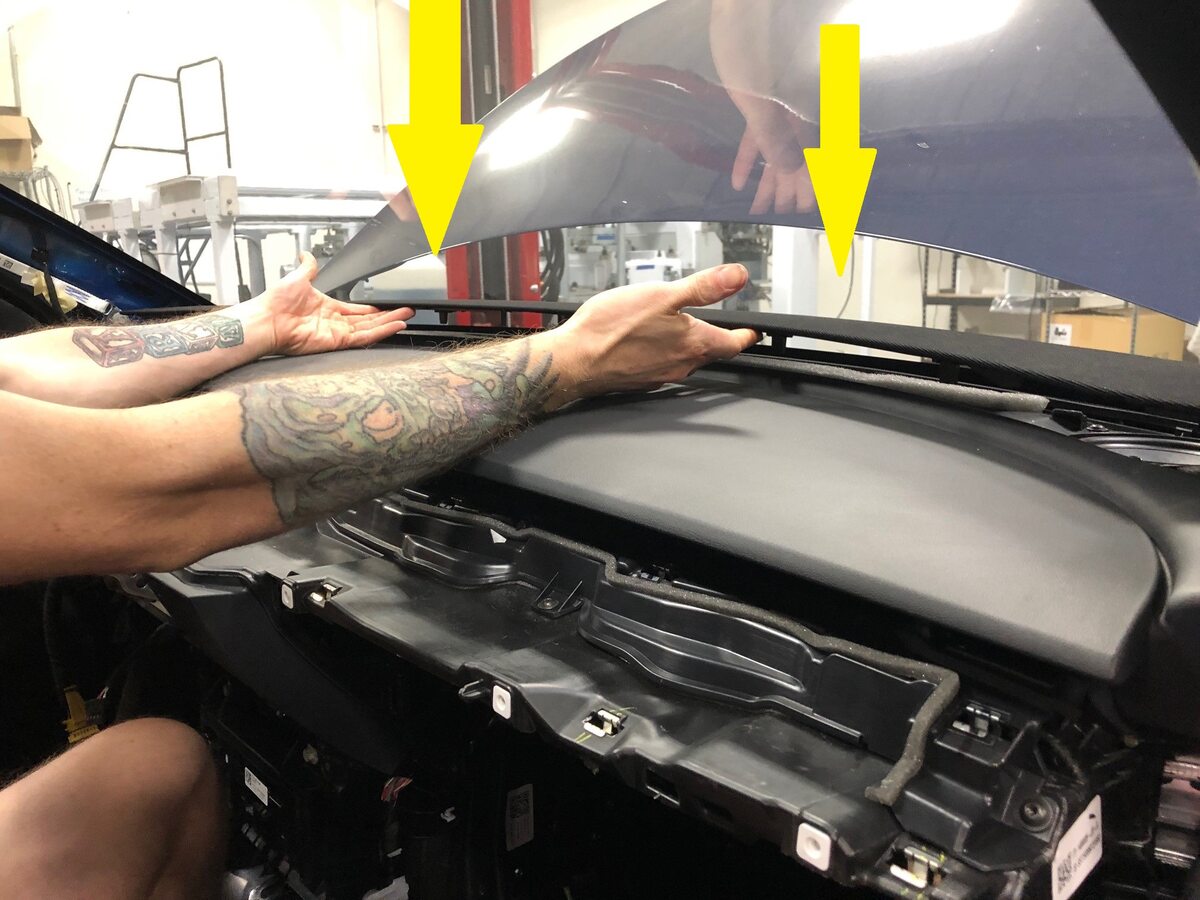
-
Secure clips securing defroster grill
注8x clips
-
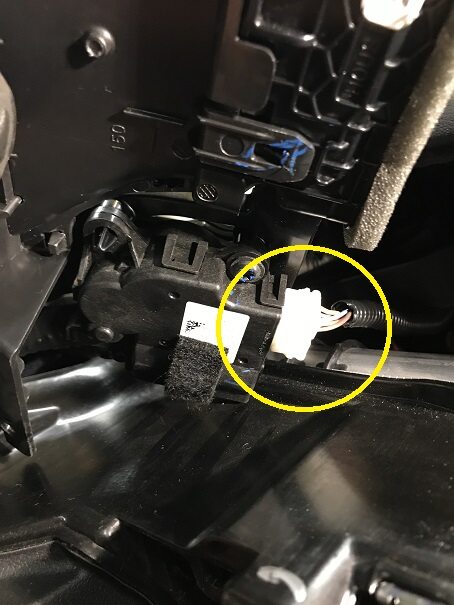
Position LH air duct into IP and connect harness connector
注1x connector
-
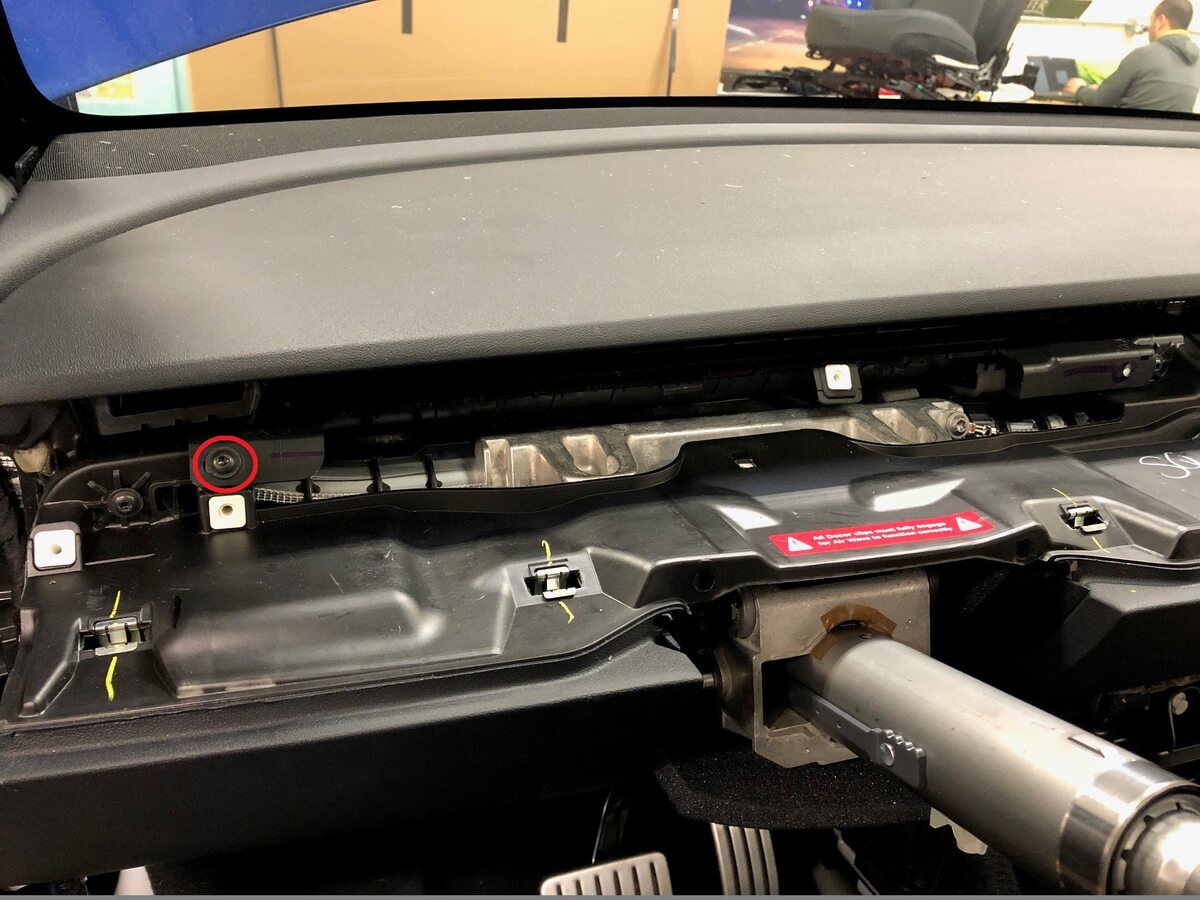
Install LH air duct into IP
注1x screw, T20, 2.3 Nm
-
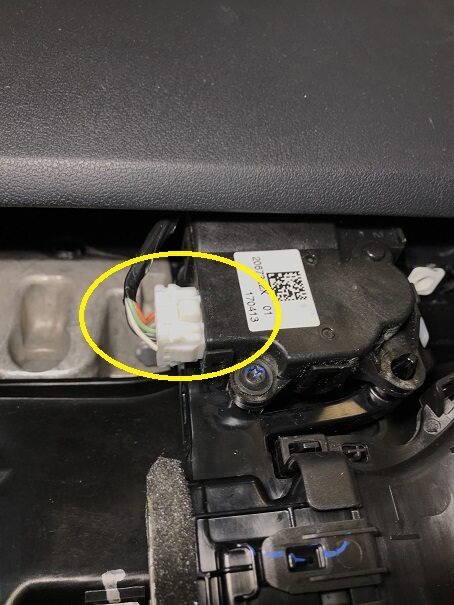
Position RH air duct into IP and connect harness connector
注1x connector
-
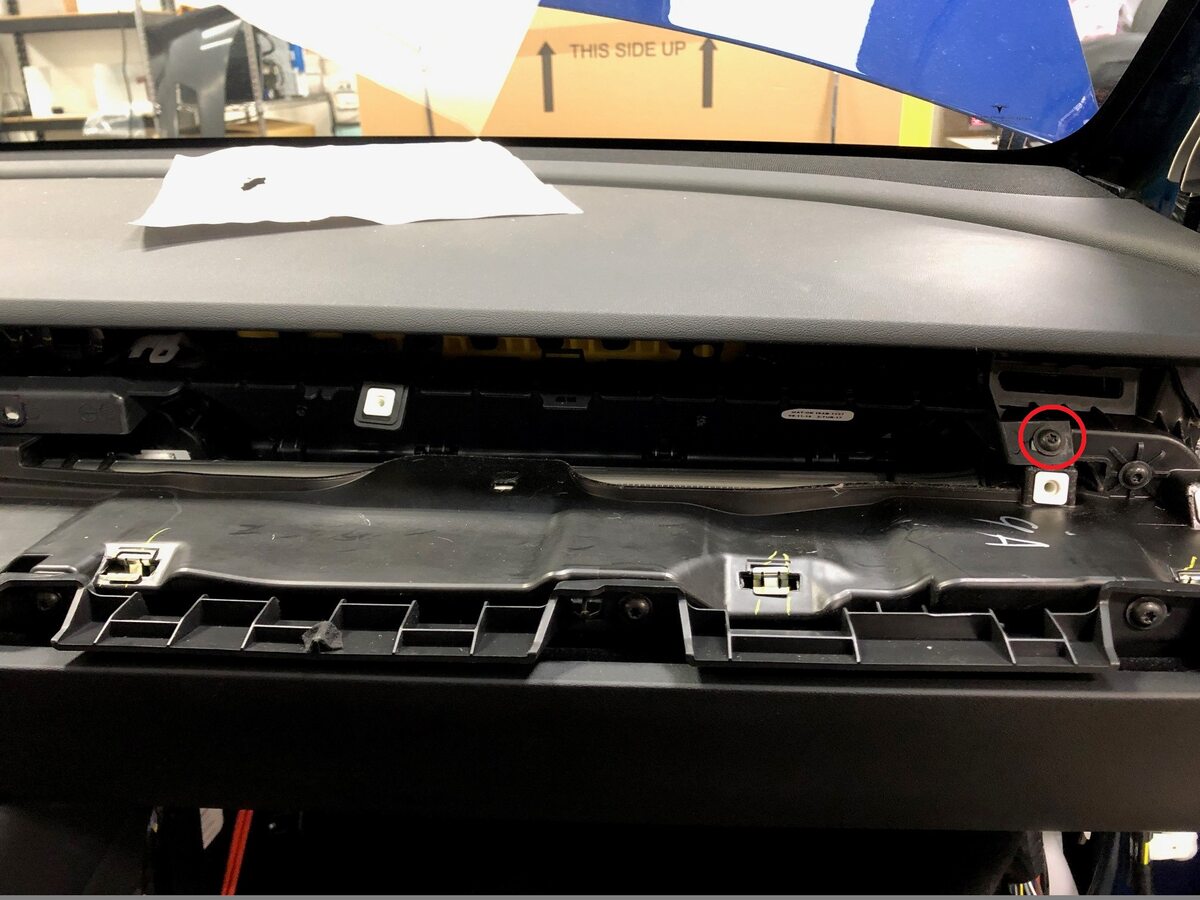
Install RH air duct into IP
注1x screw, T20, 2.3 Nm
-
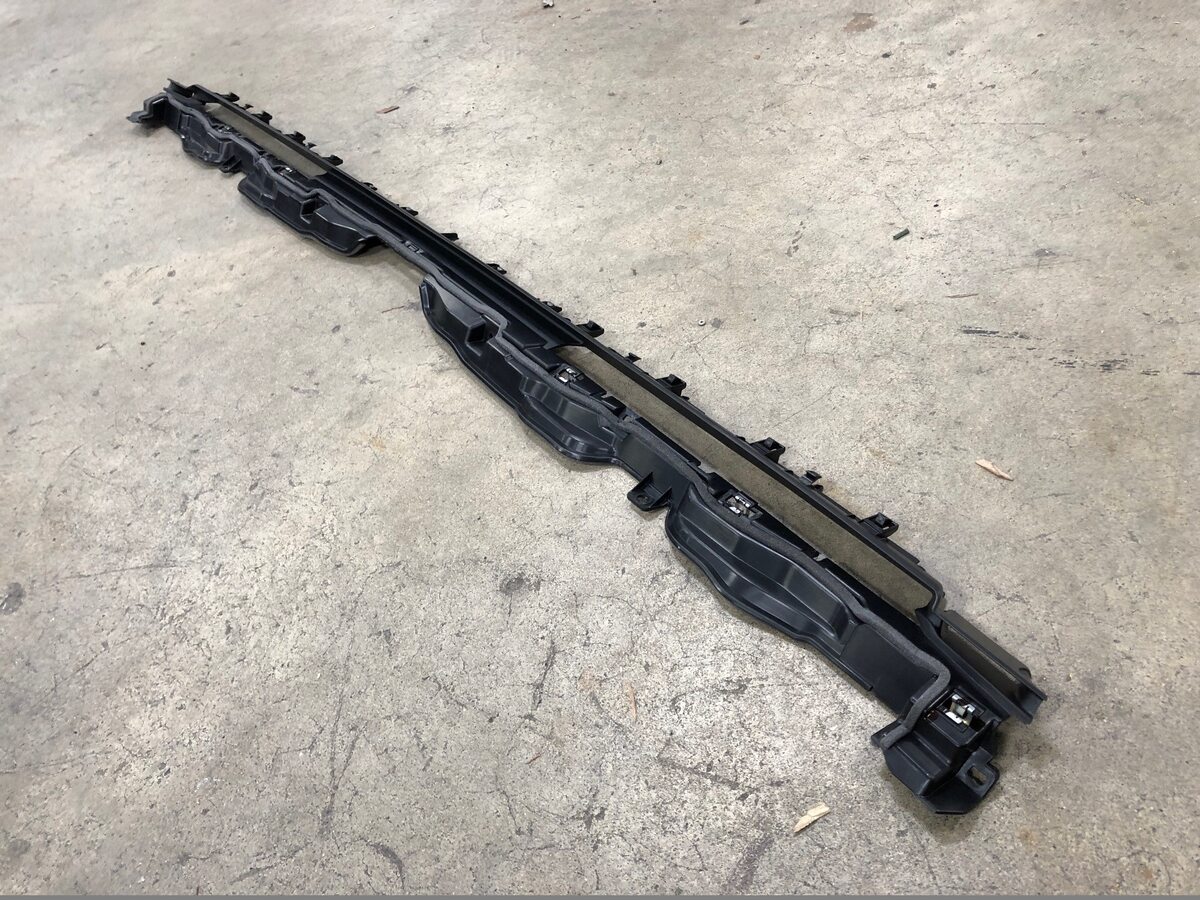
Install IP brow finisher into vehicle
注16x clips, Need to lift top pad up slightly to slide IP brow finisher into position
-
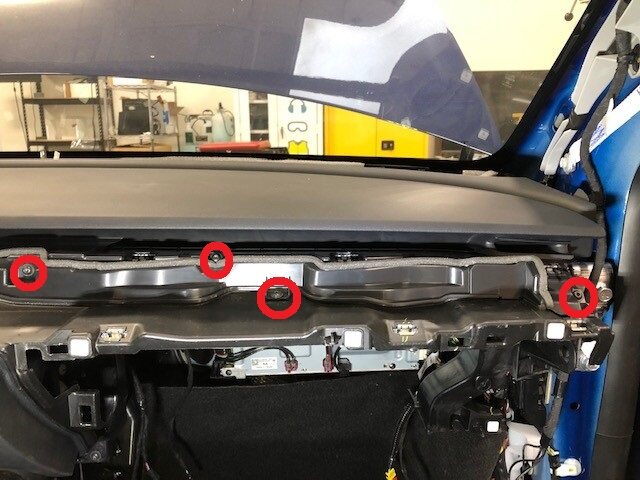
Install screws securing RH side of IP brow finisher
注4x screws, T20, 2.3 Nm, Fastener count may vary, Older production vehicles may have 5x screws
-
Install screws securing LH side of IP brow finisher
注4x screws, T20, 2.3 Nm, Fastener count may vary, Older production vehicles may have 5x screws

-
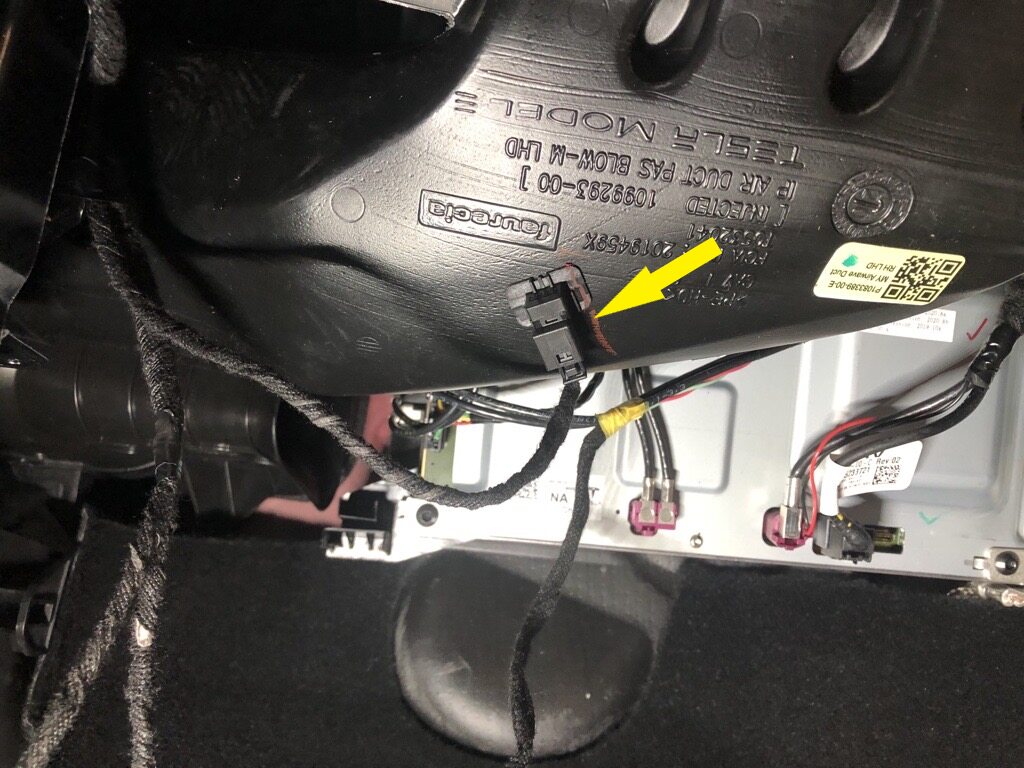
Connect RH upper duct thermistor to RH IP air wave duct
注1x connector
-
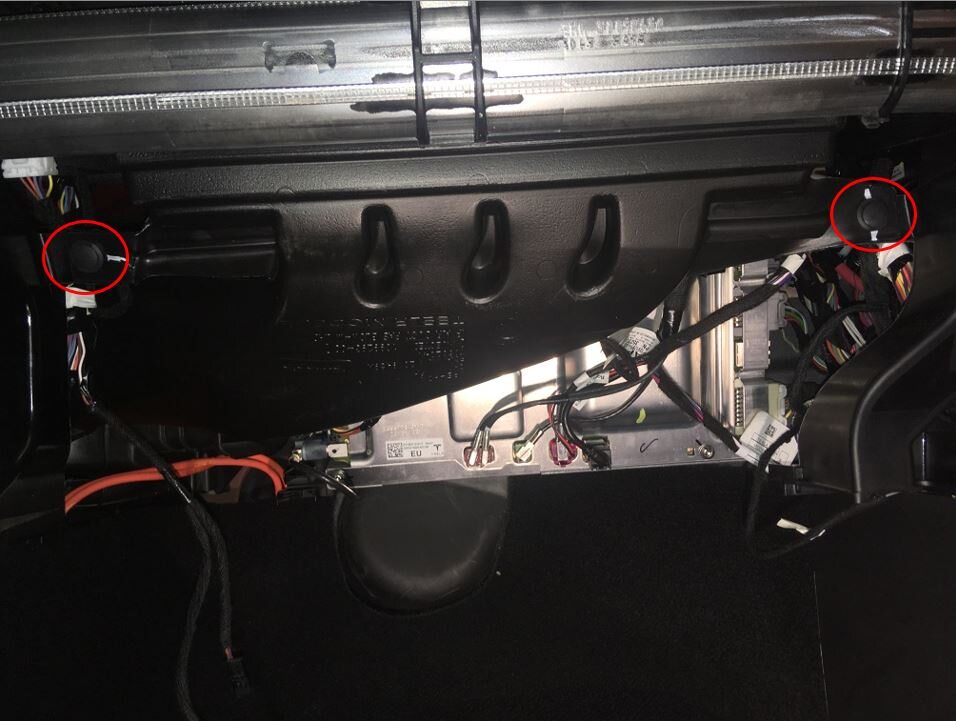
Install RH IP air wave duct
注2x push clips
-
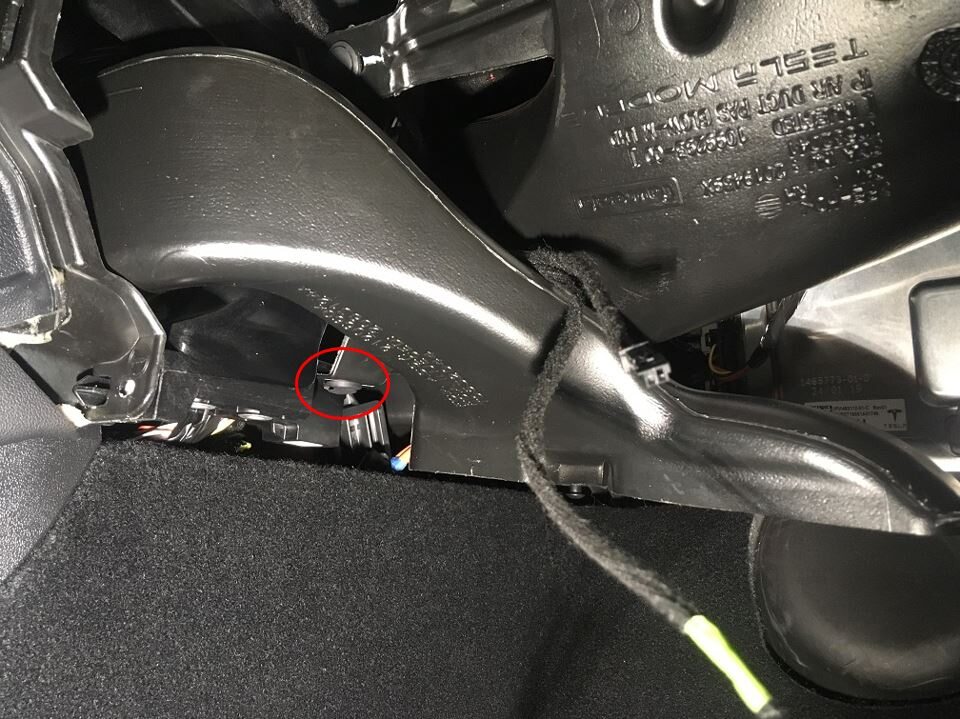
Install passenger footwell air duct
注1x push clip
-
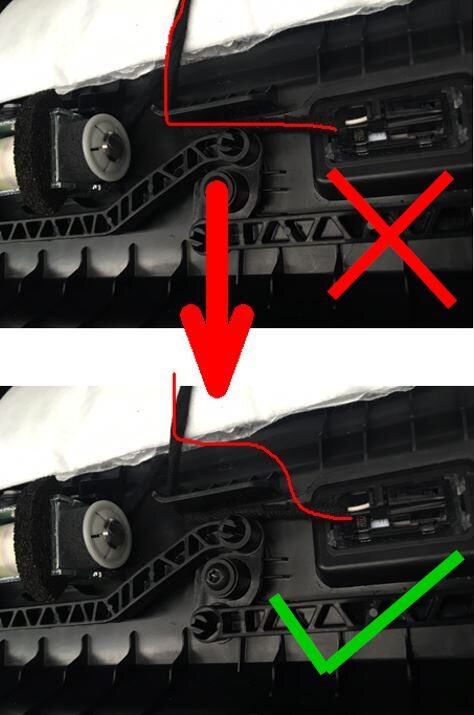
Connect glove box assembly connectors
注3x connectors, New puddle lamp harness routing prevent blocking movement of pawls, Make sure harness is routed properly above passenger footwell air duct before connecting
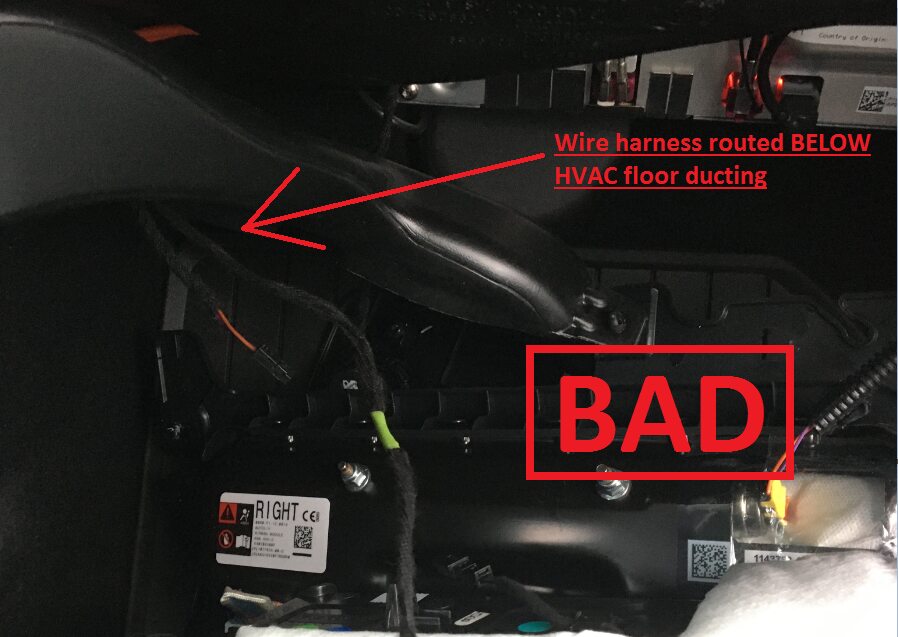
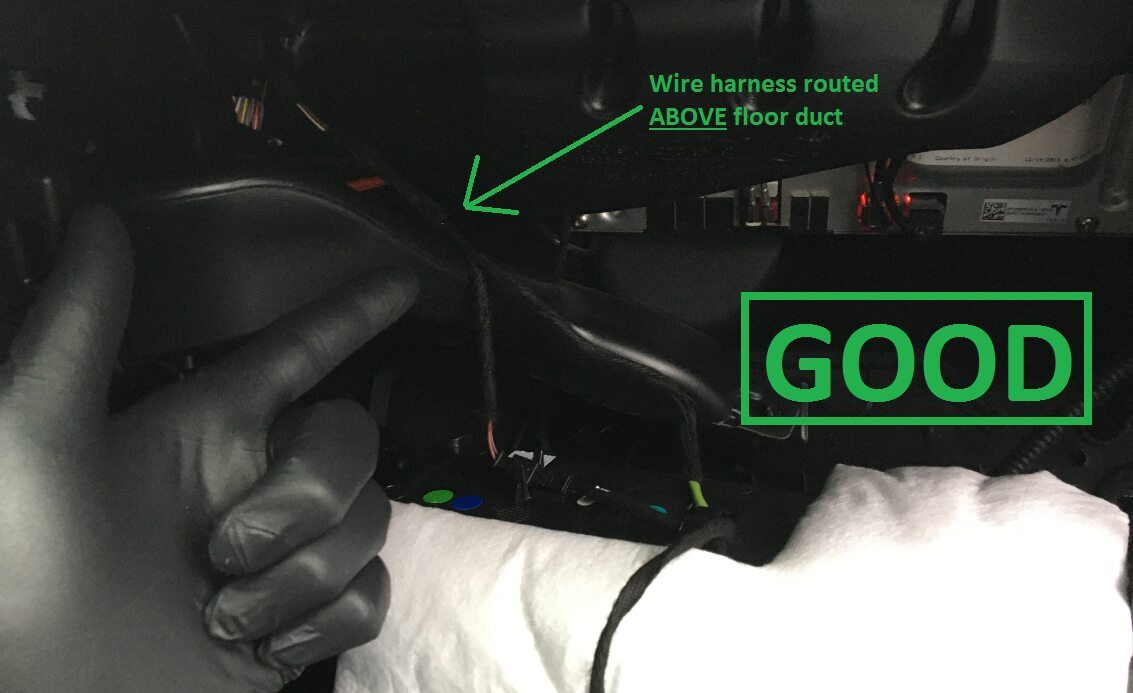
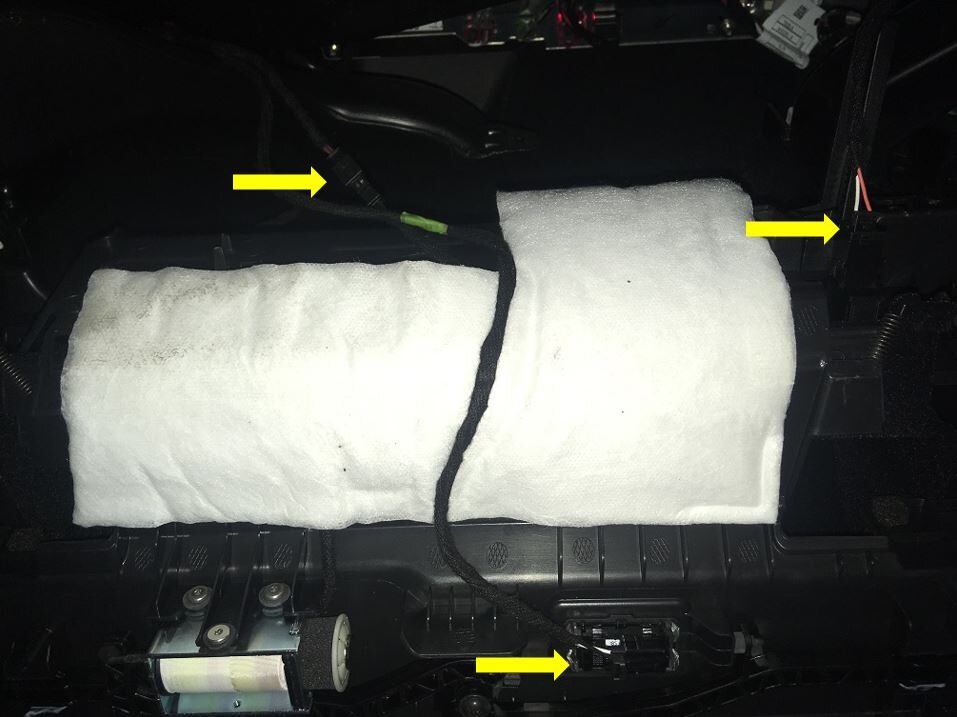
-
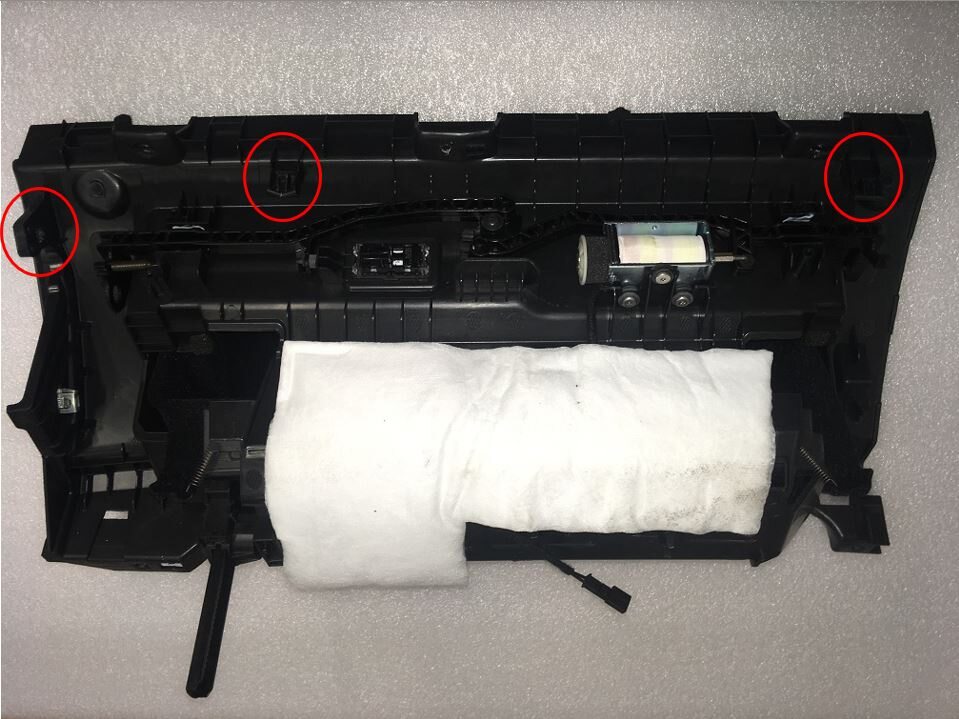
Install glove box into IP carrier
注3x clips
-
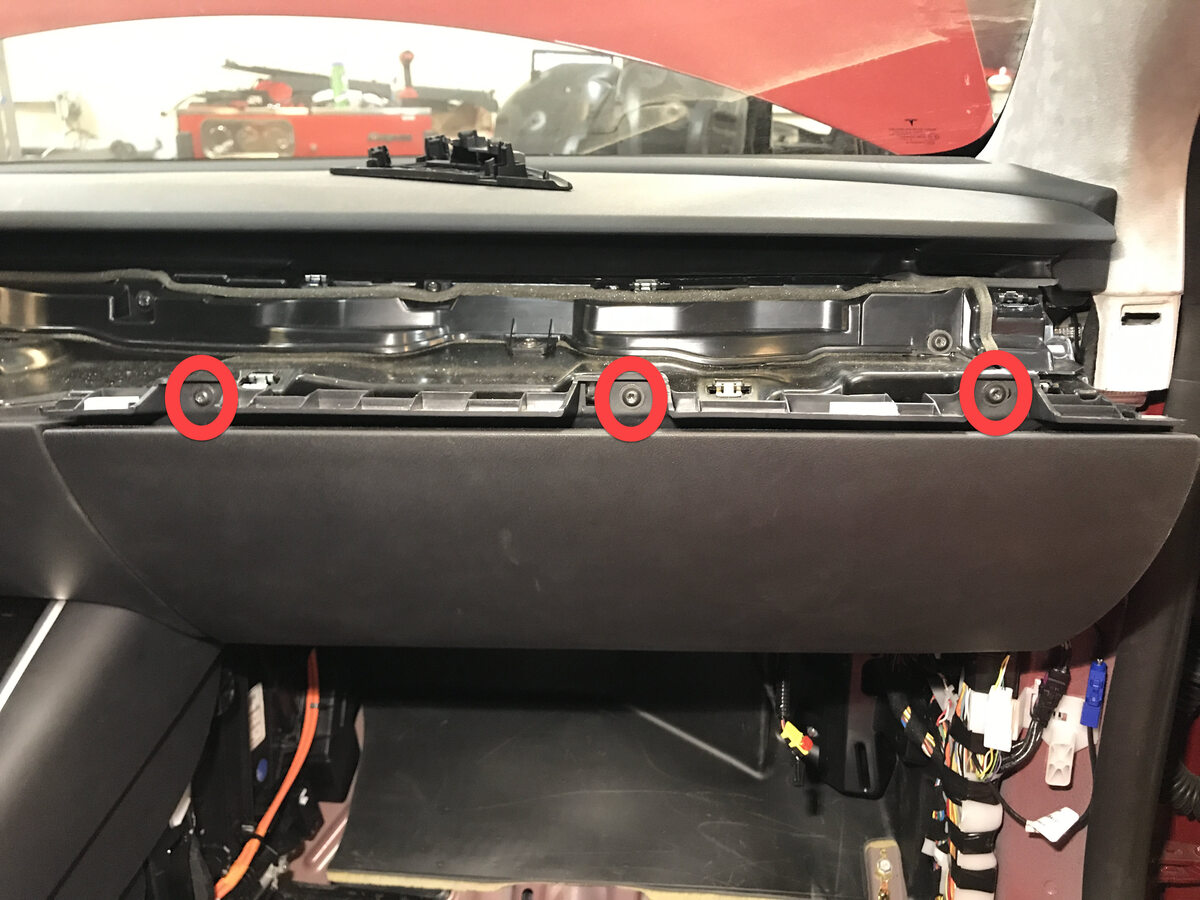
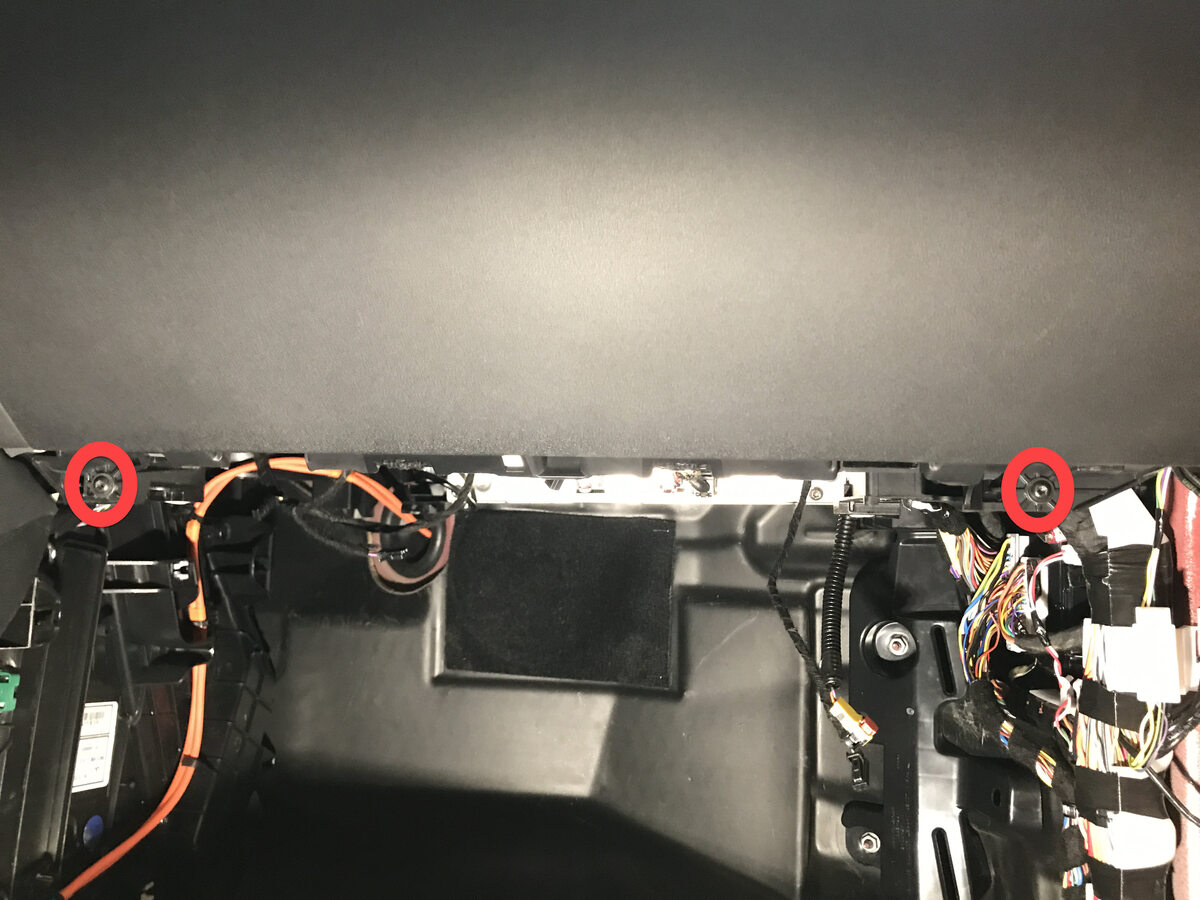
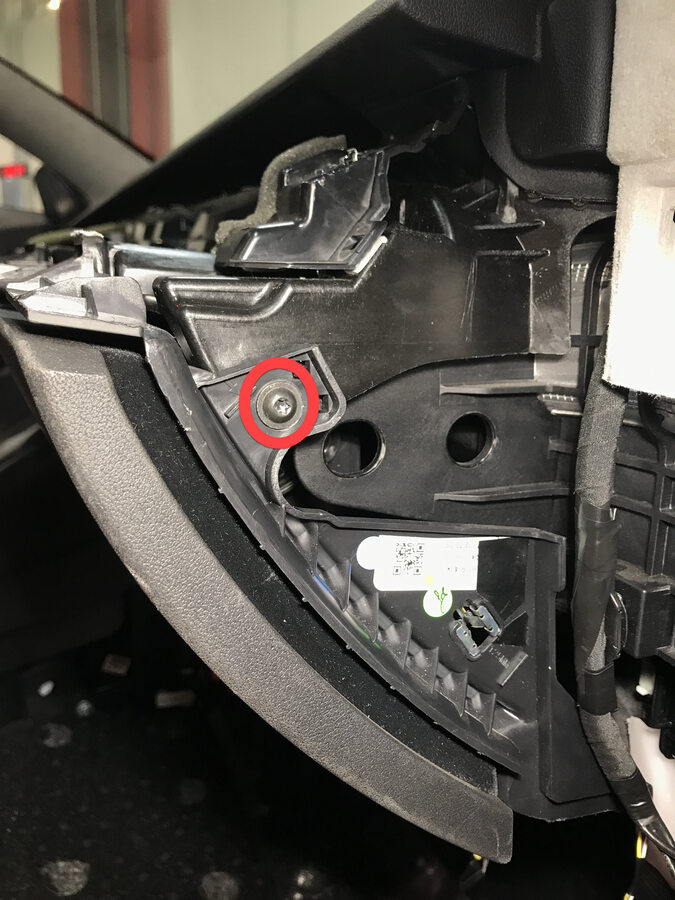
Install screws securing glove box assembly to IP carrier
注6x screws, T20, 2.3 Nm
-
Connect glove box USB cable to car computer
注1x connector
-
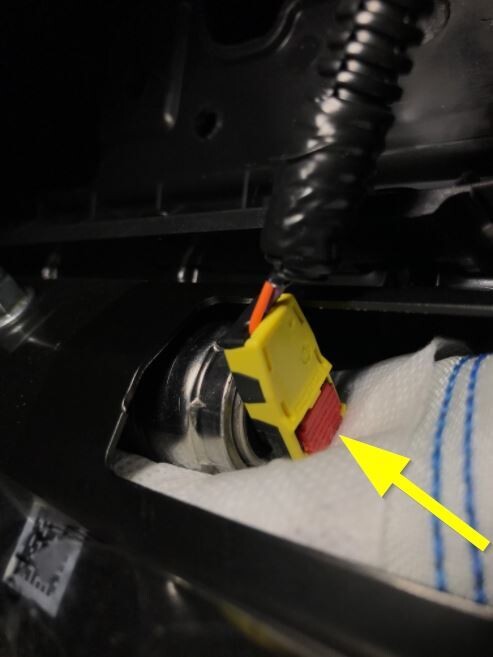
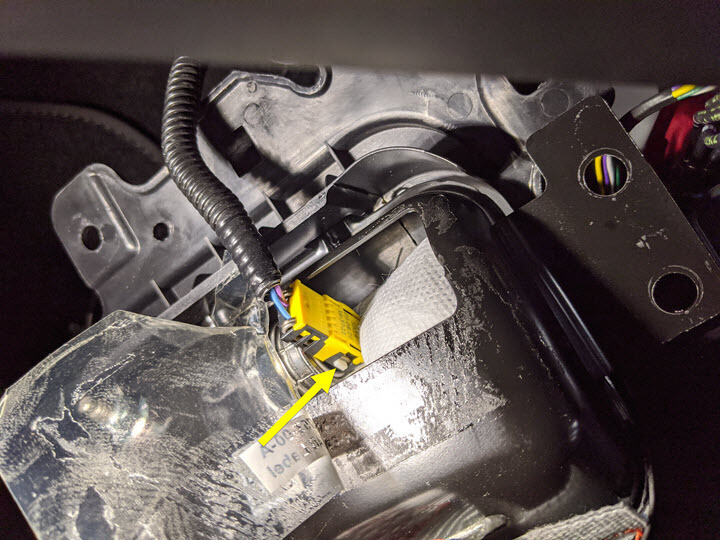
Install passenger knee air bag onto vehicle
注1x connector, Use caution not to damage connector and harness, Support knee air bag while connecting connector
-
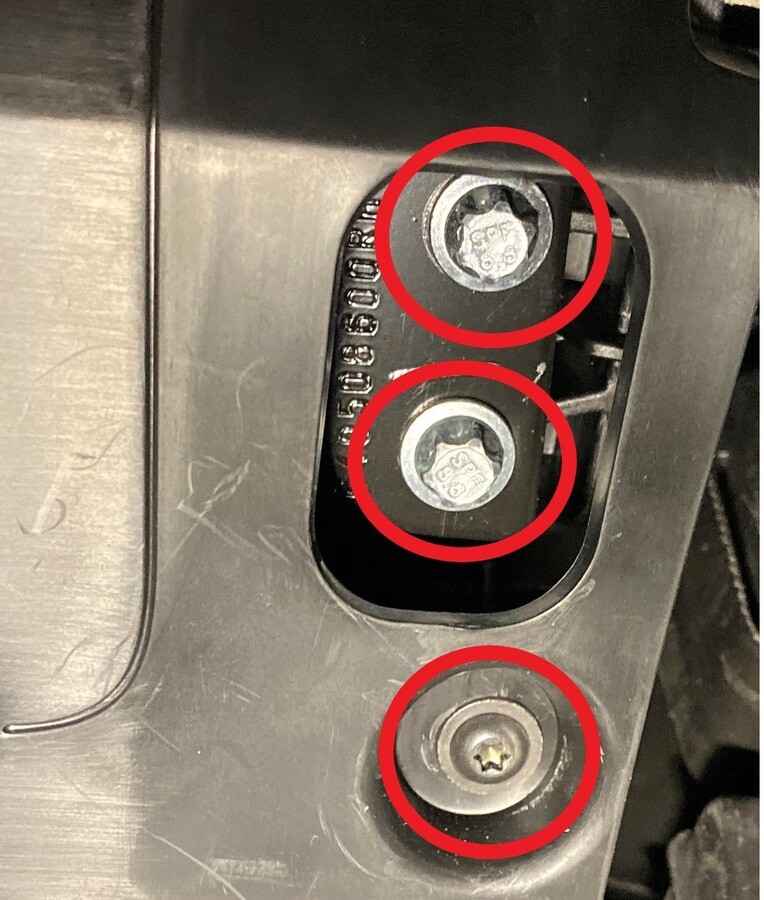
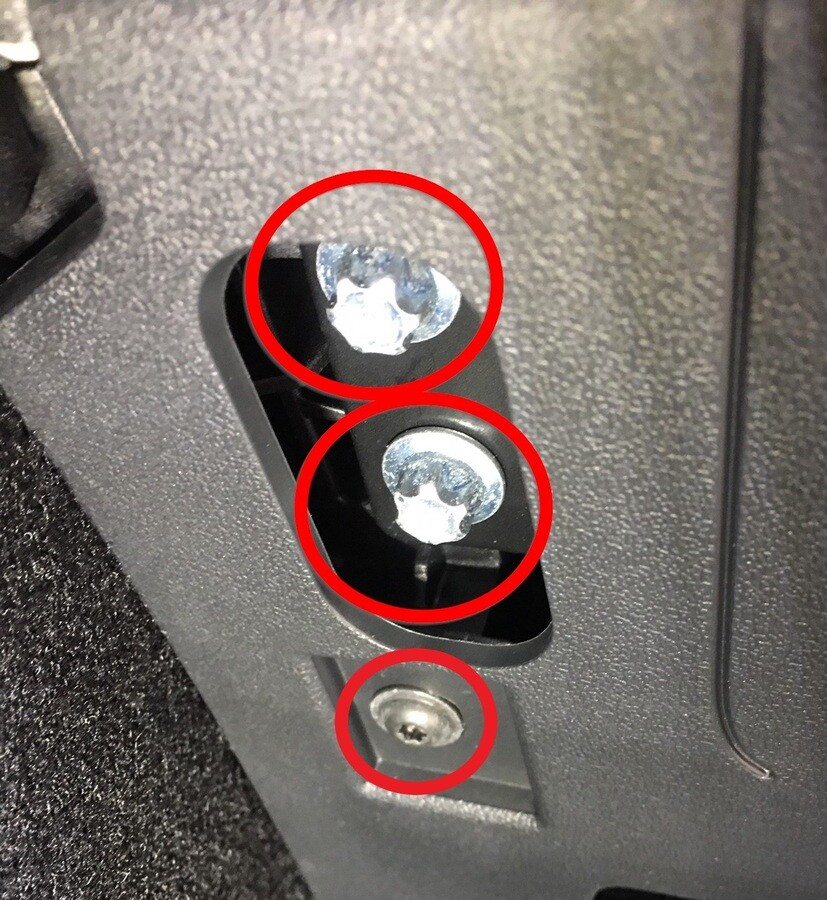
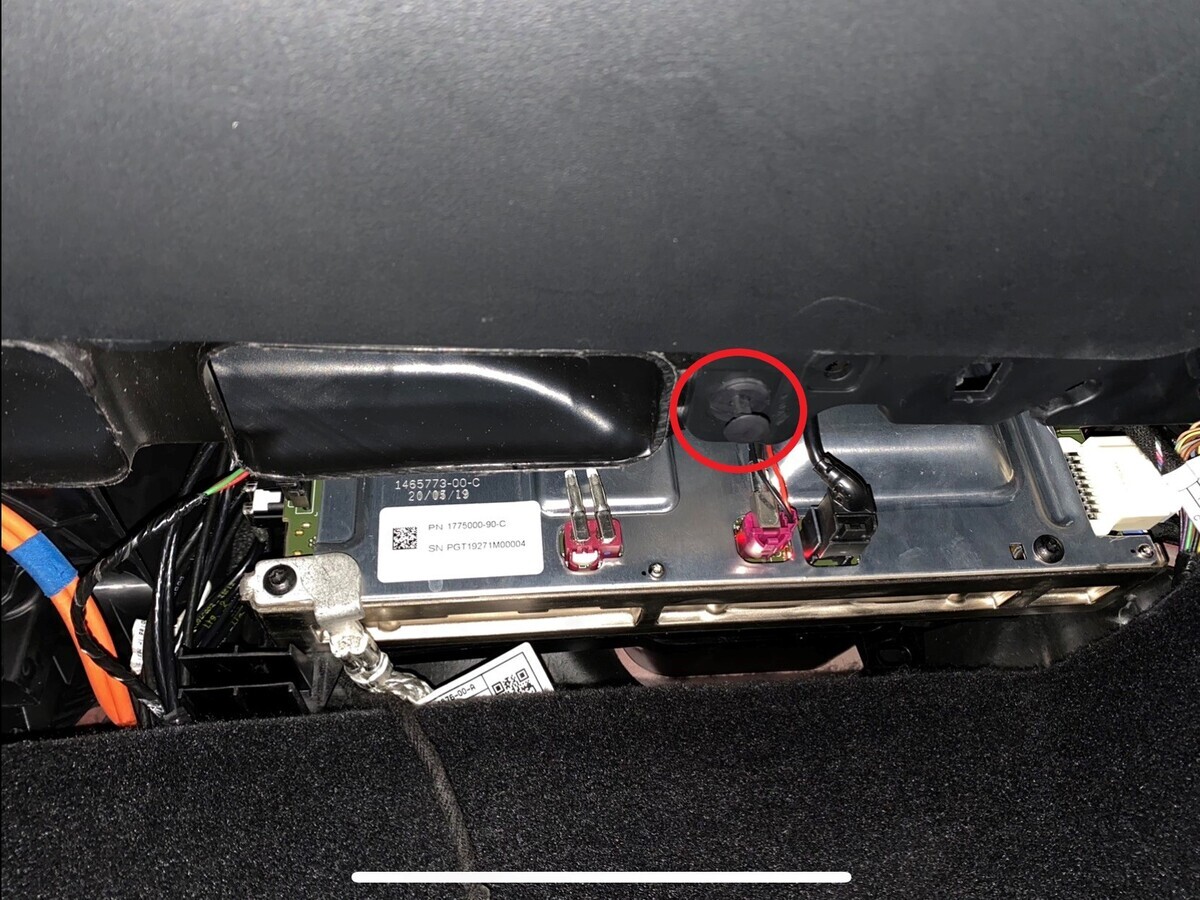
Install bolts securing passenger knee air bag to vehicle
注4x patch bolts, E10, 8 Nm, Install new patch bolts, 2x screws, T20, 2 Nm, 1x push clip, If vehicle equipped with T30 bolts update to E10
-
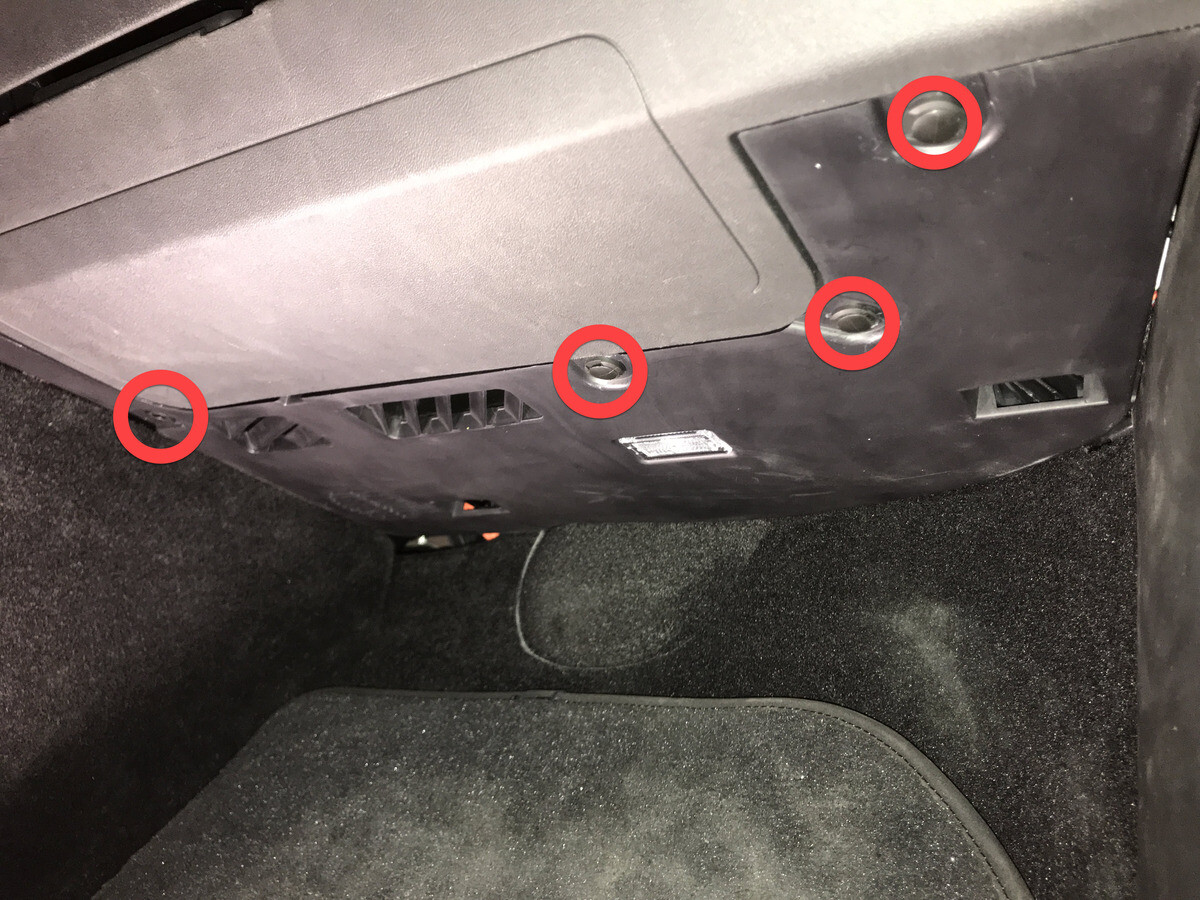
Install clips securing RH footwell assembly
注4x push clips
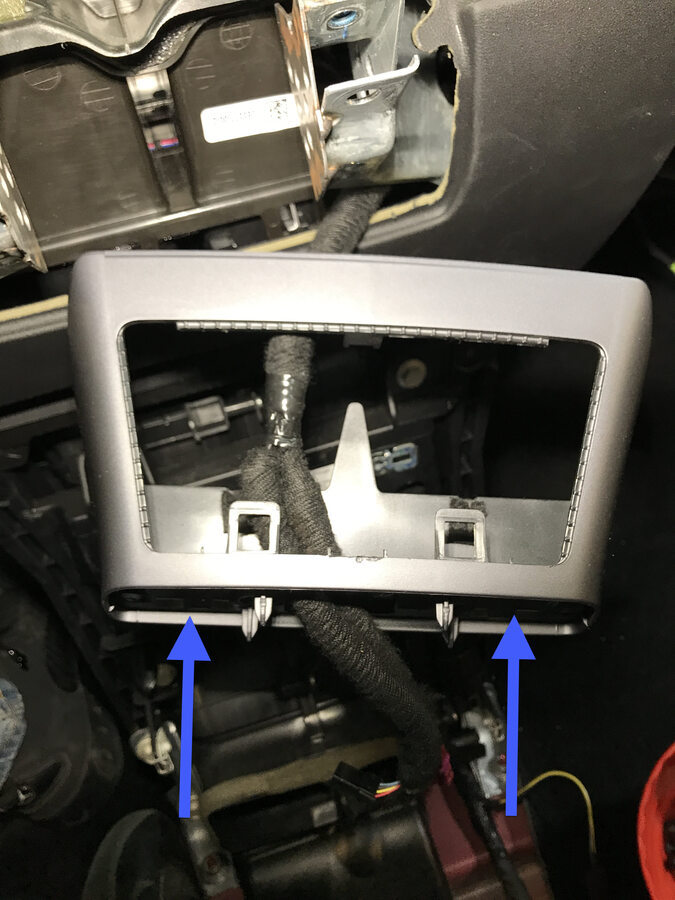
-
Position center display neck housing into vehicle
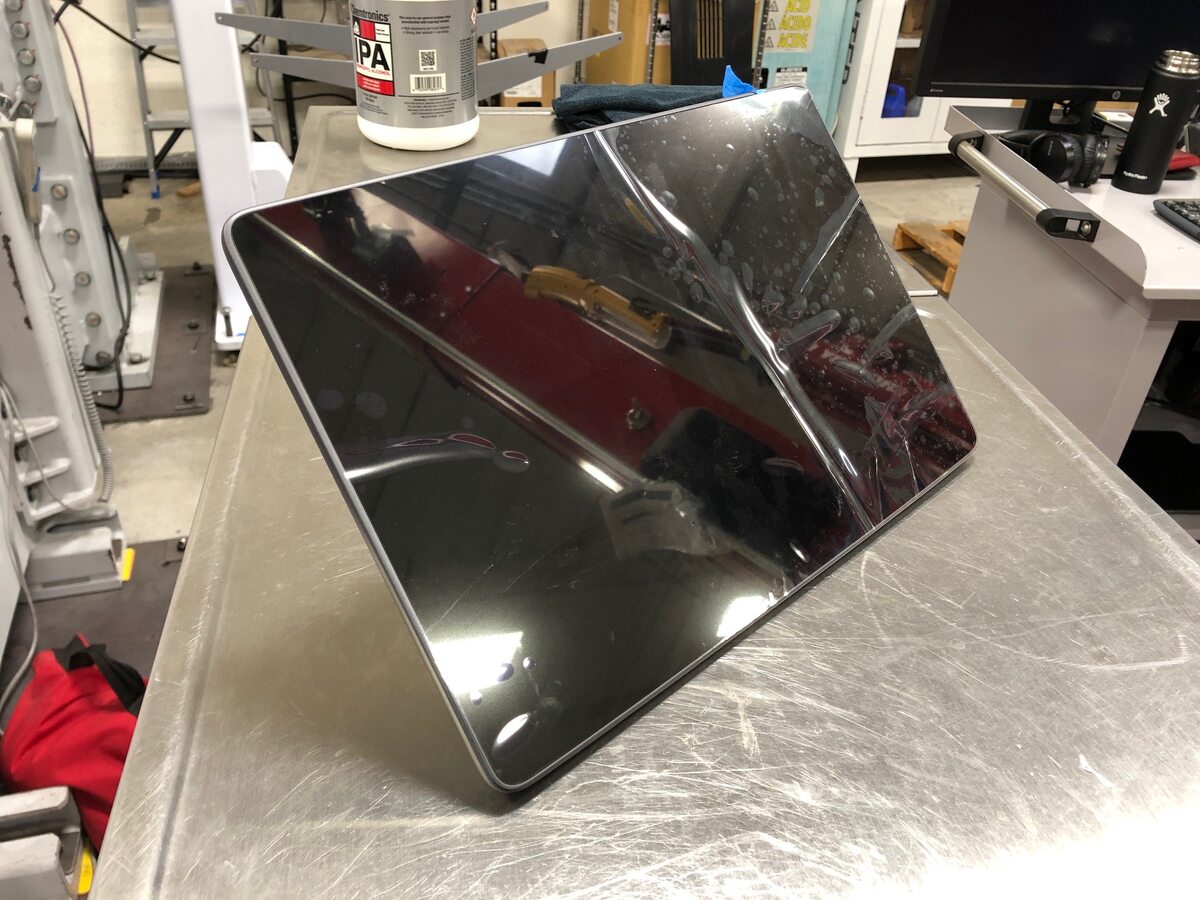
-
Position center display into vehicle
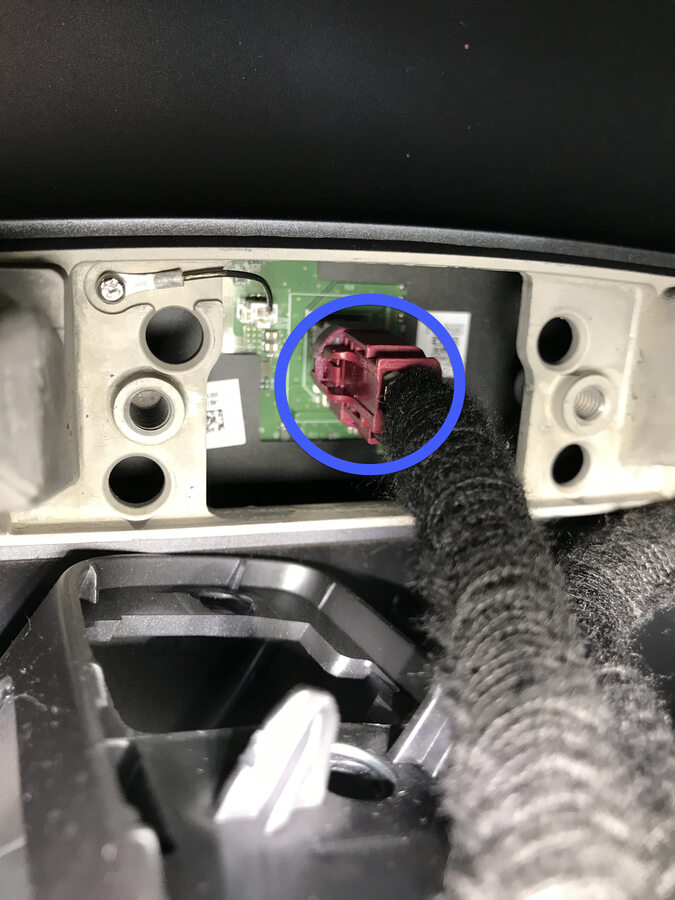
-
Connect center display
注1x connector
-
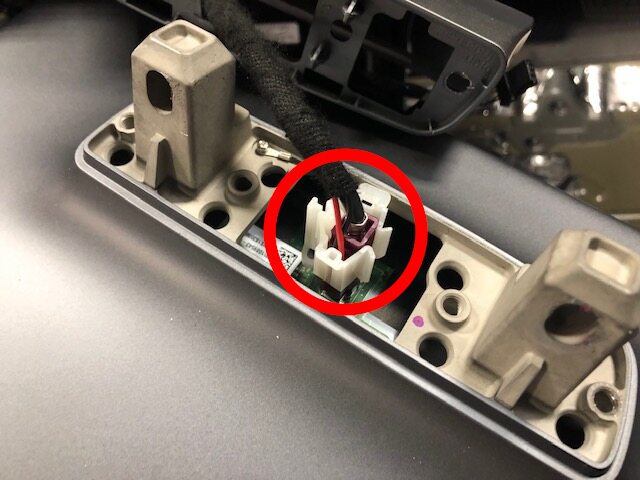
Install retaining clip to center display connector
注1x clip
-
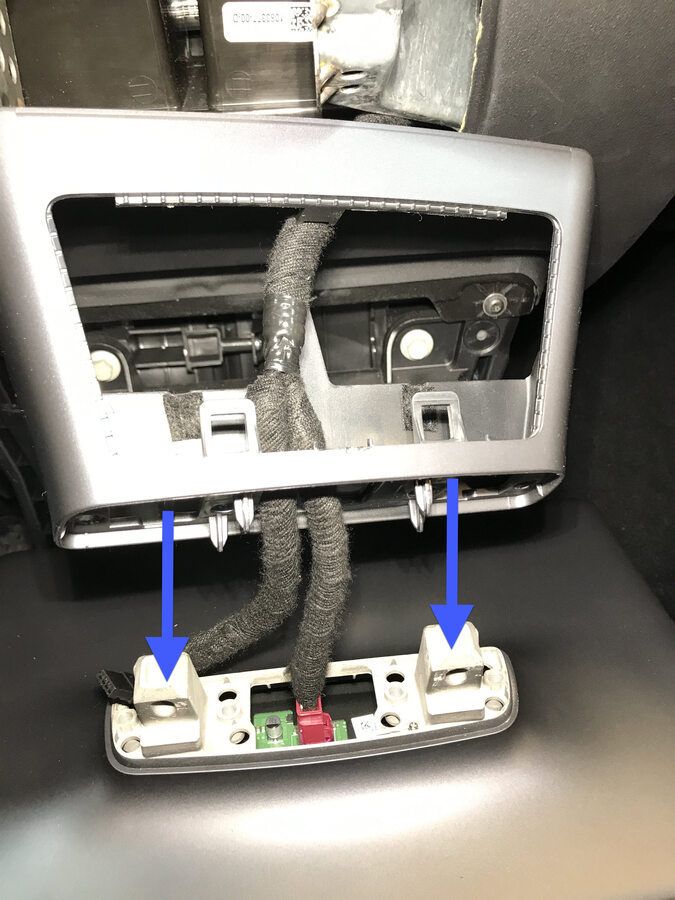
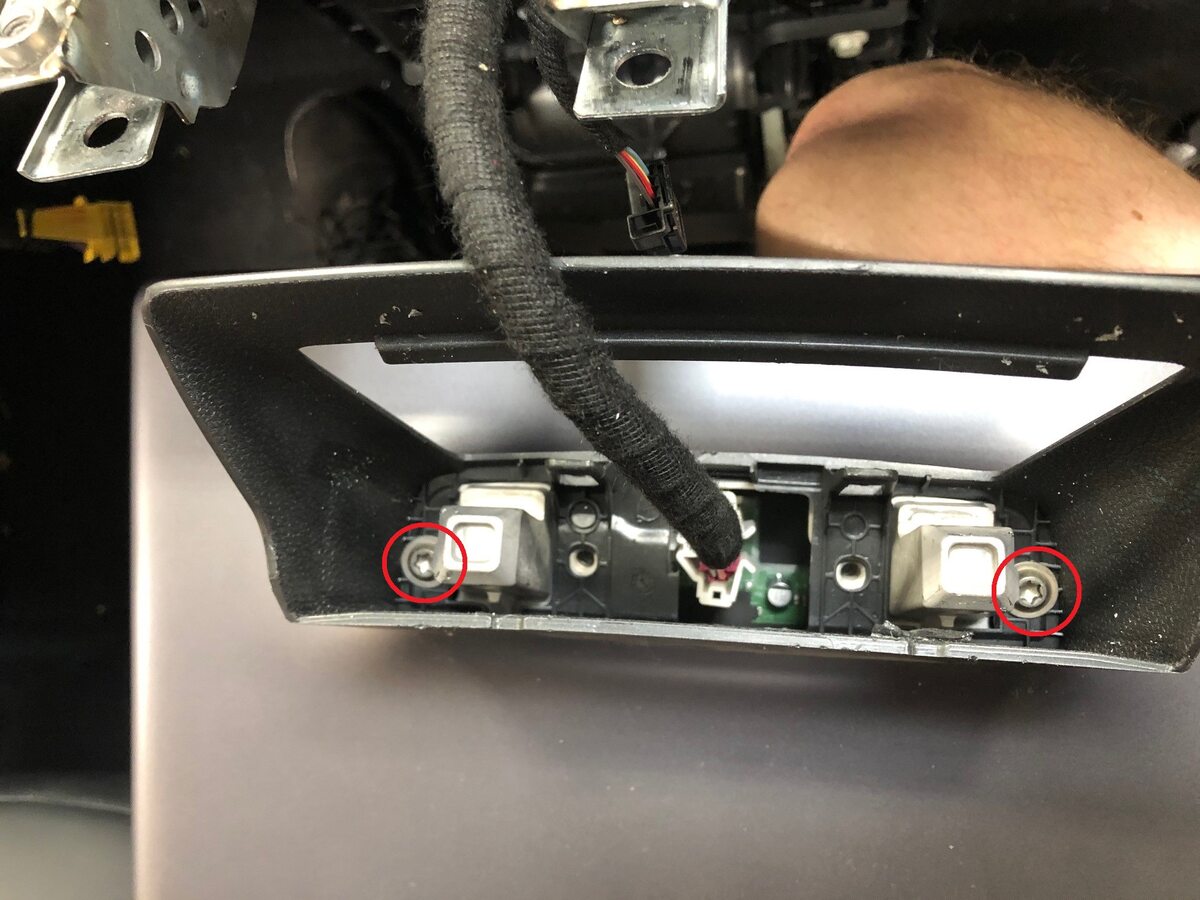
Slide down neck housing and install bolts securing neck housing to center display
注2x bolts, T30, 3 Nm, Number of fasteners on older vehicles may vary
-
Install center display to IP carrier
注2x patch bolts, 10mm, 16 Nm, Install new 10mm patch bolts, Slide towards front of vehicle

-
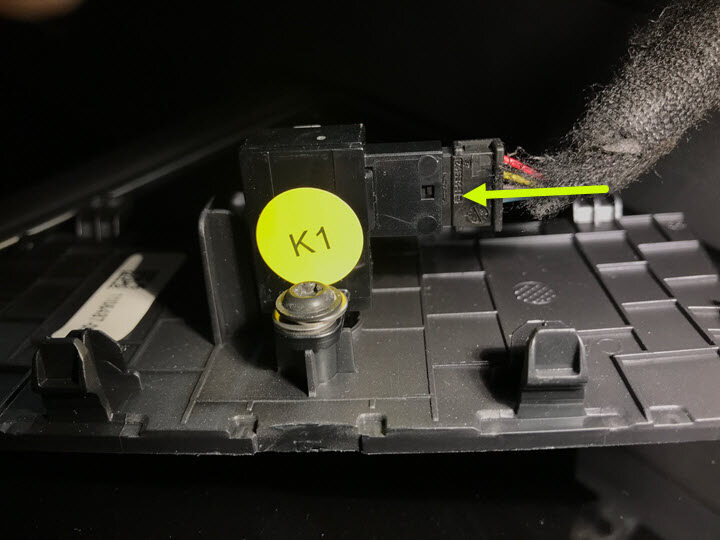
Connect temperature sensor connector and install IP service panel into IP
注4x clips, 4x tabs, 1x connector
-
Connect steering column control module (SCCM) assembly connector
注1x connector, Install new orange retaining clip to connector then install SCCM connector, Perform push-pull-push to make sure connector is seated properly
-
Install SCCM onto steering column
-
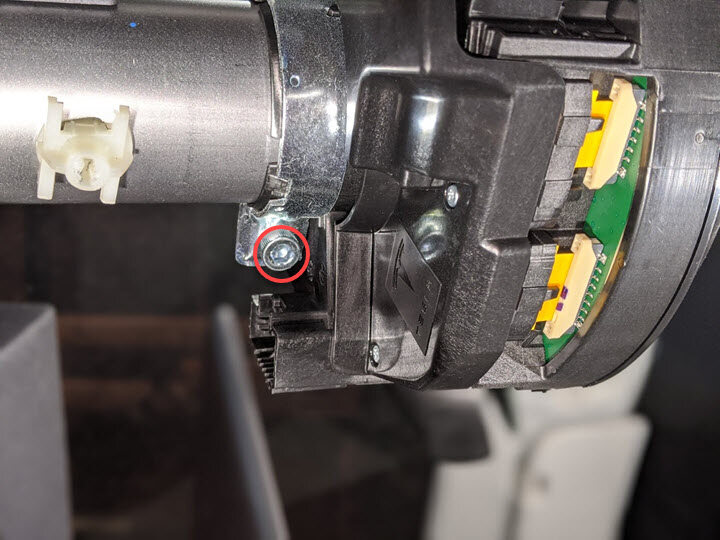
Install bolt securing SCCM to steering column
注1x bolt, 5mm allen, 9 Nm
-
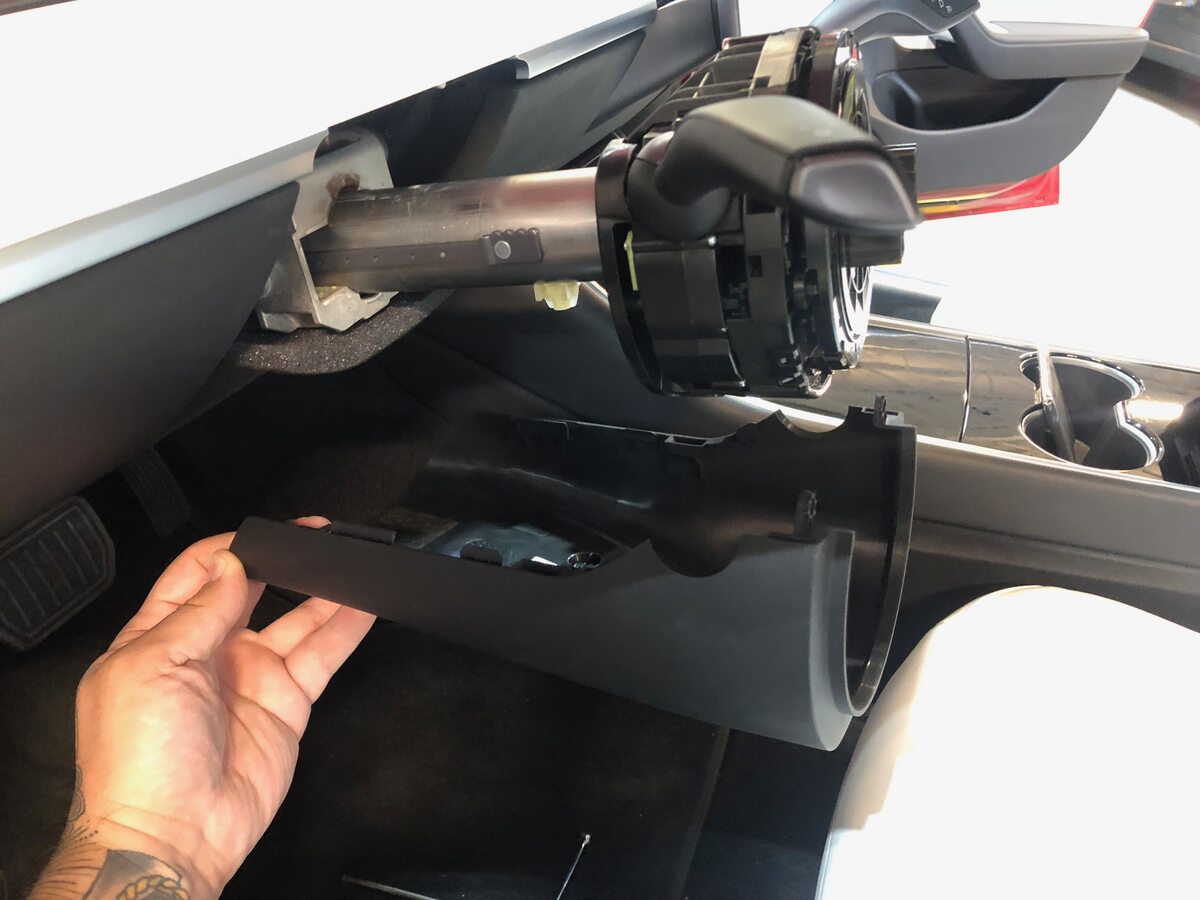
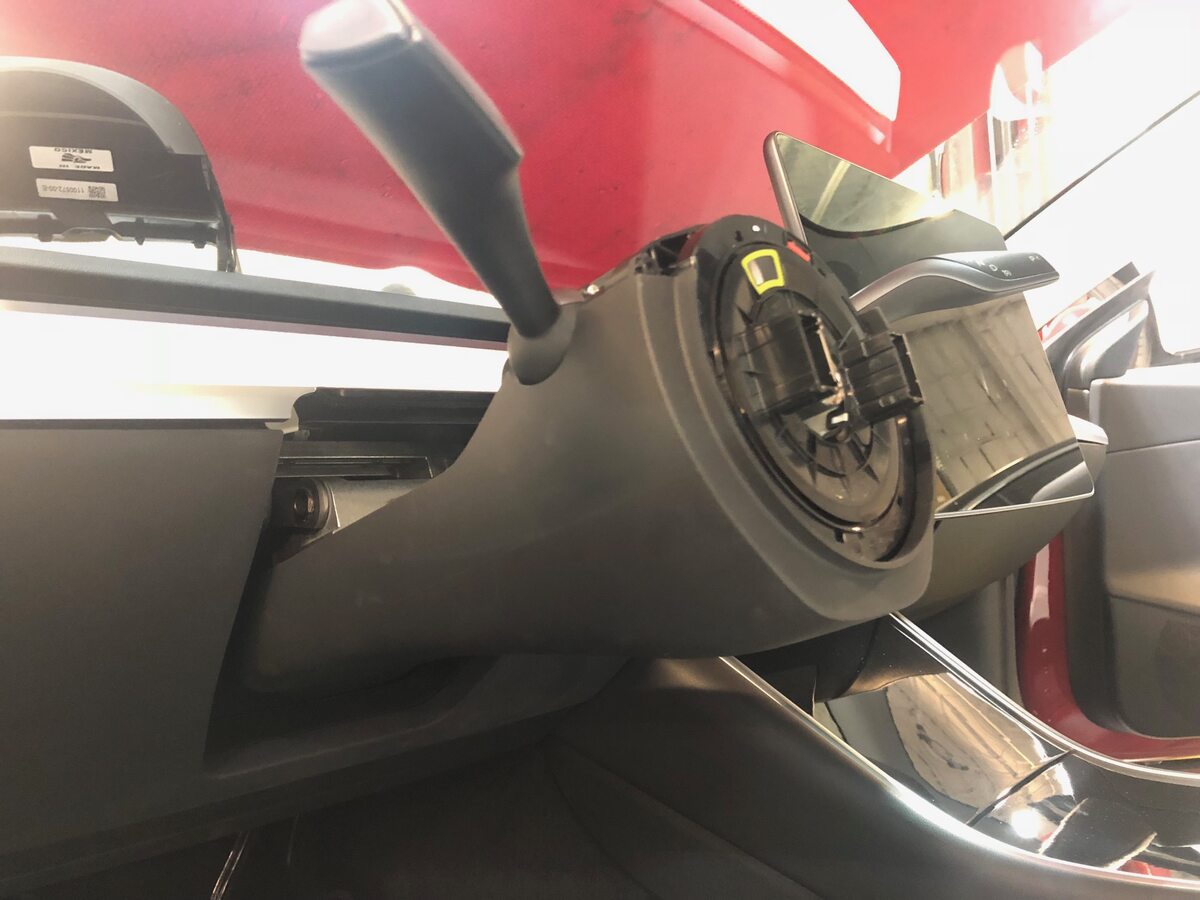
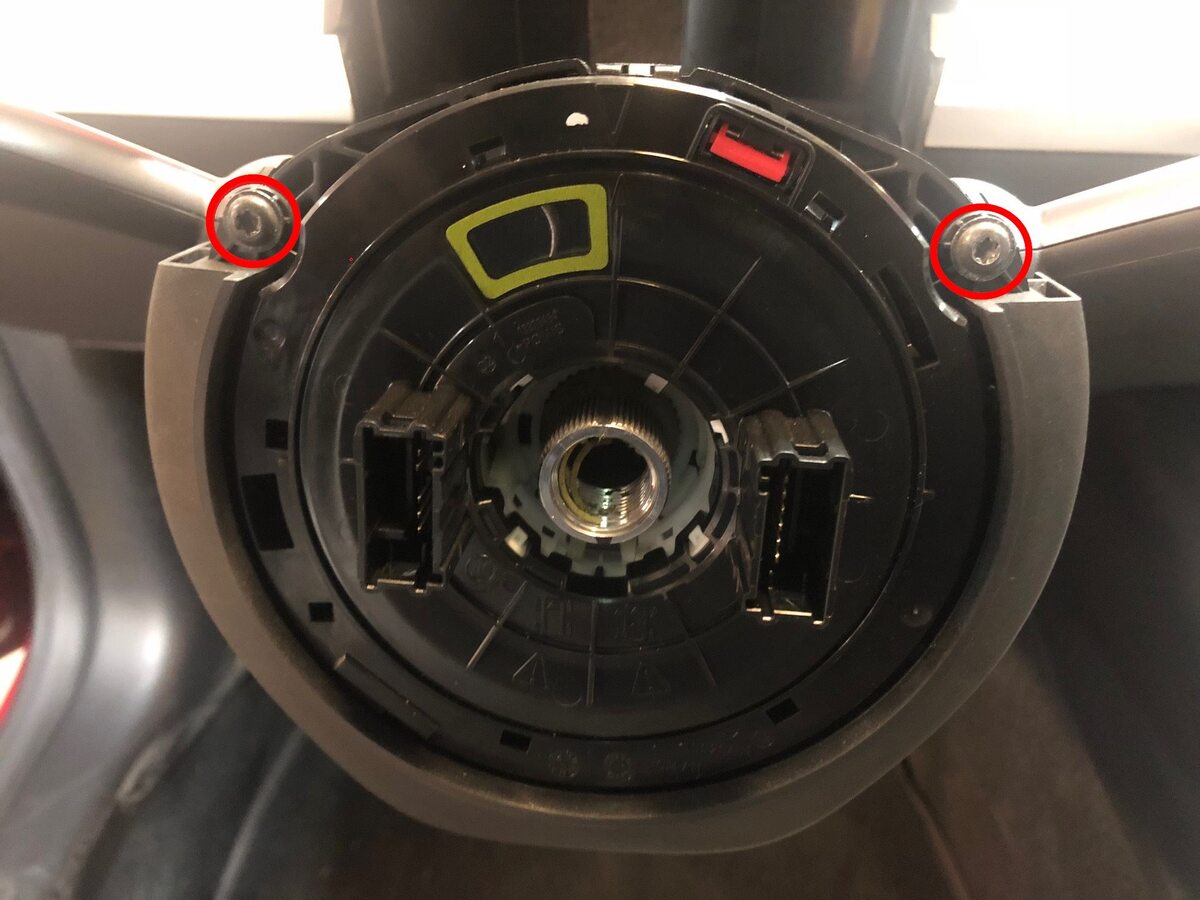
Install lower shroud onto steering column
-
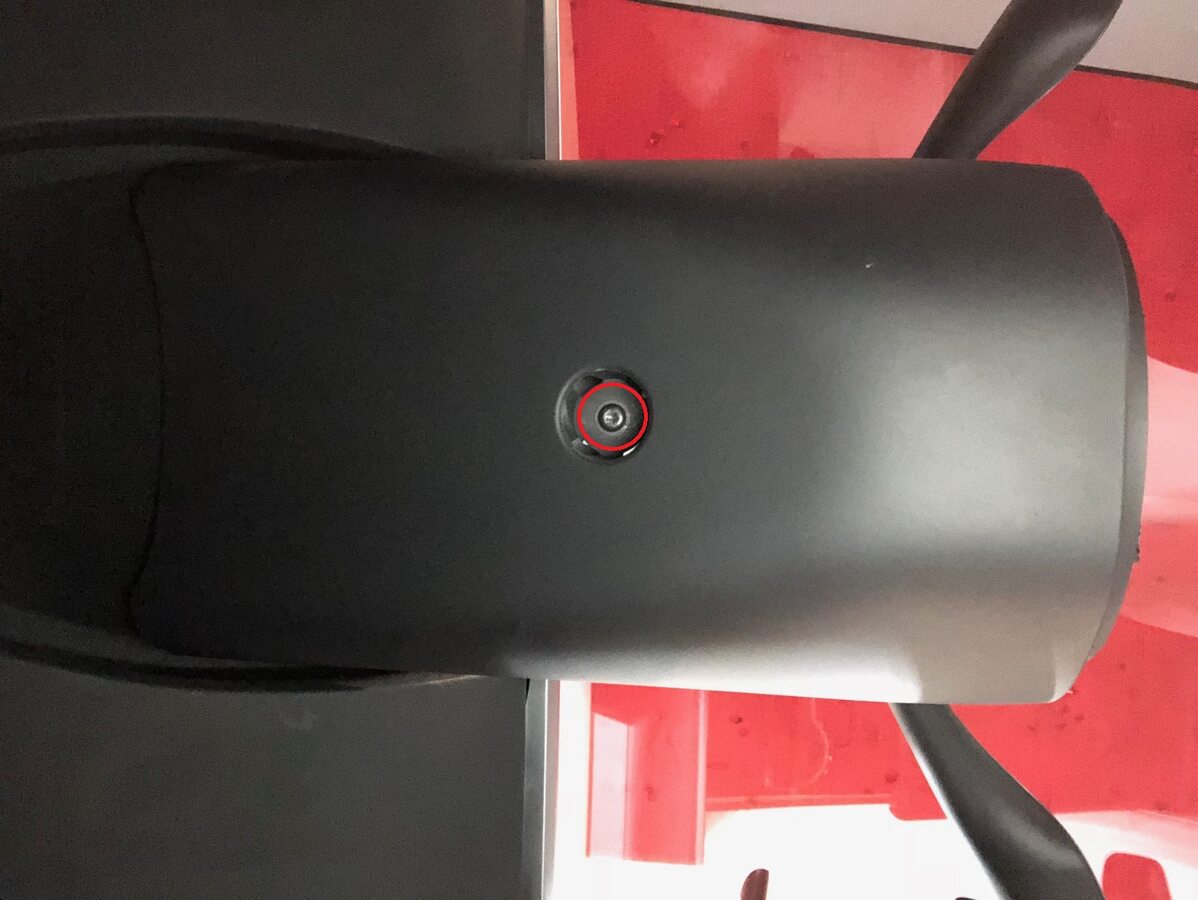
Install lower screw securing lower shroud to steering column
注1x screw, T20, 1.5 Nm
-
Install upper screws securing lower shroud to steering column
注2x screws, T20, 1.5 Nm
-
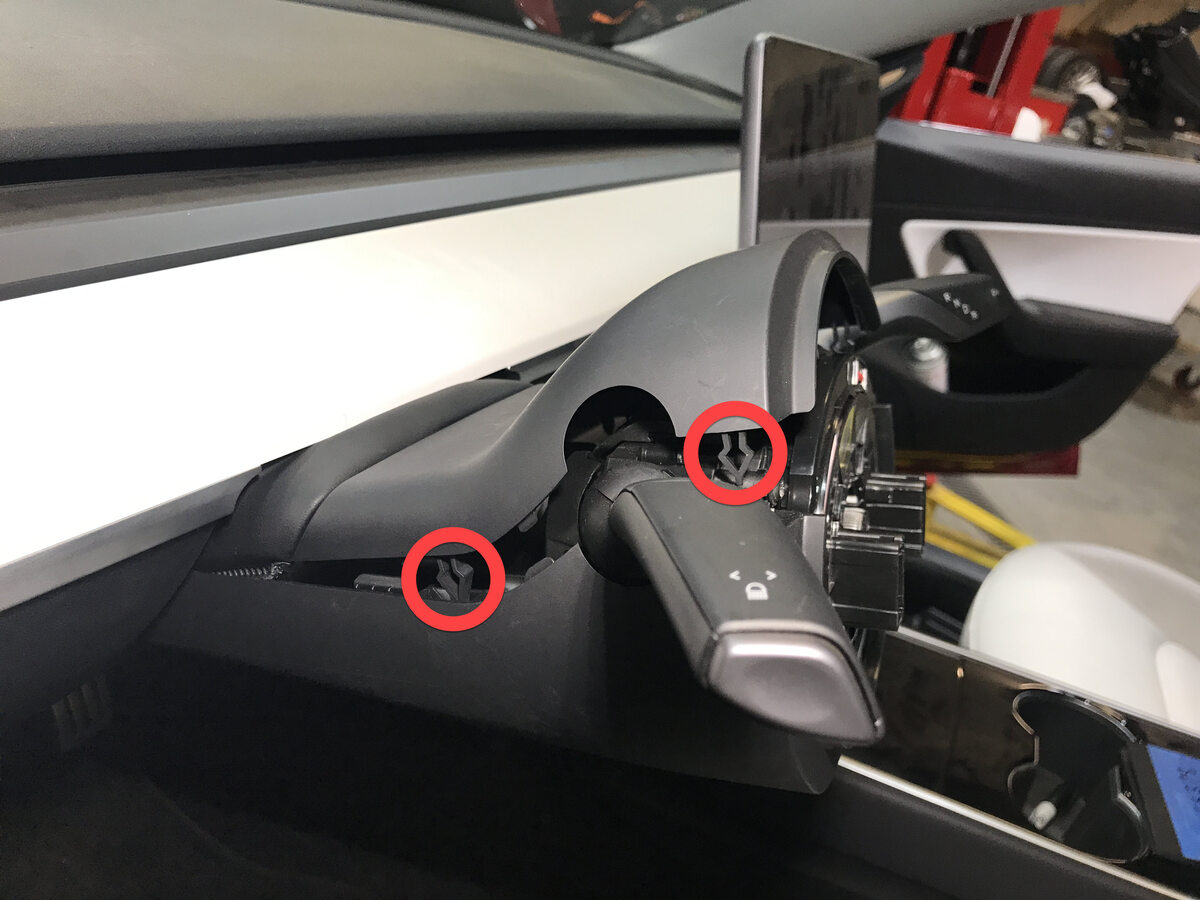
Align the clips then press downward to install upper shroud onto lower shroud
注4x clips
-
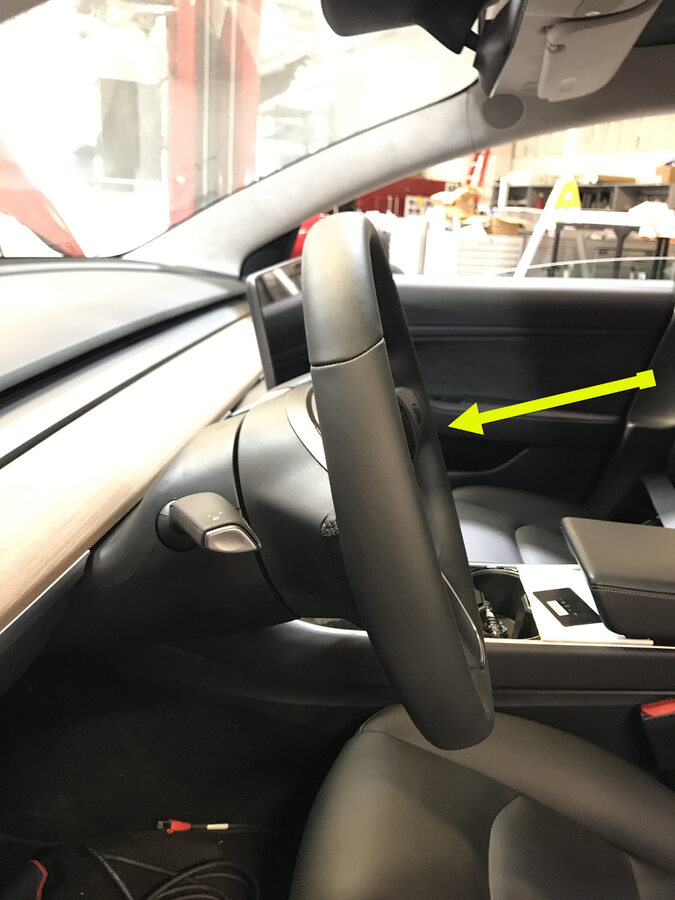
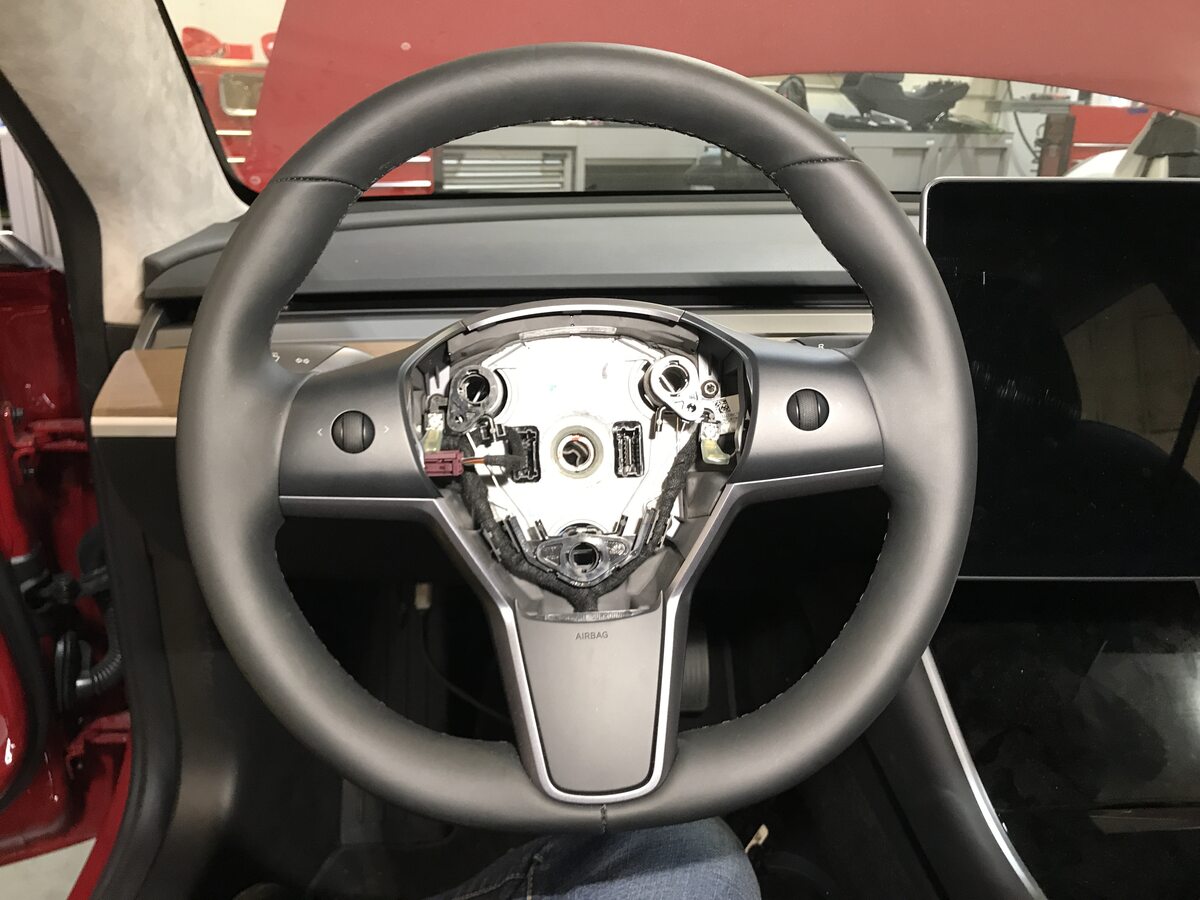
Align the steering wheel to steering column then position it for installation
注The steering wheel and column are keyed
-
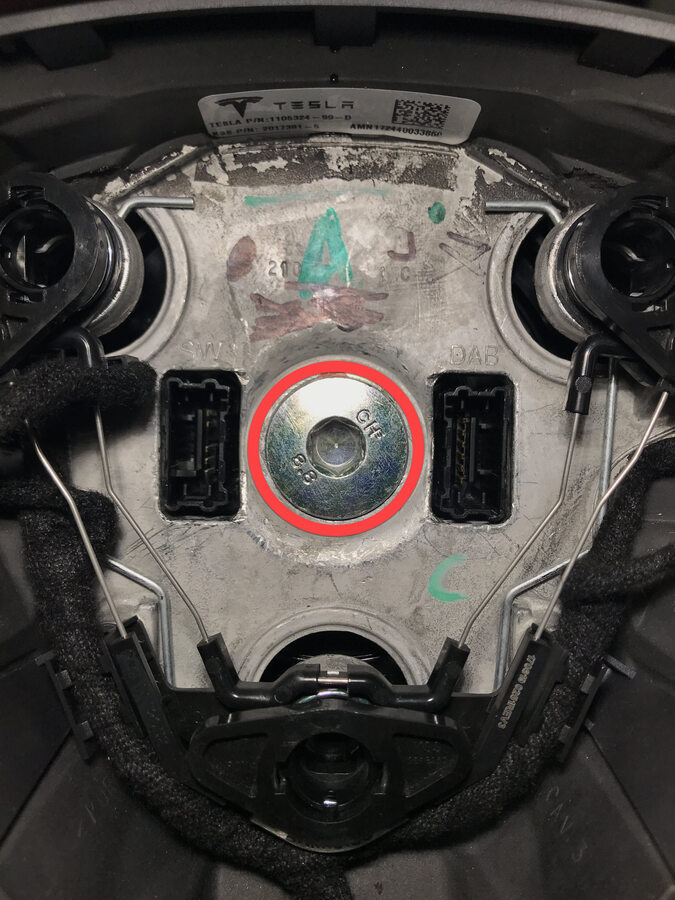
Install bolt securing steering wheel to steering column
注1x patch bolt, 10mm hex, 80 Nm, Install new patch bolt
-
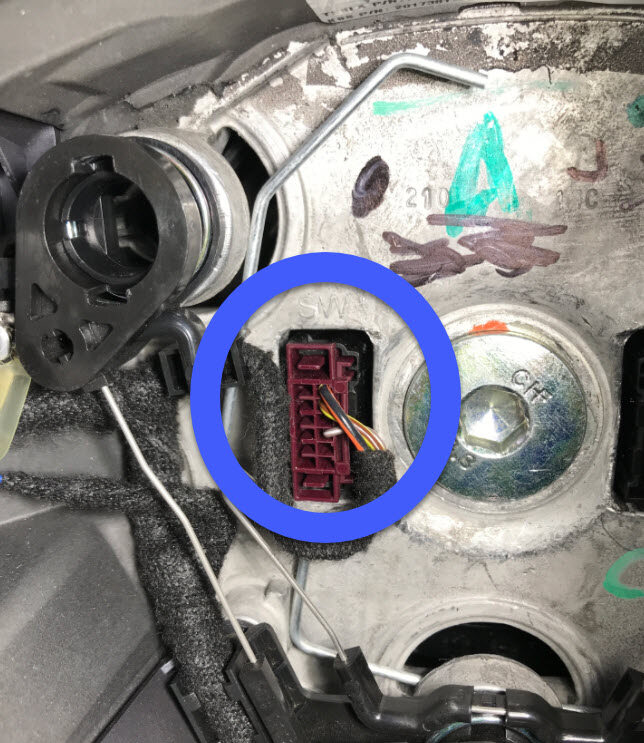
Connect steering wheel connector
注1x connector
-
Connect driver air bag connector
注1x connector, Make sure that the driver air bag harness doesn’t get caught between the driver air bag and the horn mechanism

-
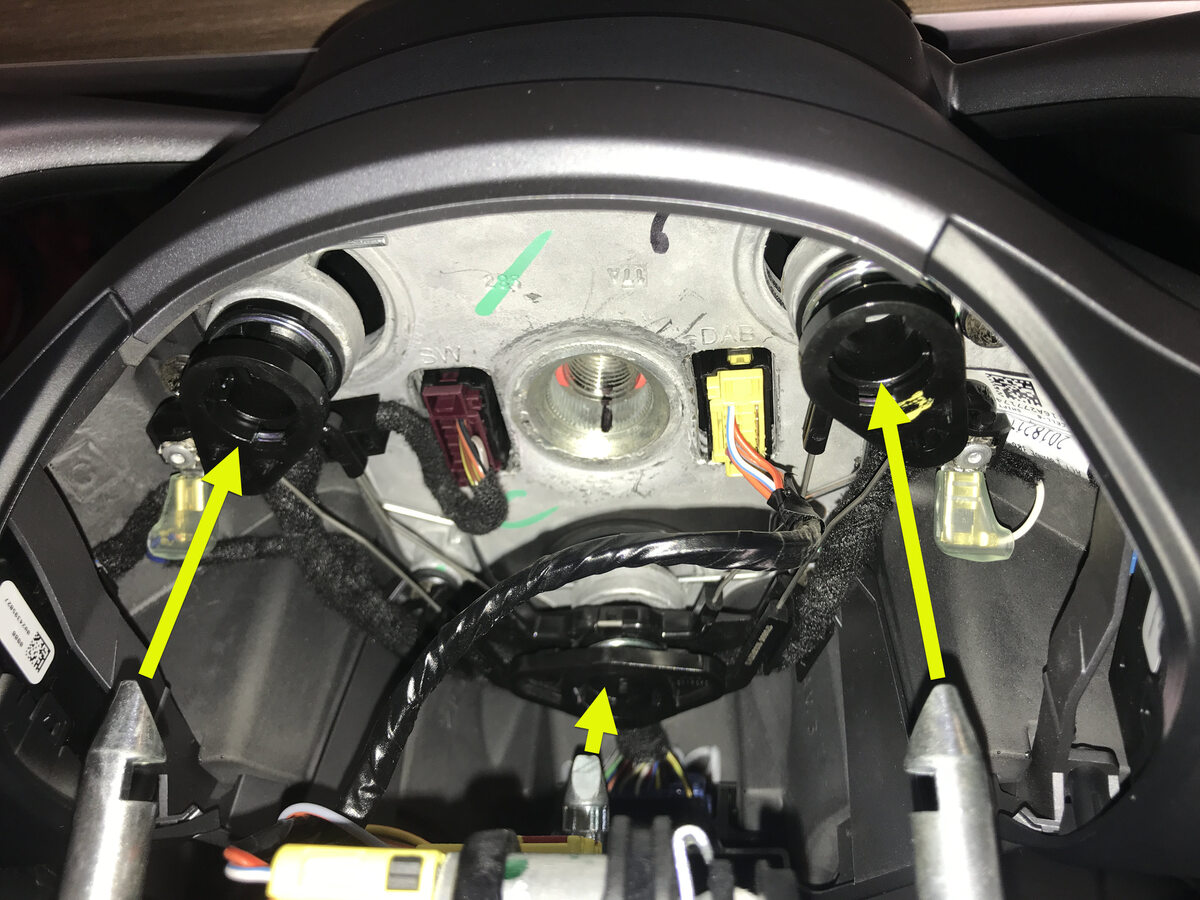
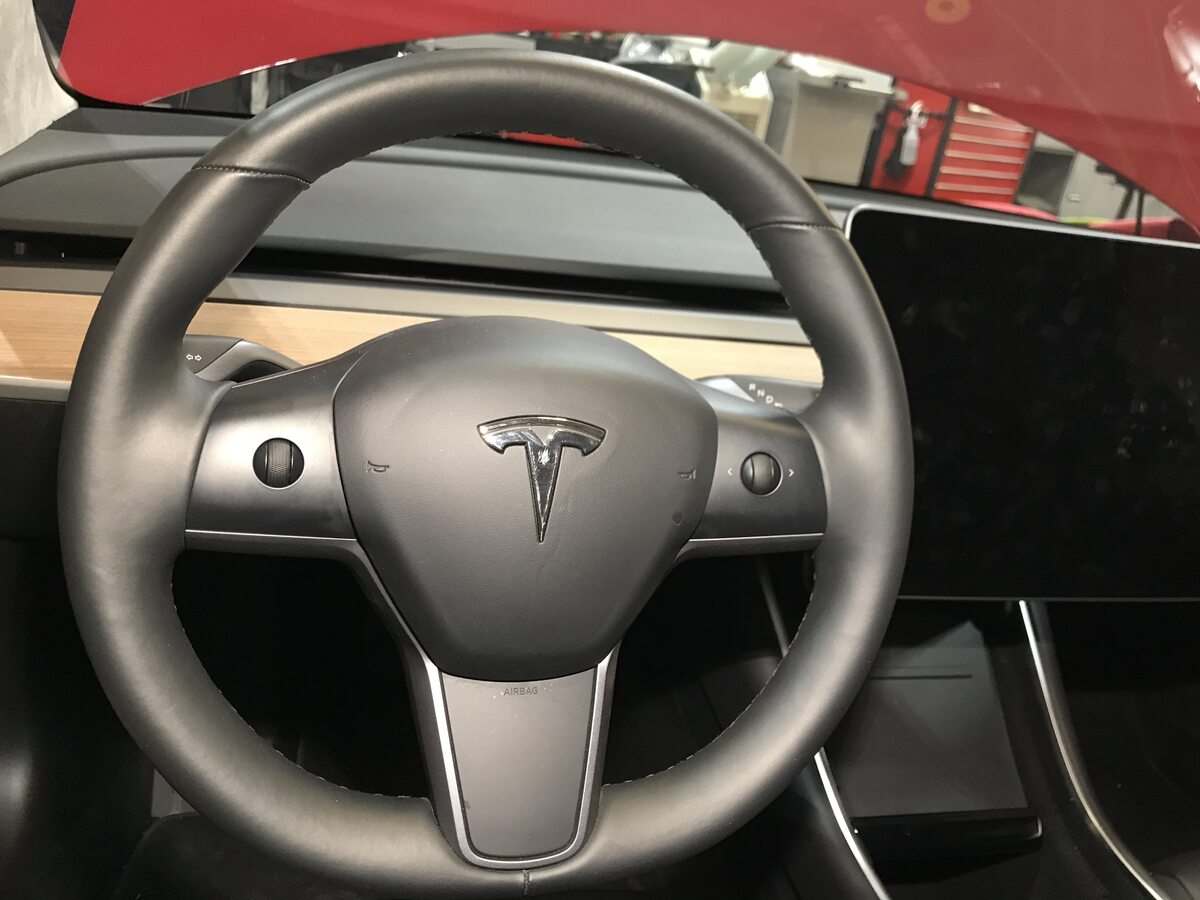
Secure driver air bag assembly to steering wheel and verify it is fully engaged
注3x datums, 1x spring clip, Inspect to make sure lower horn bracket is properly secured to steering wheel before installing driver air bag
-
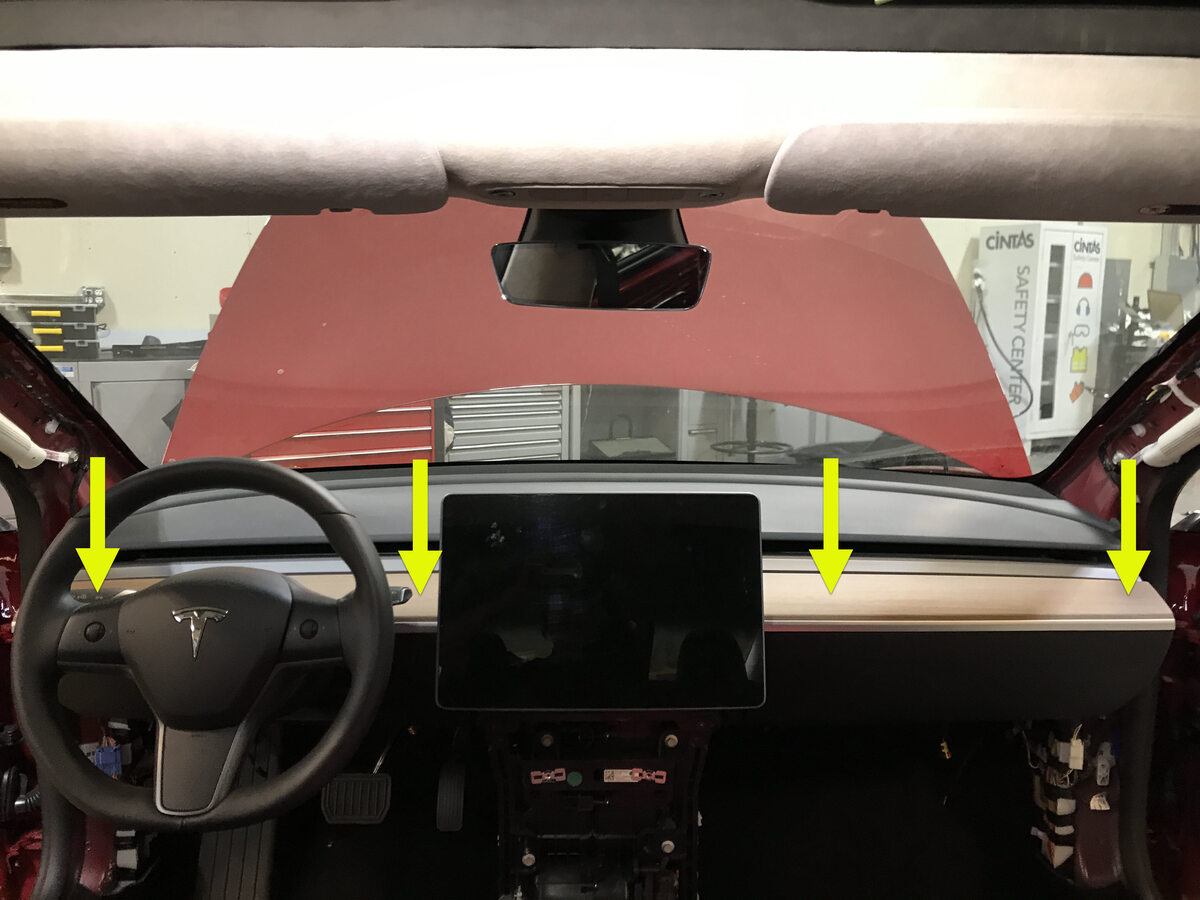
Install main decor assembly
注15x clips, 1x center clip
-
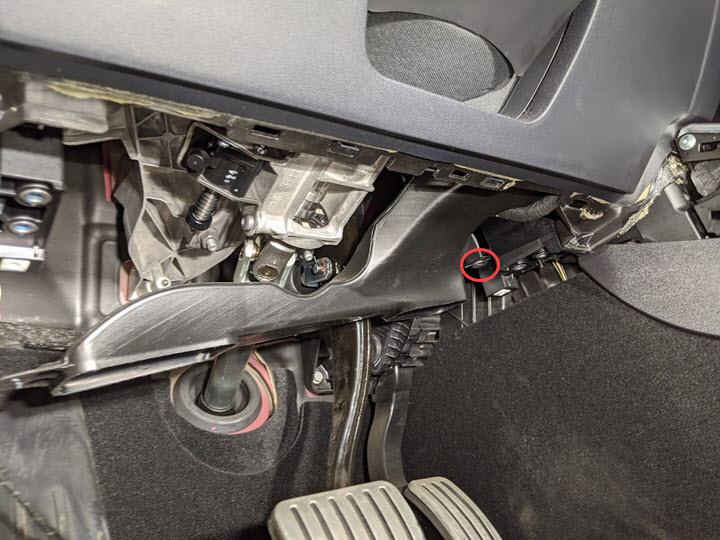
Install the LH footwell duct into HVAC module
注1x push clip
-
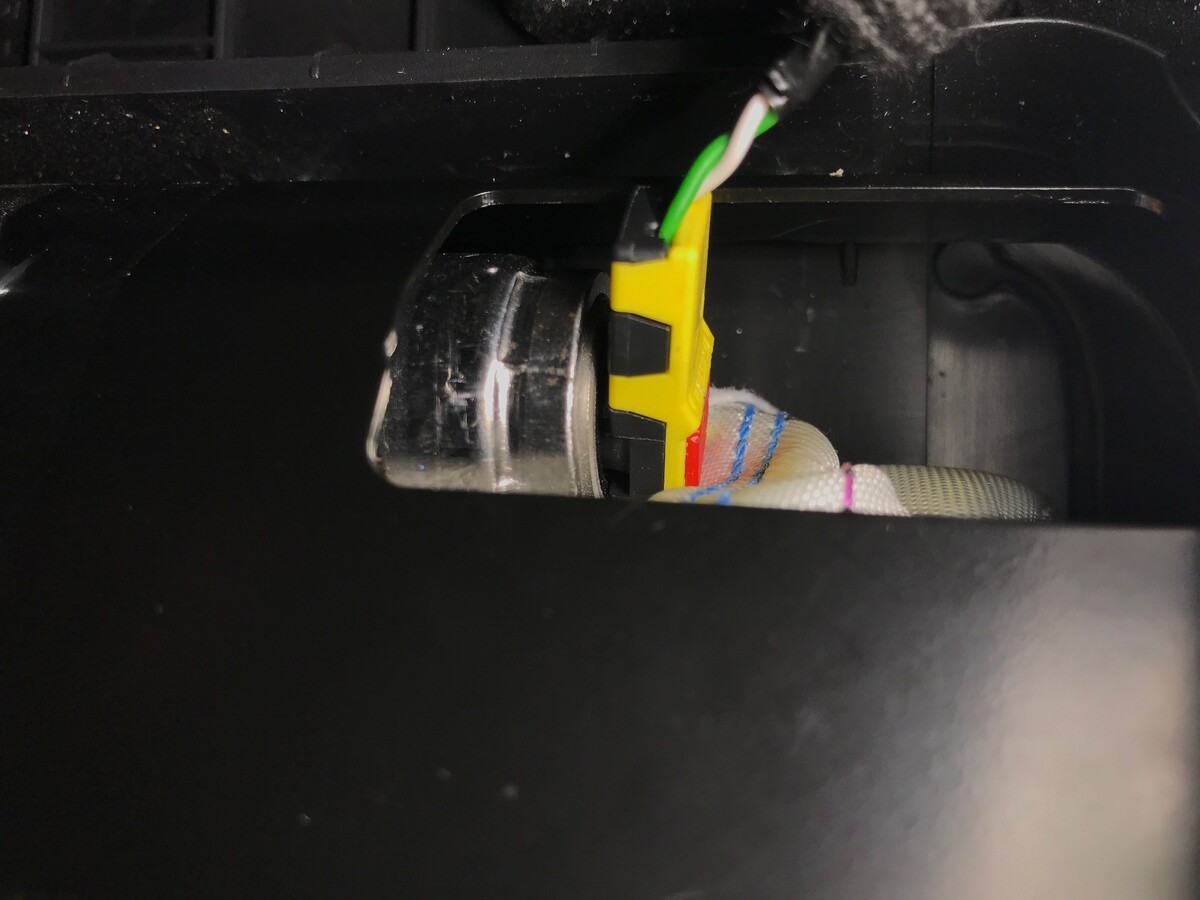
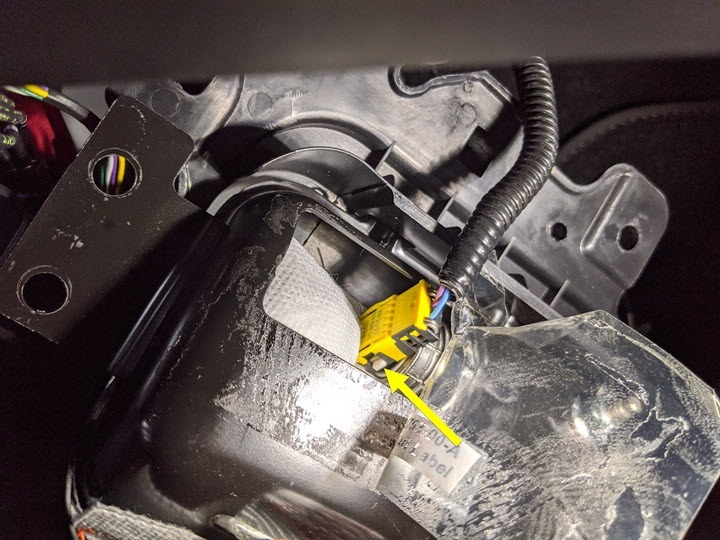
Connect the driver knee air bag and install into vehicle
注1x connector, Use caution not to damage the connector/harness, Support the knee air bag while connecting the connector
-
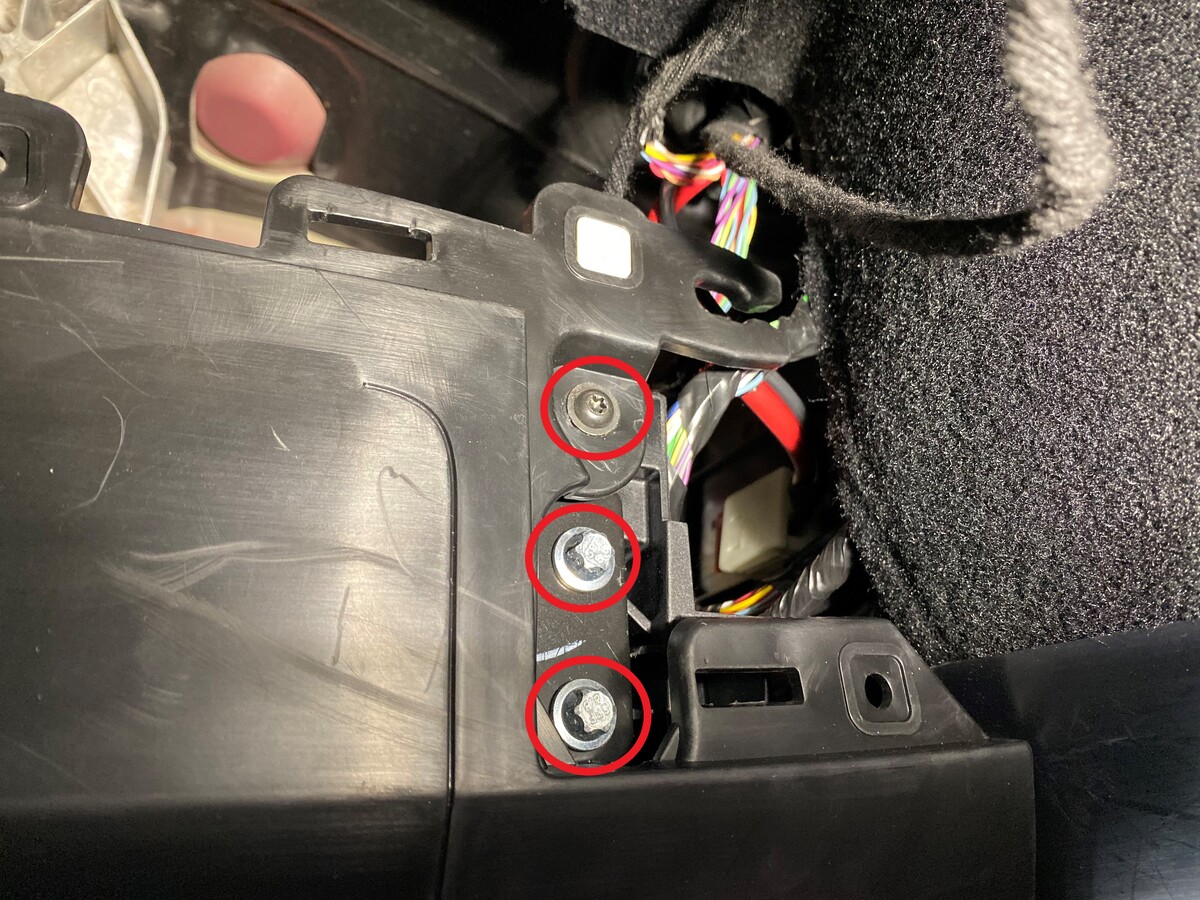
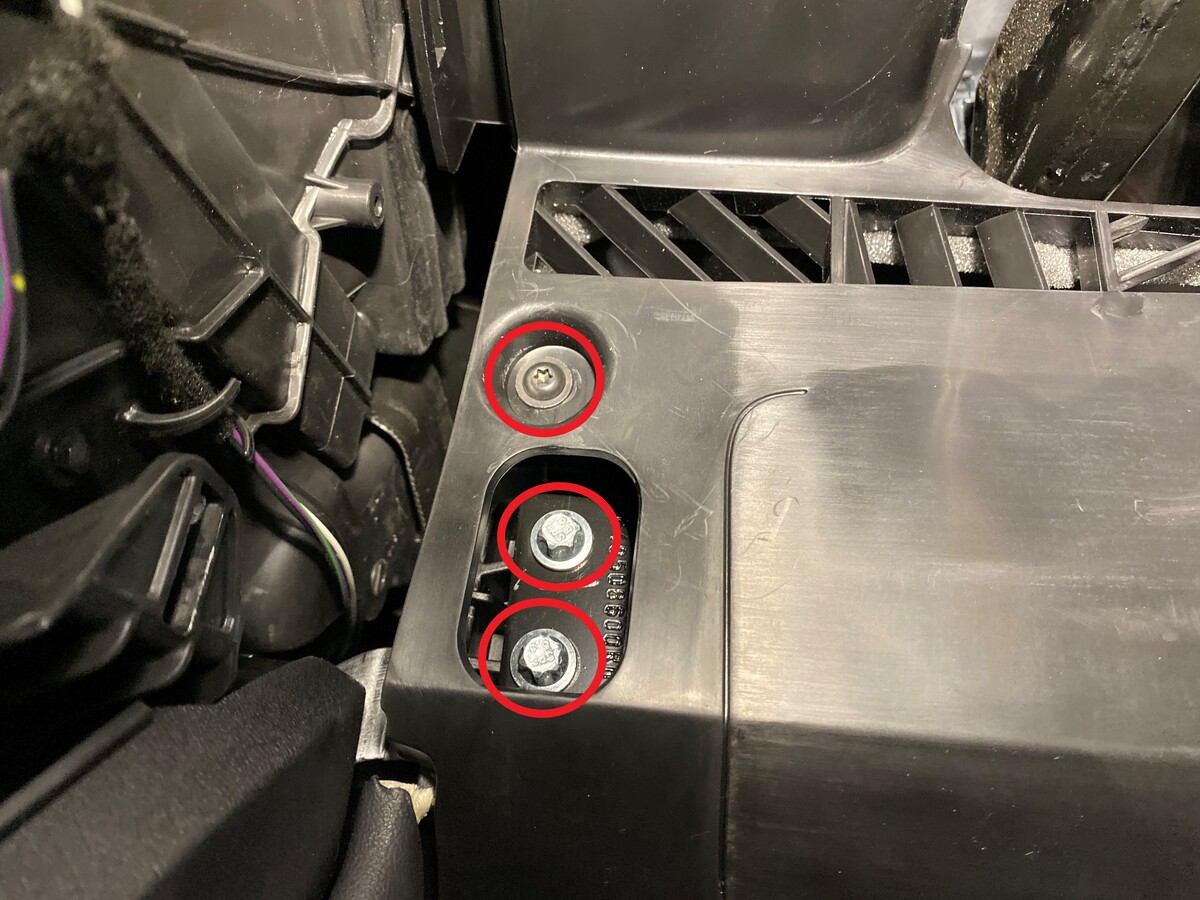
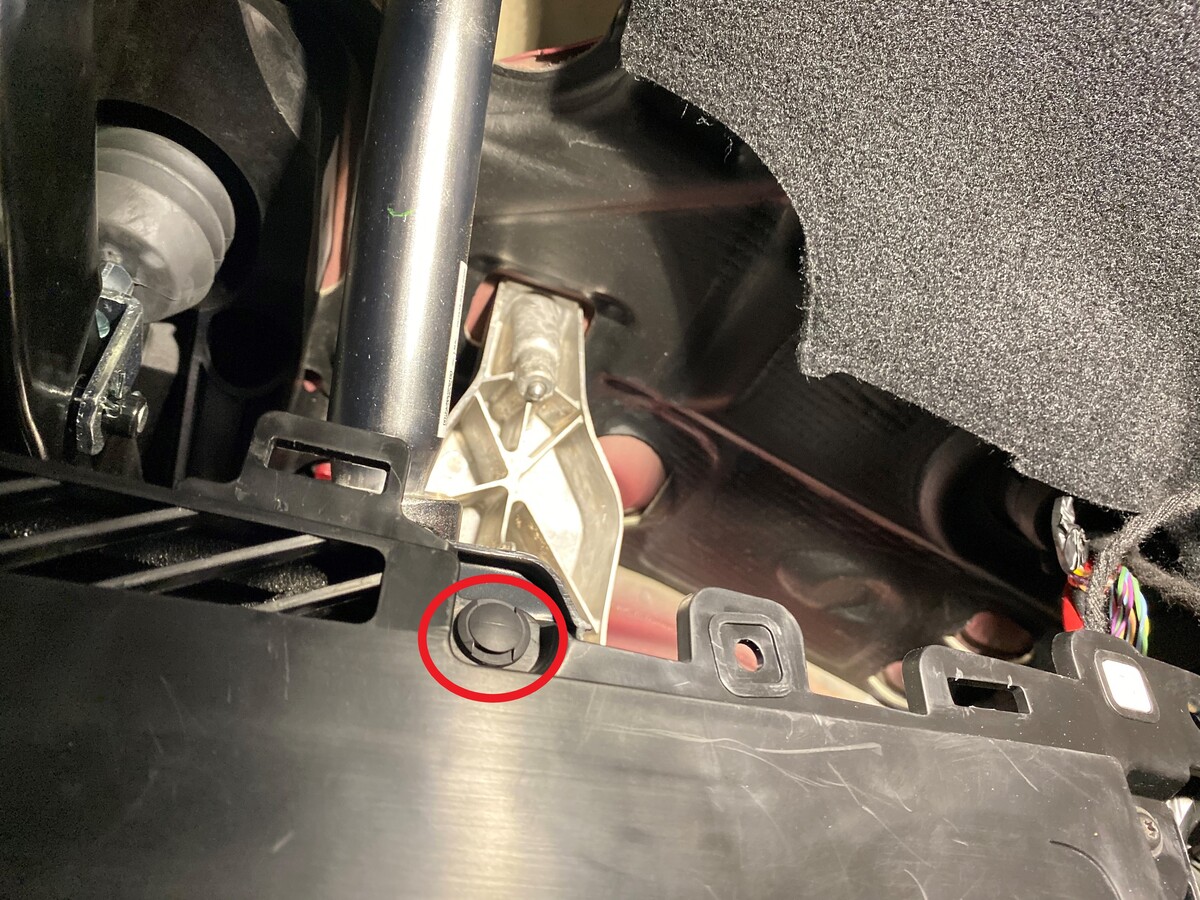
Install fasteners securing driver knee air bag to vehicle
注4x patch bolts, E10, 8 Nm, Install new patch bolts, 2x screws, T20, 2 Nm, 1x push clip, If vehicle equipped with T30 bolts, update to E10
-
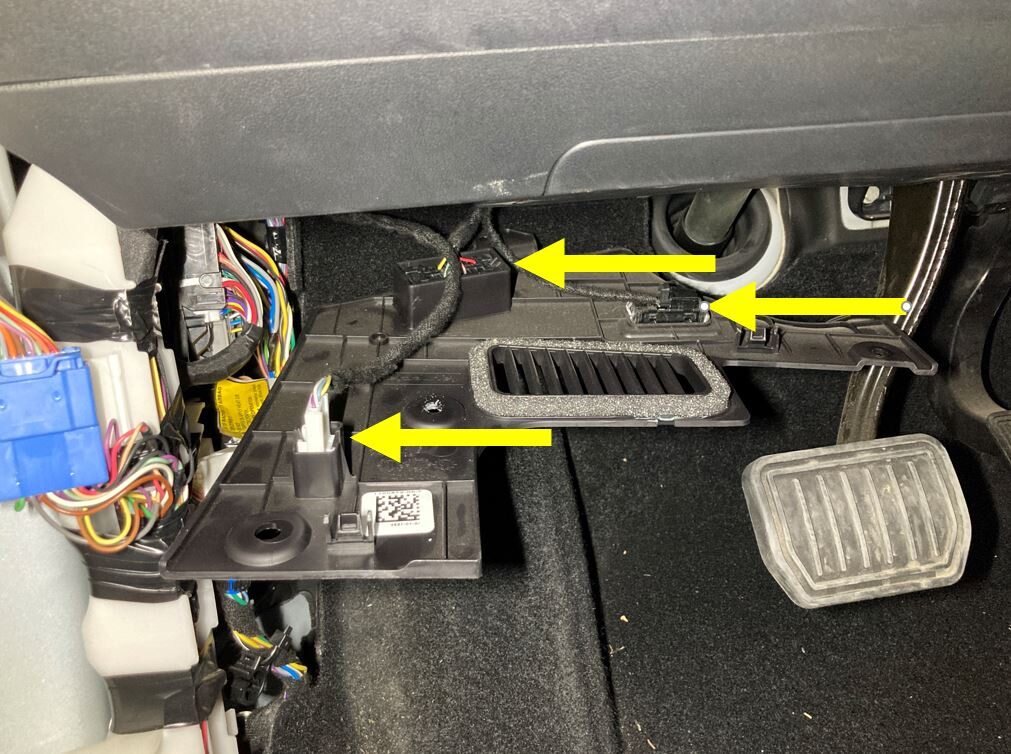
Install connectors to LH footwell cover and position for installation, securing front tabs to driver air bag assembly
注3x tabs, 1x Ethernet connector, 1x puddle light connector, APAC specific vehicles have an additional OBDII connector
-
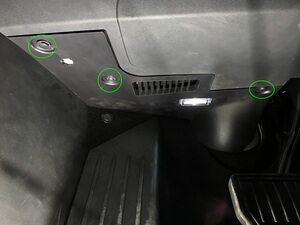
Install screw and clips securing LH footwell cover
注1x screw, T20, 2.5 Nm, 2x push clips
-
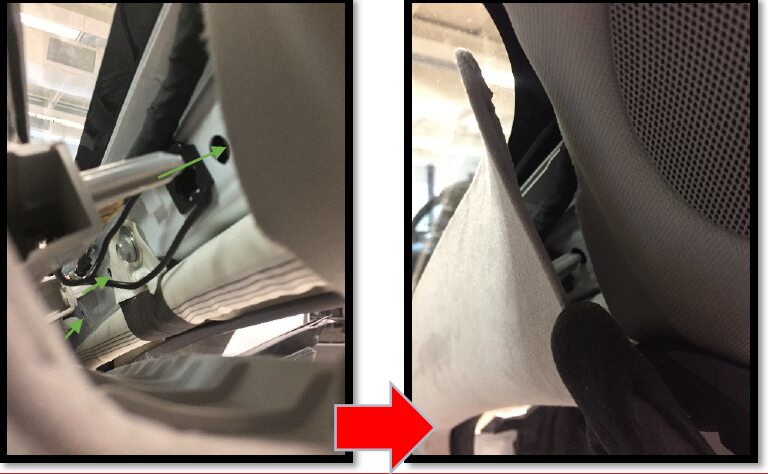
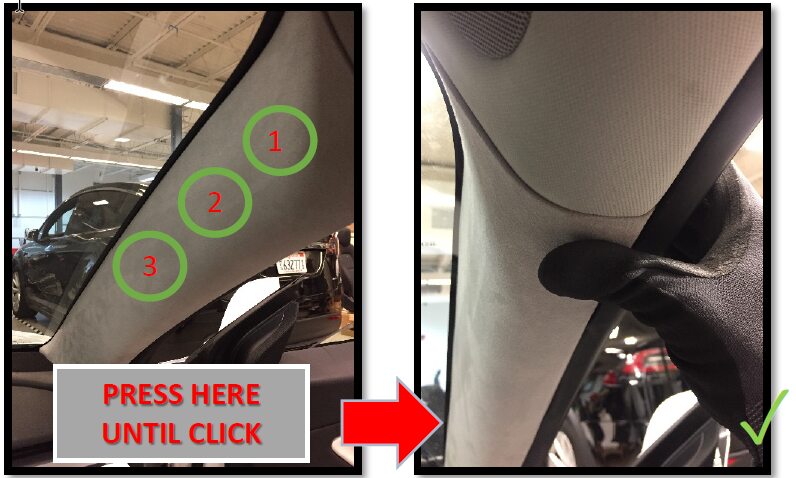
Install RH upper A-pillar trim
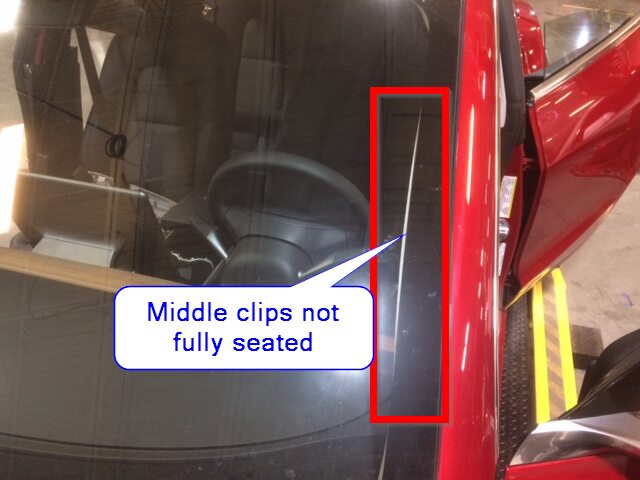
注3x clips, 1x tether, Replace tether if removed from body side, Slide the lower portion in position, Install tether 3x retainer hooks to housing, Then align the upper 3x clips, Press clip from top to bottom, Make sure double check the middle clips are fully seated
-
Install RH lower A-pillar trim
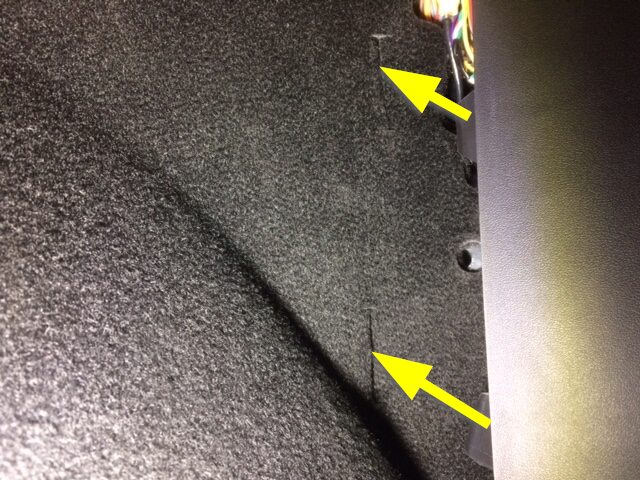
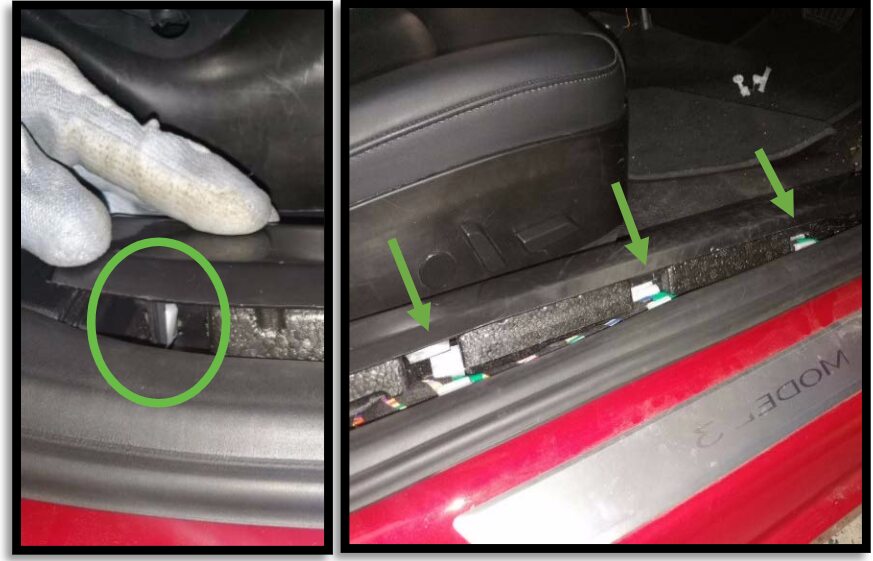
注1x clip, 2 guide tabs, Align 2 front tabs then align slot with harness bracket and then push rear clip to secure to lower B-pillar
-
Install clip for RH lower A-pillar trim
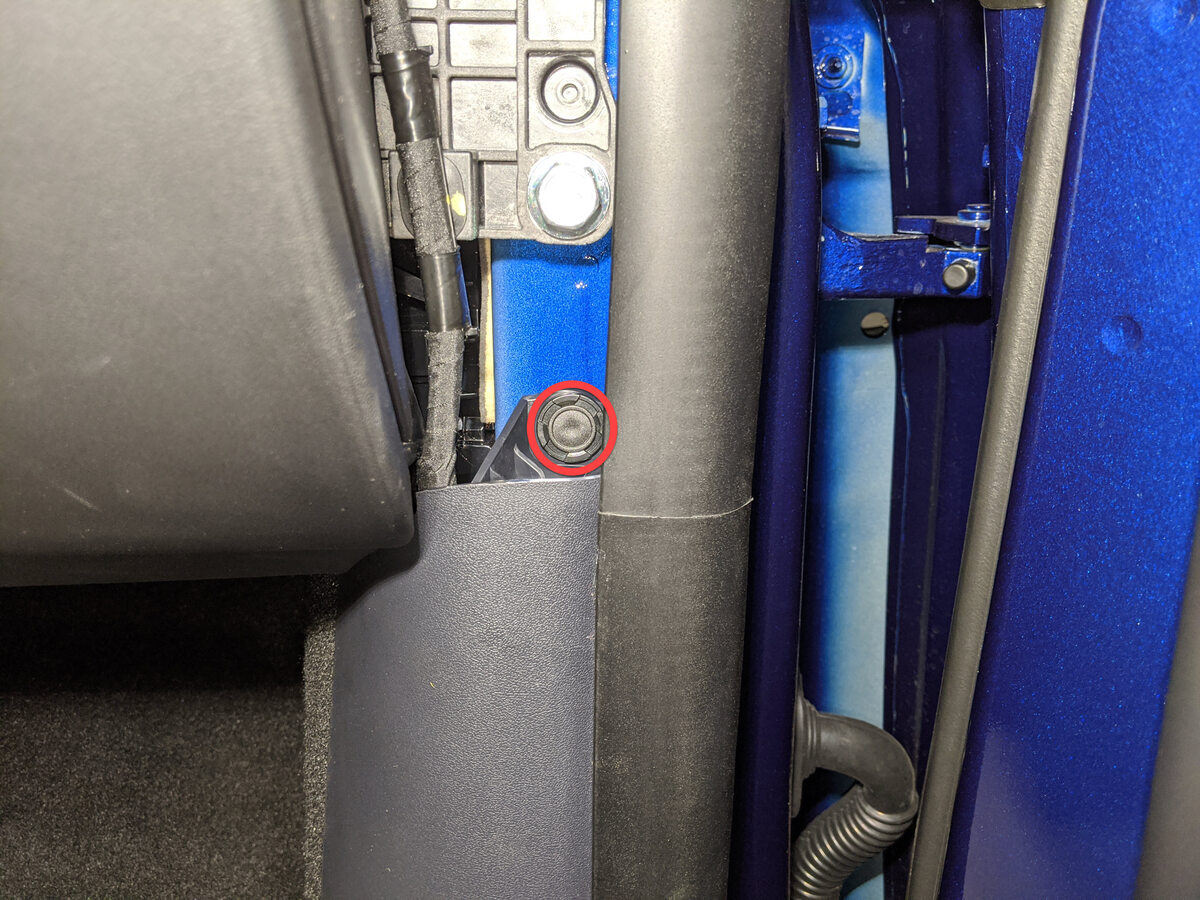
注1x push clip
-
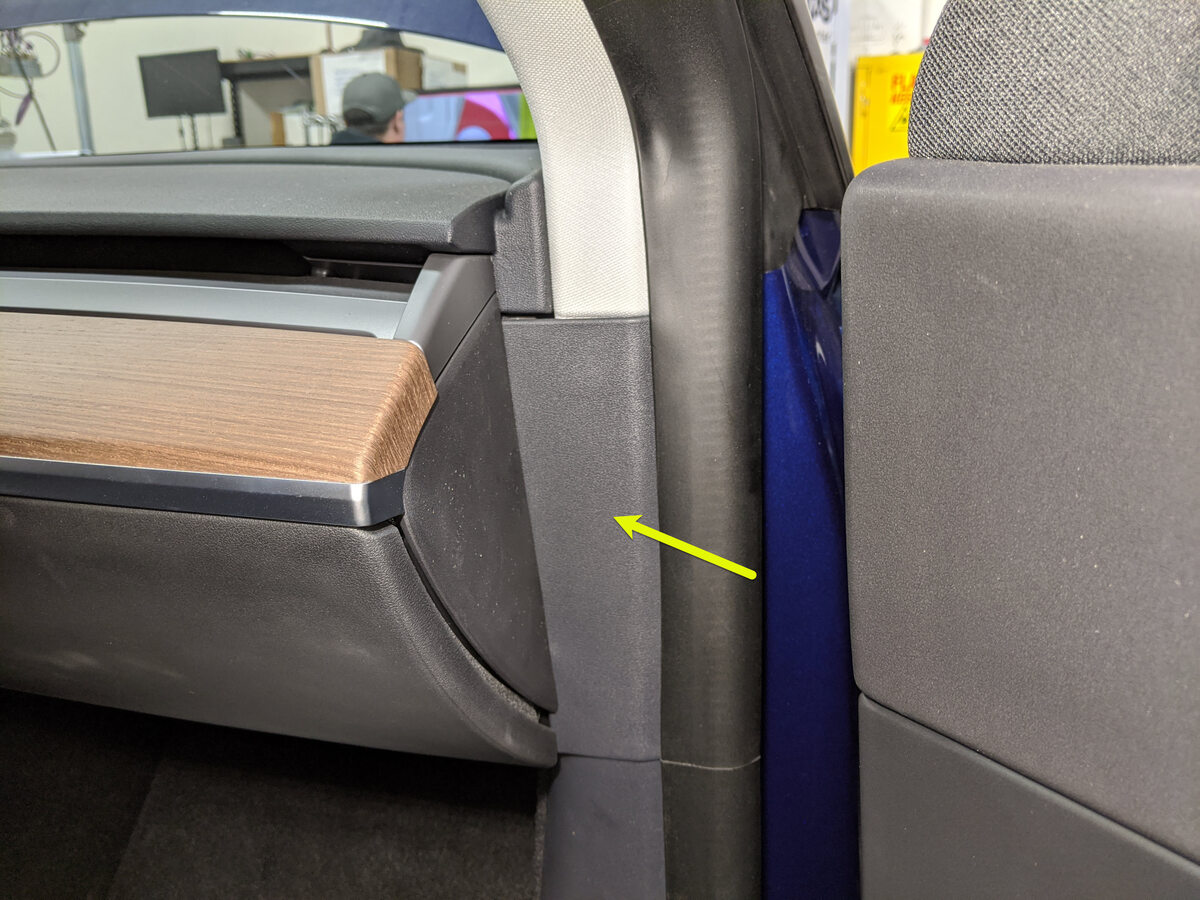
Install RH mid A-pillar assembly
注1x clip, 1x tab, Align bottom tab then push on top clip to fully seat mid A-pillar, Make sure seal seat on top of trim
-
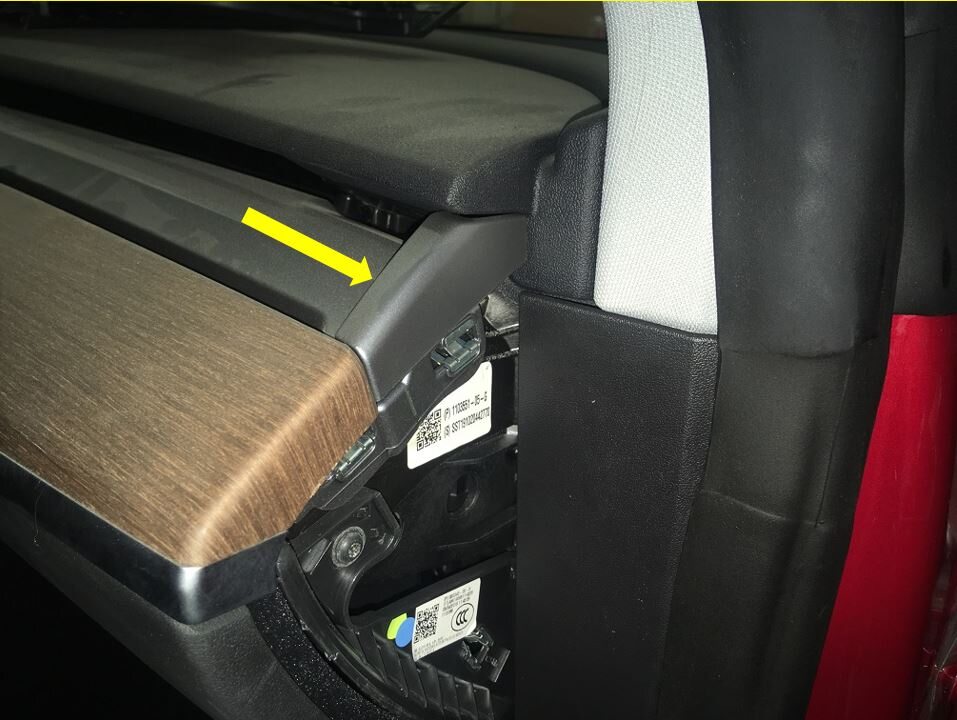
Install RH air wave bezel cap to main decor assembly
注2x clips
-
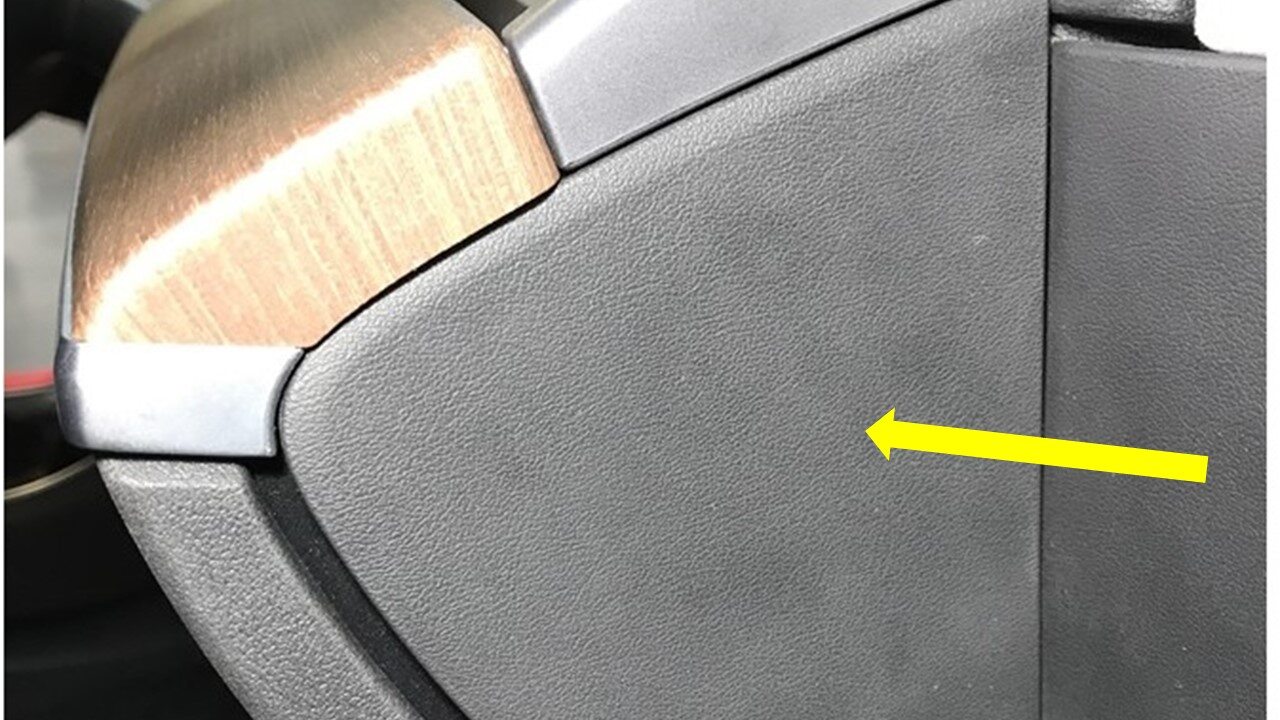
Install RH IP end cap
注3x clips
-
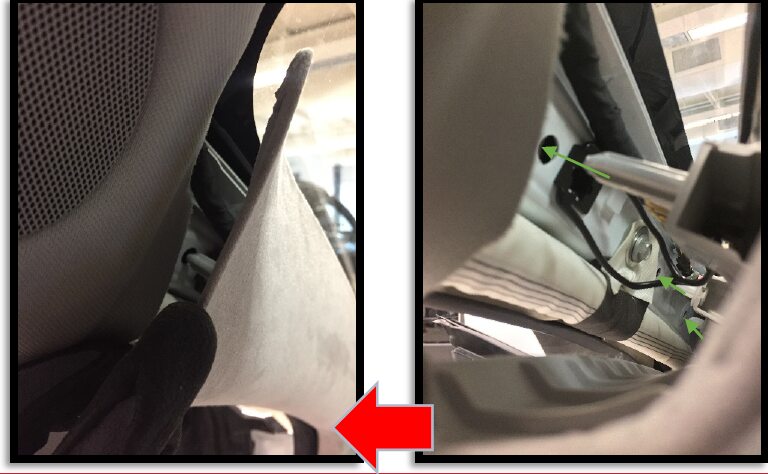
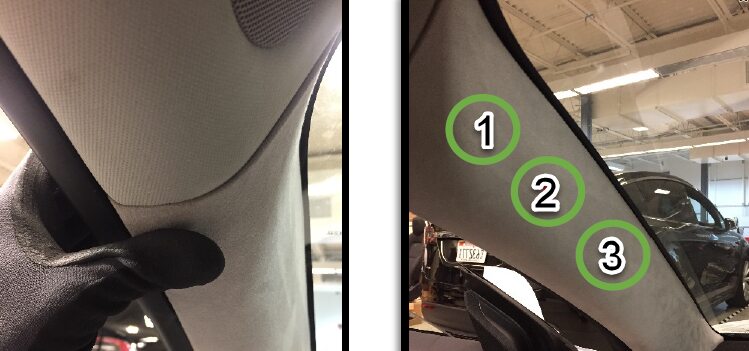
Install LH upper A-pillar trim
注3x clips, 1x tether, Replace tether if removed from body side, Slide the lower portion in position, Install tether 3x retainer hooks to housing, Then align the upper 3x clips, Press clip from top to bottom, Make sure double check the middle clips are fully seated
-
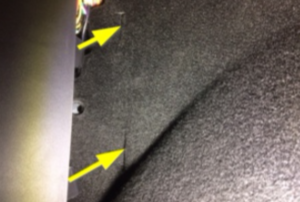
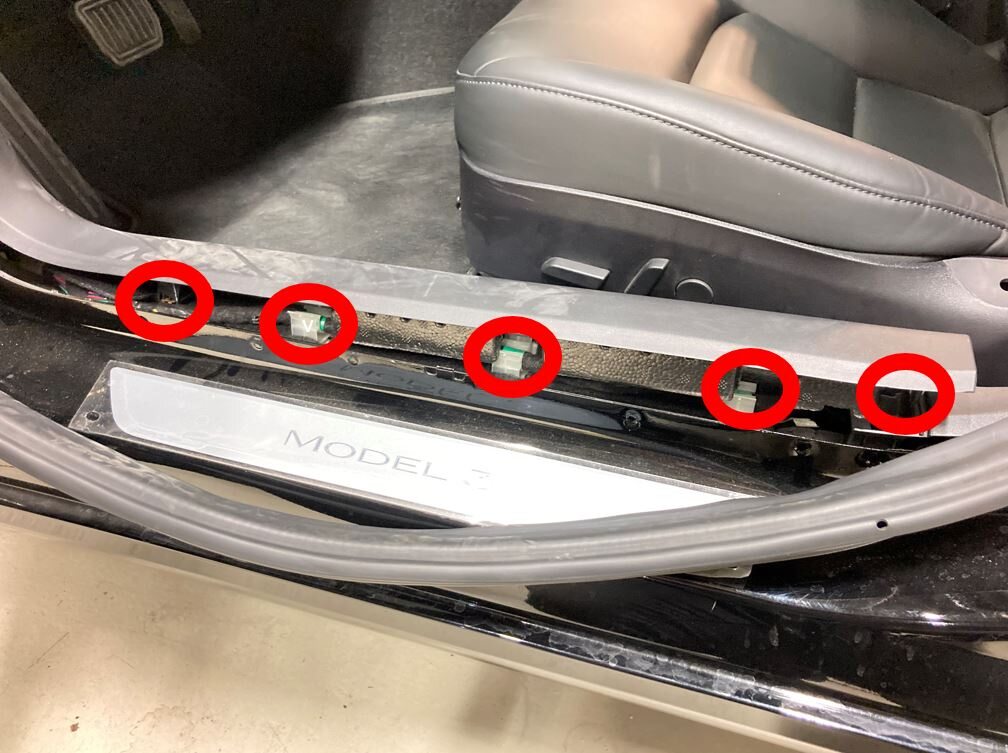
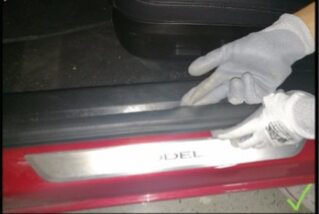
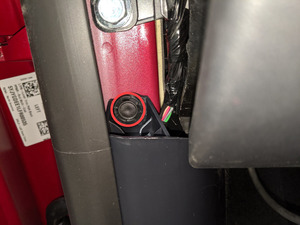
Install LH lower A-pillar trim
注2x clip, 3 guide tabs, Align the 2 front tabs then align the slot with harness bracket and then push rear clip to secure to lower B-pillar, Fully seat seal along trim
-
Install clip for LH lower A-pillar trim
注1x push clip
-
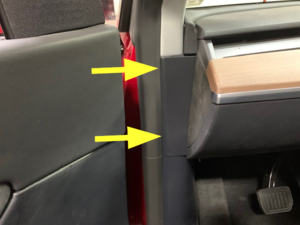
Install LH mid A-pillar assembly
注1x clip, 1x tab, Align the bottom tab then push the top clip to fully seat mid A-pillar, Pull seal over trim
-
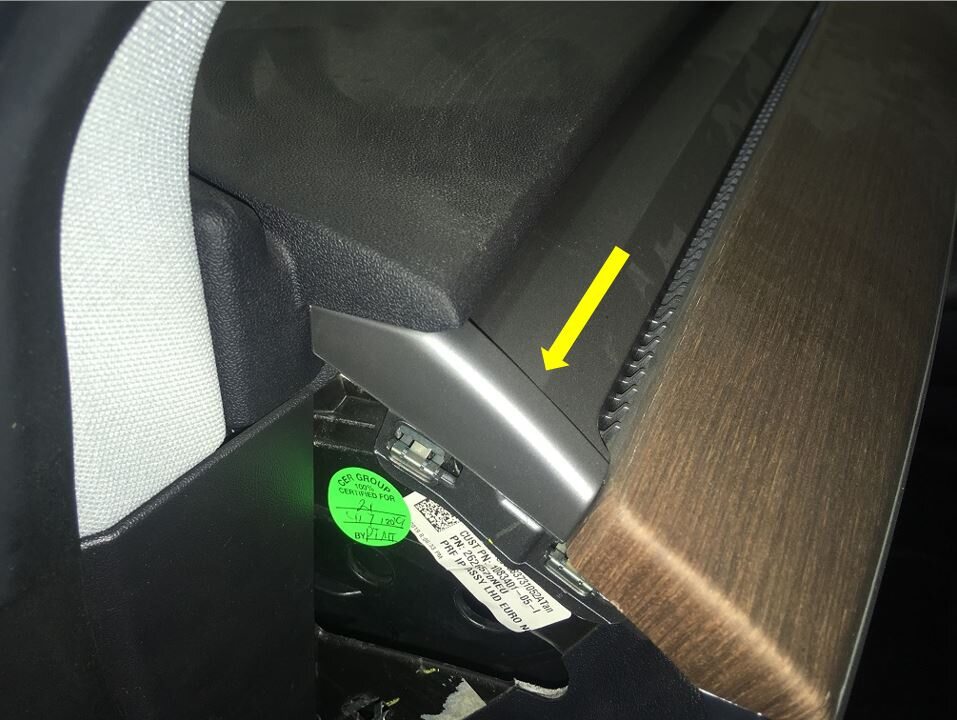
Install LH air wave bezel cap to main decor assembly
注2x clips
-
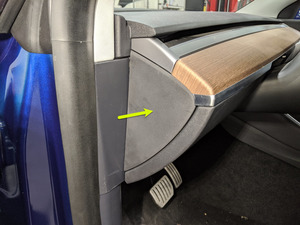
Install LH IP end cap
注3x clips
-
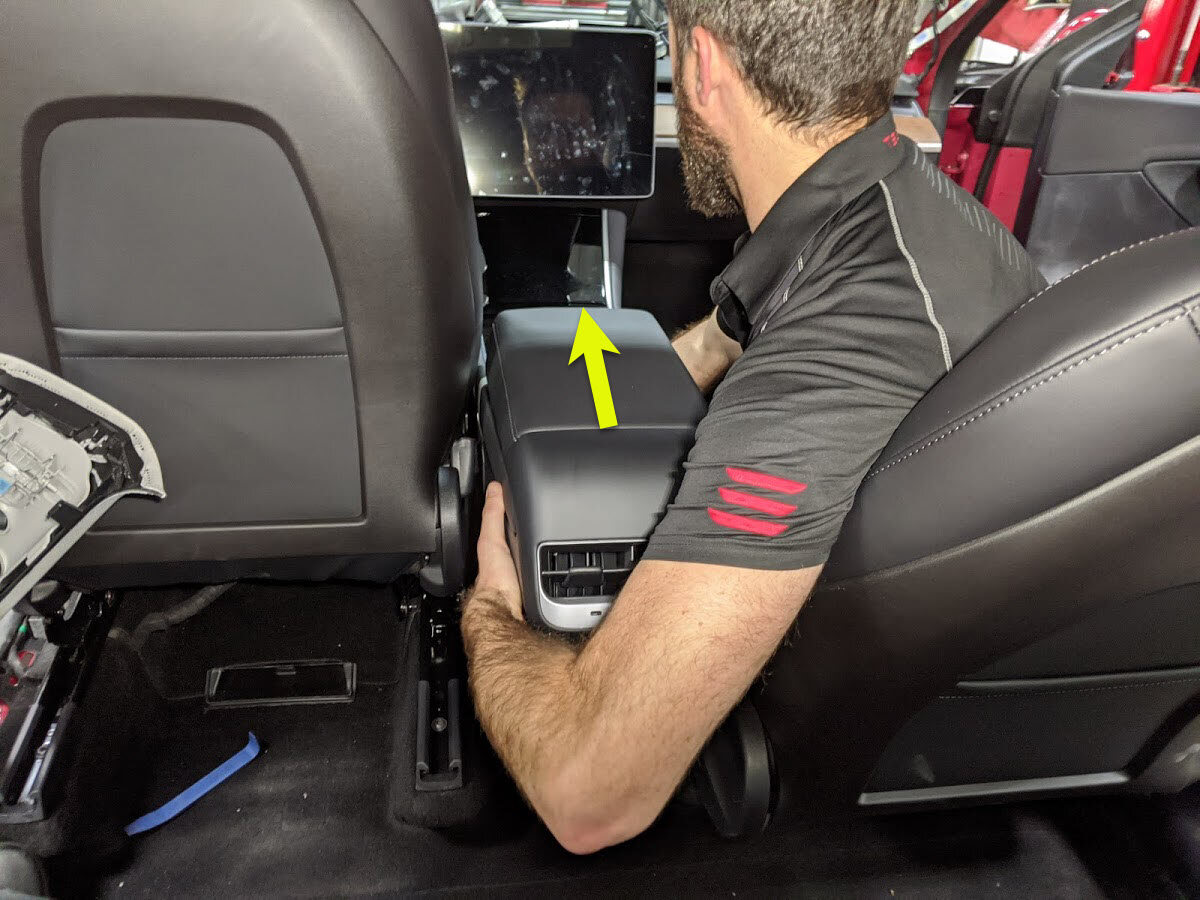
Install center console into vehicle
注Recommend assistance, Tilt front of console downward, Slide assembly towards front of vehicle and tilt rear of console down into place
-
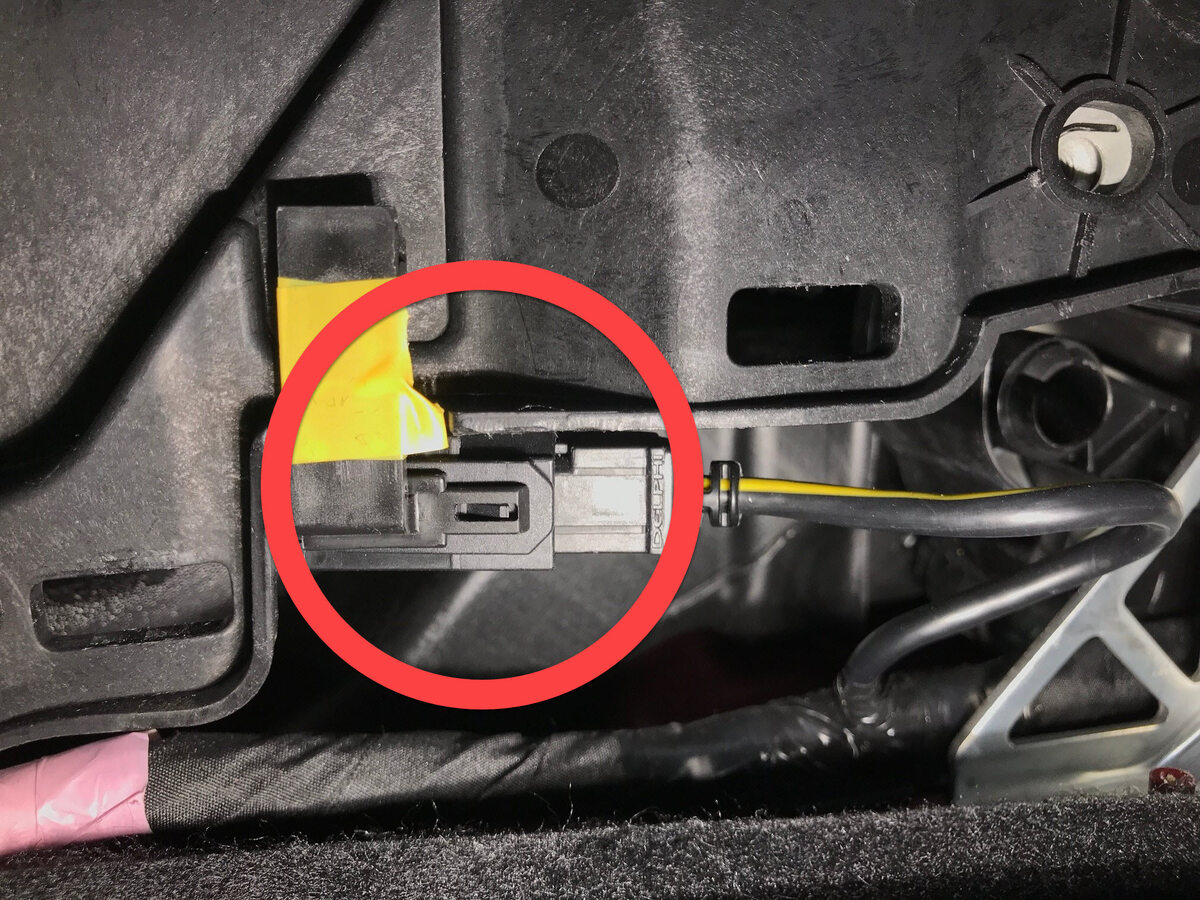
Connect USB harness at right front of center console
注1x USB connector
-
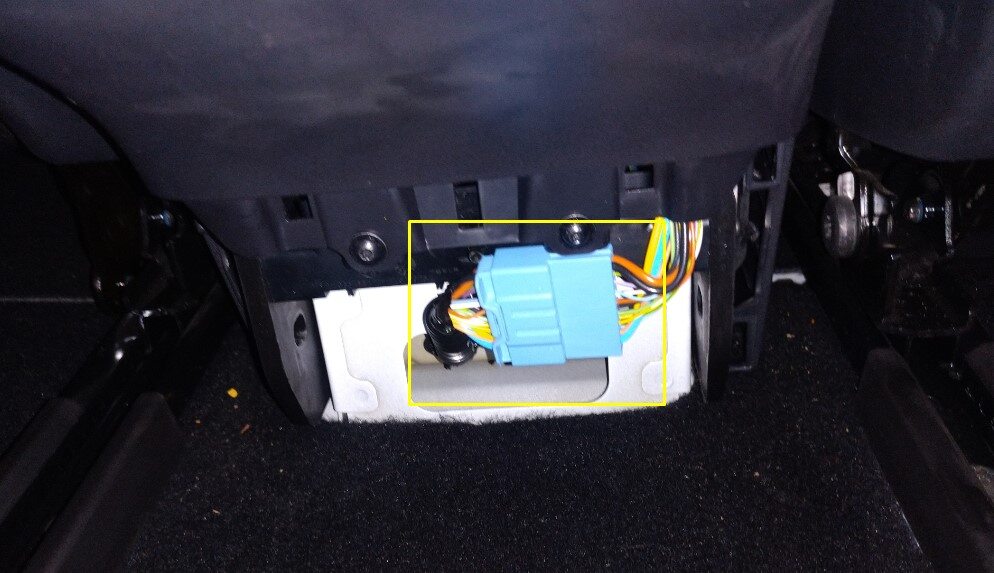
Connect harness to rear of center console
注1x connector
-
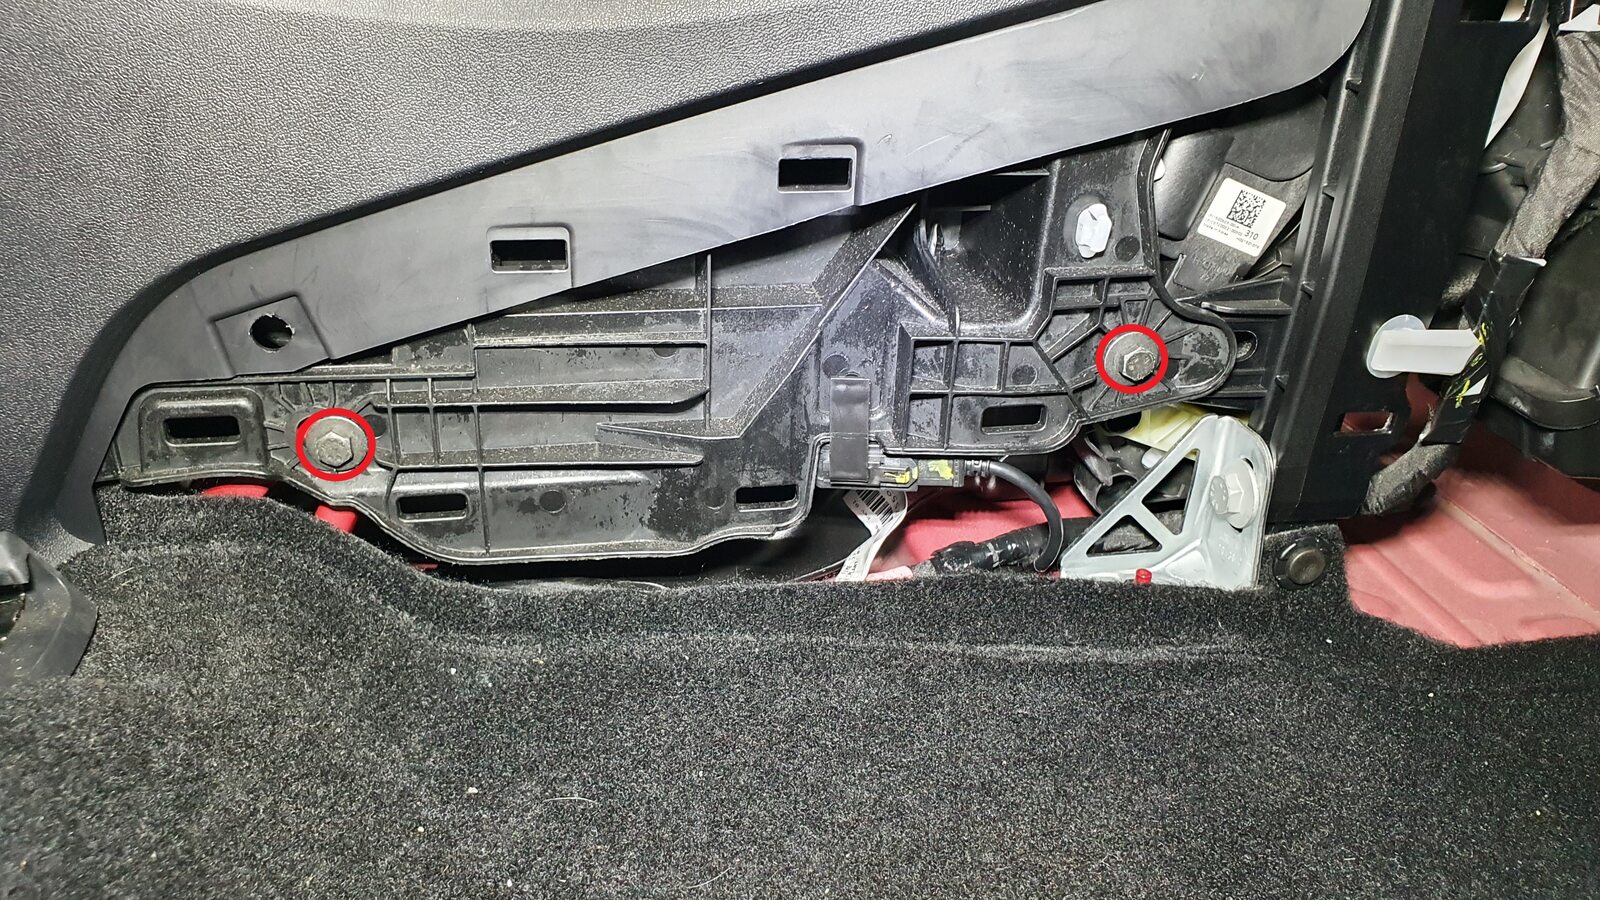
Install RH front exterior bolts to center console
注2x bolts, 10mm, 7 Nm
-
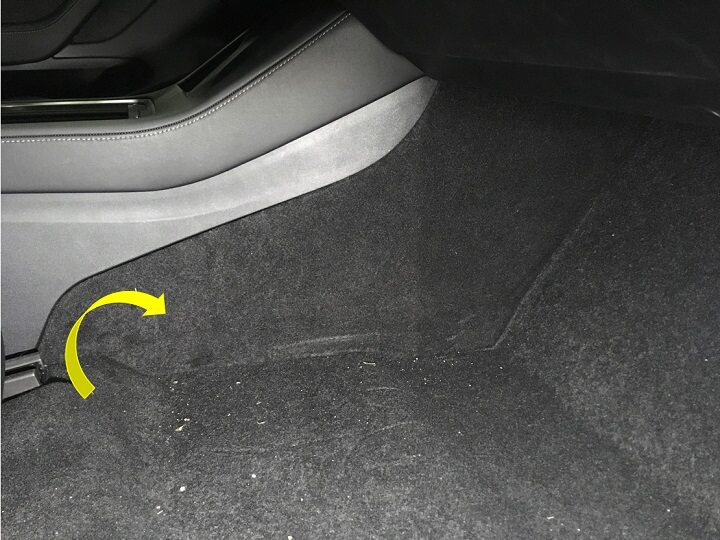
Install RH console side panel carpet
注1 tab, 12x clips, Position side panel and align the front tab. Push the console panel from the front towards the rear
-
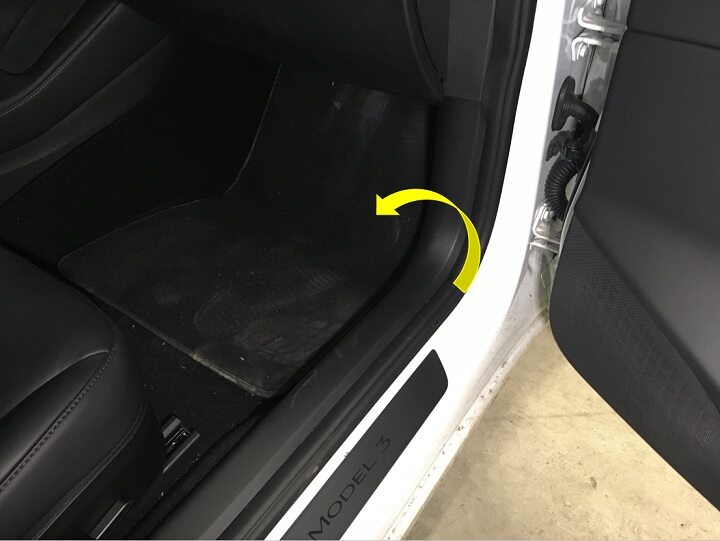
Install RH front floor mat
-
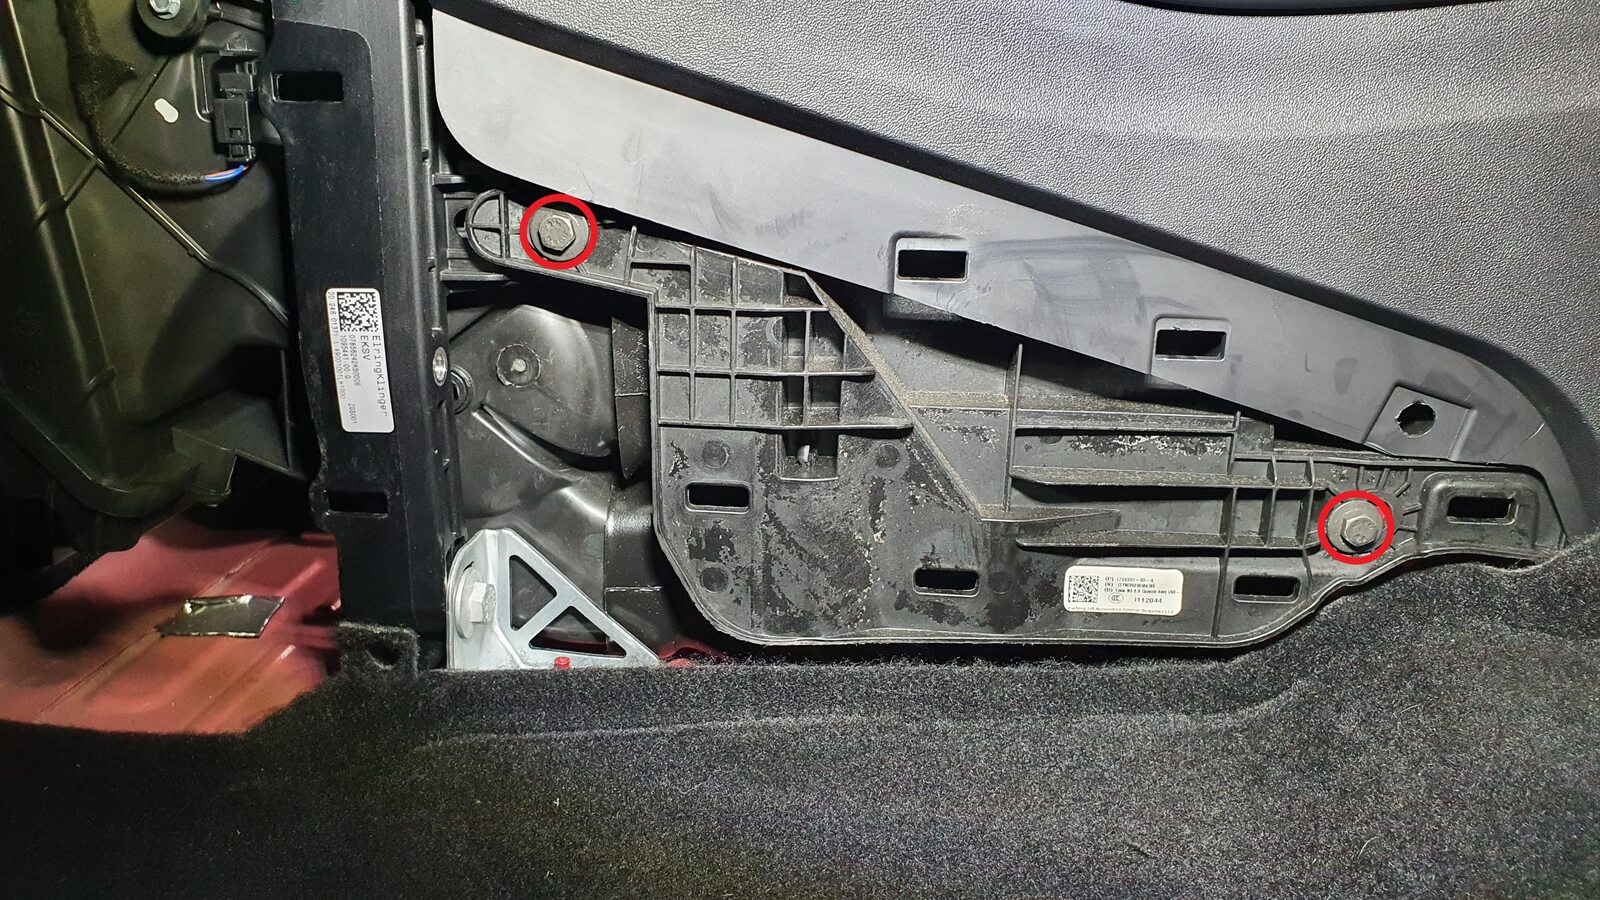
Install LH front exterior bolts to center console
注2x bolts, 10mm, 7 Nm
-
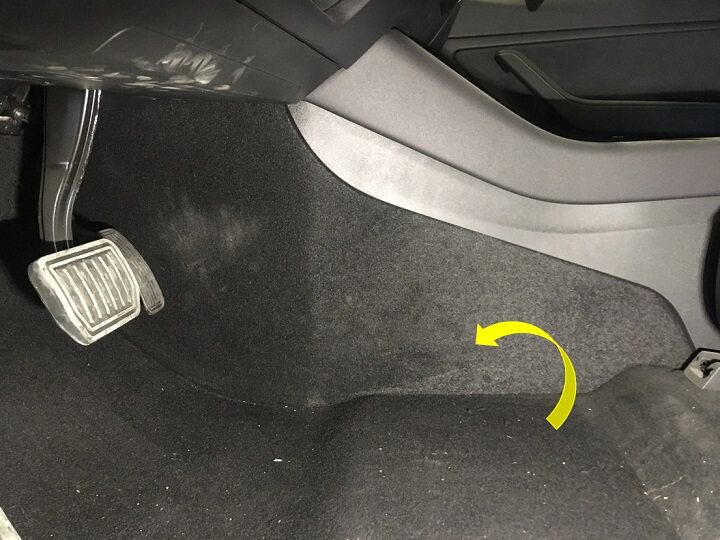
Install LH console side panel carpet
注1 tab, 12x clips, Position side panel and align the front tab. Push the console panel from the front towards the rear
-
Install LH front floor mat
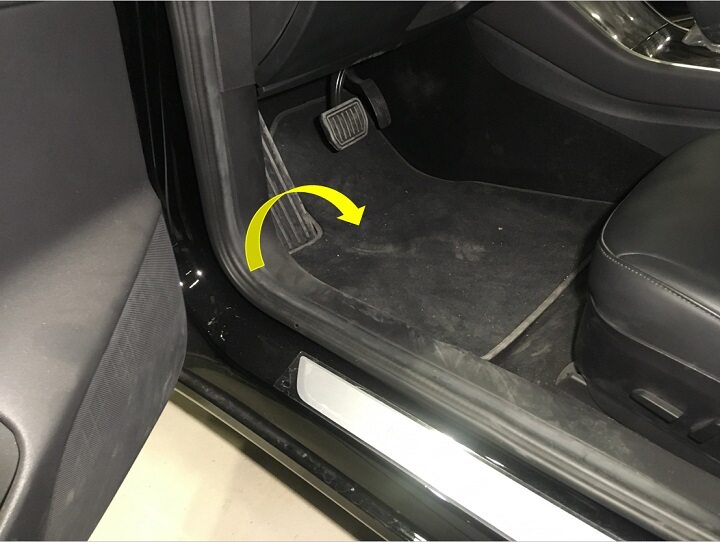
-
Connect first responder loop
注1x connector, Engage locking tab, Connect FRL before connecting 12V to avoid damage to car computer
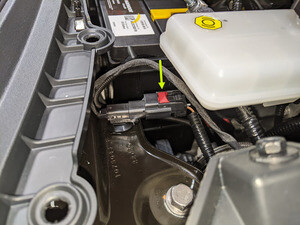
-
Connect 12V negative terminal
注1x nut, 10mm, 6 Nm
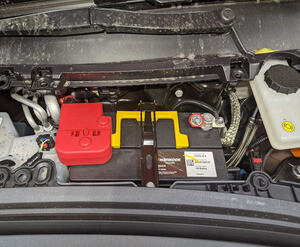
- Move RH front seat forward
-
Install RH rear exterior bolt to center console
注1x bolt, 10mm, 7 Nm
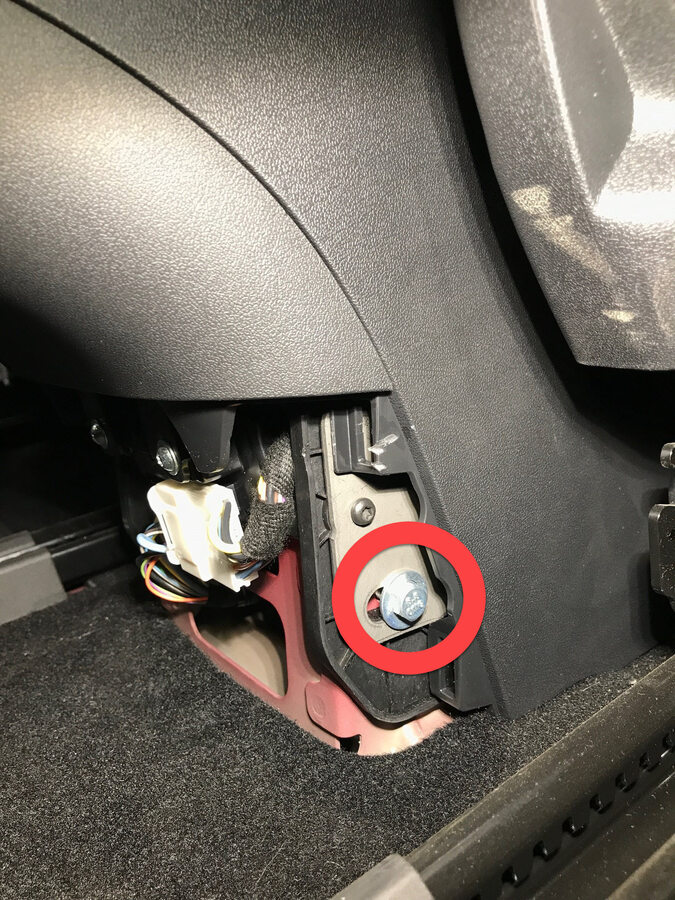
- Move RH front seat to original position
- Move LH front seat forward
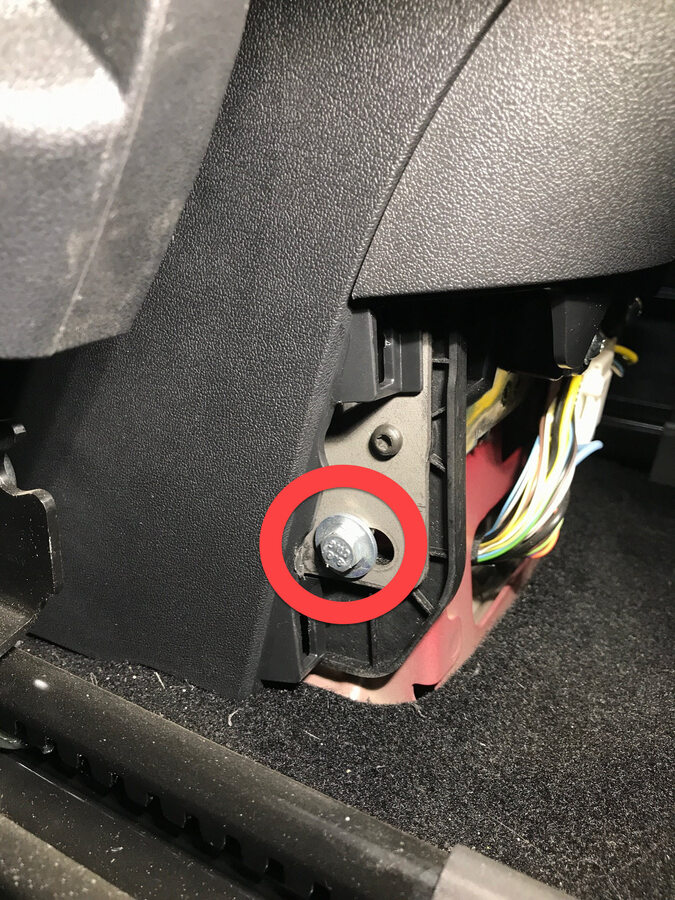
-
Install LH rear exterior bolt to center console
注1x bolt, 10mm, 7 Nm
-
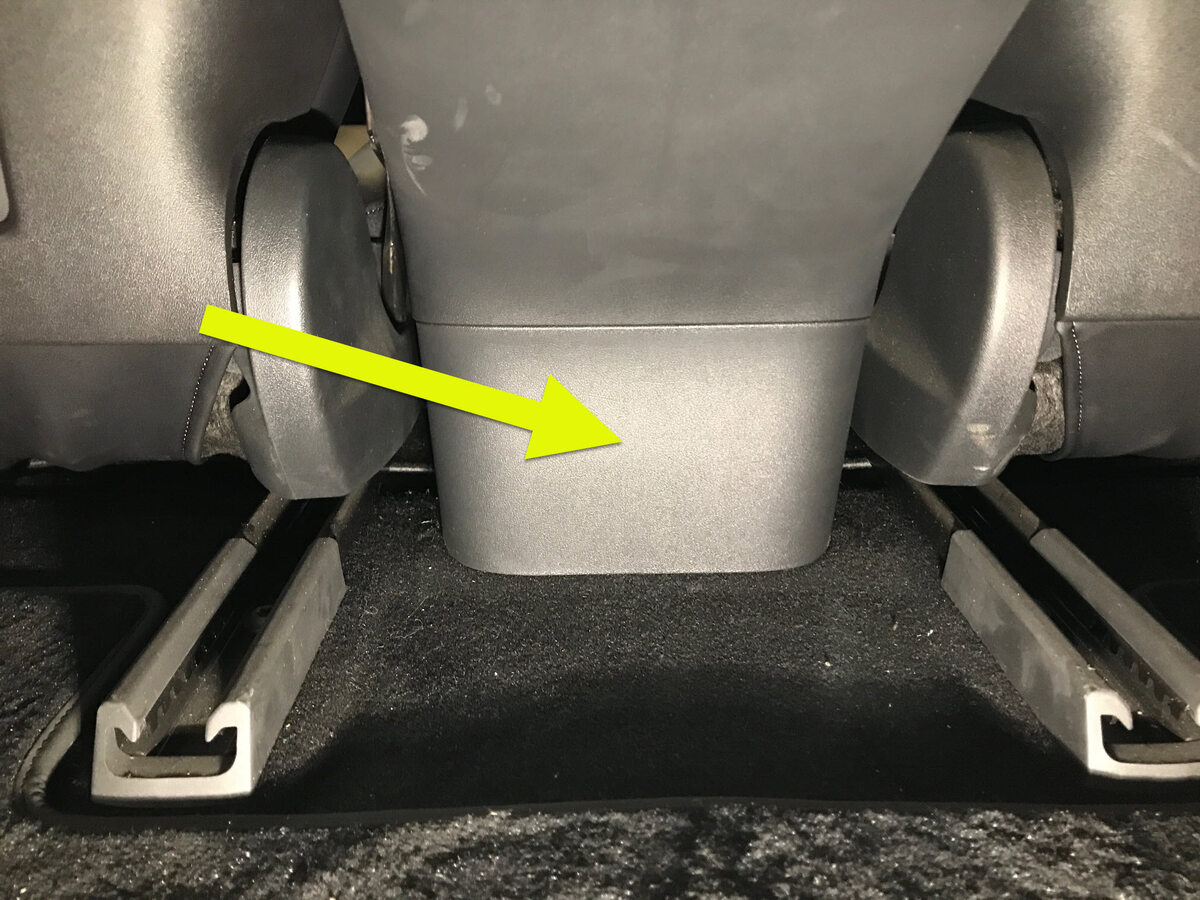
Install console lower rear panel
注5x clips
- Move LH front seat to original position
-
Push vehicle onto lift
注Recommend assistance, Note this vehicle can only be safely pushed for a very short distance and at very slow speed
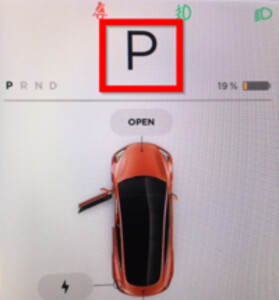
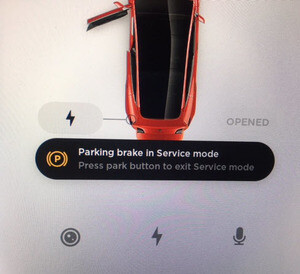
-
Press and hold park button to release EPB service mode
注Remove wheel chocks if necessary
-
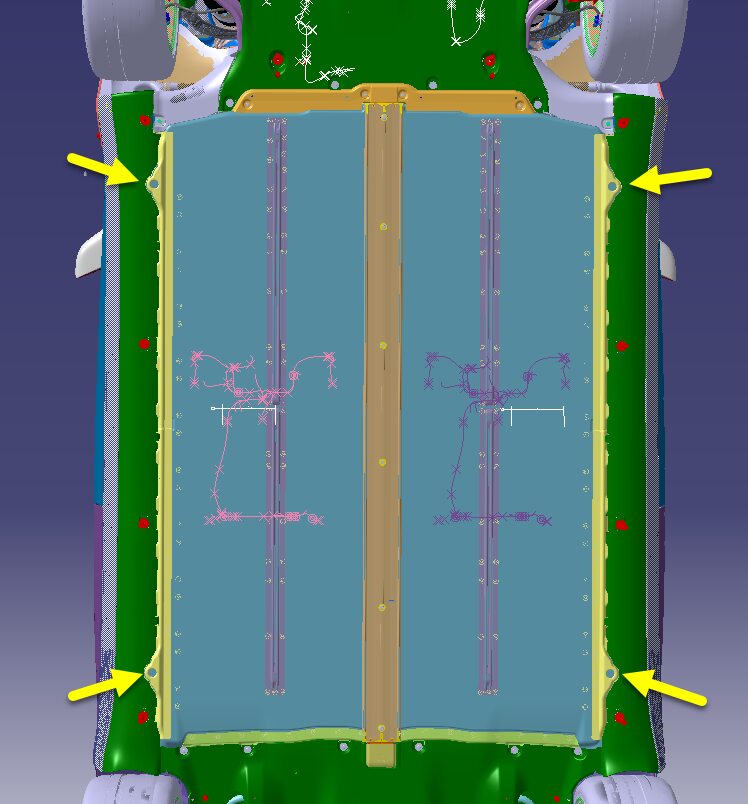
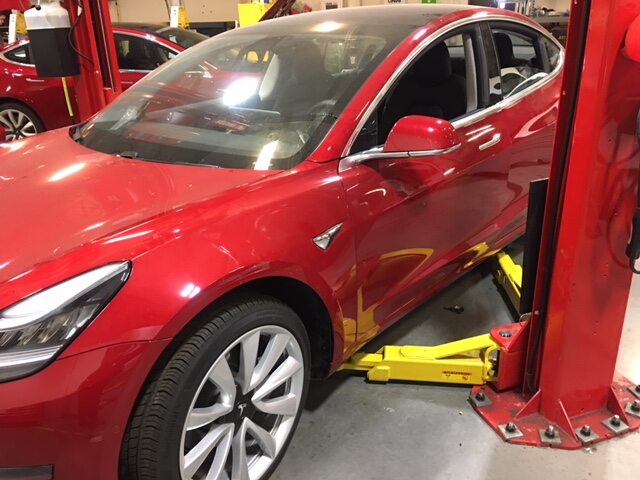
Raise and support vehicle
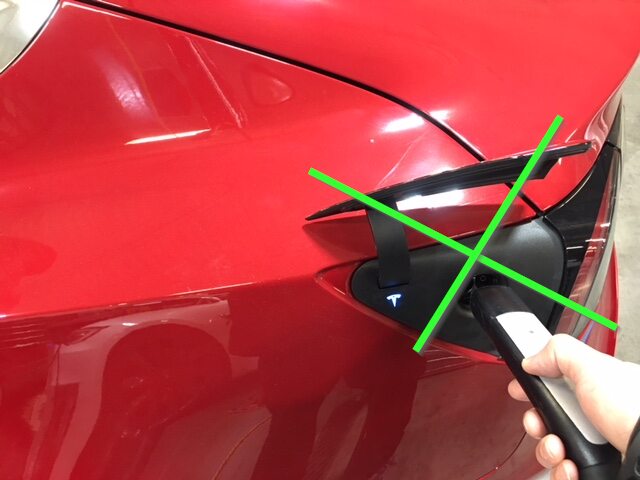
注Ensure vehicle is not charging, Remove charging cable if it's plugged in
-
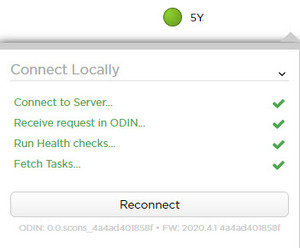
Re-establish vehicle connection to Toolbox 3.0
-
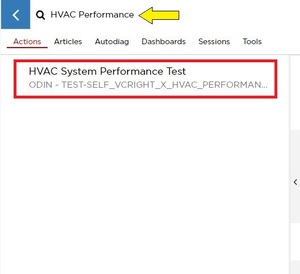
Select "Actions/Autodiag" and search for "HVAC Performance"
-
Select "TEST-SELF_VCRIGHT_X_HVAC-PERFORMANCEvia Toolbox: (link)via Service Mode:
- Thermal ➜ Actions ➜ Test HVAC Performance
- Thermal ➜ Actions ➜ Test HVAC Performance
注Select ‘X’ at top right of window to close once complete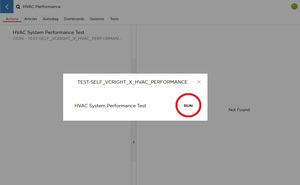
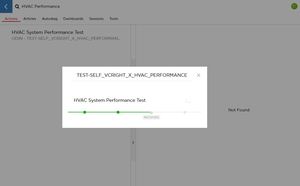
- Remove HSD or RJ45 cable from Ethernet port to disconnect Toolbox 3.0 from vehicle
-
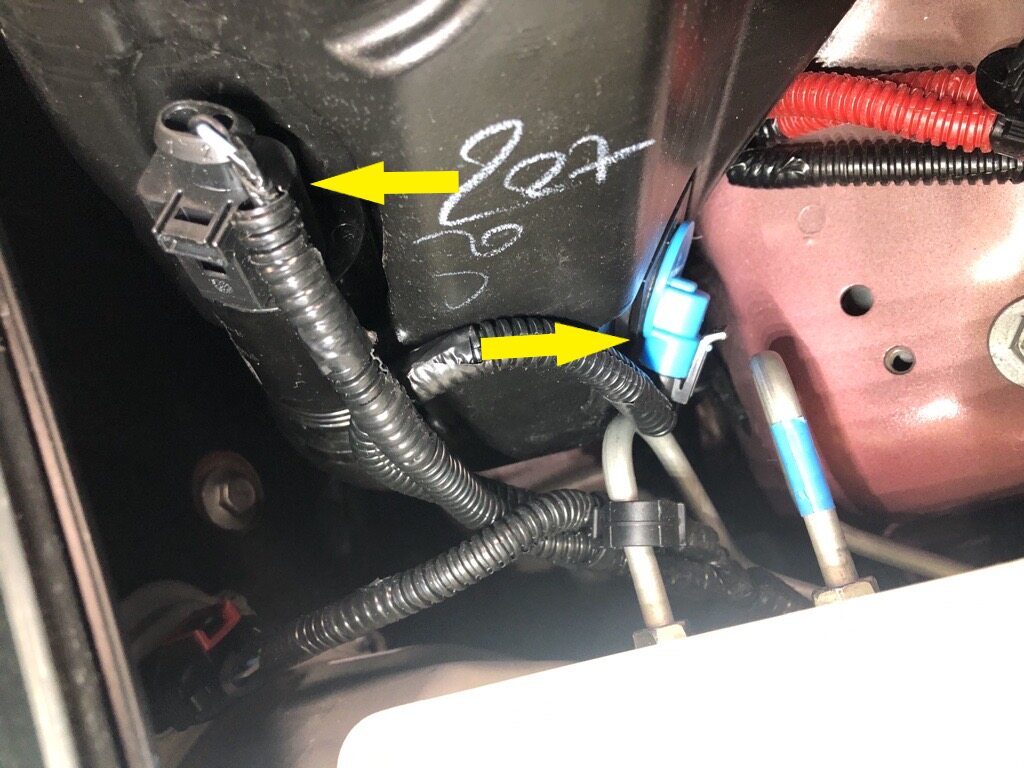
Connect washer pump and level sensor connectors
注2x connectors
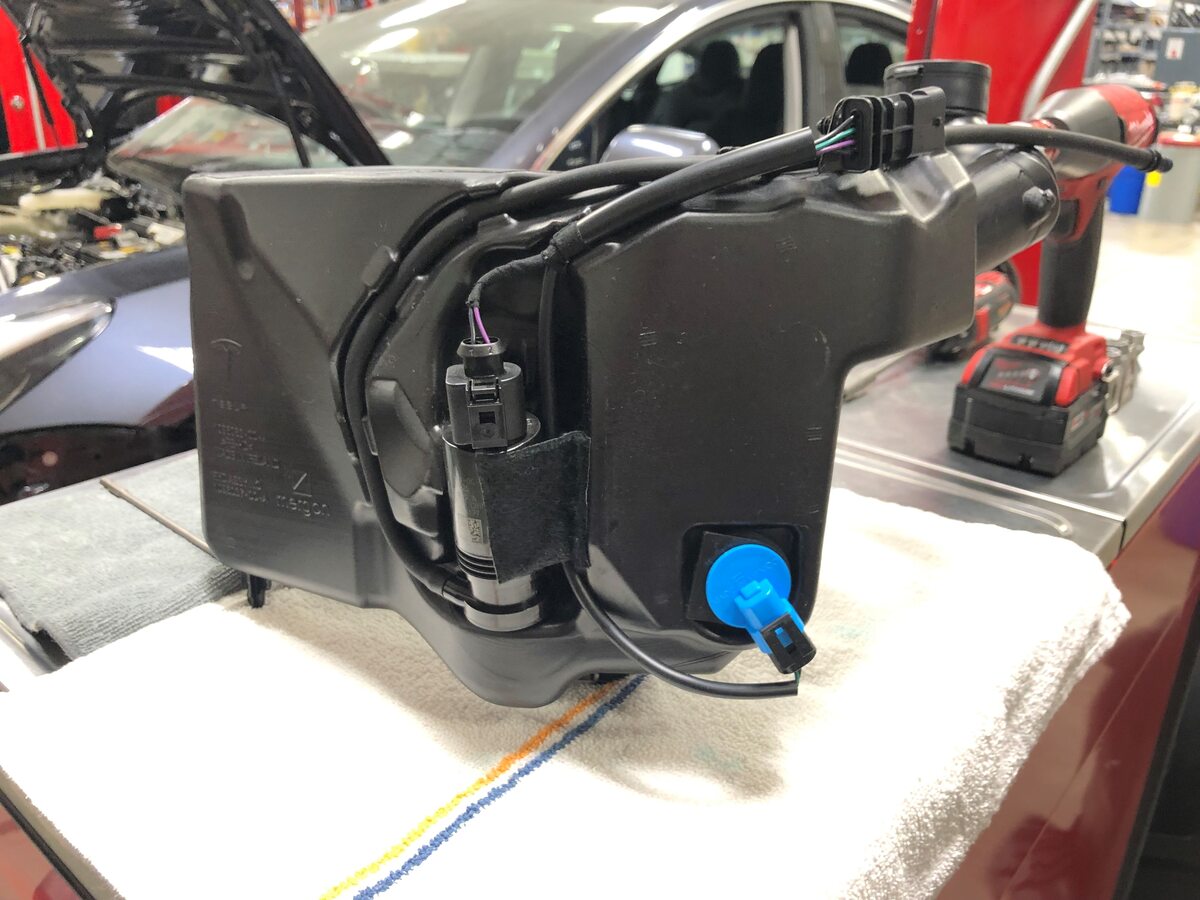
-
Install washer tank into position
-
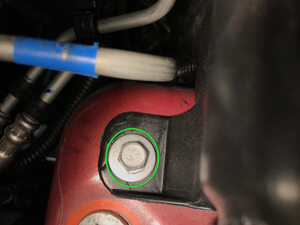
Install upper bolt securing washer tank to vehicle
注1x bolt, 10mm, 3 Nm
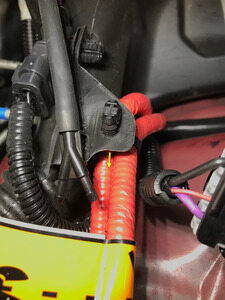
-
Secure harness clip onto LH side of washer tank inlet
注1x clip
-
Raise vehicle partially and lower lift onto locks
注Set vehicle to comfortable working height, Make sure there's an audible click of the locks on both sides before lowering, otherwise vehicle may tilt to the side
-
Remove LH front wheel
注5x nuts, 21mm, 175 Nm
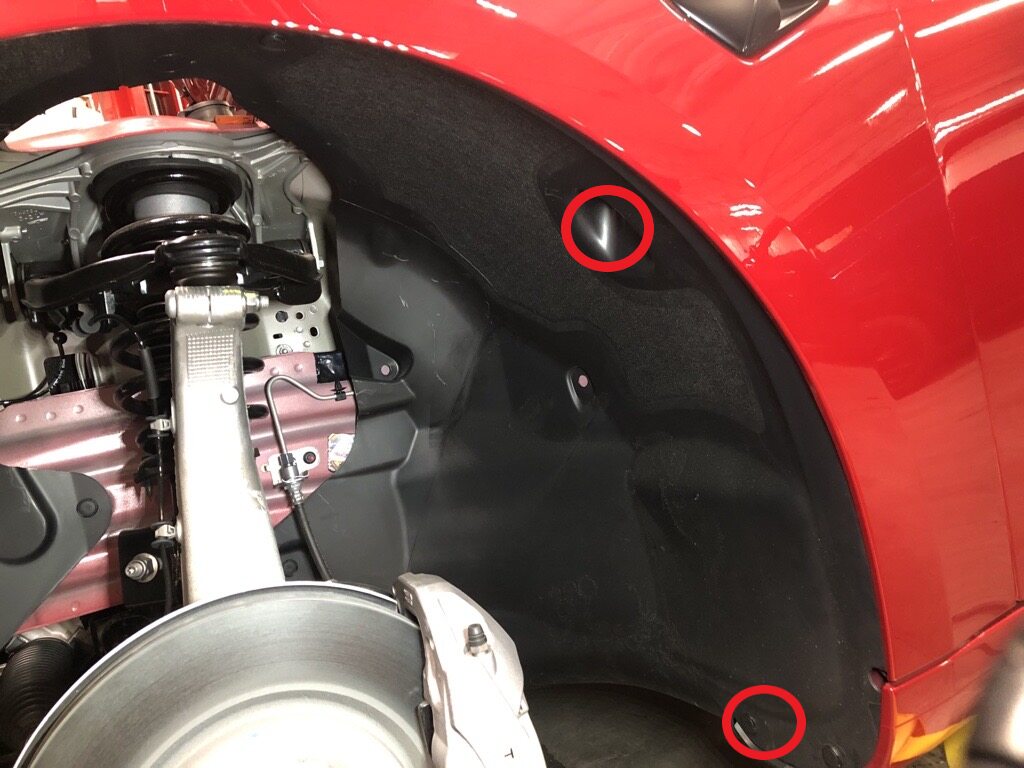
-
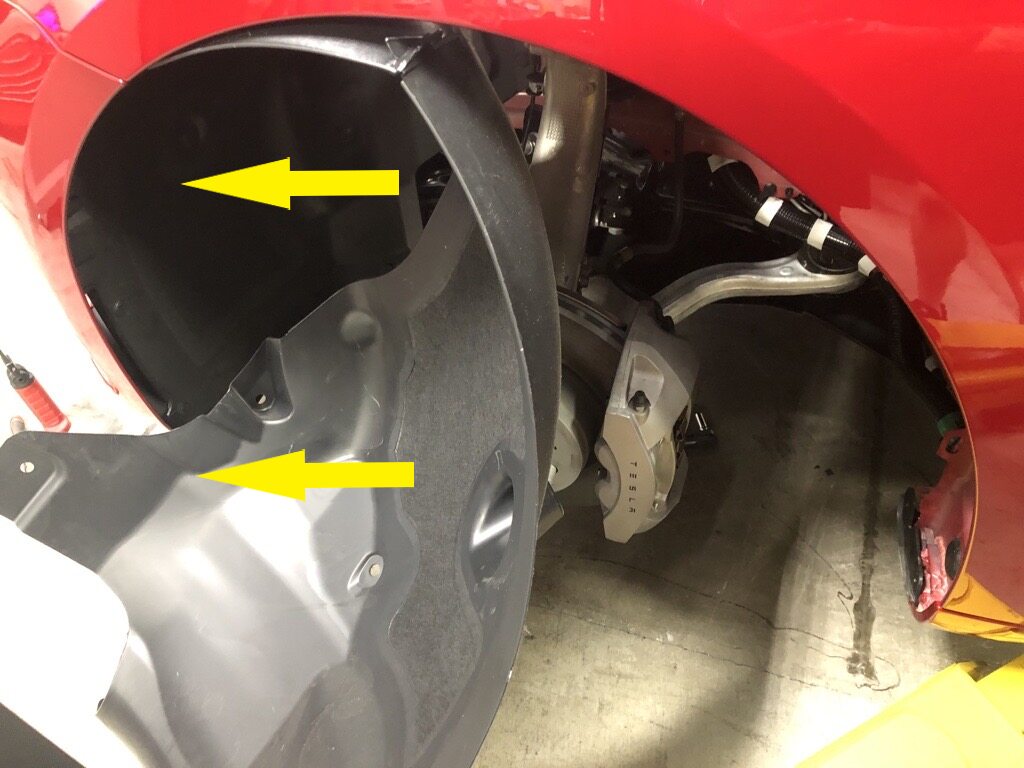
Partially release LH front wheel liner
注2x push clips
-
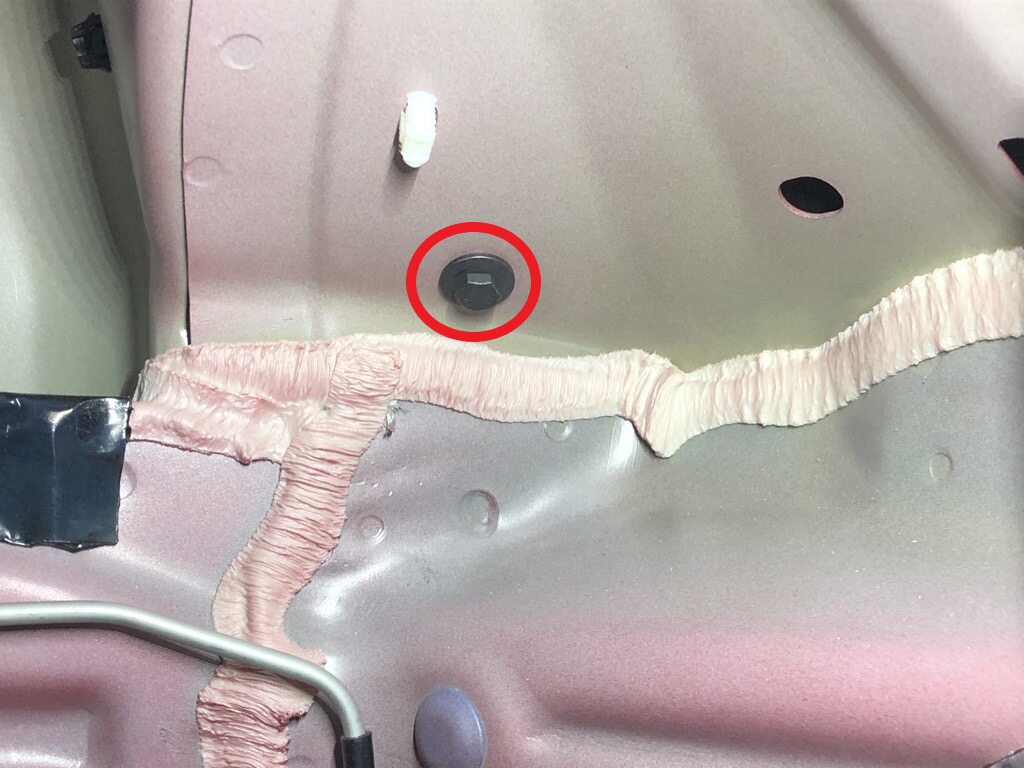
Install lower bolt securing washer tank to vehicle
注1x bolt, 10mm, 3 Nm
-
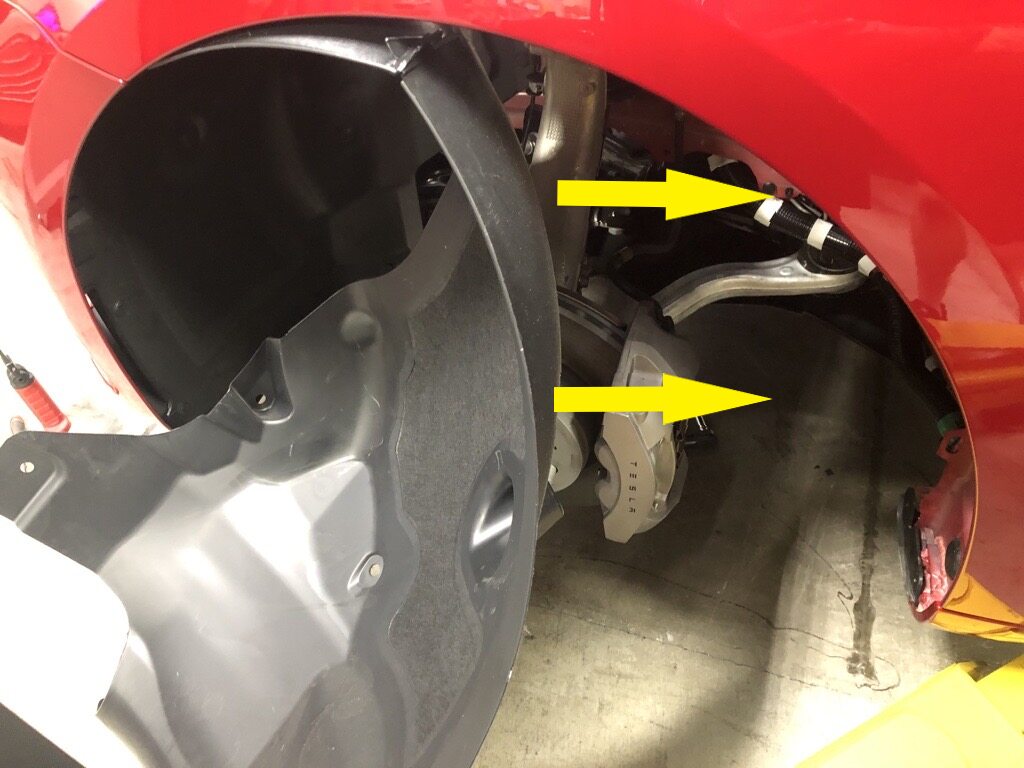
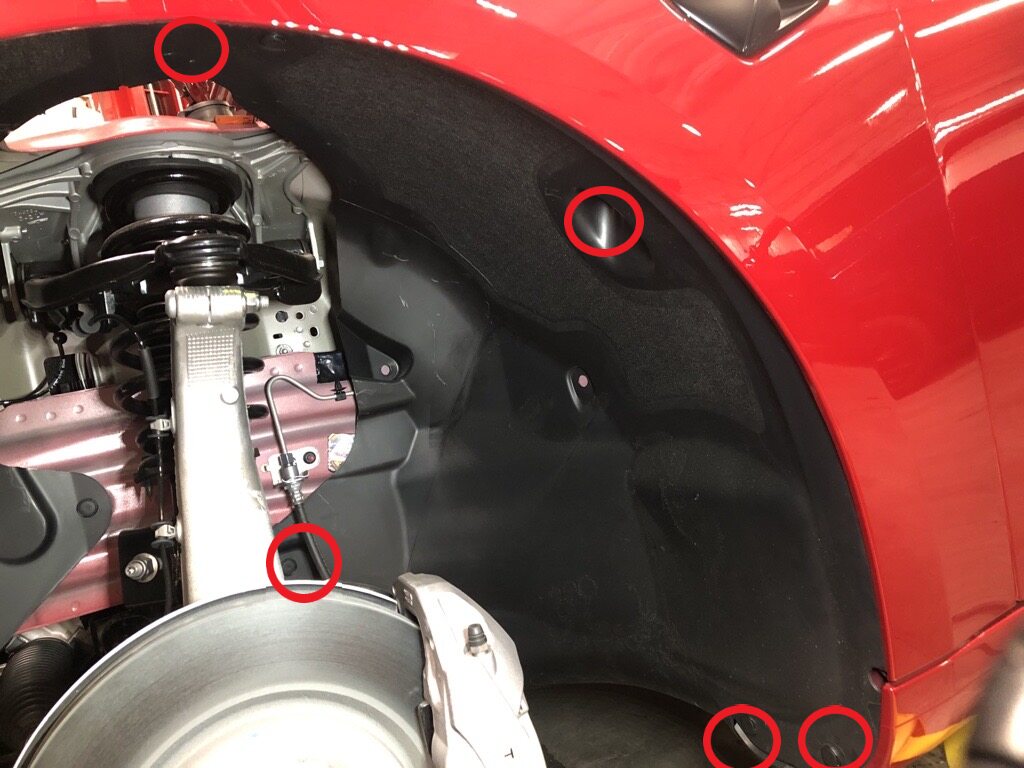
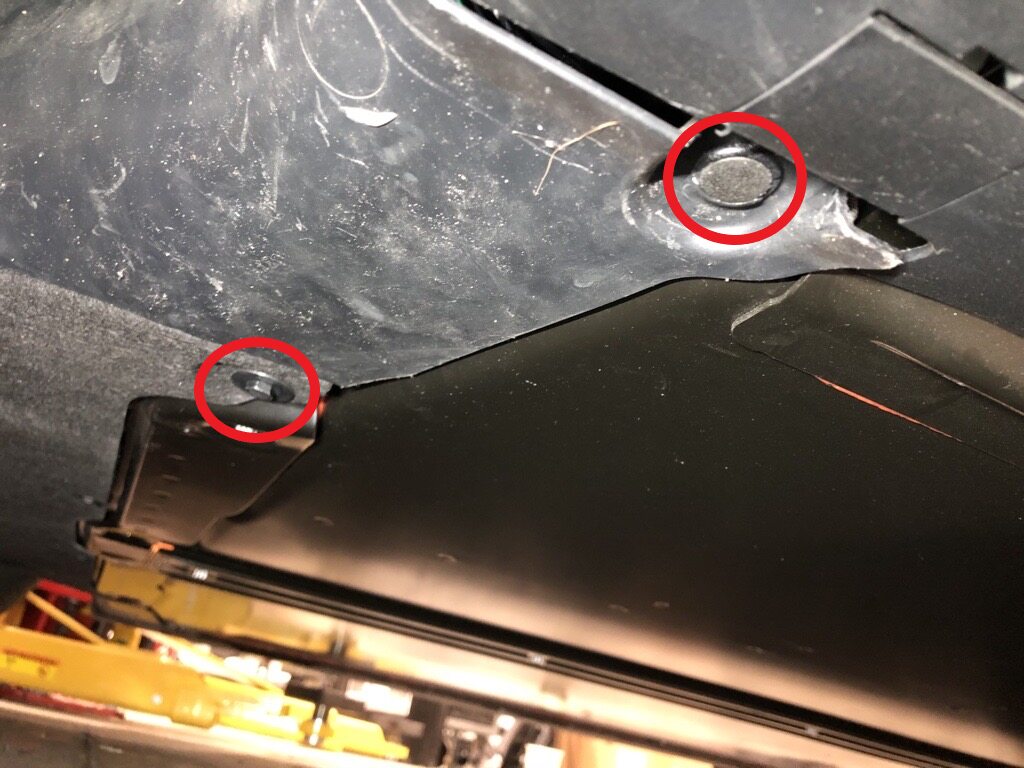
Install LH front wheel liner to vehicle
注6x clips, 1x bolt, 10mm, 5 Nm, Newer vehicles may be equipped with 2x push clips securing lower portion of liner to body
-
Install LH front wheel
注5x nuts, 21mm, 175 Nm, Start lug nuts by hand before using power tool
-
Lower vehicle until tires are touching the ground
注Raise lift off locks, then hold lock release lever to keep locks free while vehicle is lowered
-
Torque LH front wheel
注5x nuts, 21mm, 175 Nm
-
Install LH front wheel center cap
注1x cap, Verify emblem is aligned with valve stem
-
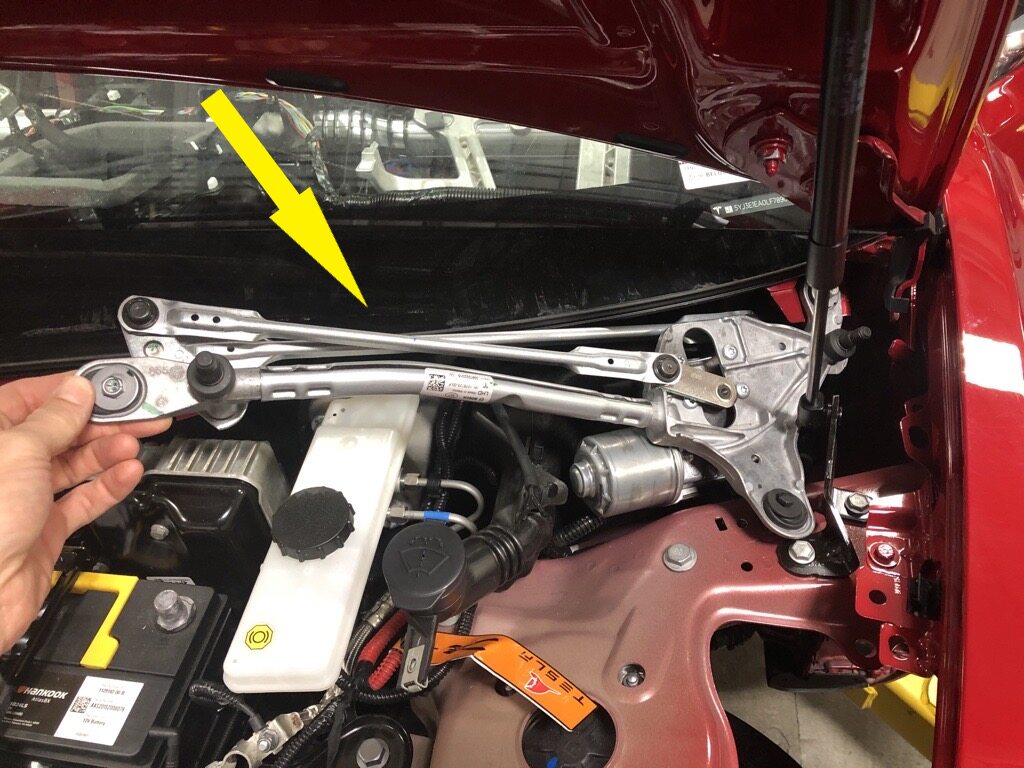
Install wiper module to vehicle
-
Connect wiper module connector
注1x connector, Do NOT place limbs within the linkage movement area as wiper arms will automatically transition to parking mode


-
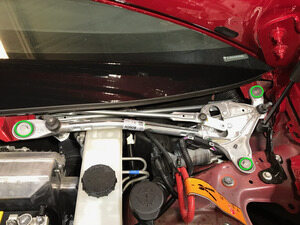
Install the bolts securing wiper module
注3x bolts, 10mm, 7 Nm
-
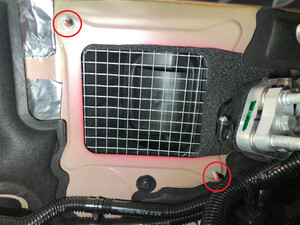
Install fresh air intake assembly
注2x studs, Maneuver between cowl and frunk

-
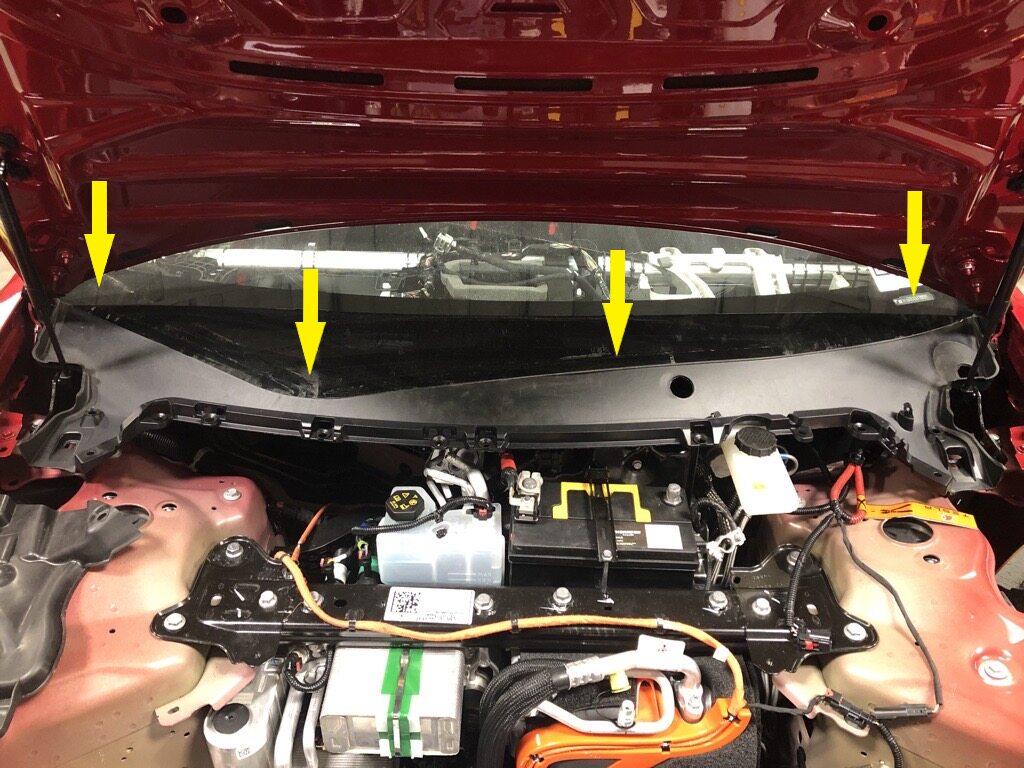
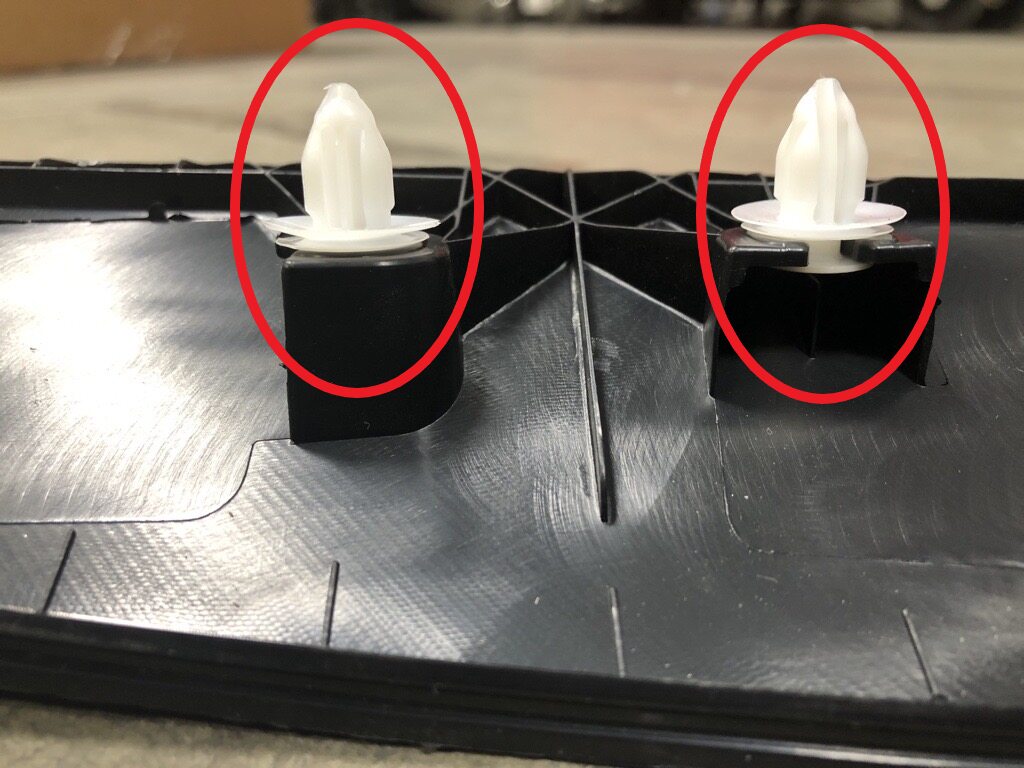
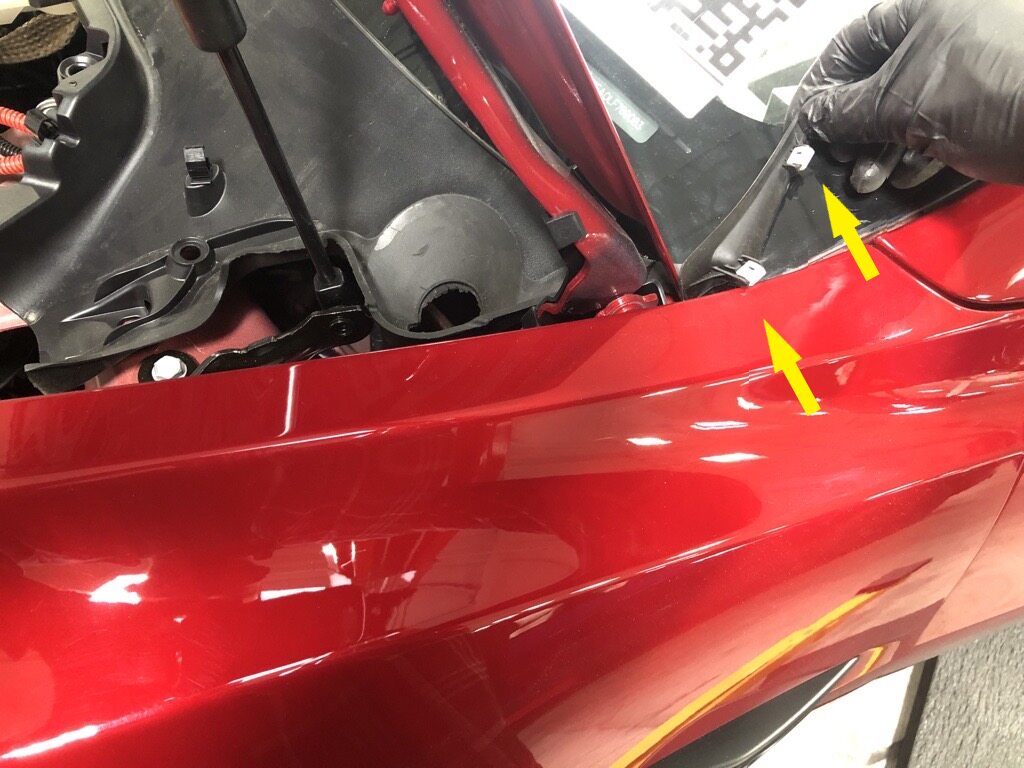
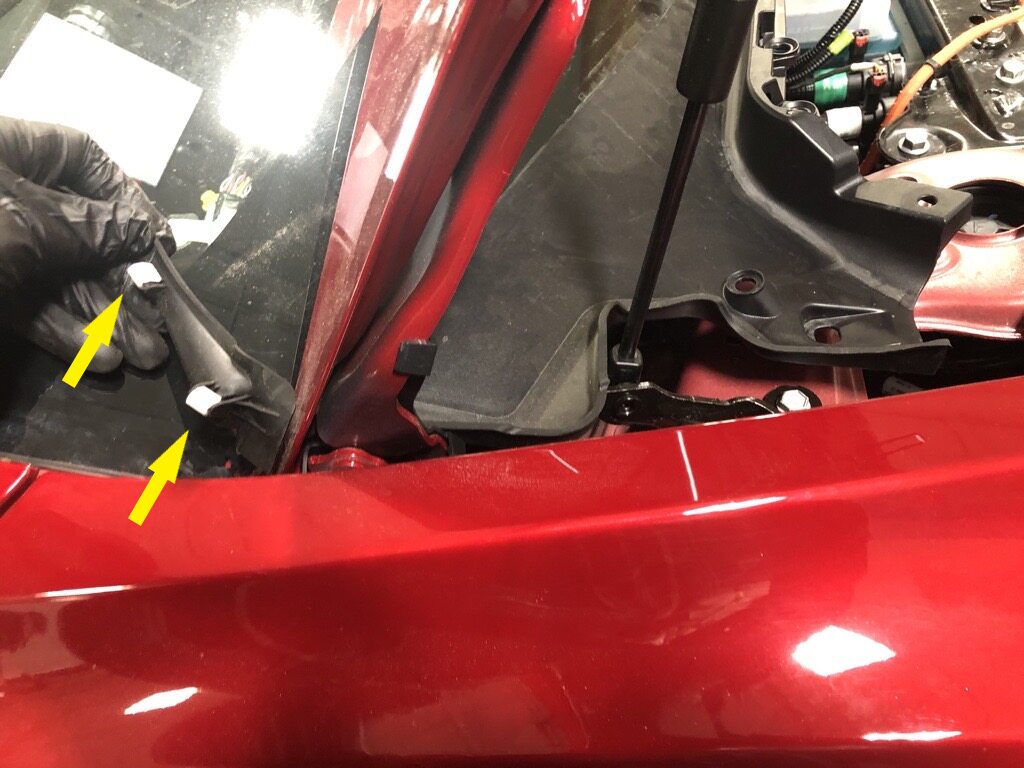
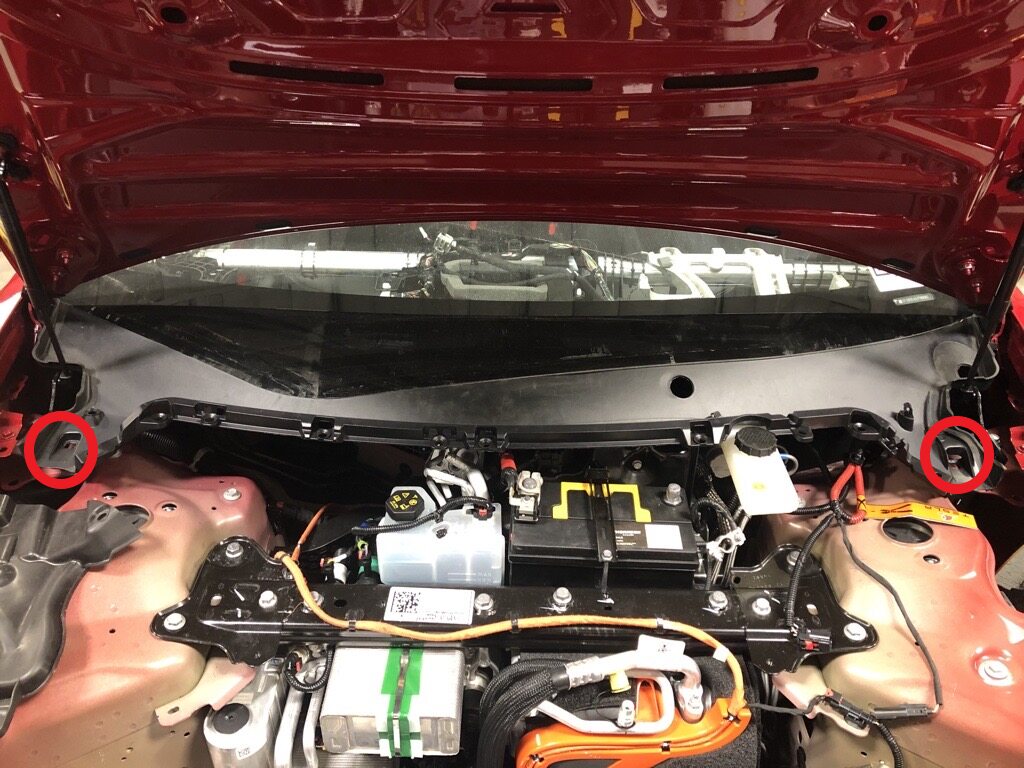
Install cowl screen assembly
注2x push clips, 6x clips
-
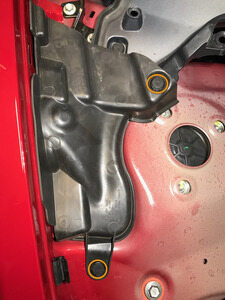
Install the RH shock tower cover
注2x push clips
-
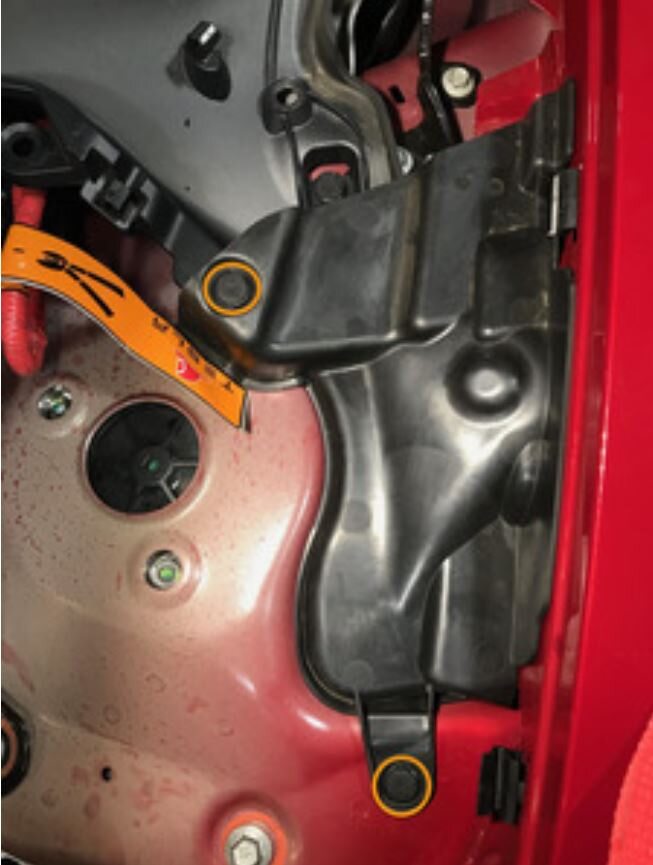
Install the LH shock tower cover
注2x push clips
-
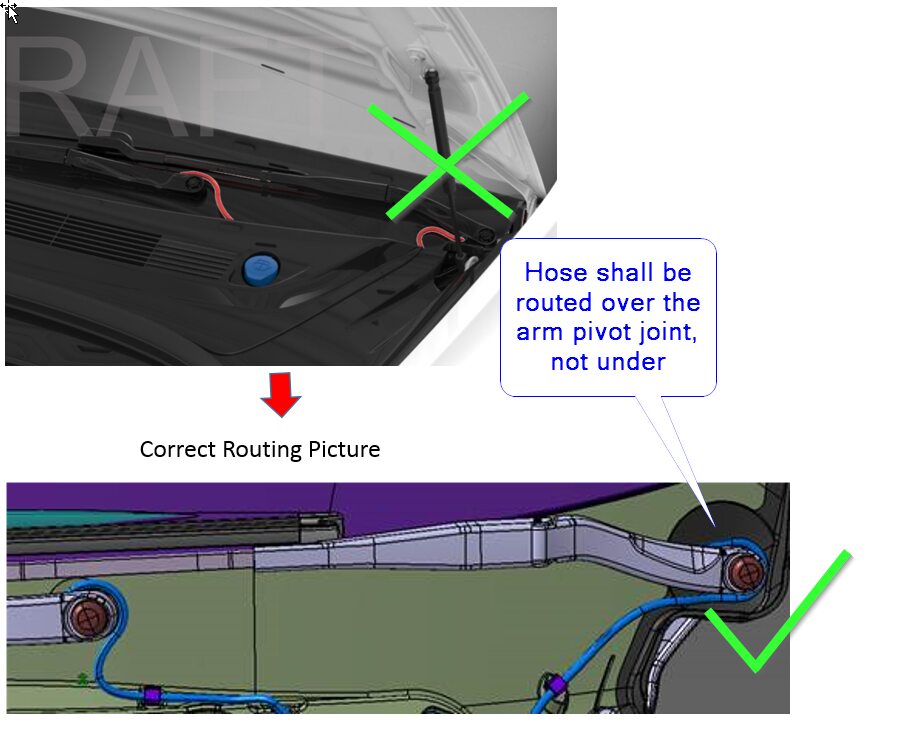
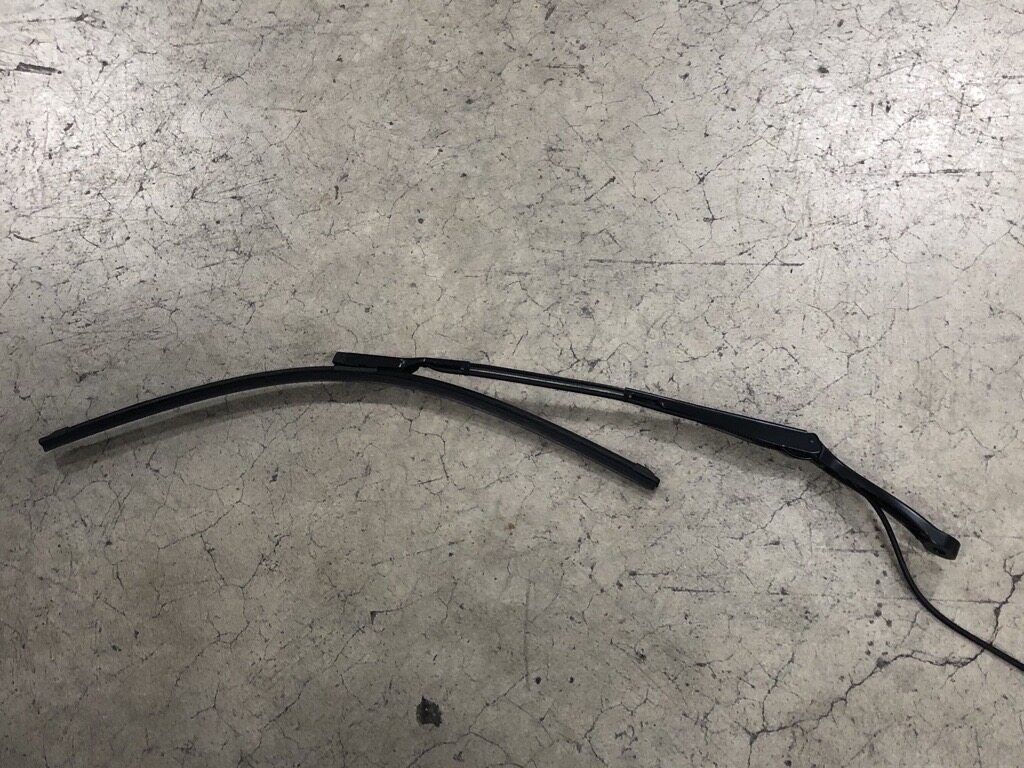
Install LH wiper arm and hose assembly onto vehicle
注The washer hose shall be routed over the arm pivot joint, not under
-
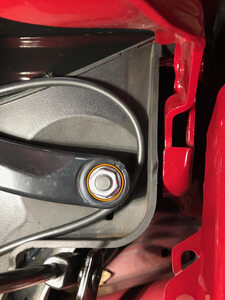
Install the nut securing the LH wiper arm to wiper module
注1x nut, 15mm, 25 Nm, Make sure the wiper tip is aligned between the two indicators at windshield
-
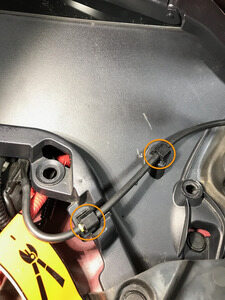
Connect washer hose from LH wiper arm to Y-tube fitting and secure washer hose clips
注2x clips, 1x hose
-
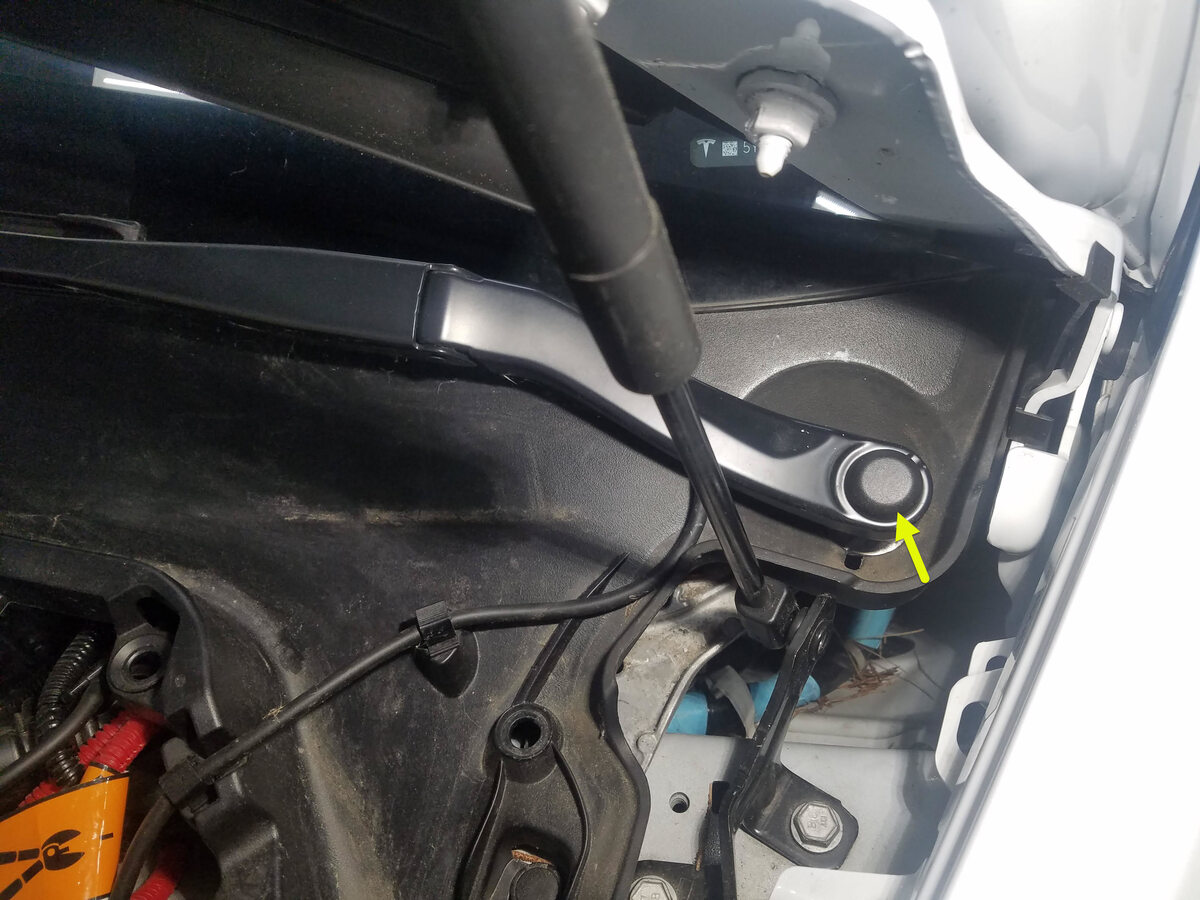
Install LH wiper arm nut cover
注1x cover
-
Install the RH wiper arm and hose assembly onto vehicle
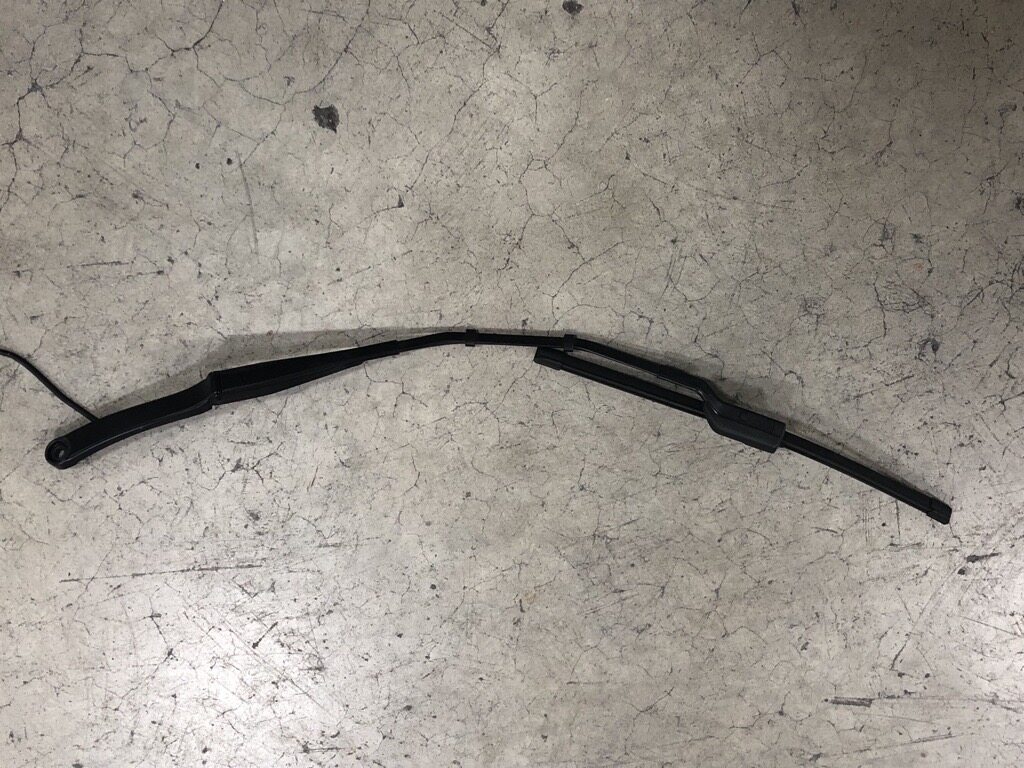
-
Install the nut securing the RH wiper arm to wiper module
注1x nut, 15mm, 25 Nm, Make sure the wiper tip is aligned between the two indicators at corner of windshield
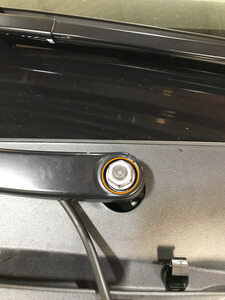
-
Connect washer hose from RH wiper arm to Y-tube fitting and secure washer hose clips
注2x clips, 1x hose
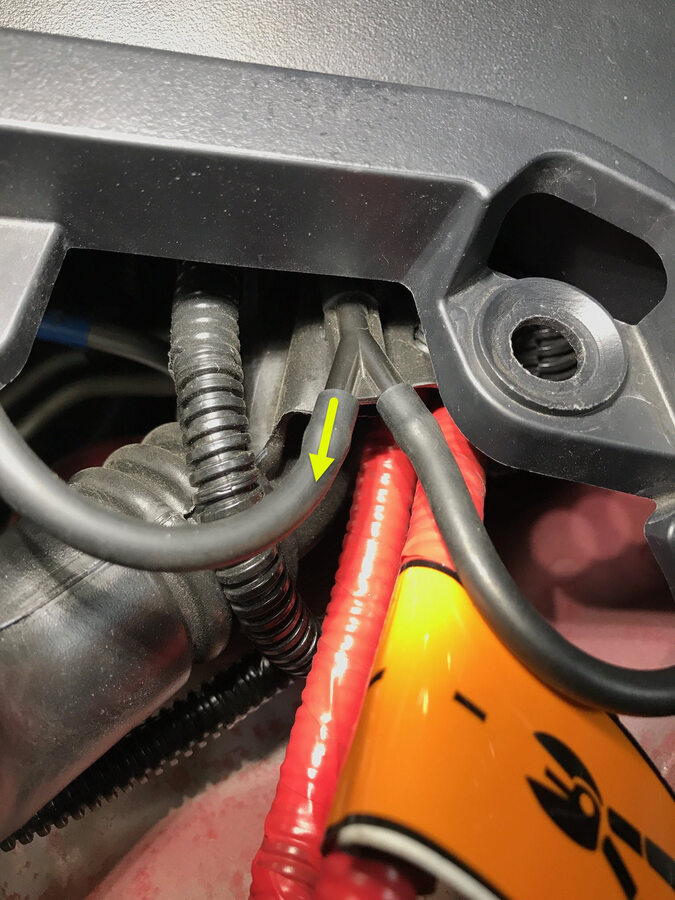
-
Install RH wiper arm nut cover
注1x cover
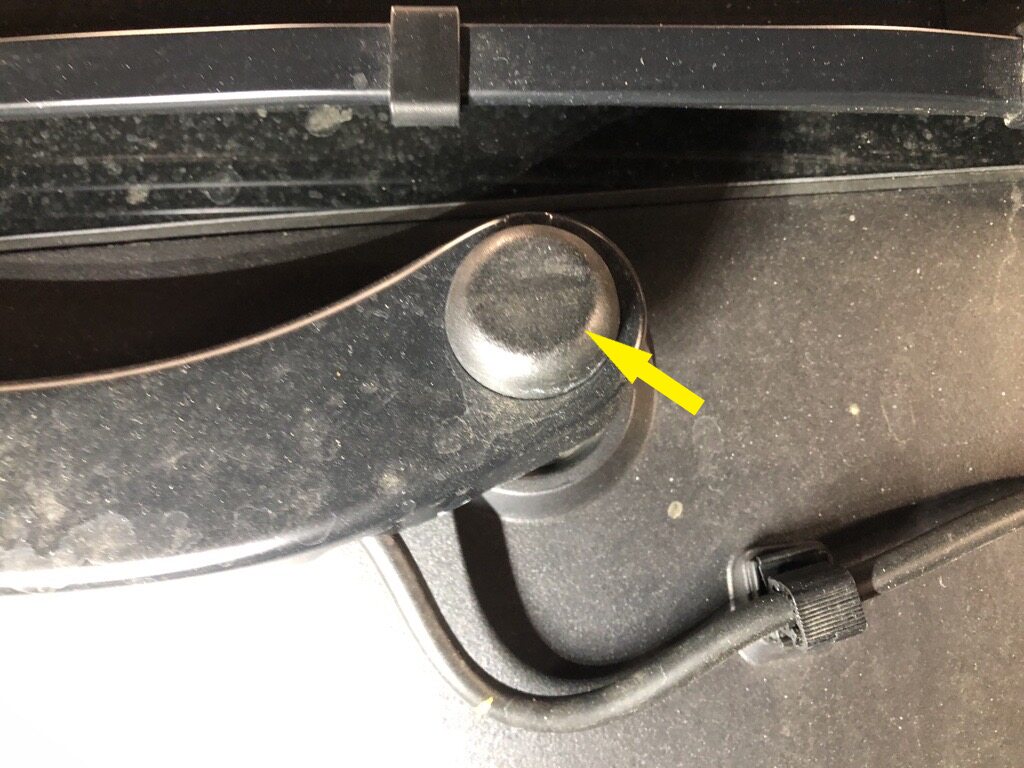
-
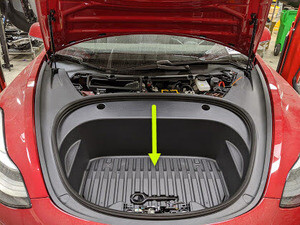
Install frunk assembly to vehicle
注12x clips, Make sure frunk assembly is fully seated onto clips, Number of clips may vary on older vehicles

-
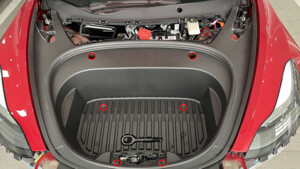
Install bolts securing frunk assembly
注7x bolts, 10mm, 5 Nm, Lower RBN covers after installing upper fasteners, Newer vehicles may not be equipped with covers
-
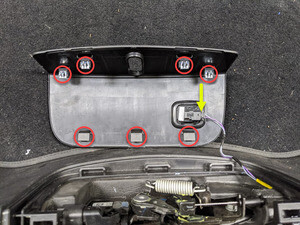
Install frunk close out panel
注4x clips, 1x connector, Frunk safety switch, 3x guide tabs, Align 3x tabs then push downward to secure clips
-
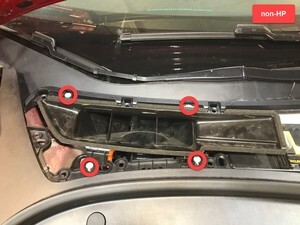
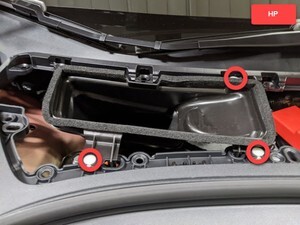
Install cabin intake upper duct assembly
注4x clips, Heat pump vehicles have 3x clips
-
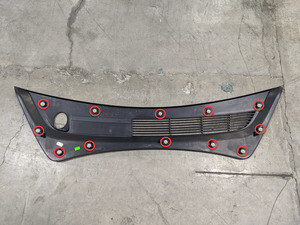
Install rear apron
注12x clips
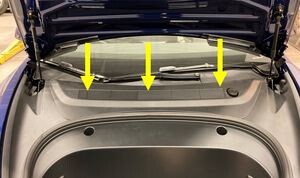
- Close hood
-
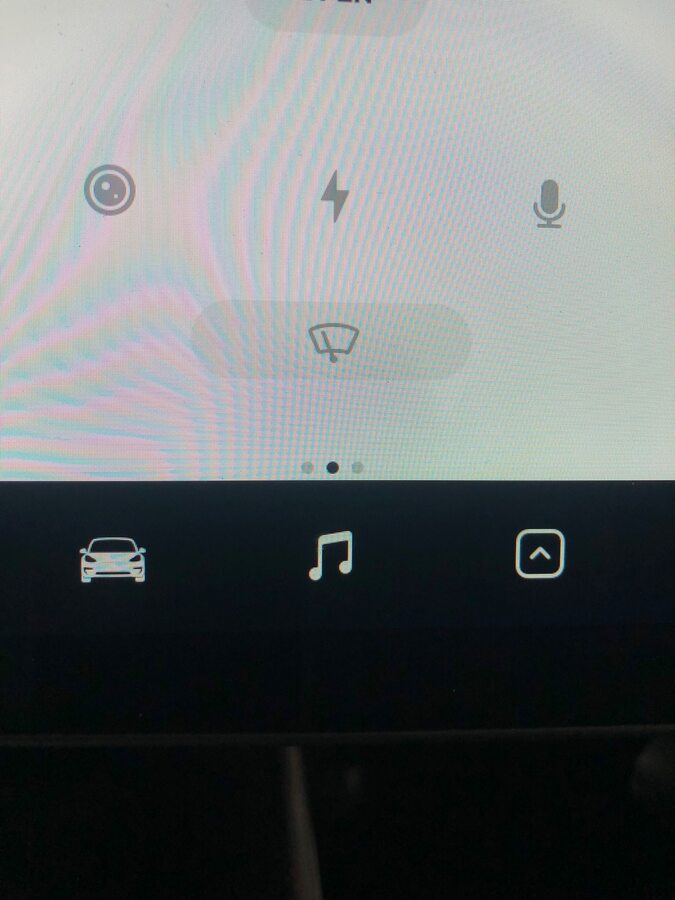
Verify operation of windshield washers and wipers
-
Close all four doors
注Unlatch rear doors before closing
- Raise all windows
-
Remove lift arms from below vehicle
注Lower rack arms fully and remove them from under vehicle


